The Great Battles of Magna Graecia: Part 1
The Great Battles of Magna Graecia: Part 1 Rulebook
Table of Contents
Table of Contents
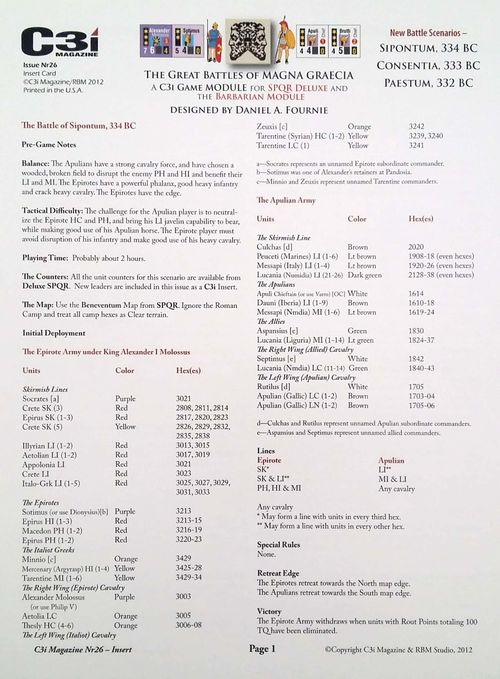
The Battle of Sipontum, 334 BC
Pre-Game Notes
Balance: The Apulians have a strong cavalry force, and have chosen a wooded, broken field to disrupt the enemy PH and HI and benefit their LI and MI. The Epirotes have a powerful phalanx, good heavy infantry and crack heavy cavalry. The Epirotes have the edge.
Tactical Difficulty: The challenge for the Apulian player is to neutralize the Epirote HC and PH, and bring his LI javelin capability to bear, while making good use of his Apulian horse. The Epirote player must avoid disruption of his infantry and make good use of his heavy cavalry.
Playing Time: Probably about 2 hours.
The Counters: All the unit counters for this scenario are available from Deluxe SPQR. New leaders are included in this issue as a C3i Insert.
The Map: Use the Beneventum Map from SPQR. Ignore the Roman Camp and treat all camp hexes as Clear terrain.
Initial Deployment
The Epirote Army under King Alexander I Molossus
| Units | Color | Hex(es) |
|---|---|---|
| The Skirmish Lines | ||
| Socrates [a] | Purple | 3021 |
| Crete SK (3) | Red | 2808, 2811, 2814 |
| Epirus SK (1-3) | Red | 2817, 2820, 2823 |
| Crete SK (5) | Yellow | 2826, 2829, 2832, 2835, 2838 |
| Illyrian LI (1-2) | Red | 3013, 3015 |
| Aetolian LI (1-2) | Red | 3017, 3019 |
| Appolonia LI | Red | 3021 |
a—Socrates represents an unnamed Epirote subordinate commander. b—Sotimus was one of Alexander's retainers at Pandosia. c—Minnio and Zeuxis represent unnamed Tarentine commanders.
The Apulian Army
| Units | Color | Hex(es) |
|---|---|---|
| The Skirmish Line | ||
| Culchas [d] | Brown | 2020 |
| Peuceti (Marines) LI (1-6) | Lt brown | 1908-18 (even hexes) |
| Messapi (Italy) LI (1-4) | Lt brown | 1920-26 (even hexes) |
| Lucania (Numidia) LI (21-26) | Dark green | 2128-38 (even hexes) |
| The Apulians | ||
| Apuli Chieftain (or use Varro) [OC] | White | 1614 |
| Dauni (Iberia) LI (1-9) | Brown | 1610-18 |
d—Culchas and Rutilus represent unnamed Apulian subordinate commanders. e—Aspansius and Septimus represent unnamed allied commanders.
Lines
| Epirote | Apulian |
|---|---|
| SK* | LI** |
| SK & LI** | MI & LI |
| PH, HI & MI | Any cavalry |
Any cavalry
* May form a line with units in every third hex. ** May form a line with units in every other hex.
Special Rules
None.
Retreat Edge
The Epirotes retreat towards the North map edge. The Apulians retreat towards the South map edge.
Victory
The Epirote Army withdraws when units with Rout Points totaling 100 TQ have been eliminated.
The Apulian Army withdraws when units with Rout Points totaling 100 TQ have been eliminated.
| Army | Units | Size | Rout Pts | Rout Ratio | Average TQ |
|---|---|---|---|---|---|
| Epirote | 50 | 208 | 250 | 40% | 1.20 |
| Apulian | 53 | 223 | 277 | 35% | 1.24 |
The Epirote army numbers about 20,000 infantry and 3,000 cavalry. The Apulians field around 23,000 foot and 2,500 horse. These numbers are only estimates, as actual army sizes were not recorded.
Simple GBoH Version
The Battle of Sipontum (334 BC)
Deploy both armies as indicated, except that Socrates and Culchas are not used.
Epirote Formation Chart
| Commander | Formation | Color |
|---|---|---|
| Alexander Molossus [OC] / 5 | Right Wing Cavalry (HC & LC) | Orange |
| Sotimus / 2 | Epirotes (PH & HI) | Red |
| Minnio / 3 | Italiots (PH, HI & MI) | Yellow |
| Zeuxis | Left Wing Cavalry (HC & LC) | Yellow |
| (auxiliaries) | Skirmish (SK & LI) [a] | Red/Yellow |
| Formation Group | Left and Right Wing Cavalry |
Epirote Units with Reduced Side: All PH, All HI, All HC.
Apulian Formation Chart
| Commander | Formation | Color |
|---|---|---|
| Varro [OC] / 2 | Apulians (MI & LI) | Brown |
| Aspansius | Allies (MI) | Green |
| Rutilus / 1 | Left Wing (Apulian) Cavalry (LN) | Brown |
| Septimus | Right Wing (Allied) Cavalry (RC) | Green/Orange |
| (auxiliaries) | Skirmishers (LI) [a] | Brown/Green |
| Formation Group | Left and Right Wing Cavalry |
a = A contiguous line may have one intervening vacant hex between each unit.
Apulian Units with Reduced Side: None.
The Battle of Consentia, 333 BC
Pre-Game Notes
Balance: The Bruttians have chosen a hilly, broken field to disrupt the enemy PH and HI and benefit their LI and MI. The Epirotes have a powerful phalanx, good heavy infantry and crack heavy cavalry, and have the advantage.
Tactical Difficulty: The challenge for the Bruttian player is to neutralize the Epirote HC and PH when disrupted by terrain, and bring his LI javelin capability to bear. The Epirote player must avoid disruption of his infantry and make good use of his heavy cavalry.
Playing Time: Probably about 2 hours.
The Counters: All the unit counters for this scenario are available from Deluxe SPQR. New leaders are included in this issue as a C3i Insert.
The Map: Use the Cynoscephalae Map from SPQR.
Initial Deployment
The Bruttian Army
| Units | Color | Hex(es) |
|---|---|---|
| The Skirmish Line | ||
| Aspansius [a] | Green | 2419 |
| Apulian (Iberia) LI (1-3) | Brown | 2405-09 (odd hexes) |
| Lucanian (Numidia) LI (21-25) | Dark Green | 2411-19 (odd hexes) |
| Bruttian (Iberian) LI (1-8) | Lt blue | 2421-37 (odd hexes) |
| The Allies | ||
| Rutilus [b] | White | 2712 |
| Apulian (Nmdia) MI (1-6) | Brown | 2705-10 |
a—Aspansius and Attenes represent unnamed Bruttian subordinate commanders. b—Rutilus and Septimus represent unnamed allied commanders.
The Epirote Army under King Alexander I Molossus
After subtracting losses, upgrading veterans and adding reinforcements, deploy the Epirote Army as follows:
Socrates and all SK/LI can deploy anywhere in or south of hexrow 18xx.
All other leaders and units can deploy anywhere in or south of hexrow 15xx.
Lines
| Epirote | Apulian [as printed] |
|---|---|
| SK* | LI** |
| SK & LI** | MI & LI |
| PH, HI & MI | Any cavalry |
* May form a line with units in every third hex. ** May form a line with units in every other hex.
Transcriber note: the Consentia line table column for the opposing army is headed "Apulian" as printed; the opposing army in this battle is the Bruttian army.
Special Rules
None.
Retreat Edge
The Epirotes retreat towards the South map edge. The Bruttians retreat towards the North map edge.
Victory
The Bruttian Army withdraws when units with Rout Points totaling 110 TQ have been eliminated. The Epirote Army withdraws when units with Rout Points totaling the determined limit have been eliminated.
| Army | Units | Size | Rout Pts | Rout Ratio | Average TQ |
|---|---|---|---|---|---|
| Epirote | Variable | --- | 40% | --- | |
| Bruttian | 48 | 246 | 326 | 35% | 1.33 |
The Bruttian army depicted here includes 22,000 foot and 2,500 horse. Actual size is unknown.
Simple GBoH Version
The Battle of Consentia (333 BC)
Deploy both armies as indicated, except that Socrates and Aspansius are not used.
Epirote Formation Chart
| Commander | Formation | Color |
|---|---|---|
| Alexander Molossus [OC] / 5 | Right Wing Cavalry (HC & LC) | Orange |
| Sotimus / 2 | Epirotes (PH & HI) | Red |
| Minnio / 3 | Italiots (PH, HI & MI) | Yellow |
| Zeuxis | Left Wing Cavalry (HC & LC) | Yellow |
| (auxiliaries) | Skirmish (SK & LI) [a] | Red/Yellow |
| Formation Group | Left and Right Wing Cavalry |
Epirote Units with Reduced Side: All PH, All HI, All HC.
Bruttian Formation Chart
| Commander | Formation | Color |
|---|---|---|
| Sulpicius [OC] / 2 | Bruttians (MI) | Blue |
| Rutilus / 1 | Allies (MI) | Green/Brown |
| Attenes | Left Wing Cavalry (LN & RC) | Brown/Orange |
| Septimus | Right Wing Cavalry (LN & LC) | Blue |
| (auxiliaries) | Skirmishers (LI) [a] | Blue/Brown/Green |
| Formation Group | Left and Right Wing Cavalry |
a = A contiguous line may have one intervening vacant hex between each unit.
Bruttian Units with Reduced Side: None.
The Battle of Paestum, 332 BC
Pre-Game Notes
This battle (only) requires ownership of the GBoH Barbarian Module for counters and the map.
Balance: The Samnite/Lucanian alliance has a fairly strong mounted force and are arrayed in depth. The Epirotes have a powerful phalanx, good heavy infantry and crack heavy cavalry. Should be fairly close.
Tactical Difficulty: The challenge for the Samnite/Lucanian player is to win with his strong Samnite wing, before his weaker Lucanians are overwhelmed. The Epirote player must crush the Lucanians while holding off the Samnite attack.
Playing Time: Probably about 2 hours.
The Counters: All the unit counters for this scenario are available from Deluxe SPQR. New leaders are included in this issue as a C3i Insert.
The Map: Use the Sentinum Map from Barbarian.
Initial Deployment
Samnite and Lucanian Allied Army
| Units | Color | Hex(es) | Source |
|---|---|---|---|
| Pontius [OC] [b] | Orange | Anywhere | Barb |
| The Samnites | |||
| Herrenius [c] | Orange | With any LG unit | Barb |
| Samnite Van LG (a-d) | Red | 2209, 2211 (2 ea) | Barb |
| Samnite Main LG (a-d) | Red | 2409, 2411 (2 ea) | Barb |
| Legio Van LG (a-h) | White | 2213, 2215, 2217, 2219 (2 ea) | Barb |
b—Pontius represents the unnamed Samnite commanding general. c—Herrenius and Statius represent unnamed Samnite subordinate commanders. d—Rutilius and Aspansius represent unnamed Lucanian commanders.
The Epirote Army under King Alexander I Molossus
After subtracting losses, upgrading veterans and adding reinforcements, deploy the Epirote Army as follows:
Socrates and all SK/LI can deploy anywhere in or southwest of hexrow 11xx.
All other leaders and units can deploy anywhere in or southwest of hexrow 07xx.
Recommend the yellow Tarentine units be deployed across from the red Samnite units, if the player wants to avoid 'color' confusion.
Lines
| Epirote | Samnite/Lucanian |
|---|---|
| SK* | LI** |
| SK & LI** | MI |
| PH, HI & MI | LG** |
| Any cavalry | Any cavalry |
* May form a line with units in every third hex. ** May form a line with units in every other hex.
BARBARIAN Module Special Rules
All the Special rules from pages 2-3 that refer to the Samnites (6.6 [the middle of this reference is cut off at the page break in the scan and is not legible] Stacking; 8.1 Missile Fire and 8.3 Shock Combat) are in effect.
Transcriber note: "pages 2-3" and "page 4" in the two Barbarian Module references refer to pages of the Barbarian Module, which is not part of this insert.
Retreat Edge
The Epirotes retreat towards the Southwest map edge. The Samnites and Lucanians retreat toward the Northeast map edge.
Victory
The Samnite/Lucanian Army withdraws when units with Rout Points totaling 120 TQ have been eliminated. The Epirote Army withdraws when units with Rout Points totaling the determined limit have been eliminated.
| Army | Units | Size | Rout Pts | Rout Ratio | Average TQ |
|---|---|---|---|---|---|
| Epirote | Variable | --- | --- | 40% | --- |
| Samnite | 56 | 220 | 351 | 35% | 1.59 |
The Samnite/Lucanian army depicted here numbers 19,000 foot and 3,000 horse. Actual size is unknown.
Simple GBoH Version
The Battle of Paestum (332 BC)
Deploy both armies as indicated, except that Socrates is not used.
Epirote Formation Chart
| Commander | Formation | Color |
|---|---|---|
| Alexander Molossus [OC] / 5 | Right Wing Cavalry (HC & LC) | Orange |
| Sotimus / 2 | Epirotes (PH & HI) | Red |
| Minnio / 3 | Italiots (PH, HI & MI) | Yellow |
| Zeuxis | Left Wing Cavalry (HC & LC) | Yellow |
| (auxiliaries) | Skirmish (SK & LI) [a] | Red/Yellow |
| Formation Group | Left and Right Wing Cavalry |
Epirote Units with Reduced Side: All PH, All HI, All HC.
Samnite Formation Chart
| Commander | Formation | Color |
|---|---|---|
| Pontius [OC] / 3 | None | |
| Herrenius / 1 | Samnites (LG & LI) | White |
| Rutilus / 1 | Lucanian (MI & LI) | Green |
| Aspansius | Left Wing Cavalry (LC) | Green |
| Statius | Right Wing Cavalry (HC, RC, LC) | White/Red/Orange |
| Formation Group | Left and Right Wing Cavalry |
a = A contiguous line may have one intervening vacant hex between each unit.
Samnite Units with Reduced Side: None.
BARBARIAN Module Special Rules
All the Special rules from page 4 that refer to the Samnites (5.1 Movement Allowances and Restrictions; 5.3 Stacking; 7.1 Missile Fire and 7.5 Shock Attack Resolution) are in effect.
Simple GBoH Special Rules for All Scenarios
-
Units that are Out of Command may not move adjacent to an enemy unit nor may they leave a hex if already in an enemy ZOC. Out of Command units may change facing in an enemy ZOC, unless or until they have an enemy unit in their ZOC. Units that begin the turn in an enemy ZOC and move out of that ZOC, may not move adjacent to an enemy unit during the rest of the movement turn.
-
The Roman player may stack LG and CO from different legions. The Roman player may also stack TR and CO from different legions.
Formation Charts
Both players have a Formation Chart that describes the overall organizational capabilities of that army.
Each row of the chart lists the units in the Formation and the leader that commands that Formation. If more than one type of unit is given for a single Formation, all units of those types must activate unless the phrase and/or appears in that Formation entry. In this case, the player can activate any combination of the unit types listed. However, if a given type is activated, all units of that type must activate. Formations without a Formation Commander are treated as Auxiliaries. Exception: Formation Groups.
A dashed line denotes separate Formations that are led by the same Commander.
Formation Groups
If a Formation has more than one commander listed, any one of the leaders listed can be used to command that Formation during that Player Turn. Allowable Formation Groups and their Commanders are either indicated as separate entries on the Formation Chart or indicated as notes. The Formations can be activated as a group if the following conditions are met:
- the individual Formation Commander is within Command Range of the Commander of the group listed on the Formation Chart, and
- the Formation Commander is stacked with or adjacent to a unit in his Formation
The Commander of the group is activated and may move whether or not he commands one of the Formations. If there is no Commander for the group, all listed Formations may activate, however, the player must roll one die for and compare the roll to each Formation Commander's Initiative Rating. If the die roll is higher, the units in that particular Formation are automatically Out of Command for the player turn. If the die roll is a '9', only one of the eligible Formations may activate – owning player's choice. If a Formation is not automatically Out of Command, the Command status is determined separately for each Formation per 4.11. The player is not required to activate all of the listed Formations.
Special Formation Rules
The following Formation rules are common and are presented here.
Skirmish and Cavalry Formations: Formations listed as Skirmish and/or Cavalry Formations on the chart may activate on every non-Seized Player Turn along with any other Formation or group of Formations. These Formations are automatically Out of Command, when activated with other Formations. The units may, however, leave an enemy ZOC at the cost of 1 Hit.
Cavalry formations are defined as formations that contain only cavalry units. There may be no other types of units in these formations to be eligible for this rule.
Formation Activation in a Non-Seized Player Turn: The player may activate any or all of his Formations as a group. See 4.14 Multiple Formations. However, only one of the Formations or Formation Groups may be placed In Command; all others are automatically Out of Command. This group activation cannot be used on a player turn won be Seizure [as printed].