Hornet Leader: Falcon Leader Module
Hornet Leader: Falcon Leader Module Rulebook
Table of Contents
Table of Contents
General Changes and Additions
Whenever a card or the rulebook refers to "Hornet" substitute "Falcon," for "F-18" substitute "F-16," for "Carrier" substitute "Airfield," for "Carrier-bound" substitute "Airfield-bound," for "Aviator" substitute "Pilot."
For this variant, the N-Pod refers to a LANTIRN (Low Altitude Navigation and Targeting InfraRed, Night) pod not the FLIR pod.
Ignore references to Harpoon missiles, F-16s are not equipped to use this missile.
Rule Changes and Additions
4.4 Airfield Defense Missions
This is a new mission type and replaces the Fleet Air Defense Mission. When a Fleet Air Defense Mission Target Card is drawn it is really an Airfield Defense Mission. All rules that would normally apply to the Fleet Air Defense Mission apply to the Airfield Defense Mission.
7.3F Weight Points and Load Area Limits
Each Falcon may carry at most ten Weight Points of munitions. Each Falcon has seven Load Areas. Three of the load areas (at the bottom of the card) may be used to carry a variety of weapons. The other four areas may only carry Air-to-Air missiles. Look at the Weight Points and Load Areas listed on the Mission Briefing Card to determine the limits for the current Mission (the remaining Weight Points and Load Areas are assumed to be used for fuel tanks).
7.31F Wing Tip Load Areas
The two Wing Tip Load Areas may always be used. They are in addition to the Load Areas designated on the Mission Briefing Card. Each may carry one Sidewinder or AIM-120 AMRAAM missile only.
7.32F Outboard Wing Load Areas
The two Outboard Wing Load Areas may always be used. They are in addition to the Load Areas designated on the Mission Briefing Card. Each may carry one Sidewinder or AIM-120 AMRAAM missile only.
7.33F Inboard Wing Load Areas
The two Inboard Wing Load Areas may either be used to carry one Mk 84 bomb or two of any other type of weapons or pods that can be carried by an F-16. If carrying two counters, they can be of different types (i.e. a Mk 82 and a Rockeye).
7.34F Center Line Area
The Centerline Area may carry one Pod (N, E, or Gun), Mk 83 or Rockeye.
10.53 Dogfight Bonus
Because the Falcons are slightly more maneuverable, they receive an automatic +1 Dogfight Modifier.
14.51 Pilot Check Modifiers
Landing at an Airfield: Subtract 1 from the pilot check roll. This modifier applies because landing at an airfield is less stressful than landing on an aircraft carrier.
18.2 Fatigue
Subtract 1 fatigue point from the total. This applies because landing at an airfield is less stressful than landing on an aircraft carrier.
19.8 F-15C Eagles
The following rules are used for the Special Conditions/Mission Events involving F-15C Eagles. Eagles may use "Leader/Wingman" tactics in Dogfighting. The Eagles may also both be Leaders; the choice is left to the player. All Eagles have an Aggressive air-to-air style. MiGs have a -1 to achieve a Fire Position against them. Enemy MiGs shot down by Eagles are counted toward the player's Mission Points for Fighter Sweep or Airfield Defense Missions. Eagles DO NOT gain a bonus for AIM-120 AMRAAMs (should that Special Condition be present). Apply all Air Combat modifiers to Eagles that are applied to Falcons. Do not apply cannon or missile modifiers, as the values for the Eagles take into account pilot Skill and weaponry.
When resolving a Dogfight Attack, apply the "+3 Sidewinder" bonus to the Fire Position Result die roll. The Air Combat Numbers for the F-15C Eagles are: 8/7/5/3. These numbers are used in the same manner as the MiG and F-14 numbers. Eagles have the same chance to Strafe as a Falcon pilot with a +0 Air to Ground Skill.
19.9 F-15E Strike Eagles
The following rules are used for the Special Condition involving F-15E Strike Eagles. Apply all ground Attack modifiers to Strike Eagles that are applied to Falcons. The "+1 on Ground Attacks" takes into account the Pilot Skill and equipment for the Strike Eagles. Strike Eagles have the same chance to Strafe as a Falcon pilot with a +1 Air to Ground Skill. Use Munitions counters for the Strike Eagles. The counters provided are to be used for both the Falcons and Strike Eagles, how they are divided is left to the player. Strike Eagles may take part in air-to-air combat. Strike Eagles may use "Leader/Wingman" tactics in Dogfighting. The Strike Eagles may also both be Leaders; the choice is left to the player. If they are involved in air-to-air combat the Air Combat Numbers for the F-15E Strike Eagles are: 7/5/4/3. These numbers are used in the same manner as the MiG and F-14 numbers. All Strike Eagles are considered to have a Normal air-to-air style.
Campaign Cards
Because the operating bases and missions for an F-16 Falcon Squadron are different than those of an F-18 Hornet Squadron only certain Campaign Cards are used for Falcon Leader. There are also some modifications that must be made to the Campaign Cards to represent different missions for the Falcons.
The following Campaign Cards are recommended for use with Falcon Leader: Iraq, Iran, Central America, North Korea and World War III: Mediterranean, Cuba (from Inside GMT Games #2), and Yugoslavia (from Inside GMT Games #2).
For any Falcon Leader campaign, the following target cards should be removed: 2, 8, 9, 10 and 19. These are naval targets and the Air Force lets the Navy handle these targets.
Special Conditions and Mission Event Cards
Because the missions, operating conditions and support aircraft for an F-16 Falcon Squadron are different than those of an F-18 Hornet Squadron, there are changes to certain Mission Event Cards used in the game. The changes to the cards are given below:
- The "F-14 Tomcat Support" card is changed to "F-15C Eagle Support." All other items on the card remain in effect. See rule 19.8 for the information about the F-15C Eagle Support.
- The "A-6 Intruder Support" card is changed to "F-15E Strike Eagle Support." Each F-15E carries two Mavericks, one E-Pod, (one N-Pod if on a night mission) and three Mk 83's (or two Mk 84's). There should be a +1 to all Air to Ground Attack die rolls for the Strike Eagles. See rule 19.9 for more information about the F-15E Strike Eagle Support.
- The "Rough Seas" card is changed to "Stormy Weather." The rolls and results printed on the card are used and remain in effect.
- The "No E-2 Coverage" card is changed to "No AEW Coverage." The effects listed on the card are used and remain in effect.
Weapons Loadout
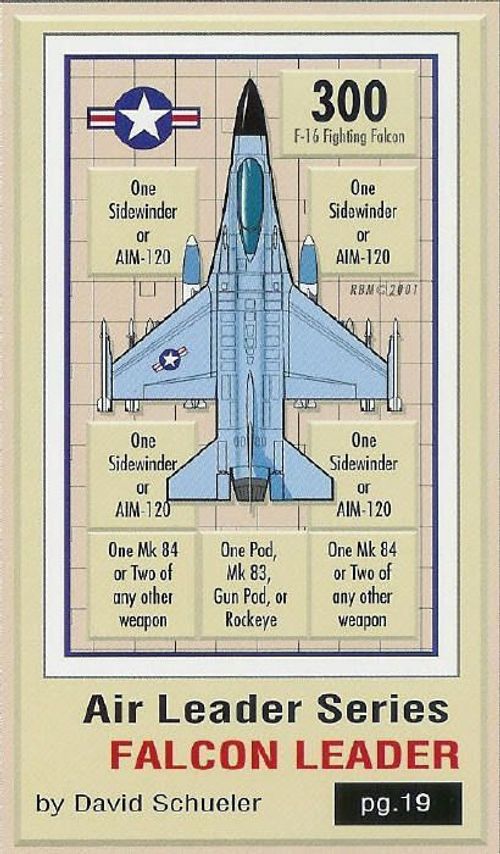
The Falcon Load Areas diagram on the next page replaces the "Hornet Load Areas" section of the Mission Display. This is used when arming a Falcon for a mission.
The printed Falcon Load Areas diagram (the aircraft is labelled "300 F-16 Fighting Falcon") shows these labels:
- Wing tips (two): "One Sidewinder or AIM-120"
- Outboard wings (two): "One Sidewinder or AIM-120"
- Inboard wings (two): "One Mk 84 or Two of any other weapon"
- Centerline: "One Pod, Mk 83, Gun Pod, or Rockeye"
The first four labels are the four Air-to-Air load areas; the bottom three are the load areas that may carry a variety of weapons (see rule 7.3F).
Available Weapons
The F-18 Hornet and F-16 Falcon have similar weapons capabilities, but they cannot carry or employ all the same weapons. The list below shows the weapons that are available for use by the F-16 Falcon.
- Mk 82
- Mk 83
- Mk 84 (note a)
- HARM (note b)
- Rockeye (note c)
- AMRAAM (note c)
- Gun Pod (note c)
- N Pod
- E Pod
- Maverick
- Sidewinder
- AIM-120
Notes:
- a. From C3i #1 and reprinted on this issue's insert.
- b. Only F-16C/J (Block 50) model aircraft have the capability to target these weapons. Standard F-16C's will not carry HARMs.
- c. From C3i #3 and reprinted on this issue's insert. If you don't have a copy of C3i #3, use the following rules:
Rockeye
- Weight Points: 1
- Load Area Allocation: Mk 82
- Usage: Bomb, Hit Number 2/ /-
Due to its Cluster Munitions characteristics, the Rockeye has a very good chance of scoring one hit, but no chance of scoring a second or third hit.
Gun Pod
- Weight Points: 1
- Load Area Allocation: Mk 82
- Usage: Cannon
A Falcon may carry only one Gun Pod at a time. When the Falcon executes a Strafing attack, add two to its die roll. A Gun Pod does not increase the Cannon Bonus in Air Combat. A Gun Pod is treated as an AGW Weight Point for purposes of Dogfight Modifiers.
AIM-120 AMRAAM
- Weight Points: 0
- Load Area Allocation: Sparrow
- Usage: Long Range Air Combat, Hit Number +4, +8, (+1)
AIM-120 AMRAAMs are state of the art air-to-air missiles. They have an active radar homing seeker (like the Phoenix missile) and are very good at hitting enemy aircraft. Add 1 to the Fire Position Result die roll for each AIM-120 fired by a Falcon. However, the cost of these missiles is very high. At the start of each mission (after drawing the Mission Briefing Card) roll a die. The result is the number of AIM-120 counters available for this mission. Counters may not be saved for future missions. If the AIM-120 AMRAAMs Special Condition Card is drawn, the die roll number is automatically 10.
Munitions shortages: If a Munitions Shortage card is drawn it has the following effects for these weapons:
- Minor Munitions Shortage: Rockeye = 8, Gun Pod = 4, AIM-120 = -3 to die roll
- Munitions Shortage: Rockeye = 6, Gun Pod = 3, AIM-120 = -6 to die roll
- Severe Munitions Shortage: Rockeye = 4, Gun Pod = 2, AIM-120 = Unavailable.
Air Defense Suppression
Unlike the F-18 Hornet, the standard F-16 Falcon does not have the ability to target the AGM-88B HARM missile. Only the F-16 C/J (Block 50) model of the aircraft has the capability to target this missile. The F-16 C/J's are assigned to special SEAD (Suppression of Enemy Air Defense) squadrons and do not participate in normal F-16 missions. Typically external assets (such as EA-6B's, F-16 C/J's, or even F-18's) are assigned to assist in suppressing SAMs and AAA during an F-16 mission. If the "EA-6B Support" Special Condition Card was not drawn for a mission, the player may choose to use other SEAD assets to support the mission. First the player determines what SEAD assets are available for the mission by rolling one die and referring to the table below.
The player may choose to use or not use the available SEAD assets. If the player chooses to use the SEAD assets on the mission, the player treats the selection as if extra aircraft had been allocated to the mission and automatically loses Mission Points equal to the "Points Per Hit" listed for the Target. If the SEAD assets are added to the mission, they only may be used to attack air defenses (SAMs or AAA) on the Mission Display or "Target of Opportunity" and "SAM Site" events from the Mission Event Cards. The player may still choose to take extra F-16's on the mission in addition to taking the SEAD assets. The standard HORNET LEADER rules apply if extra F-16's are taken on the mission.
SEAD Asset Availability (Falcon Leader: HORNET LEADER Variant)
| Target SAM Level | Die Roll | SEAD Assets |
|---|---|---|
| Minimal | 1-5 | None |
| Minimal | 6-8 | 2 F-16C/J (each with 2 HARM, 2 Rockeye, and 2 Sidewinder) |
| Minimal | 9-10 | 2 F-18 (each with 2 HARM, 2 Rockeye, and 2 Sidewinder) |
| Light | 1-3 | None |
| Light | 4-7 | 2 F-16C/J (each with 2 HARM, 2 Rockeye, and 2 Sidewinder) |
| Light | 8-10 | 2 F-18 (each with 2 HARM, 2 Rockeye, and 2 Sidewinder) |
| Moderate | 1-4 | 2 F-16C/J (each with 2 HARM, 2 Rockeye, and 2 Sidewinder) |
| Moderate | 5-8 | 2 F-18 (each with 2 HARM, 2 Rockeye, and 2 Sidewinder) |
| Moderate | 9-10 | 2 EA-6B (use the same information as is on the "EA-6B Support" Special Condition Card) |
| Heavy | 1-4 | 2 F-16C/J (each with 2 HARM, 2 Rockeye, and 2 Sidewinder) |
| Heavy | 5-8 | 2 F-18 (each with 2 HARM, 2 Rockeye, and 2 Sidewinder) |
| Heavy | 9-10 | 2 F-16 C/J (each with 2 HARM, 2 Rockeye, and 2 Sidewinder) and 2 EA-6B (use the same information as is on the "EA-6B Support" Special Condition Card) |
Airfield Display
The Airfield Display replaces the Carrier Display for the Falcon Leader variant and is used to organize your pilots and Falcons when they are not flying a mission.
The insert's Airfield Display sheet (by Rodger B. MacGowan, RBM Studio 2001) carries these printed cards. The printed heading on the hangar cards reads "HANGER" (sic); it is shown here as printed.
- FLIGHT LINE: "Ready F-16's"
- HANGER: "Not Ready"
- HANGER MAINTENANCE, Damaged: REPAIR CHECK (d10): 1-8 "Falcon is ready"; 9-10 "Falcon still damaged"
- HANGER MAINTENANCE, Heavily Damaged: REPAIR CHECK (d10): 1 "Falcon is ready"; 2-7 "Falcon is damaged"; 8-10 "Falcon is still heavily damaged"
- Aircraft Returning Damaged (d10 / Result of Damage): 1 to 5 "Damaged"; 6 to 9 "Heavily Damaged"; 10 "Crash, Destroyed". Footnote: "Roll for pilot ejection"
- SICK BAY: "Not Ready Pilots"
- PILOT'S LOUNGE: "Shaken Pilots"
- BRIEFING ROOM: "Ready Pilots"
Counters
Thirty-Four HORNET LEADER counters are included on the insert in this issue of C3i. The F-15, F-16C/J and most weapons are for this variant, while the JDAM and JSOW will be needed for a forthcoming HORNET LEADER mini-campaign. During play, use F-18 aircraft counters to represent F-16s wherever necessary.
The insert's Falcon sheets carry F-16 Fighting Falcon counters numbered 300 to 311 (front: weapons load-area labels; back: "DAMAGED"). The insert's Campaign Card sheet carries Yugoslavia (Target 5), Angola (Target 6), Cuba (Target 10) and China (Target 18) target cards, whose numeric tables are not transcribed here.