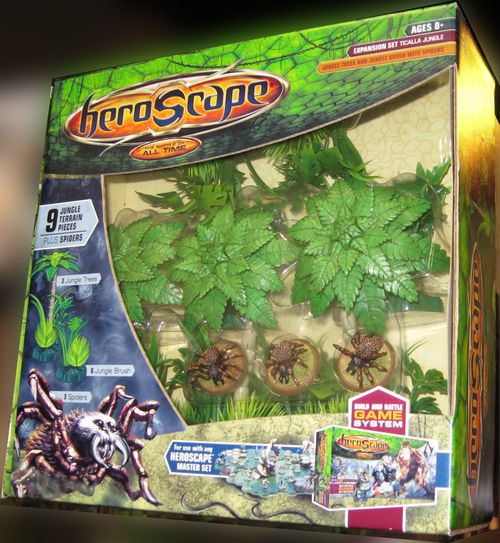
Heroscape Expansion Set: Ticalla Jungle
Heroscape Expansion Set: Ticalla Jungle Rulebook
Table of Contents
Table of Contents
Game Contents
- 9 Jungle Pieces (3 Palm Trees and 6 Underbrush)
- 3 Fyorlag Spiders
- Fyorlag Spider Army Card
The First Time You Play
Remove your game parts from their wrappings. Discard the extra materials.
Jungle Piece Battlefield Key
Underbrush and Palm Trees are both considered Jungle Pieces. Use this key when building battlefields with Underbrush and Palm Trees.
- 9 height Underbrush
- 14 height Palm Tree
- 15 height Palm Tree
- 16 height Palm Tree
Rules for the Basic Game & Master Game
Assembling a Palm Tree: To attach a canopy to a Palm Tree, insert the canopy into the top of the Palm Tree's trunk. The two three-layer canopies attach to the 14 and 15 height Palm Trees. The four-layer canopy attaches to the 16 height Palm Tree.
Building with Jungle Pieces: Each Jungle Piece in this set occupies one single hex space. Jungle Pieces may be placed adjacent to tiles or on top of tiles. When placed, a Jungle Piece must have two or more of its six connecting faces attached to other hex tiles. For example, a Palm Tree may attach to a Swamp Water tile, a Sand tile, and another Jungle Piece. See Examples 1 and 2.
Example 1: Connecting Faces (figure labels: canopy, connecting faces)
Example 2: Placing Jungle Pieces Correctly
The Palm Tree and the far right Underbrush are correctly placed because two or more of their connecting faces are attached to hex tiles. The center Underbrush is incorrectly placed because only one of its connecting faces is attached to a hex tile.
(Figure labels: correctly placed, correctly placed, incorrectly placed.)
Moving through a Jungle Piece: Figures are not allowed to occupy or move through Jungle Pieces.
You may remove a canopy to access hard-to-reach areas of the battlefield, but you must reattach it afterwards. If a figure cannot fit on a space under a canopy, you cannot remove the canopy to allow the figure to move onto that space.
When moving your figure adjacent to a Jungle Piece, you are allowed to move any of the lower plants of the Jungle Piece that hang over the space that the figure will occupy. A figure may not be placed on any space adjacent to a Jungle Piece if the figure being placed does not fit fully on the space.
Line of Sight: Jungle Pieces may block Line of Sight. Range attacks can be used only when a clear Line of Sight is available between or through Jungle Pieces. See Examples 3 and 4.
Example 3: Seeing Through Jungle Pieces
Sonlen can see the Marro Stinger through the Jungle Pieces.
Example 4: Not Seeing Through Jungle Pieces
Sonlen cannot see the Marro Stinger through the multiple Jungle Pieces.
Rules for the Master Game Only
The following additional rules apply only to the Master Game.
Attacking figures adjacent to Jungle Pieces with range: A figure becomes adjacent to a Jungle Piece when it moves next to a Jungle Piece. When a small, medium, or large figure adjacent to a Jungle Piece is defending against a non-adjacent attack, the defending figure receives one additional defense die.
A defending figure never receives more than one additional defense die, even if it is adjacent to multiple Jungle Pieces; however, other factors such as Height Advantage may give a defending figure more additional defense dice. See Figure 9.
Attacking an adjacent figure: A defending figure adjacent to a Jungle Piece does not roll one extra defense die when attacked by an adjacent figure. See Example 10.
Adjacency Exceptions: Most of the time, if a figure is next to a Jungle Piece, they are adjacent. Here are exceptions to the rule:
- If a defending figure's base is on a level equal to or higher than the height of a Jungle Piece, they are not adjacent.
- If a figure is next to a space under a canopy, that figure is not adjacent to that Jungle Piece.
- When determining adjacency to a Palm Tree, the figure must be next to the trunk of the tree.
See Examples 5, 6, 7 and 8.
Example 5: Defending Against a Ranged Attack
Sonlen is attacking the Marro Drudge. The Marro Drudge (a medium figure) is adjacent to a Jungle Piece. That Marro Drudge rolls one additional defense die.
Example 6: Height Advantage while Adjacent to a Jungle Piece
Sonlen is attacking the Marro Stinger. The Marro Stinger is adjacent to a Jungle Piece. The Marro Stinger also has Height Advantage. That Marro Stinger rolls 2 additional defense dice: one for the Height Advantage and one for being adjacent to a Jungle Piece.
Example 7: Height Advantage while Adjacent to a Jungle Piece
Sonlen is attacking the Marro Stinger. The Marro Stinger is eight levels high and is adjacent to the Jungle Piece (height of 9). The Marro Stinger also has height advantage. That Marro Stinger rolls 2 additional defense dice: one for the height advantage and one for being adjacent to a Jungle Piece.
Example 8: Adjacent/Not Adjacent to Jungle Pieces
The Underbrush has a height of 9 and the Palm Tree has a height of 14. Sonlen is the only figure adjacent to a Jungle Piece, because Marro Drudge 1's base is even with the Underbrush's height, and Marro Drudge 2 and 3 are not adjacent to the Palm Tree.
Example 9: Defending Adjacent to Multiple Jungle Pieces
Sonlen is attacking the Marro Stinger, which is adjacent to two Jungle Pieces and has Height Advantage. The Marro Stinger rolls 2 additional defense dice: one for the Height Advantage and one for being adjacent to multiple Jungle Pieces.
Example 10: Defending Against an Adjacent Attack
When defending against an adjacent attacking figure, Sonlen does not receive an extra defense die for being adjacent to the Jungle Piece.
Battlefield & Scenarios
Avorice Stand Battlefield: The battlefield layouts (a Level 01 to Level 04 map set) are graphics only and are not reproduced here. The booklet states the following: Required Sets: Swarm of The Marro Master Set and the Ticalla Jungle.
Within the first valley of the Quilato Mountain Range, southwest of the Montiqua Ledge, lies a small pool of crystal-clear water. Many of these pools can be seen from above and are scattered throughout the mountains, jungles and swamps of the area. Many Kyrie of the Ticalla Jungle believe that these waters are shaped into ancient symbols of the Green Leaf Tribe and may be the key to finding their greatest secrets.
Master Game – New Waters (2 Players)
Your small band of warriors sit at the Kyrie spring, replenishing their resolve after the constant battling of these once-tranquil valleys. This pool of water is the only fresh source left in the immediate area, and it is a relief to be here; but you know that the serenity of the day will end when your enemy inevitably arrives to contaminate this pure water source.
Goal: Player 1 must protect the pool of water (the eight water spaces). Player 2 must enter the eight water spaces, contaminating them.
Setup: Keep the eight Glyphs near the battlefield to be used as Contamination Markers later.
Each player drafts or brings a pre-made 500-point Army.
Player 1 starts in the red starting zone. Player 2 starts in the blue starting zones.
Special Rules: Glyphs in this scenario count only as Contamination Markers. Do not follow any Glyph rules.
At the end of Player 2's turn, Player 2 may place Contamination Markers symbol side-up on the spaces beneath any figure he controls that occupies an uncontaminated water space. A water space with a Glyph on it is considered to be contaminated. Placed Contamination Markers remain on the contaminated water space for the rest of the game.
Victory: Destroy all of your opponents' figures to win the game. Player 2 wins immediately when all eight water spaces have been contaminated. Player 1 wins immediately if Player 2 hasn't contaminated all eight water spaces by the end of Round 8.
Master Game – Jungle Guardians (3 Players as individuals)
"Remember, young warrior, there is a great power within the pools of the ancients, a kinship with the planet and its many creatures. Each pool is guarded by an ancient animal totem of the Green Leaf Tribe. Those who befriend these jungle creatures may drink freely of the pools, safe in knowing that these fearsome beasts will defend you as if you were one of their own." — Aquilla of the Moon Tribes.
Goal: Destroy all your opponents' figures with the aid of the pool's guardian spiders.
Setup: Place the Glyph of Brandar (Spider Totem) power-side up where shown.
Keep 3 Fyorlag Spiders and their Army Card near the battlefield to be used later.
The Fyorlag Spiders cannot be chosen to be in players' armies.
Each player drafts or brings a pre-made 325-point Army.
One player starts in the red starting zone; one player starts in the blue starting zone; one player starts in the green starting zone.
Special Rules: The player controlling the first figure to land on the Spider Totem (Glyph of Brandar) during the battle may immediately place the 3 Fyorlag Spiders in any empty space adjacent to any Jungle Pieces on the battlefield.
Instead of taking a turn with an Army Card that includes a figure standing on the Spider Totem (Glyph of Brandar), you may take a turn with the Fyorlag Spiders. If no figure occupies the Spider Totem (Glyph of Brandar), the Fyorlag Spiders are neutral. While they are neutral, you cannot destroy the Fyorlag Spiders or receive a disengagement attack from them.
At the start of any round, before Order Markers are placed, any player with a figure occupying the Spider Totem (Glyph of Brandar) may immediately place any previously destroyed Fyorlag Spiders in any empty space adjacent to any Jungle Pieces on the battlefield.
Victory: You win immediately if all of your opponents' figures are destroyed before the end of Round 8. If the battle reaches the end of Round 8, then the game is over and the player with the most points on the battlefield wins (see Scoring, on page 13 in the Swarm of the Marro Master Game Guide). The Fyorlag Spiders never count towards the total points scored.
(The booklet's Round Marker Track, numbered 1 to 8, is a printed component graphic for the Master Game scenarios and is not reproduced here.)