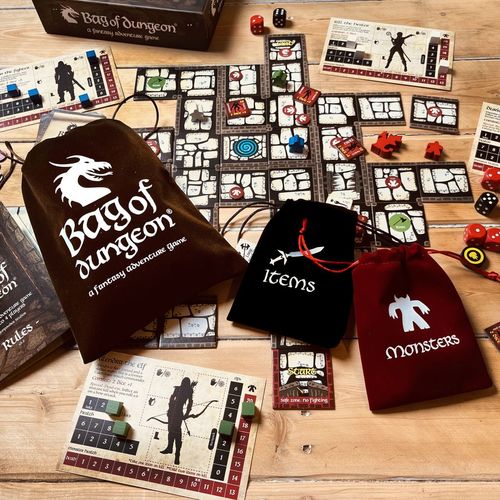
Bag of Dungeon: A Fantasy Adventure Game
Bag of Dungeon: A Fantasy Adventure Game Rulebook
Table of Contents
Table of Contents
- Standard Rules
- 1. Object of the Game
- 2. Set Up
- 3. Using Action Points
- 4. Building the Dungeon
- 5. Spawning & Fighting Monsters
- 6. If You Win a Fight...
- 7. If You Lose a Fight...
- 8. Monsters Regenerate Health
- 9. Tagging Other Adventurers
- 10. Ranged Combat
- 11. Spells and Potions
- 12. Inventory, Trading & Symbols
- 13. Special Tiles
- 14. When Does the Ring Appear?
- 15. The Ring Spawns a Defender!
- 16. Defeating the Red Dragon
- 17. Solo Game
- Advanced Rules
- Abbreviations
- Contents
Standard Rules
1. Object of the Game
You play adventurers entering a magical dungeon to find and steal the Ring of Creation. Monsters, traps, items and treasure await, and the fearsome Red Dragon guards the exit. Your quest? Get in, get the Ring and get out! The dungeon collapses once the Ring leaves the exit. Adventurers still inside have one turn to escape or are lost forever in the ruins.
2. Set Up
- Place the Start dungeon tile in the centre of your play area. Set aside the Exit tile. Shuffle the rest of the dungeon tiles and split them into two equal stacks. Shuffle the Exit tile into one of the stacks and place that stack beneath the other to form a single face-down draw stack.
- Each player chooses a character card, an adventurer meeple and four cubes. Place your adventurer on the Start tile.
- Place a cube on the highest numbered Health space of your character card, one on the '3' space of your Lives track and one on the highest numbered APs space. You'll use the other cube to track monster health during a fight.
3. Using Action Points
The bravest player goes first. On your turn, you will spend the action points (APs) on your character card to move your adventurer, draw and lay dungeon tiles, use items and fight. Move your cube down your APs track as you spend them.
It costs 1 AP to move one space or lay a new dungeon tile. Using some items costs one or more APs (see item's text).
You can spend APs in any combination of actions. For example, you could draw and place a dungeon tile (1 AP), move your character one tile (1 AP), draw and place another dungeon tile (1 AP), and shoot a fireball at a monster (2 APs), and so on until you have spent all your APs or enter a fight.
You don't have to spend all your APs but they cannot be carried over to your next turn. Your APs are reset to full at the end of your turn. Your turn always ends after a fight, even if you have APs remaining.
4. Building the Dungeon
Dungeon tiles are laid adjacent to your adventurer. Place them so that an opening edge joins another, forming a logical path. No match? You are lost! Return the tile face down under the stack and end your turn.
Connect openings to create paths through the dungeon. The Start tile is a safe zone: no fighting.
5. Spawning & Fighting Monsters
When you lay an M tile, place a red/black token (choose either side) on it to show there is a monster there. When your adventurer lands on an M tile with a token, draw a monster from the Monsters bag and place it face up, replacing the token. Monsters spawn once for each M tile drawn (do not draw another monster if you move there again).
When you lay the Exit tile (M12), place the Red Dragon tile there, face up.
Melee (hand-to-hand) combat happens when opponents are on the same tile. APs are not required for melee combat unless specified by an item. You cannot use ranged weapons (e.g. a bow) when fighting an opponent on the same tile. Before any combat round, if you have APs left you can escape (see 5.5. Escape) or tag another adventurer to help you (see 9. Tagging Other Adventurers).
5.1. Fight: Roll the number of combat dice shown on your character card. Add weapons or item modifiers. Get another player to roll for the monster (see its tile for combat stats).
5.2. Damage: The lower scoring opponent takes damage equal to the score difference. Reduce its health by that number. For example, you score 9, the monster scores 5, so the monster takes 4 damage.
5.3. Slug it out: Repeat 5.1-5.2 until one opponent is killed (its health reaches 0), or you escape.
5.4. Critical hit: If all your dice rolls are identical (e.g. two 6s, three 4s) you score a critical hit. Double your score, and add modifiers. Monsters cannot score critical hits.
5.5. Escape: Before any combat round, you may go back or go past to an existing tile (spend 1 AP and take 1 damage) or go past and lay a new tile (2 APs, 2 damage). Damage is direct (armour and shields do not protect you).
6. If You Win a Fight...
...you gain items as a reward. If the monster started with health 6-9, take one item from the Items bag. If it started with health 10+, take two items.
Place items on an inventory space on your character card (face down if you want to hide them from other players). (See 12. Inventory, Trading & Symbols.)
7. If You Lose a Fight...
...your adventurer loses a life and your turn is over. If this is your last life, your adventure is also over. Otherwise, return to the Start tile and reset your health to full. Place all your items (including the Ring if you have it) on the tile where you died. These can now be picked up by any adventurer on their turn if the tile is free of monsters. If you are defeated by the Red Dragon, your items are magically transported to the Healing Pool (if the Healing Pool has not been drawn, place items to one side until it appears, then place them).
8. Monsters Regenerate Health
Any monsters still alive at the end of an adventurer's turn have their health reset to full.
9. Tagging Other Adventurers
You can spend 1 AP during a fight to call one nearby adventurer to help you, provided they have enough APs available to reach your tile. If the player agrees (which they do not declare until after you've spent the AP), they spend APs to reach you, become your tag partner and add one dice to your combat roll.
The tag partner does not reset their APs after the fight; they now have fewer APs for their next turn. When you take damage, your tag partner takes half damage, rounded down (e.g. The dwarf takes 7 points of damage, so its tag partner (the elf) takes 3 damage).
Adventurers cannot escape during a tagged fight. You get the item(s) if you win (though you may choose to reward your tag partner with a gift).
If you lose the fight, the monster will attack the tag partner, and now inflicts full damage. The tag partner can spend APs (if they have them) to use items, and may now escape.
10. Ranged Combat
You can use ranged weapons (e.g. bows) to shoot monsters from a distance. You must have line of sight (LoS) - meaning an uninterrupted line between you and the monster - and the monster must be in range, as shown on the ranged item. Count the range starting from the tile in front of you.
Adventurers between you and the monster do not affect LoS. Spend the APs (per shot) shown on the item and roll the number of dice shown. The monster takes the total amount in damage.
You can shoot unrevealed monsters. Once you have fired, draw a monster tile from the bag and place it face up, replacing the token. Deduct the damage result from its health and continue your turn (e.g. fire again or move to the monster's tile and fight). If you don't manage to kill the monster by the end of your turn, its health returns to full.
11. Spells and Potions
Spells (which must have LoS if ranged) and potions are removed from the game once used. Non-ranged spells (e.g. Teleport, Witch's Claw) can affect anyone, anywhere in the dungeon.
12. Inventory, Trading & Symbols
You can hold as many items as you have inventory spaces on your character card. Adventurers on the same tile can trade items freely (even when tagging). You may also drop unwanted items on your current tile. If a space on your character card has a symbol, you can only place items here that show the same symbol. For example, you cannot put a shield in the armour space and only boots can go in the boot space. You can store any item in an unmarked box. You can switch items at no AP cost, even in a fight.
13. Special Tiles
13.1. Healing Pool: Once placed, put one token on the Healing Pool for each adventurer still in the game. To use, end your turn on the Healing Pool, remove a token from the tile and reset your health to full. The Healing Pool is empty when all its tokens have been removed. An adventurer may use the Healing Pool as many times as there are tokens remaining.
13.2. Item tiles: These are single-use tiles. Whoever reaches one first draws one item.
13.3. Traps: When a trap is drawn, all adventurers on that tile suffer its effect. Armour and shield bonuses reduce damage. Exception: Chests only affect the adventurer who opens them.
14. When Does the Ring Appear?
Whoever lays the last dungeon tile from the stack rolls two dice and places the Ring of Creation on that M tile (e.g. roll 9: Ring is placed on M9).
The exit is now sealed shut and can only be opened by an adventurer holding the Ring on the Exit tile. Once the ring bearer has exited the dungeon, those still inside each have one turn to escape before the dungeon collapses!
15. The Ring Spawns a Defender!
If there is no monster on the tile where the Ring appears, place a token on the Ring, then replace it with a monster when an adventurer lands on the tile.
16. Defeating the Red Dragon
The Red Dragon waits patiently at the exit to prevent your escape. All weapons except arrows can harm the Red Dragon, and the Dragonlance can only be used against her. If the Red Dragon defeats you, your items are placed on the Healing Pool (see 7. If You Lose a Fight...).
The Red Dragon does not move from the Exit tile.
Red Dragon: Health 20. Combat: 4 dice. Immune to arrows.
Here endeth the standard rules!
17. Solo Game
In the solo game you can choose to send up to four adventurers into the dungeon, but each only gets one life. For a tough challenge, try sending just one brave adventurer against the Red Dragon and her minions.
You can choose to remove the following tiles from the game before play: Vampire Teeth, Sorcerer's Skull, Imp's Teeth, Witch's Claw, Magic Vine, Acme Insurance Scroll. If you prefer, you can also discard them as you play, and draw again.
17.1. Tagging during a solo game
When playing solo with multiple adventurers, an adventurer can try to tag another.
The adventurer being tagged must have at least 5 health (otherwise they are too weak to help). Roll a dice. On a roll of 3-6, the adventurer becomes your tag partner. If you roll a 1 or 2 they refuse to assist for that fight.
Advanced Rules
Add any of these additional rules to the standard or solo game for competitive play, angrier monsters and an entrepreneurial gnome.
18. Competitive Game
In competitive play, the winner is the surviving adventurer who has killed the most monsters. Keep your monster tokens (kills). Each monster is worth one kill. The Ring is worth four kills, and you get two kills for slaying the Red Dragon. Once the Ring is in play, adventurers can also attack each other. Ranged combat against adventurers is the same as when fighting monsters (standard rules). Melee is also the same, with two exceptions - escape and defeat:
18.1. Escape: Before a combat round, you may escape to an adjacent tile. To do so, you must either give one of your kills (dead monster tokens) to your opponent or take four damage. If you have no kills to give, you must take the damage.
When you are defending outside your turn, you may spend APs from your next turn (e.g. to use items), and play your next turn with fewer APs to spend.
18.2. Defeat: If you are killed by another adventurer, drop all your items on the tile where you died. You must then lose a life and return to the Start tile (if you have lives remaining, otherwise your adventure is over).
You must give one of your kills to the victor (if you have one) and they can also take any dropped items (if they have space to carry them).
19. Monster Rush
After you perform a ranged attack on a monster, it will charge towards you. If it is unrevealed, replace the token with a monster tile, reveal it and deduct the damage result from its health. If the monster is still alive, roll one dice and move it that many spaces towards your tile.
If the monster reaches your tile, each adventurer on that tile takes one dice of instant damage. The monster will then fight you. You may choose one adventurer on the tile as your tag partner (this costs no APs and cannot be refused). Normal tagging rules apply. You are now locked in a fight to the death and may not escape.
If the monster fails to reach you, you may repeat the ranged attack (as long as you have sufficient APs and ranged items remaining) until the monster either dies or reaches your tile. Each time you fire, the monster continues charging (roll again for movement). If the monster is still alive when you stop attacking, move away or your turn ends, the monster stays where it is, revealed. Restore its health to full at the end of your turn.
19.1. Adventurers in the way
If a monster charges past one or more adventurers, it inflicts one dice of instant damage to each adventurer it passes. If its movement ends on a tile where there are adventurers, each takes one dice of instant damage and the active adventurer may then continue their turn (if they have APs remaining) or play passes to the next player.
20. Fred's Lucky Dip Stall
Fred the Gnome, local postal operative and regular at the Wasted Wizard tavern, has a licence to trade lost property in the dungeon in exchange for dead monster tokens (we have no idea what he does with the tokens, but we suspect he claims them as his own kills in order to impress other gnomes and get dates).
At the start of the game, place a token on the Start tile (Fred won't bring his goods into the dungeon). This is the location of Fred's Lucky Dip stall. When you move onto this tile, you may discard three dead monster tokens or two items to draw one item from the Items bag (there is no AP cost to do this).
Fred has no idea what's in his Lucky Dip, and does not offer refunds or exchanges if you get something you don't want, e.g. a trap (which will activate). If the item you draw is of no use to you, you may put it back in the Items bag or keep it to trade with another adventurer.
21. Dragon Scrolls
The Dragon Scrolls are 11 further adventures that add new quests, enemies and treasure to Bag of Dungeon. Pick a card. Pick a character. Pick a fight.
The First Scroll: 'Siren Song' The Siren sisters draw you to their song. You are enchanted by their bewitching melody. It seems to say "Come to me, weary adventurer, and let me comfort you..."
The Second Scroll: 'Where's William?' 13-year-old Lord William Ingram has run off to the dungeon to prove his worth as a warrior. Sadly, William has all the gear and no idea. His father, King Brian, has hired you to rescue him.
The Third Scroll: 'Take Me to the River' Mother Nature is angry and has decided to flood the dungeon. You'll wish you'd packed your pigskin armbands. Swim for your life!
The Fourth Scroll: 'Entombed' A wraith has entombed one of the adventurers as its prisoner. The entombed adventurer must find a way to lead the rescuers to them, and to the wraith...
The Fifth Scroll: 'The Broken Axe' Legend tells of the Sunstone axe; that its head was torn from its haft and each piece was cast into the darkness. Find both pieces and restore the axe to once more wield its ancient power.
The Sixth Scroll: 'Goblin Season' It is the third moon after the Awakening, which means only one thing: lots of angry, hungry Goblins. The hunt is on!
The Seventh Scroll: 'The Lure of the Ring' The Red Dragon has left the dungeon to hunt, leaving the Ring of Creation unguarded. This is the perfect opportunity to steal the Ring while she is away. Sounds easy, right?
The Eighth Scroll: 'Mr Lava Man' There's a new god in town and he's putting on a show! He's erupted a nearby volcano and a molten lava flow is heading your way.
The Ninth Scroll: 'Enter the Dragon' It seems the flutter of tiny wings will soon be heard in the dungeon: the Red Dragon has laid two eggs. Unfortunately for her, they are worth a king's ransom to anyone clever and brave enough to steal them from under her watchful gaze.
The Tenth Scroll: 'Monster for a Day' "You think running an evil dungeon is easy?" protested the dungeon master in the Wasted Wizard tavern. "Here, take the keys. Be my guest. You'll be back here in no time begging for your little backpack and sword."
The Eleventh Scroll: 'Ambush!' Looks like some of the smarter monsters are on to us. Someone made a terrible racket rearranging their backpack at the entrance and sound travels fast. The monsters are planning an ambush...
Abbreviations
D6: 6-sided dice. APs: action points. DMG: damage. RNG: range. CBT: combat.
Contents
Game bag, Monsters bag, Items bag, 40 dungeon tiles, 30 monsters, 40 items, 4 character cards, 16 wooden cubes, 4 wooden meeples, 4 6-sided dice, Ring of Creation, 28 red/black tokens, 11 Dragon Scroll cards, Red Dragon.