Anno 1800: Der Solo-Modus
Anno 1800: Der Solo-Modus Rulebook
Table of Contents
Table of Contents
- Solo Campaign
- Missions
- Mission 1 – The Founding of Ditchwater
- Mission 2 – Explosive Progress
- Mission 3 – With Letter and Seal
- Mission 4 – The New World
- Mission 5 – Wealthy Friends
- Mission 6 – A Worthwhile Investment
- Mission 7 – The Pyrphorians
- Mission 8 – The Search for the Nest
- Mission 9 – The End Justifies the Means
- Mission 10 – A New Beginning
- Mission Tips
- The Normal Solo Game
- End of Game and Scoring
Solo Campaign
Setup
The setup for the solo campaign is the same as described for the base game on pages 2 and 3 of the base rulebook, with the following exceptions:
- Step 1: Of the industries, one tile of each kind is enough. The shipyards and ships are placed as usual, all of them.
- Steps 5, 8 and 9 are skipped. Order cards, fireworks tokens and start player tokens are not needed, and you never start with gold.
Most missions also have individual setup changes. Especially in the early missions, some game elements are not available, for example certain industries or the Old World and New World islands. These restrictions may keep you from pursuing some strategies. In Mission 1, for example, sails are not available, so no ships can be built. And without ships you cannot trade.
IMPORTANT: In every mission of the solo campaign, none of the Farmer/Worker cards you draw during setup may have the effect "You receive 1 Engineer." If one does, set that card aside and draw a new card in its place, repeating as needed. Then shuffle the set-aside cards back into the deck.
Time Stack and Difficulty
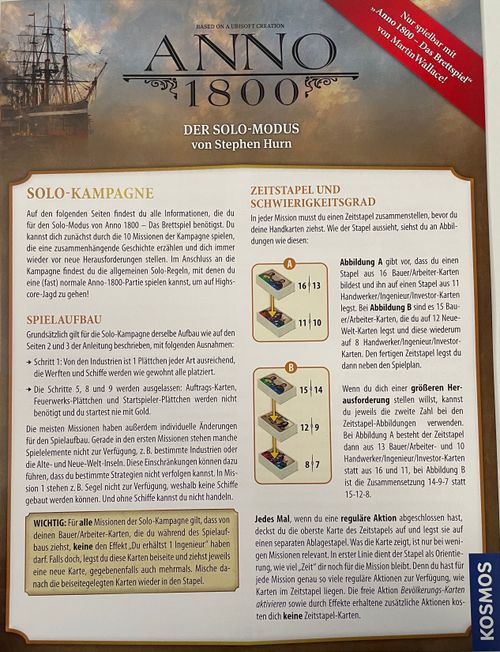
In every mission you must assemble a time stack before you draw your hand cards. Examples of what the stack looks like are shown in pictures such as these:
- Figure A calls for a stack of 16 Farmer/Worker cards placed on a stack of 11 Artisan/Engineer/Investor cards.
- Figure B calls for 15 Farmer/Worker cards placed on 12 New World cards, which are in turn placed on 8 Artisan/Engineer/Investor cards.
Place the finished time stack next to the board.
If you want a greater challenge, use the second number shown in each time-stack picture. In Figure A the time stack then consists of 13 Farmer/Worker and 10 Artisan/Engineer/Investor cards instead of 16 and 11. In Figure B the composition is 14-9-7 instead of 15-12-8.
Each time you complete a regular action, turn over the top card of the time stack and place it on a separate discard pile. What the card shows is relevant only in a few missions. Primarily the stack is a guide to how much "time" you have left in the mission. You have exactly as many regular actions in a mission as there are cards in the time stack. The free action "Activate population cards" and additional actions gained through effects do not cost you any time-stack cards.
Victory and Defeat
Each mission has individual goals, listed at the end of its page. A mission can end in one of two ways:
- Victory: All goals are fulfilled at the same time. Their order is still up to you.
- Defeat: You place the last card of the time stack, but at least one goal is still not fulfilled.
Special Rules
Each mission lists special rules that apply only to that mission. These rules always take precedence over the card rules and the rulebook. They may be restrictions on the game material, changed effects, or changes to trade.
Restrictions on the game material are shown in each mission by a picture that highlights everything that is available. For example, the picture might show that you have access only to Farmers, Workers, Farmer/Worker cards and some Worker industries (blue).
Trade
Trade becomes possible only from Mission 3, because before then you have no marine tiles. When you can trade, it works just as in the base game. You must have enough trade tiles available, and you may trade the same resource only once per turn. In principle every resource, including Farmer resources (green), can be traded. Depending on the mission, however, restrictions may apply:
- Trade ban: Resources listed after this keyword can under no circumstances be traded. You will have to do without them or produce them yourself. As a reminder, place an investor from the supply on the corresponding industries on the board.
- Trade limit: After this keyword, the number of different resources you may trade in the game can be given for individual resource categories (blue, red, purple). You do not need to decide which resources these are at the start. Instead: whenever you trade a resource from a limited category for the first time, you mark it on the board with a matching population cube from the supply. You may trade a marked resource as often as you like for the rest of the game, but you may mark no more different resources in a category than the limit allows.
Example of a trade limit: Suppose the trade limit reads "3 Worker resources (blue)." In this mission you may trade up to 3 different blue resources. Earlier in the game you traded sausage and soap and marked both with a population cube.
Example 1: Next you want to play a card that needs canned meat and work clothes. You may mark only 1 more Worker resource for trade, so you will have to produce one of the two resources yourself.
Example 2: You want to play a card that needs soap and canned meat. Because you have already traded soap and marked it, you may trade this resource again in any turn.
The resources of the pre-printed green and red industries on your home island can be traded at any time, even if you have already built over them. The trade limits of the mission never apply to the pre-printed Artisan resources (red), so you may trade as many of them as you like in addition to the limit.
And so, enjoy the solo campaign of Anno 1800 – The Board Game! If you cannot get past a mission, you will find tips for all missions on page 13.
Missions
Mission 1 – The Founding of Ditchwater
Time stack: top layer 15 / 12, bottom layer 10 / 10 (standard / harder).
Changes to setup:
- Return all 11 Farmer/Worker cards whose costs include exploration tiles, cotton fabric or goods to the box.
- Remove the 2 Artisans from your home island. Do not draw their cards either; draw only the cards for your Farmers and Workers.
- Remove all marine tiles from your home island. Ships are not available to you.
Special rules:
- Only the highlighted elements of the board are available to you. Everything else you cannot build, receive or trade.
- Ignore the effects of population cards. You cannot activate them.
Goal:
- Have no population cards left in your hand.
Mission 2 – Explosive Progress
Time stack: top layer 18 / 14, bottom layer 10 / 10 (standard / harder).
Changes to setup:
- Return all 8 Farmer/Worker cards whose costs include exploration tiles or cotton fabric to the box.
- Do not draw cards for your 2 Artisans.
- Remove all marine tiles from your home island. Ships are not available to you.
Special rules:
- Only the highlighted elements of the board are available to you. Everything else you cannot build, receive or trade.
- Do not draw cards for additional Artisans or Engineers.
- The effect "Receive 1 Engineer" becomes "Receive one additional action."
- The effect "Receive 3 trade tiles" becomes "Receive 4 gold."
Goals:
- Have at least 3 Engineers.
- Build the dynamite factory.
- Fulfil at least 10 population cards.
Mission 3 – With Letter and Seal
Time stack: top layer 20 / 20, bottom layer 10 / 7 (standard / harder).
Changes to setup:
- Remove the Old World island with the bonus "Receive 2 expedition cards."
Special rules:
- Only the highlighted elements of the board are available to you. Everything else you cannot build or receive.
- You may trade missing resources.
Goals:
- Receive at least 50 influence points from population cards.
- Build at least one trade ship and one exploration ship, each of strength 2.
Mission 4 – The New World
Time stack: top layer 20 / 15, bottom layer 12 / 9 (standard / harder).
Changes to setup:
- Remove the Old World island with the bonus "Receive 2 expedition cards."
Special rules:
- Only the highlighted elements of the board are available to you. Everything else you cannot build or receive.
- You may trade missing resources.
- Trade ban: Coal, bricks, goods, steel beams, sails, cotton fabric, cannons.
Goal:
- Fulfil at least 7 New World cards.
Mission 5 – Wealthy Friends
Time stack: top layer 20 / 20, middle layer 10 / 10, bottom layer 12 / 8 (standard / harder).
Changes to setup:
- None.
Special rules:
- You may not have investors in your city unless you own at least 4 expedition cards or 1 expedition card with an investor space.
- Trade ban: Cotton fabric, windows, fur coats.
Trade limit: 4 Worker resources (blue), 4 Artisan resources (red), 3 Engineer resources (purple).
Goals:
- Gain at least 1 investor through the action "Increase workforce."
- Have no population cards left in your hand.
Mission 6 – A Worthwhile Investment
Time stack: top layer 20 / 20, middle layer 10 / 10, bottom layer 10 / 5 (standard / harder).
Changes to setup:
- Remove the Old World island with the bonus "Receive 2 expedition cards."
- You start with an additional investor (and therefore also draw one additional Artisan/Engineer/Investor card).
Special rules:
- When you turn over a card from the time stack, look at the first resource on the far left of its costs. If you own an industry that could produce this resource, you receive 1 gold. If not, or if the costs show exploration tiles, you receive no gold.
- The effect "Receive 4 gold" on Farmer/Worker cards yields only 2 gold.
- Trade ban: Worker cotton fabric (blue).
Trade limit: 4 Worker resources (blue), 4 Artisan resources (red), 3 Engineer resources (purple).
Goals:
- Have at least 25 gold.
- Explore at least 1 New World island.
- Fulfil all New World and Artisan/Engineer/Investor cards in your hand.
Mission 7 – The Pyrphorians
Time stack: top layer 20 / 20, middle layer 10 / 10, bottom layer 15 / 8 (standard / harder).
Changes to setup:
- Remove the Old World island with the bonus "Receive 2 expedition cards."
- You start with an additional exploration ship of strength 2.
Special rules:
- You may explore at most 1 Old World island.
- Whenever you turn over a card from the time stack whose costs show exploration tiles, you must immediately exhaust that number of tiles. If that is not possible, you exhaust no tiles, but the Pyrphorians burn down one of your building tiles, provided you have built at least one. They always choose the tile farthest to the left on your islands, checking first the bottom row of land spaces, then the middle row, and finally the top row. They ignore pre-printed building tiles. Return the tile to the board. If population cubes were on the work spaces, place them in your exhausted area.
- Trade limit: 3 Worker resources (blue), 3 Artisan and/or Engineer resources (that is, 3 in total, which you may split between red and purple).
Goals:
- Have at least 12 exploration tiles (including unused tiles on population cards you have played).
- Fulfil at least 5 Artisan/Engineer/Investor cards.
- Build the dynamite factory and the cannon factory.
Mission 8 – The Search for the Nest
Time stack: top layer 20 / 20, middle layer 10 / 5, bottom layer 10 / 7 (standard / harder).
Changes to setup:
- None.
Trade limit: 4 Worker resources (blue), 4 Artisan and/or Engineer resources (that is, 4 in total, which you may split between red and purple).
Goals:
- Gain at least 30 influence points from occupied expedition cards.
- Gain at least 40 influence points from population cards.
Mission 9 – The End Justifies the Means
Time stack: top layer 20 / 20, middle layer 10 / 10, bottom layer 15 / 8 (standard / harder).
Changes to setup:
- Place the order card "The Editor."
- You start with an additional exploration ship of strength 2.
Special rules:
- The card effect "Receive 2 expedition cards" becomes "Discard up to 2 hand cards of your choice."
- The Old World island bonus "Receive 2 expedition cards" becomes "Discard up to 1 hand card of your choice."
- Using the effect of the order card "The Editor" counts as an action!
- Trade ban: Worker cotton fabric (blue).
Trade limit: 4 Worker resources (blue), 3 Artisan resources (red), 2 Engineer resources (purple).
Goals:
- Have at least 20 population cubes, including at least 5 Artisans, 3 Engineers and 2 Investors.
- Gain at most 60 influence points. You lose as soon as you have gained more than 60 influence points!
- Have no population cards left in your hand.
Mission 10 – A New Beginning
Time stack: top layer 20 / 15, middle layer 10 / 5, bottom layer 5 / 5 (standard / harder).
Changes to setup:
- None.
Special rules:
- At any time, as a free action, you may exhaust 6 trade tiles to receive one additional Expand action. You may use it only to build industries and shipyards, not ships.
- You may carry out the action "Explore the Old World" a 5th and a 6th time. To do so, you must exhaust 5 or 6 exploration tiles respectively.
- As soon as the time stack is used up for the first time, turn it over and use it a second time. In total, the time stack therefore gives you 70 or 50 actions.
- Whenever you turn over a card from the time stack, look at its costs. If the costs include resources of which you could produce at least 2, you receive 1 gold. If the costs include a trade tile, you may count it as one of the two resources, provided you exhaust 1 trade tile. If you are already on your second pass through the time stack, in both cases you must exhaust 1 additional trade tile to receive the gold.
- Trade ban: All trade is forbidden.
Goals:
- Have no population cards left in your hand.
- Have at least 10 trade tiles and 6 exploration tiles (including unused tiles on played population cards).
- Gain at least 10 influence points from occupied expedition cards.
- Have every industry from the board at least once, except wood. Pre-printed industries count toward this. In total that is 33 industries, since only one cotton weaving mill needs to be built.
Mission Tips
Mission 1
- Do not give up the charcoal kiln.
- Plan your turns carefully.
- Try not to build all the necessary industries first and only then play your population cards. You will have to take care of both in parallel.
- Level up your Farmers.
- Remember that as an action you may exchange up to 3 population cards.
Mission 2
- Try to get the maximum out of the population card effects.
- Remember that you can spend gold to remove population cubes from required work spaces at the end of a turn.
- Remember that you do not have to use the effects of fulfilled population cards right away.
Mission 3
- Do not build everything yourself. Make wide use of the trade options.
Mission 4
- Your goal is the New World cards, so do not spend time on other elements unnecessarily.
- A 2-slot shipyard and a strong focus on trade are the keys to success.
- You can trade neither cannons nor sails, so using your Artisans efficiently for shipbuilding is extremely important.
Mission 5
- You need windows and fur coats for an investor, and you will have to produce them yourself.
- New World population cards often bring you additional expedition cards.
Mission 6
- You should largely do without additional Artisans, Engineers and Investors.
- Building quick Worker industries (blue) will bring you a good amount of gold.
Mission 7
- This mission is very hard. You will urgently need every building space and must plan as efficiently as possible.
- The less important an industry is in the long run, the further forward you should build it on the numbered spaces.
Mission 8
- A large population is the key to victory.
- Remember that you do not have to use the effects of fulfilled population cards right away.
Mission 9
- Make generous use of the Editor's effect to get rid of your elaborate cards.
- Cards whose effect makes you discard other cards are, of course, even more efficient.
- Advancing population cubes is especially valuable here.
Mission 10
- Building quick Worker industries (blue) will bring you a good amount of gold.
- In the later game, trade tiles are also a good source of income.
- The free Expand action helps enormously.
- Balance building industries with playing population cards, so that you neither spend too many actions on city festivals nor receive gold only rarely.
- Use your gold!
The Normal Solo Game
The following pages contain all rules and rule changes for the normal solo game. It largely corresponds to a multiplayer game, so you can use it to chase a high score or to test new strategies at leisure. It can be worthwhile to delay the end of the game so that you can play cards up to the last turn. Because the scoring has changed, you can also try to end the game as quickly as possible and thereby collect many influence points.
Setup
The setup for the normal solo game is the same as described for the base game on pages 2 and 3 of the base rulebook, except that you skip steps 8 and 9. In contrast to the solo campaign, the normal solo game requires all industry tiles. The time stack consists of 20 Farmer/Worker, 10 New World and 20 Artisan/Engineer/Investor cards.
Trading
Trading works just as in the base game, so you must have enough trade tiles available, and you may trade the same resource only once per turn. Special rules apply to availability:
- You may trade only resources whose industries could already be built. That means the costs of these industries must be covered by your already-built industries and/or the trade display.
- If you want to trade a resource whose industry would require a population cube to build, you must have a corresponding population cube. It does not matter whether it is still in its residential district, on a work space, or in the exhausted area.
- You may trade at most 1 resource per action whose industry is not yet in the trade display.
- The resources of the pre-printed green and red industries on your home island can be traded at any time, even if you have already built over them. For these you always need to exhaust only the regular number of trade tiles (1 or 2), even the first time you trade them. For the red industries this hardly pays, since their blue alternatives are more efficient.
- If you want to trade a resource for the first time, you must carry out the following steps:
- Exhaust 1 additional trade tile.
- Place the corresponding industry tile in your own trade display above the board, built side up.
The trade display lets you keep track of which resources you have already traded. Each further trade of those resources requires only the regular number of trade tiles shown on the residential districts.
Example: You want to trade beer for the first time and therefore exhaust 2 trade tiles (1 because you trade it for the first time, and 1 because it is a Worker resource). Then you place a brewery in the trade display.
Example: You want to build the clockmaker's workshop, but neither glass nor brass is in your islands or in the trade display. You may not trade both new resources within one action. So you must first build one of the industries, or trade one of the resources some other way, and place it in the trade display.
Example: You want to trade cannons, but neither your islands nor the trade display has the dynamite that is required. Since no dynamite "exists" at the moment, no cannons can be traded (or any other resources that require dynamite).
It can never be the case that more industries requiring a New World resource lie in the trade display than you yourself have built of that kind. See the example below.
Example: Suppose you have already built the rum distillery and the cotton weaving mill. That gives you two industries that required New World resources (sugar cane and cotton, respectively). In the trade display at most two industries may then lie whose construction likewise requires New World resources (for example the cigar manufactory and the penny-farthing workshop).
In short, the trade costs are 1 higher for each first trade, only 1 new resource can be traded per action, and your islands together with the trade display must be able to produce the industry of the new resource. You must also, at all times, own at least as many industries that require New World resources as already lie in the trade display.
Gold
When you turn over a card from the time stack, look at its costs. If the costs contain resources and you could produce at least 2 of these resources, you receive 1 gold. If you could produce all 3 resources of a card, you receive 2 gold. If the costs contain a trade tile, you may count it as one of the 2 or 3 resources, provided you exhaust 1 trade tile.
Example: If the card you turn over costs canned meat, sewing machines and a trade tile, you receive 1 gold if:
- you have built the canning factory and the sewing machine factory, or
- you have built one of the two industries and exhaust 1 trade tile.
You receive 2 gold instead if you have built both factories and exhaust 1 trade tile.
Order Cards
The following order cards work somewhat differently in the normal solo game than in a multiplayer game; all others remain unchanged.
- Universität (University) – If you have 4 or more Engineers at game end, you receive 8 influence points.
- Weltausstellung (World Exhibition) – If you have 3 or more Investors at game end, you receive 8 influence points.
- Madame Kahina – If you have 12 or more trade tiles at game end, you receive 8 influence points.
- Die Besucherin (The Visitor) – If you have 6 or more expedition cards at game end, you receive 8 influence points.
- Hannah Goode – If you have 20 or more population cubes at game end, you receive 8 influence points.
Note: the Pyrphorier entry is printed on the same page as the order cards and is transcribed in that position.
- Pyrphorier – You start with an additional exploration ship of strength 2. Whenever you turn over a card from the time stack whose costs show exploration tiles, you must immediately exhaust that number of tiles. If that is not possible, you exhaust no tiles, but the Pyrphorians burn down one of your building tiles, provided you have built at least one. They always choose the tile farthest to the left on your islands, checking first the bottom row of land spaces, then the middle row, and finally the top row. They ignore pre-printed building tiles. Return the tile to the board. If population cubes were on the work spaces, place them in your exhausted area.
End of Game and Scoring
The game ends immediately when one of the following conditions occurs:
- You place the last card of the time stack.
- You have no population cards left in your hand after you have placed a card from the time stack.
Scoring follows the base game (rulebook, p. 11), with one difference: you receive the fireworks tile only if the game ends and at least one card is still in the time stack.
You receive additional influence points for every card still on the time stack, depending on how many cards in total are still on the time stack:
| Cards in time stack | Influence points |
|---|---|
| 1 to 5 | 1 per card |
| 6 to 10 | 2 per card |
| 11 to 15 | 3 per card |
| 16 to 20 | 4 per card |
| 21 and more | 5 per card |
Example: If 3 cards are still in the time stack at game end, you receive a total of 3 influence points for them. If 13 cards are there instead, you receive 39 influence points (13 x 3).
You can of course always measure yourself against your previous best, but here is a small guide to your result:
| Influence points | Rating |
|---|---|
| 49 or fewer | Dismal settlement |
| 50 to 79 | Ordinary hamlet |
| 80 to 99 | Curious village |
| 100 to 129 | Charming town |
| 130 to 159 | Enchanting city |
| 160 to 199 | Magnificent metropolis |
| 200 and more | Extravagant world city |
Goal: Build a magnificent empire by collecting as many influence points as possible!