Zombie 15': Bonus Campaign
Zombie 15': Bonus Campaign Rulebook
Table of Contents
Table of Contents
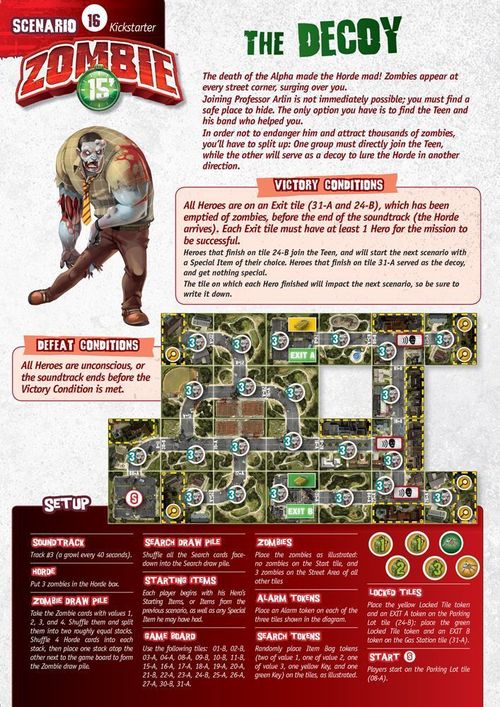
Scenario 16: The Decoy
The death of the Alpha made the Horde mad! Zombies appear at every street corner, surging over you. Joining Professor Arlin is not immediately possible; you must find a safe place to hide. The only option you have is to find the Teen and his band who helped you. In order not to endanger him and attract thousands of zombies, you'll have to split up: One group must directly join the Teen, while the other will serve as a decoy to lure the Horde in another direction.
Victory Conditions
All Heroes are on an Exit tile (31-A and 24-B), which has been emptied of zombies, before the end of the soundtrack (the Horde arrives). Each Exit tile must have at least 1 Hero for the mission to be successful.
Heroes that finish on tile 24-B join the Teen, and will start the next scenario with a Special Item of their choice. Heroes that finish on tile 31-A served as the decoy, and get nothing special.
The tile on which each Hero finished will impact the next scenario, so be sure to write it down.
Defeat Conditions
All Heroes are unconscious, or the soundtrack ends before the Victory Condition is met.
Setup
Soundtrack: Track #3 (a growl every 40 seconds).
Horde: Put 3 zombies in the Horde box.
Zombie Draw Pile: Take the Zombie cards with values 1, 2, 3, and 4. Shuffle them and split them into two roughly equal stacks. Shuffle 4 Horde cards into each stack, then place one stack atop the other next to the game board to form the Zombie draw pile.
Search Draw Pile: Shuffle all the Search cards facedown into the Search draw pile.
Starting Items: Each player begins with his Hero's Starting Items, or Items from the previous scenario, as well as any Special Item he may have had.
Game Board: Use the following tiles: 01-B, 02-B, 03-A, 04-A, 08-A, 09-B, 10-B, 11-B, 15-A, 16-A, 17-A, 18-A, 19-A, 20-A, 21-B, 22-A, 23-A, 24-B, 25-A, 26-A, 27-A, 30-B, 31-A.
Zombies: Place the zombies as illustrated: no zombies on the Start tile, and 3 zombies on the Street Area of all other tiles.
Alarm Tokens: Place an Alarm token on each of the three tiles shown in the diagram.
Search Tokens: Randomly place Item Bag tokens (two of value 1, one of value 2, one of value 3, one yellow Key, and one green Key) on the tiles, as illustrated.
Locked Tiles: Place the yellow Locked Tile token and an EXIT A token on the Parking Lot tile (24-B); place the green Locked Tile token and an EXIT B token on the Gas Station tile (31-A).
Start: Players start on the Parking Lot tile (08-A).
Scenario 17: The Return of the Teen
After several minutes of frenetic running, the decoy team turns to see that they doubly fulfilled their mission: The Horde followed them, and it's far behind… for now, anyway. You'll have to find the others. The other team reached the refuge. Everything has been devastated by the Horde. Only the Teen survived. He sits in the rubble, injured and haggard, radio in hand. "Just before the attack, we received a call from a group that managed to get themselves organized. They have food and weapons. More importantly, they have a helicopter, and they're coming to pick me up. We're supposed to rendezvous a few blocks from here in an hour. Come on, we've gotta get outta here." His injuries prevent him from defending himself; you must escort him.
Special Rules
Moving the Teen: The Teen moves at the beginning of the first player's turn. He follows the arrows on the diagram. He moves one tile each turn. Neither zombies nor Locked Tiles stop his progress. He stops when he reaches the Exit tile.
Arrival of the Zombies: This scenario does not use the usual rules for arrival of zombies:
- When you hear a growl, draw two cards from the Zombie draw pile.
- For each card, put the indicated number of zombies on the first Street Area without any zombies in it, starting from the letter indicated on the card (A, B, C, or D) on the road to the Active Hero.
- If all the tiles on the road to the Active Hero are already occupied, the new zombies are put on the Street Area of the Active Hero's tile, even if there already are zombies there.
- Horde Card: When a Horde is drawn, use the normal rule.
Victory Condition
All Heroes and the Teen are on the Parking Lot Exit tile (32-A) before the end of the soundtrack (the Horde arrives).
Defeat Conditions
All Heroes are unconscious, or the soundtrack ends before the Victory Condition is met. If the Teen is ever alone, or with only unconscious Heroes on a tile that contains zombies, he dies and you fail this scenario.
Setup
Soundtrack: Track #3 (a growl every 40 seconds).
Horde: Put 3 zombies in the Horde box.
Zombie Draw Pile: Take the Zombie cards with values 1, 2, 3, and 4. Shuffle them and split them into two roughly equal stacks. Shuffle 4 Horde cards into each stack, then place one stack atop the other next to the game board to form the Zombie draw pile.
Search Draw Pile: Shuffle all the Search cards facedown into the Search draw pile.
Starting Items: Each player begins with his Hero's Starting Items, or Items from the previous scenario, as well as any Special Item he may have had. Each Hero who finished the previous scenario on EXIT A can take a Special Item of his choice for free.
Game Board: Use the following tiles: 01-B, 02-B, 03-B, 04-B, 05-B, 06-B, 08-A, 10-B, 11-B, 12-B, 13-B, 14-B, 15-B, 16-A, 17-A, 18-B, 19-B, 20-B, 21-B, 22-B, 23-B, 24-A, 25-A, 26-B, 29-B, 30-B, 32-A.
Zombie Entry Points: Place the tiles with the letters A, B, C, and D in front of each zombie entry point, as shown in the diagram.
Zombies: Place the zombies as shown in the diagram.
Alarm Tokens: Place an Alarm token on each of the two tiles shown in the diagram.
Search Tokens: Randomly place Item Bag tokens (two of value 1, one of value 2, one of value 3, and one red Key) on the tiles, as illustrated.
Locked Tile: Place a red Locked Tile token on the indicated tile.
Start: Players start on different tiles, depending on their Exit tile in the previous scenario: Those who finished the previous scenario on EXIT A start on the Diner (01-B); those who finished the previous scenario on EXIT B start on the Parking Lot (08-A).
The Teen: Pick the figure of an unused Hero to represent the Teen, and place it on the Start tile.
Scenario 18: We Need BIG Guns
You're almost at the rendezvous point, but the Teen was severely injured. Exhausted, he stops at a house, unable to go any further. You must wait here for the helicopter… but the Horde will not wait. You need to prepare for a siege. Fortunately, you are in an area where the military started to intervene at the beginning of the epidemic… before they turned into zombies, too. They left heavy weapons nearby; nobody's going to mind if you take a few. Stock up, and prepare yourself for the worst.
Special Rules
Machine Gun:
- Machine Guns and Machine Gun Ammo are Heavy Objects (see page 7 of the Survival Guide).
- When a player takes a Machine Gun token or a Machine Gun Ammo token, give him the corresponding card, which he then places on his Hero sheet, on the Heavy Object slot. He places the token on the card. If he puts down the Heavy Object, he discards the card, and places the token on the tile where he is standing.
- Machine Guns and their Ammo cannot be used in this scenario; they can only be moved.
Search Tokens: For this scenario, the Search tokens are not in the Search Areas, but can be acquired in the normal fashion if there are no zombies on the tile.
Victory Condition
All Heroes are on the finish tile (26-B) with at least one Machine Gun and a box of Machine Gun Ammo before the end of the soundtrack (the Horde arrives). (Note: The Start tile and Exit tile are the same).
We recommend that you take as many Machine Guns and as much Machine Gun Ammo to the Exit tile as you can before the time runs out. Write down how many of each you amass for the following scenario.
Defeat Conditions
All Heroes are unconscious, or the soundtrack ends before the Victory Condition is met.
Setup
Soundtrack: Track #3 (a growl every 40 seconds).
Horde: Put 3 zombies in the Horde box.
Zombie Draw Pile: Take the Zombie cards with values 1, 2, 3, and 4. Shuffle them and split them into two roughly equal stacks. Shuffle 4 Horde cards into each stack, then place one stack atop the other next to the game board to form the Zombie draw pile.
Search Draw Pile: Shuffle all the Search cards facedown into the Search draw pile.
Starting Items: Each player begins with his Hero's Starting Items, or Items from the previous scenario, as well as any Special Item he may have had.
Game Board: Use the following tiles: 01-A, 02-A, 03-A, 04-A, 05-A, 07-A, 08-A, 11-B, 12-B, 13-B, 14-B, 15-A, 16-A, 17-A, 18-A, 19-B, 20-B, 24-B, 26-B, 27-B, 28-B, 32-B.
Machine Guns and Ammo: Place a Machine Gun or an Ammo token on each Street Area of tiles shown in the diagram. Place the five corresponding cards nearby.
Zombies: Place the zombies as illustrated: no zombies on the Start tile, 3 zombies on the Street Area of tiles with no Search Area, 6 zombies on the Street Area of tiles that start with a Machine Gun or Ammo, and 4 zombies on the Street Area of all other tiles.
Search Tokens: Randomly place Item Bag tokens (one of value 1, three of value 2, and one of value 3) on the tiles, as illustrated.
Start: Players start on the Street of 26-B tile.
Note: The setup will be the same for the next scenario.
Scenario 19: The Siege
Just another quarter hour before the helicopter arrives… but you can hear the Horde approaching. Well, the Horde is going to have to face your heavy machine guns, which are all dressed up and ready to dance….
Victory Conditions
At the end of the soundtrack (arrival of the helicopter):
- All heroes are on the Exit tile (26-B). (Note: The Start tile and Exit tile are the same).
- There are no zombies on the Start tile (26-B) and tiles 01-A, 02-A, 03-A, 04-A, 05-A, 15-A, 16-A, 17-A, 18-A, and 32-B (the tiles near the Start tile without a Search Area).
Defeat Conditions
All Heroes are unconscious, or the soundtrack ends before the Victory Condition is met.
Special Rules
Arrival of the Zombies: This scenario does not use the usual rules for arrival of zombies:
- When you hear a growl, draw two cards from the Zombie draw pile.
- For each card, put the indicated number of zombies on the first Street Area without any zombies in it, starting from the letter indicated on the card (A, B, C, or D) on the road to the Active Hero.
- If all the tiles on the road to the Active Hero are already occupied, the new zombies are put on the Street Area of the Active Hero's tile, even if there already are zombies there.
- Horde Card: When a Horde is drawn, use the normal rule.
Machine Gun and Ammo:
- Machine Guns and Machine Gun Ammo are Heavy Objects.
- When a player takes a Machine Gun token or a Machine Gun Ammo token, give him the corresponding card, which he then places on his Hero sheet, on the Heavy Object slot. He places the token on the card. If he puts down the Heavy Object, he discards the card and places the token on the tile where he is standing.
- By spending 1 Action, a Hero carrying a machine gun can use it to shoot zombies. A Machine Gun can eliminate distant zombies located in the Street Area of any tile in a straight line from the machine gunner. Walls and corners block line of sight.
- By spending 1 Action, a player carrying Machine Gun Ammo can completely reload a Machine Gun carried by another player in the same Area. Then remove the Ammo from the game. You cannot reload a Machine Gun that is on the ground.
Search Tokens: For this scenario, the Search tokens are not in the Search Areas, but can be acquired in the normal fashion if there are no zombies on the tile.
Setup
Soundtrack: Track #2 (a growl every 60 seconds).
Horde: Put 3 zombies in the Horde box.
Zombie Draw Pile: Take the Zombie cards with values 1, 2, 3, and 4. Shuffle them and split them into two roughly equal stacks. Shuffle 4 Horde cards into each stack, then place one stack atop the other next to the game board to form the Zombie draw pile.
Search Draw Pile: Shuffle all the Search cards facedown into the Search draw pile.
Starting Items: Each player begins with his Hero's Starting Items, or Items from the previous scenario, as well as any Special Item he may have had.
Game Board: Use the following tiles: 01-A, 02-A, 03-A, 04-A, 05-A, 07-A, 08-A, 11-B, 12-B, 13-B, 14-B, 15-A, 16-A, 17-A, 18-A, 19-B, 20-B, 24-B, 26-B, 27-B, 28-B, 32-B. Note: These tiles are the same as for the previous scenario.
Zombie Entry Points: Place the tiles with the letters A, B, C, and D in front of each zombie entry point, as shown in the diagram.
Zombies: Place the zombies as illustrated: no zombies on the Start tile, and 3 zombies on the Street Area of all other tiles.
Machine Gun and Ammo: Place as many Machine Gun and Machine Gun Ammo tokens on the starting tile as you gathered in the previous scenario.
Search Tokens: Randomly place Item Bag tokens (one of value 1, two of value 2, and two of value 3) on the tiles, as illustrated.
Start: Players start on the Street of 26-B tile.
Scenario 20: Rescue
The onslaught of zombies rages on, and just as you start to run out of ammo, you hear the helicopter approaching! Unfortunately, the Teen will not be joining you: He succumbed to his injuries during the battle. His radio is also on its last leg, but you manage to make out the following from the helicopter pilot: "Impossible to land… too many zombies…". Then the radio gives up the ghost. You must find radios to give new rendezvous points to the pilot. The mass of zombies prevents touching down for too long. He'll only be able to load one person at a time… good luck to the rest!
Special Rules
The Radios and the Helicopter:
- The helicopter will only land if it is called. A Hero present in an area with a Radio token may spend 1 Action to turn it over. Place the helicopter on the Exit corresponding to the letter revealed (A, B, C, or D), then remove the Radio token from the game.
- It is impossible to use a new Radio before the helicopter has taken off.
- As soon as a Hero reaches the tile with the helicopter, he is automatically saved, without spending an Action. Then remove the helicopter from the board. The helicopter must be called again with another radio in order to land and save another player.
- A Hero carrying an unconscious Hero must choose whether to save himself or the unconscious Hero, but there's not time for both. Whichever Hero is left behind on the tile remains in the same state.
Victory Condition
At least 3 Heroes are saved by the helicopter before the end of the soundtrack (the helicopter departs).
Superhero Difficulty: Every hero must be saved.
Defeat Conditions
All the Heroes who have not been rescued by the helicopter are unconscious, or the soundtrack ends before the Victory Condition is met.
Setup
Soundtrack: Track #3 (a growl every 40 seconds).
Horde: Put 3 zombies in the Horde box.
Zombie Draw Pile: Take the Zombie cards with values 1, 2, 3, and 4. Shuffle them and split them into two roughly equal stacks. Shuffle 4 Horde cards into each stack, then place one stack atop the other next to the game board to form the Zombie draw pile.
Search Draw Pile: Shuffle all the Search cards facedown into the Search draw pile.
Starting Items: Each player begins with his Hero's Starting Items, or Items from the previous scenario, as well as any Special Item he may have had.
Game Board: Use the following tiles: 01-B, 02-A, 03-A, 04-A, 05-A, 07-A, 08-A, 10-A, 13-B, 15-A, 16-A, 17-A, 18-B, 19-B, 20-B, 21-A, 22-B, 23-A, 24-A, 25-A, 26-B, 27-B, 28-B, 29-B, 30-A, 31-A, 32-B.
Zombies: Place the zombies as illustrated: no zombies on the Start tile and the four Exit tiles, and 3 zombies on the Street Area of all other tiles.
Alarm Tokens: Place an Alarm token on each of the four tiles shown in the diagram.
Radio Tokens: Place a random Radio token facedown (with the letter hidden) on the Search Area of the four tiles shown in the diagram.
Helicopter Touchdown Points: Place the tiles EXIT A, B, C, and D on the four tiles shown in the diagram.
Helicopter: Place the Helicopter token next to the board.
Start: Players start on the Gas Station (31-A).