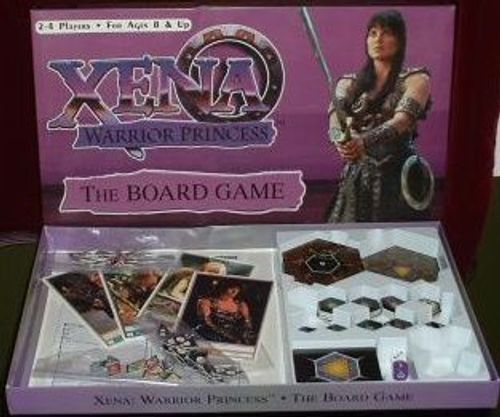
Xena Warrior Princess: The Board Game
Xena Warrior Princess: The Board Game Rulebook
Table of Contents
Table of Contents
A – Introduction
Welcome to the fantasy world of the Component Game System (CGS). A CGS is an innovative, freely expandable game system made up of various components that interact with each other in fascinating ways and guarantee varied and exciting play.
In this series, Hercules: The Legendary Journeys and Xena: The Warrior Princess have been released so far. Both games have the same rules but different components. They can be combined with each other to bring larger games with more variety and fun. Expansion sets are in preparation for both games.
Science-fiction CGS board games are also in preparation, all of which can be combined through the same game system: Babylon 5, Battlestar Galactica, Star Trek: Next Generation and Star Trek: Deep Space Nine.
A1 Notes for the Newcomer
A1.1 Structure of the Rules
A1.11 Numbering of the rules: The rules are divided into chapters (letters) and topics (numbers). Example: A1 is the first topic of chapter A (Introduction). The rules of a topic are further divided into paragraphs and sections, whose numbers are separated by a decimal point.
A1.12 Explanatory text: Explanatory texts, background information and all other texts that do not directly deal with rules are set in italics. Notes and examples are set in italics and additionally in [square brackets].
Behind some rules stands the note (Advanced). These rule supplements you can ignore in your first games. Add these rules when you want to go deeper into the game.
A1.2 Preparing the Game Materials
Please carefully punch out the pre-cut game pieces from the frames.
A2 Game Sections
A2.1 Game: A game consists of several rounds. It ends as soon as a player has fulfilled the victory conditions.
A2.2 Round: In a round, all players of the series take their turns. From the point of view of a player, a round lasts from the beginning of his turn until the beginning of his next turn.
A2.3 Turn: A turn consists of the following four phases: card phase, movement phase, combat phase and creature phase. After that, the next player is on turn (clockwise).
A3 Team Play (Advanced)
The game can be played in teams or every player against every player. In team play, several players in a team together lead one or more main characters, each player leading one or more main characters. The teams may differ greatly in the number of members; what matters is only that each team has the same number of main characters.
B – Game Materials
B1 Game Boards
The playing area is assembled from the hexagonal game boards. Each game board consists of seven hex fields, which are called hexes in the following.
B1.1 Symbols on the Game Board
Legend:
- Encounter indicator (white circle with black number)
- Creature indicator (black circle with white number)
- Card indicator (box with a number)
- Mountain hex
- Forest hex
- Water (blue line)
- City wall (red line)
- Road (green dotted line)
- Cave entrance
- Cave exit
B1.11 Encounter indicator: A white circle with a black number. When a character enters a hex with such a symbol, an encounter may occur (see Activating Indicators, rule D2.32).
B1.12 Creature indicator: A black circle with a white number. When a character enters a hex with such a symbol, a hostile creature may appear there (see Activating Indicators, rule D2.32).
B1.13 Card indicator: On such a field, characters can play equipment cards at reduced cost. The number in the card indicator states by how much the equipment becomes cheaper. The costs cannot, however, be reduced below 0.
B1.14 Water: Water (blue line) forms a barrier between two hexes that cannot be crossed. A melee fight across water is not possible.
B1.15 City wall: The city wall (red line) forms a barrier between two hexes that cannot be crossed. Neither melee nor ranged combat is possible across the city wall.
B1.16 Road: A road is symbolised by a green dotted line between two hexes. Characters may move over ONE such road line per turn without spending a movement. If they move over further road lines in the same turn, they must pay the normal movement costs for them.
B1.17 Mountain hex: It costs characters an additional movement to move into a mountain hex (i.e. two movements are always needed, unless further modifications to carrying apply).
B1.18 Forest hex: Game pieces in a forest hex add one point to their defence value in ranged combat. Meeting opponents in the forest is made more difficult by trees, branches and undergrowth.
B1.19A Cave entrance: Characters can move from a field with a cave entrance to a cave exit on a cave game board. This costs one movement (if no modifications for carrying apply).
If several cave game boards are present, then when a cave is entered for the first time, a cave game board is drawn face down, turned face up and laid out. Each cave entrance is connected to a different cave game board (i.e. each entrance leads into a different cave).
B1.19B Cave exit: Characters may move on the cave game board from a field with a cave exit to the field with the corresponding cave entrance, and must spend one movement for it (plus modifications).
B1.2 Cave Game Boards
B1.21 Movement: Game pieces may not move into or over the edge of the cave game board into black hexes.
B1.22 Combat: The entrance and exit fields of caves are adjacent to each other (this is shown by the connection markers, see B2.2). Ranged combat on a cave is limited to adjacent game pieces if attackers or defenders are in a cave.
B2 Markers
B2.1 Dinars: Dinars are small, triangular markers with values from 1 to 5. In the game they represent money. When dinars are spent (e.g. to play cards), they go to the bank.
In team play, players of a team may lend dinars to each other (but need not do so). If a team member plays a card for which he does not have enough dinars, the other team members must step in.
B2.2 Connections: These are small, triangular markers with printed letters. Connections always come in pairs (2 x A, 2 x B etc.), and they are used to link two hex fields or to mark which hex contains which encounter card.
B2.3 Banners: The small, rhombus-shaped markers bear the name of a main character. A player (or team) should only use the banners of his main characters. If a character of a player that is not the main character can place a banner, the banner of the main character is nevertheless used. The successes of all characters of a player count toward victory.
In team play, every rule that refers to the banner of a player applies to all banners of the team — members of a team use their banners together.
B2.4 Base camp: These hexagonal markers mark the starting field of a character. Each player has only one base camp for all his characters.
In team play, each team has one base camp.
B3 Character Sheets
The character sheets are the large cards with the pictures of the main characters (for Hercules: Iolaus, Autolycus, Salmoneus and Hercules; for Xena: Gabrielle, Callisto, Joxer and Xena). The character sheets show the game values of the character as well as its starting set-up (number of cards the player may take into hand at the beginning, and number of dinars he owns at the beginning of the game). It is advisable to place the money of a character on the corresponding character sheet.
B3.1 Main characters: The characters for which there are character sheets are called main characters. Character sheets cannot be exchanged for character cards; rules that refer to character cards do not apply to character sheets. Rules that apply to characters in general apply to both character sheets and character cards.
B4 Dice
B4.1 Action dice: These dice are either violet (in the Xena board game) or orange (in the Hercules board game). Action dice have a logo on one side; if this logo comes up when the die is rolled, the action is automatically successful.
B4.2 Standard dice: The standard die has numbers from 1 to 6. Cards and rules state the notation "nW6", where n is the number of dice of the standard die. [Example: 3W6 means 3 dice with the standard die.]
B5 Game Pieces
There are game pieces for characters and creatures.
B5.1 Information on the game piece: The game pieces for characters and some of the creatures are printed on both sides. One side is intended for unwounded characters or creatures, the other for wounded ones. Otherwise the same information appears on both sides.
B5.2 Explanation of the Game Pieces
Not all information is necessarily also on every game piece. Information that is missing from a game piece is not needed for it (or the game piece does not have the specific ability or attribute).
B5.21 Defence value: The number in the upper left corner shows how well a character can defend. The defence value determines whether a character is wounded or even defeated in combat.
B5.22 Combat values:
- Ranged combat value (red): the number in the red hexagon at the lower left side of the game piece.
- Melee combat value (yellow): the number in the yellow hexagon at the lower right side of the game piece.
B5.23 Name: The name of the character or creature. On double-sided game pieces, the word "verletzt" (wounded) stands above the name on the wounded side.
B6 Cards
B6.1 Explanation of the Cards
B6.11 Card name: This is the name of the card.
B6.12 Cost / card value: The cost or a value is given on the cards. Cards that the player takes into his hand cause costs only when the card is played; the costs are then paid immediately in dinars to the bank. Encounter cards have a value. The value of an encounter card plays a role especially in chapter D2.35, Encounter indicator.
The higher the cost or card value of a card, the more powerful it is.
B6.13 Card functions: Before all card texts stand symbols that indicate when the card may unfold its game effect. The following symbols are distinguished:
- Periodic: The symbol "-" indicates that this card function may be played once per round during the player's own turn. This counts as an action (see D3, combat phase). The function may not be played during the turn of another player.
- Compelling: The symbol "=" indicates that the function is always active.
- Conditional: The symbol ">" indicates that the function may always be played when the stated conditions are fulfilled. Depending on the card text this can happen at any time, also during the turn of another player. Creatures with this function must, if possible, carry it out each time.
- When played: The symbol "~" indicates that the card takes effect immediately and once only, when it is played.
B6.14 Explanatory text: Texts in [square brackets, in italics] serve only to clarify the functions of this card and are not necessarily on every card.
B6.15 Game values: (Not to be confused with the card value.) Some cards have, at the bottom edge, values for various game values: Defence (white), Command (cyan-blue), Diplomacy (magenta), Magic (green), Ranged combat (red), Melee combat (yellow).
B6.2 Card Categories
B6.21 Encounter: An encounter card represents an obstacle that the character must overcome.
B6.22 Special: Special cards represent chance events or obstacles that the character need not overcome, but which may delay him on his journey.
B6.23 Character-specific: On character-specific cards the name of the character stands in the category field. At the start of the game, the player who leads the character may take one or more character-specific cards into his hand (as stated on the character sheet).
B6.24 Other: "Other" means that the card is not character-specific.
B6.3 Card Types
B6.31 Character: Character cards represent characters that may be used in addition to the main characters and can help them. The player lays such cards face up in front of himself, and the corresponding character game piece is placed on the field on which one of his main characters is.
B6.32 Event: An event that influences the game situation.
B6.33 Equipment: Equipment items that can be used by the character. An equipment card may be played onto one of the player's own characters.
- Use: Equipment cards have functions that are helpful to the respective character.
- Possession: A character may own only one of certain equipment cards (or equipment types). If the player plays a second card of this kind onto a character, the first one is discarded.
B6.34 Ability: Ability cards give the character a special power or ability. An ability card may be played onto one of the player's own characters.
- Use: Ability cards have functions that are helpful to the character.
B6.35 Creature: Creatures are obstacles that the character must overcome.
Figure: Information on a card. The labels are: card name, cost/value, card type, card category, illustration, card text, when the card is discarded, and game values. The example card is "Wegelagerer" (Highwayman), with card category "Begegnung Kreatur" (encounter creature), a cost/value of 5, and game values Defence 4, Command (blank), Diplomacy 4, Magic (blank), Ranged combat 3, Melee combat 5. Its card text reads: "= When this creature defeats a character, its equipment card with the highest cost is handed over to the creature. If several cards come into question, the player chooses. = Discard after the indicator has been overcome."
B6.4 Dice Rolls (Prüfwürfe)
For a test roll, roll the standard die (1W6). If the roll is less than or equal to the respective game value, it is a success; otherwise it is a failure. Sometimes a modifier is added to the game value; for example, a Diplomacy roll at −2 is called a "Diplomacy roll −2". In such a case the corresponding game value is first modified (in our example, 2 points are deducted from the Diplomacy value) before the die is rolled.
C – Game Start
C1 Game Setup
Follow the individual steps.
C1.1 Setup
C1.11 Character sheets: Each player chooses a main character (by prior agreement or in turn order). The players may also agree to play the same main characters, provided that character sheets are available for them (for this you need more than one game of the corresponding series).
In team play, the team chooses all of its main characters at once and then distributes them among the individual team members. Some team members may lead more main characters than others, but all teams must have the same number of main characters.
C1.12 Game pieces: The teams now look for the corresponding game pieces and markers (character game pieces, base camp and banners). The creature cards with the same number (indicator) on the back are placed face down in stacks on the table (red, green, yellow). All other game pieces are set aside for later use.
C1.13 Cards:
- Encounter deck: All cards of the types "Special" and "Encounter" are shuffled together and form the encounter deck.
- Character-specific cards: Each player receives the character-specific cards that concern his main character(s). These bear the name of the character and each has a specific background colour. From these, each player chooses cards for his starting hand (as stated on the character sheet).
- Draw deck: The remaining cards (including the character-specific cards that the players did not choose for their starting hands) are shuffled and form the draw deck.
C1.14 Game boards: All cave game boards are set aside. The Olympus game board ("Olymp") is placed in the middle of the table (see C2.3, Olympus). The remaining game boards are shuffled and laid out face down as shown in the illustration below. That no player may look at the game boards in advance goes without saying.
C2 Game Start
C2.1 Start of the Game
C2.11 Turning over the game boards: Each player (or each team) turns his game board over and lays it out in any orientation. The diagram below shows which game boards are turned over at the start for which number of players:
- 2 players: positions 1 and 4
- 3 players: positions 1, 3 and 5
- 4 players: positions 1, 2, 4 and 5
C2.12 Placing base camps: The players (or teams) place their base camps on any hex of the turned-over game board (except the fields with creature or encounter indicators). A player receives only one base camp, no matter how many characters he leads.
[Note: Place your base camp as close as possible to the next game board. This shortens the journey.]
C2.13 Placing characters: Each player places his characters on the base camp.
C2.14 Dinars: The players lay out their character sheets in front of themselves and place on them as many dinars as stated on the character sheet.
C2.2 Turn Order
Each player rolls the die once; whoever achieves the highest result begins the game with his first turn. Clockwise, the other players then take their turns. Once a player has carried out all phases of his turn (see chapter D), his turn is over.
In team play, each player carries out his own turn. When a player of a team is finished, a player of another team comes up next. If one player from each team has completed his turn, the second player of the first team comes up, and so on. In this way the waiting times for the teams are kept within limits. (The players should then sit in the correct order, i.e. players of the same team should not sit next to each other.)
C2.3 Olympus
C2.31 Entering the central hex: A character may enter the central hex on the Olympus game board — the Olympus itself — only under the following conditions: the sum of all the indicators he has overcome (on which his banner lies) must be at least 8 and greater than that of the other players.
[Note: Lowering the required point total shortens the game; raising it lengthens the game.]
C2.32 Combat: Game pieces outside the Olympus hex cannot attack game pieces inside it, and vice versa.
C2.4 Victory
The player (or team) who first overcomes the encounter indicator in Olympus wins the game.
Game Board Note
[Note: The game board layout is not to scale. It shows only interesting locations and points where conflicts may arise.]
The illustration in the original shows the six numbered game boards arranged around the central Olympus board, with the positions numbered 1 to 6.
D – Turn Sequence
Each turn is carried out in the following order:
- D1 – Card phase
- D2 – Movement phase
- D3 – Combat phase
- D4 – Creature phase
[Tip: For beginners it is advisable to take this chapter in hand for the first turns and to play through the individual phases of a turn exactly step by step, following the instructions.]
D1 Card Phase
This phase is divided into four steps, each carried out once in the order below.
D1.1 Cards with Lasting Effect
D1.11 Duration: The duration of a card's effect begins when it is played. Some cards act for a set number of rounds, turns or phases and are then discarded. Other cards are discarded immediately after they are played (they carry the note "Discard after playing").
[Example: A card with a duration of one round, played in the last round, now moves to the discard pile.]
D1.12 Counting down: For played cards the duration is counted down.
[Example: A card with a duration of three rounds is played. Place a die showing 3 (or a 3-dinar marker) on the card. In the next round the die is turned to 2 (or the 3-dinar marker is exchanged for a 2-dinar marker). Another round later the die is turned to 1 (the dinar marker is treated accordingly). In the next round the card then moves to the discard pile.]
D1.2 Passing On Equipment Cards
A player may pass equipment cards from one of his characters to another of his characters if the characters are in the same hex (see B6.33, Equipment).
In team play, the card may also be passed to the character of another player of the same team, if the characters are in the same hex.
D1.3 Drawing Cards
The player draws one card from the draw deck for each of his character sheets and takes it into his hand. When the draw deck is used up, the discarded cards are shuffled and thus form the new draw deck.
In team play, players may now pass cards from their hands on to other team members.
D1.4 Playing Cards
Now cards may be played from the hand. To play a card, one needs enough dinars to pay its costs. The dinars go immediately to the bank after the card is played. Any number of cards may be played, as long as the money holds out.
D1.41 Reaction cards: Some cards may be played on certain occasions and are not restricted to the card phase. They may also be played during the turns of other players. On the card you will find a corresponding note.
D2 Movement Phase
D2.1 Movement
A movement of a character always leads from one hex to an adjacent one.
D2.11 Speed: All characters have a speed of 2, unless it is changed by cards. A character's speed is the number of movements it can carry out. No game piece is forced to move or to carry out all of its movements.
D2.12 Several game pieces in one hex: A game piece may move into an occupied hex. There is no limit to the number of game pieces in one hex.
D2.2 Revealing Game Boards
D2.21 Exploration: When a character game piece wants to move onto a face-down game board, the board is revealed. The player decides in which direction the board is to be oriented BEFORE he turns it over. The character must still have at least one movement left if it wants to move onto a face-down game board.
D2.22 Movement not possible: If a game board is turned over and a barrier (e.g. a river or a wall) now prevents further movement into the as yet unexplored board, the movement of that game piece for this round is ended.
D2.3 Activating Hexes
D2.31 Entering a hex: A game piece enters a hex when it is pulled into it, or when it is placed into it by a rule or card.
D2.32 Activating indicators: If a game piece enters a hex with a creature or encounter indicator, the indicator is activated. The indicator is NOT activated if an undefeated game piece or an encounter card is already in that hex.
D2.33 Banners: If a player's banner lies on an indicator, the indicator is NOT activated by the entry of a game piece belonging to that same player. It IS, however, activated by the entry of a game piece belonging to another player.
D2.34 Creature indicator: If a game piece enters a hex with a creature indicator, the player draws the creature game piece with that number and places it on the hex. The creature carries out a surprise attack against the character (see D2.4, Surprise attack).
Some game pieces contain rules instead of a creature. Follow the instructions on the game piece (usually another game piece is then drawn). Rule game pieces are only set aside when the corresponding creature is set aside.
Some rule game pieces allow a banner to be placed on the field of the creature indicator. The banner is only removed when another player can place his banner there.
D2.35 Encounter indicator: If a game piece enters a hex with an encounter indicator, the player draws a card from the encounter deck and proceeds as follows, depending on the card type:
- Special: The player follows the instructions on the card. If the card does not remove the character from the hex, the player draws another card.
- Creature: The creature carries out a surprise attack against the character (see D2.4, Surprise attack).
- Other: If the card is an encounter but not a creature, the character must try to defeat the encounter card (see D3.3).
Defeating an encounter card: Each encounter card has a value. If the total value of the encounter cards defeated in a hex is greater than or equal to the indicator, the encounter indicator is overcome, and the player may place his banner on the hex field. If a character has defeated an encounter card and the total has not yet reached the indicator, another encounter card is drawn and laid on the previously defeated one. The player must then try to defeat this new encounter card on his next turn. This procedure is repeated until the total value of the defeated encounter cards is greater than or equal to the indicator. Then the indicator is overcome.
This also applies when a player, during his turn, attacks another character with a creature (from an encounter) (see D4, Creature phase). If that creature is defeated, another encounter card is drawn as described above, or the banner is placed if the indicator was overcome through the victory — even if the character is not in the field of the indicator.
D2.4 Surprise Attack
D2.41 Creatures: When a creature is revealed (drawn) for the first time, it carries out a surprise attack against the character that activated the creature. This is carried out as described in D3.1, Carrying out an attack.
Distance Diagram
The white game piece can attack other game pieces in the same hex or in the dark grey hexes in melee combat. The white game piece can be in ranged combat with game pieces in the dark grey or light grey hexes.
[The original shows a diagram of a white game piece surrounded by dark grey and light grey hexes, with the creature/encounter game pieces placed around it.]
D3 Combat Phase
Each character of the player whose turn it is may carry out one action in this phase. This may be an attack on another game piece, support of another character's attack, or an attempt to defeat an encounter card in the character's hex. The use of a card function marked "-" is also an action. Each action is completed before the next character may carry out an action.
D3.1 Carrying Out an Attack
D3.11 Combat sequence: Follow the steps below for every attack.
Declaring the attack:
- Declare which character attacks.
- Declare which creature or which character is attacked.
- Declare the type of attack: ranged or melee combat. If the attacker is a creature, it chooses the type of attack that suits it best.
- Declare which characters support the attack (see D3.2, Support).
Attack roll:
- Roll the action dice. If the die shows the logo, this is an automatic success.
- Otherwise the die result is added to the melee or ranged combat value of the attacking character (depending on the type of attack chosen).
- For each supporting character, 1 is added to the die result (see D3.2, Support).
Consequences of an attack:
- If the result is greater than the defence value of the attacked game piece, the corresponding game piece is wounded (or defeated). An unwounded game piece is turned over to its wounded side; if it has no wounded side, it is defeated. A game piece that is already wounded is now defeated. A defeated game piece is removed from the playing area; defeated main characters are placed unwounded in the base camp. Character cards for defeated characters go to the discard pile.
Counterattack:
- If the defender is not defeated, it launches a counterattack if able. The procedure is as described above, except that no other character may support it. A counterattack does not trigger a further counterattack.
D3.12 Distance:
- Melee combat can be carried out if attacker and defender are in the same hex or in adjacent hexes.
- Ranged combat can be carried out only if attacker and defender are in adjacent hexes, or are at most two hexes apart.
D3.2 Support
Instead of an attack, a character may also support another character in its attack. For this it must be able to attack the target (see D3.12). Only attacks can be supported, not counterattacks. Support is carried out during the combat phase and counts as an action of the character.
D3.21 Combat bonus: When supporting, 1 is added to the attack roll.
[Example: Draco supports Hercules in this turn; Hercules may add one extra point to his attack roll.]
D3.22 Limit: A character cannot be supported by more characters than its command value.
[Example: A command value of 3 limits the number of supporting characters to 3. A fourth character cannot provide support any more.]
D3.3 Defeating an Encounter
A character may attempt to defeat an encounter card in its turn. This counts as an action.
D3.31 Defeating an encounter card: Each encounter card states how it is to be defeated (creatures are the exception; they can only be defeated by combat).
D3.32 Overcoming the encounter indicator: If a character has defeated encounter cards whose total value is greater than or equal to the indicator in the hex, the encounter indicator is overcome. The player may now place his banner in this hex (unless another player's banner already lies in this field, see D3.33). If an encounter has been defeated but the encounter indicator has not yet been overcome, the player draws another encounter card and repeats the procedure (see D2.35).
D3.33 Destroying a banner: If an opposing player's banner lies on an encounter indicator, the total value of the defeated encounter cards must be at least double the indicator in order to overcome it.
D3.4 Reward
D3.41 Dinars: If a character defeats an encounter or creature card, it receives as many dinars as the value of the creature or encounter card states.
D3.42 Equipment: If a creature is defeated, the player may give all of the creature's equipment cards to one of his characters in the same or an adjacent hex.
D4 Creature Phase
In this phase the player may select a creature on the playing area and thus attack an opposing character. This is carried out as described under D3.1. Then the turn of the next player comes.
X – Appendices
[Note from the transcriber: the hotline and tournament information in sections X1 and X2 of the original, and the page-reference index in section X5, are administrative material rather than rules and are not transcribed here.]
X3 Setup Summary
Choosing characters and dealing cards:
- Choosing the character sheet (C1.11)
- Shuffling the draw deck (C1.13)
- Players take their character-specific cards (C1.13)
- Choosing the cards for the starting hand (as stated on the character sheet) (C1.13)
- The remaining cards are shuffled into the draw deck (C1.13)
Setting up the playing area:
- Placing the Olympus game board in the middle (C1.14)
- Setting the cave game boards aside (C1.14)
- Shuffling the game boards and setting up the playing area (C1.14)
Start of the game:
- Each player turns over his game board and orients it (C2.11)
- Each player places his base camp (C2.12)
- Each player places his main character game piece on the base camp (C2.13)
- Each player takes his starting dinars (C2.14)
The game begins: The highest roll starts. The player whose turn it is follows the phase sequence (the printed cross-reference in the original reads "X2, Phasenabfolge"; the turn sequence is set out in section X4 below). The turns are taken clockwise.
X4 Turn Sequence
Card phase (in order, once): (D1)
- Duration of cards is counted down (D1.12)
- Passing on equipment cards (D1.2)
- One card is drawn per character sheet (D1.3)
- Cards are played (and paid for) (D1.4)
Movement phase (once per character): (D2)
- Characters move as follows:
- Exploring game boards (D2.21)
- Activating creature indicators (D2.34)
- Activating encounter indicators (D2.35)
Combat phase (once per character; one action per character): (D3)
- Carrying out an attack (D3.1)
- Declare which character attacks
- Declare which creature or which character is attacked
- Declare the type of attack: ranged or melee combat
- Declare which characters support
- Attack roll: roll the action dice; add the result to the melee or ranged combat value; add 1 for each supporting character
- Consequences: if the result is greater than the defence value of the defender, the defender is wounded (or defeated)
- Counterattack (if the defender is not defeated)
- Reward: take dinars and equipment (D3.4)
- Support (D3.2); counts as an action in this phase
- Attempt to defeat an encounter (D3.3)
- On success: if the indicator is overcome, place the banner; if not, draw one more encounter card and try to defeat it
- Take dinars of the value of the encounter
Creature phase: Select a creature game piece on the playing area and attack an opposing character.
[Transcriber's note: the printed reward line in this summary cross-references "D3.13", which does not appear in the body of the rules; the reward rules are given in D3.4 (D3.41 and D3.42) above.]
[Transcriber's note: the alphabetical index in the original is a page-reference aid and the copyright and trademark notice is boilerplate; neither is transcribed. The rules above are the complete body of the German rulebook.]