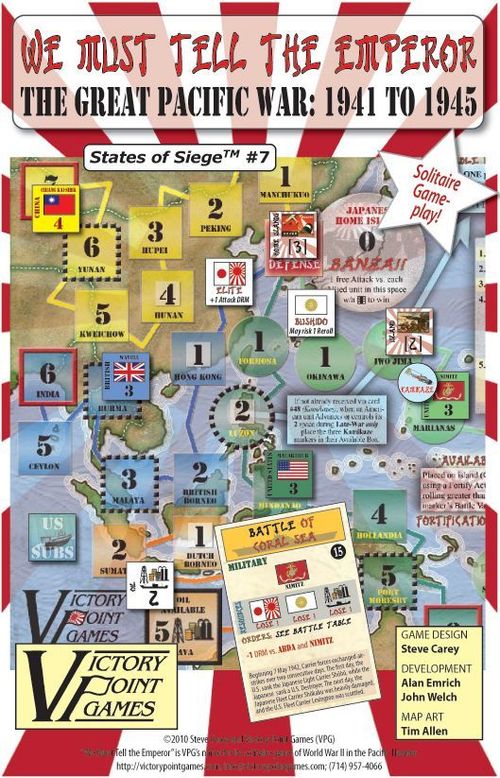
We Must Tell the Emperor: The Great Pacific War, 1941 to 1945
We Must Tell the Emperor Rulebook
Table of Contents
Table of Contents
0.0 Using These Rules
New gaming terms, when they are initially defined, appear in dark red lettering for quick referencing.
The instructions for this game are organized into major "Rules" sections as shown in large green CAPS font, and represented by the number to the left of the decimal point (e.g., rule 4.0 is the fourth rule). These rules generally explain the game's components, procedures for play, the game's core systems and mechanics, how to set it up, and how to win.
With each Rule, there can be "Cases" that further explain a general concept or basic procedure. Cases might also restrict the application of a rule by denoting exceptions to it. Cases (and Subcases) are an extension of a Rule shown in the way that they are numbered. For example, Rule 4.1 is the first Case of the fourth Rule; and Rule 4.1.2 is the second Subcase of the first Case of the fourth Rule.
Important information is in red text.
References to examples of a Rule or Case are in blue text and this font.
Text in shaded boxes, like this, provides the voice of the game's designer, who is addressing you to explain an idea or concept that is not, itself, a Rule or a Case.
1.0 Introduction
We Must Tell the Emperor is a solitaire strategy game covering the titanic struggle during World War Two between the Empire of Japan and the Allied Coalition. It can also be played cooperatively with two (or more) players working together to best direct and protect the Empire's goals and interests.
2.0 Game Equipment
Parts Inventory
- 1 11" x 17" map
- 12 3/4" square game pieces
- 11 5/8" round game pieces
- 48 Event cards
- 1 Battle Tables sheet
- 1 Rules booklet
Not included is one 6-sided die needed for resolving battles.
2.1 The Game Map
The game map depicts the great expanse of the Pacific Ocean, plus part of Asia. The Japanese Home Islands are the central hub of the game's activity and four colored tracks emanate outward from it. The square spaces denote regular (large, overlapping) territories, while round spaces (symbolized with an (island icon) in text) denote Islands and their surrounding areas, with spaces having a dashed outline being Allied fortified (see the terrain key on the map).
The Pacific Ocean is vast and the map serves as an abstraction of land areas used to facilitate play.
There are three Resource tracks on the map used to record the player's Army-Navy, Prestige, and Oil Resource levels. There are also various holding boxes including those for a Draw and Discard pile of Event cards.
2.2 Event Cards
These cards regulate the activity and narrative in the game, pronouncing headlines, providing history, listing moving Allied Fronts and the number of Actions you have available each turn. In addition, special effects or occurrences appear on some cards and must be taken into account during play.
The full deck of cards enters play in three "Epochs:" Early War (#1-19 with the yellow headline background color), Mid War (#20-40 with the blue headline background color) and Late War (#41-60 with the gray background color). An Event card is divided into five sections, thus: Headline (background shading indicates the card's Epoch), Card Number, Advancing unit(s) (red = "seed" card), Player Actions allotted for that turn, Resource Gained or Lost (and quantity), Historical flavor text (explains the context), Action modifiers and Special Events.
Always read the cards carefully and do not overlook any special instructions on them!
2.3 The Playing Pieces
The square playing pieces come in two basic flavors: "Front" and Fortification units and information markers.
A Front (also called a "unit" or "Army") represents the forces arrayed against the Empire of Japan. For example, the ABDA unit is the American-British-Dutch-Australian command coalition.
Japan has no army pieces. Their military is abstractly present in every space with an Allied Front, and by the Army-Navy, Kamikaze and Fortification markers.
Each Front piece shows a Front Name, Leader name, Symbol, and Battle Value on its front face, with a Back face used when the unit is inactive or knocked out.
The various information markers indicate the status, possession or effect of an important game activity or situation. Markers are also provided to keep quantitative information on tracks, such as the current level of Japanese Resources or the US Submarine level.
3.0 Set Up
Follow these steps to set up the game:
-
Place each of the five Allied Armies, with their proper starting Battle Value (BV), in their starting spaces as shown:
- Nimitz (3): Hawaiian Islands [8]
- MacArthur (3): Luzon [2]
- ABDA (2): Dutch Borneo [1]
- British (3): Hong Kong [1]
- China (4): Hunan [4]
-
Place the US Subs marker in the [0] box of its track.
-
Place the Army-Navy marker (3) in the [5] box of its track; the Prestige marker (3) in its [0] box, and the reverse side of the Island Fortress marker ("No Oil Rolls Take Java!") in the [3] box of the Oil track.
-
Place the Home Islands Defense (3) marker in its box on the map.
-
Place all of the remaining markers (Oil, Solomons, Kamikaze, and DRMs) in the Not in Play Box.
-
Sort the cards into their three Epochs (see 2.2). Set aside the Mid War and Late War cards for now.
The included 48 card deck is not consecutively numbered! See 12.1 for details.
From the Early War (yellow) cards, remove #19 (Battle of Midway) and place it face-down in the Draw Pile box. Then set aside the #1 card (Battle at Pearl Harbor). Shuffle the remaining Early War cards and place them face-down in the Draw Pile box (on top of the Midway card that is already there). Finally, place the #1 card face-down in the Draw Pile box on top of that stack.
Thus, the first card revealed is Battle at Pearl Harbor, and the last card from the Early War deck will always be Battle of Midway. This is "seeding" the deck.
Adding Event Cards: Twice per game, when the Early War and Mid War cards are exhausted, cards for the next Epoch are added to refresh the Draw Pile.
- The Mid War Deck: From the Mid War (blue) cards, set aside the #20 card (Solomons Campaign). Shuffle the remaining Mid War cards and place them face-down in the Draw Pile box. Then place the #20 card face-down in the Draw Pile box on top of that stack (it will always be the first card drawn from the Mid War deck). There is no "seeded" card at the bottom of the Mid and Late War decks.
- The Late War Deck: From the Late War (gray) cards, set aside the #41 card (Imphal and Kohima). Shuffle the remaining Late War cards and place them face-down in the Draw Pile box. Finally, place the #41 card face-down in the Draw Pile box on top of that stack (it will always be the first card drawn from the Late War deck).
4.0 Sequence of Play
Basically, each card revealed and acted upon is a "Turn." Those items listed on a card are performed in strict order, from top to bottom. Thus, each turn consists of the following Phases:
-
Headline Phase: Reveal the top card in the Draw Pile and place it, face up, in the Event Pile (a.k.a., the Discard Pile). That card becomes the new Current Event card that you resolve that turn.
If, during this Phase, there are no cards in the Draw Pile, add the next Epoch's cards to it (see 5.0) and draw that top card or, if the last Late War card has been played, the game ends and victory is determined (see 11.0).
-
Military Phase: Move active Allied armies (see 6.0) and adjust the US Subs marker if indicated on the Current Event card.
-
Resources Phase: Adjust the Resource markers on their tracks (see 7.0) and add new fortification units as indicated on the Current Event card.
-
Orders Phase: The Current Event card confers a number of Actions to the player and establishes certain DRMs (Die Roll Modifiers) used when resolving those actions that turn.
Place DRM markers on the listed units and Resource markers affected by the card. Then perform the allowed number of Attack, Battle, Resource, and/or Fortify Actions (see 8.0) as desired.
-
Housekeeping Phase: This Phase consists of the following Steps (see 9.0):
-
A. Japanese Defeat: Check to see if an Allied unit occupies the 0 space on its track (Japanese Home Islands) – OR – if both the Army-Navy and Prestige Resources are at 0. If so, the game ends immediately in defeat.
-
B. Refresh Map: Return all DRM markers to the Not in Play Box, Allied-occupied Fortification units to their Available Box, and rotate back Allied units that you Retreated this turn.
-
A complete game continues until all the cards have been revealed and played or victory / defeat occurs (see 11.0).
5.0 The Event Cards
The use of the Event cards is largely self-evident. The notations on each card are presented in the order that they are applied during the Sequence of Play so that they can easily be performed from top to bottom, with the Player's Actions performed last each turn.
6.0 Army Movement
During the Military Phase, Allied units move along their tracks as indicated on the Current Event card. Generally, Fronts "Advance" a single box closer to Japan (i.e., to their next consecutively lower-numbered box). Sometimes, Fronts "Retreat" one space (i.e., farther away from Japan, thus reducing their threat).
6.1 Inactive Fronts
A Front that has been Knocked Out (see 8.2.3) is temporarily inactive until it returns.
6.2 No Retreat Limit
A Front can be retreated beyond the highest-numbered space on its track via a card or Battle (8.3) event, or a Knock-Out Blow (8.2.2, 8.2.3).
6.3 Advance Any/All
Some Military Events allow the player to choose any one active unit to Advance, while others require that all active units Advance. Inactive units that are out of play (6.1) roll to return to the game (see 8.2.3) when called to Advance.
6.4 Blocking Advances
If an Allied unit is to advance into a space containing a Fortification unit, carry out the following procedure.
Procedure: Roll a die for the Advancing Front and compare the result to the Battle Value of the Fortification unit.
- If the die roll is less than or equal to (≤) the Battle Value, the Advancing unit is halted and simply remains in its current space; it does not advance.
- If the result is greater than (>) the Battle Value, that unit Advances normally and the Fortification unit remains in place for now (but see 8.4.5).
6.5 Kamikazes Received
When the first American Army (Nimitz or MacArthur) occupies or controls (see 8.4.2 for the definition of "Control") the 2 space on its track at any time during Late-War only, the player immediately receives the 3 round Kamikaze markers and places them in their Available Box if card #48 (Kamikazes) has not been played.
6.6 Japan Invaded
When an enemy unit enters the 0 space on its track (Japanese Home Islands), the game still continues. You'll need to Retreat it before the Housekeeping Phase or the game is lost (9.1)!
7.0 Resources
During the Resources Phase, add (gain) or subtract (lose) the number and type of Resources shown on the Current Event card, if any.
Accumulating and managing Resources is every bit as important as conducting military operations!
7.1 Minimum / Maximum
There can never be more than six of each Resource type. Additional Resources received of a type that already has six are lost.
Conversely, there can never be less than zero of each Resource type. However, if instructed to lose any Resource type to less than zero, you must still attempt to satisfy that loss! Lose the required Resource first from the Army-Navy track (if it is at one or higher); if that track is at zero, then apply the loss to the Prestige track (if it is at one or higher); if both of those tracks are at zero, then apply the loss to the Oil track.
7.2 Resource Collapse
If all three Resource markers are ever at their 0 value at the same moment, the game ends immediately in a Complete Collapse (11.0).
If both the Army-Navy and Prestige Resources are at 0 during the Housekeeping Phase (see 9.1), the game ends immediately in a Japanese Defeat (see 11.0).
7.3 Bonus Abilities for Maximum Resources
When the Army-Navy or Prestige marker reaches the 6 box on its track (its maximum), it is flipped over to its reverse (bonus ability) side. You immediately gain the benefit of that Army-Navy or Prestige bonus ability and continue to enjoy it while that marker remains in its 6 box. When reduced to a lower-number box, that bonus is immediately lost and that Resource marker is flipped back to its normal front (Resource acquisition) side.
The Oil Resource bonus is handled differently, being checked, and any bonus granted performed, during the Housekeeping Phase each turn.
7.3.1 Army-Navy Elite Bonus: During the Early War Epoch only, the Elite bonus awards a +1 DRM to all Attack Actions only.
This bonus is lost and cannot be regained (even if the Army-Navy marker is in its 6 box) once the final Early War card, #19 (Battle of Midway), is revealed and the event ending this bonus is applied.
Japan's initial military capabilities were high, but its early campaigns saw experienced troops and pilots lost in combat. Rivalries in Japanese military and industry remained unresolved, all of which contributed to the overall decline of its military's quality.
7.3.2 Prestige Bushido Spirit Bonus: The Bushido Spirit bonus allows the player to risk one re-roll per turn for any failed Attack (including Knock-Out Blow attempts), Resource, or Fortification Action roll (only; not for Battle or Banzai/Kamikaze rolls).
If the Bushido bonus re-roll also fails, the player immediately loses one (-1) Prestige. Move the marker to its 5 box.
7.3.3 Oil Production Bonus: The Production bonus grants a +1 DRM marker per turn, placed during the Housekeeping Phase (9.3) as long as the Oil marker occupies its 6 box. This +1 DRM marker may be placed on any active Allied unit (for Attack Actions) or on a unit in the Available Fortification Units box (for Fortify Actions) only, not on a Resource track marker!
Since this marker is placed as the last duty each turn (4.0), it will affect play throughout the following turn.
Example: During the last step of the Housekeeping Phase, the Oil marker occupies its 6 box, and so the player receives a +1 DRM marker and decides to place it on the Nimitz unit, anticipating a favorable attack on that Front next turn. However, the next card has a "-2 DRM vs. Nimitz" notation on it, so if the player decides to attack Nimitz this turn, absent any other DRMs, a cumulative -1 DRM will apply.
If the player chose instead to put the +1 DRM marker in the Available Fortification Units box atop the Island Fortification [2] unit currently residing there, he gains a +1 DRM to Fortify Actions applied to it next turn. Assuming there are no other Fortify DRMs on the next card, he rolls a 1 to place this unit with his first Action, which fails. The +1 DRM marker remains, and so he allocates another Fortify Action and rolls again, this time obtaining a 2; normally this would fail again, but due to the +1 DRM bonus marker the roll is increased to a "3" which succeeds, so the Fortification unit is placed on the map.
The Oil marker = exchange this marker for that marker: lastly, if the Oil Marker currently occupies its (maximum) 6 box, flip it to its reverse (Production) side (if not already there) and place a +1 DRM marker on the map in accordance with 7.3.3. This marker remains in play until the Housekeeping Phase of the next turn, when it is removed along with all other DRM markers (9.2).
The Japanese often engaged in elaborate and time-consuming planning for their military endeavors, but all too often events changed suddenly to throw these plans into chaos. Once gained, the player will be placing the +1 DRM Oil Production bonus marker after the map has been Refreshed and just prior to next turn's card being revealed, thus not knowing what course of events the war will be taking!
8.0 Player Actions
Each Event card specifies a number of Actions conferred to you, the Japanese Player. Actions are used to confront the game's evolving situations and crises that are the heart of the game. Actions are spent one at a time and are not pre-designated. You can see the effects of one Action before deciding how to allocate your next Action. Actions cannot be saved from turn to turn (i.e., any unspent Actions are lost). You may "spend" Actions to:
- Attack enemy units to drive them back;
- Fight a Battle using the Battle Tables when a "Battle" titled Event card presents that opportunity;
- Attempt to Fortify an island (island icon) location as Fortification units become available;
- Attempt to gain Resources.
8.1 Die Roll Modifiers (DRMs)
Certain cards or conditions can impose a die roll modifier (abbreviated "DRM"). In all such cases, the modified result of a die roll is used after applying all applicable DRMs. DRMs are cumulative without limit.
For Example: A die roll is influenced by both a +2 DRM and -1 DRM. These are cumulative in their effect, so the net result would be to apply a +1 DRM to that die roll.
Important: Regardless of the die roll modifiers, when conducting an Attack (8.2), Knock-Out (8.2.3), Fortify (8.4) or Resource (8.5) Action, a natural (unmodified) roll of 1 always results in failure; a natural (unmodified) roll of 6 always results in success. Modified die rolls are never certain or impossible; such is war!
Note that DRMs are applied exclusively as indicated. That is, a DRM for Attacks against the Nimitz unit does not affect an attack against the China unit or rolling to increase the Army-Navy Resource.
8.2 Conducting an Attack
An Attack Action is used to try to Retreat an enemy Front (i.e., move it back one box away from the Japanese Home Islands space to its next-higher numbered box). It costs one Action to conduct a regular Attack.
The number of Attack Actions that can be conducted in a given turn can be restricted (due to Army-Navy and/or Oil shortages; 8.2.5) or enhanced (by free Kamikaze and Banzai Attacks; 8.2.6), as described later in this Rule.
Procedure: When conducting an Attack, designate the non-rotated Front you are attacking and roll the die, applying all appropriate DRMs.
- If the result is less than or equal to (≤) the target Front's Battle Value, that Attack is unsuccessful and there is no effect; that enemy Front remains in its current box.
- If the result is greater than (>) the target Front's Battle Value, that Attack is successful and the targeted Front is moved back on its track by one box and rotated 90 degrees.
By rotating a unit Retreated by your successful Attack, it cannot be attacked again that turn. It will be rotated back during the Housekeeping Phase (see 9.2) and so can be attacked again next turn.
8.2.1 Sustained Efforts: In general, there is no limit as to how many Actions may be used to attack a specific Front per turn, save the number of Actions available to do so, until it is finally Retreated (and thus rotated, symbolizing it cannot be Attacked again that turn). Failure on prior attempts does not limit future attempts.
8.2.2 Retreat: If the current card's event or a Battle result calls for an Allied unit to "Retreat", move it back one space on its track, i.e., further away from Japan. Note that when an Allied unit is Retreated by a card Event or Battle, it is not Rotated, and can thus be Attacked that turn and moved back a second space!
If a "Retreated" unit is already in its highest numbered box, consider the "Retreat" to be a free Knock-Out Blow Attack instead (see 8.2.3 below), not costing any Actions nor Resources, and succeeding only on a natural (unmodified) die roll of 5 or 6. If a "Retreat" is indicated while the Allied unit is already inactive (i.e., in the Not in Play Box), then there is no further effect.
8.2.3 Knock-Out Blow: When an Allied Front (not ABDA; see 8.5.2) is in the highest-numbered (red-bordered fortified) box on its track, a special type of Attack, called a Knock-Out Blow, can be conducted to temporarily remove it from play! Knock-Outs are difficult to achieve in the game, but if accomplished they will grant the player valuable time. This represents overwhelming Japanese forces temporarily isolating or dominating India, Australia, or China, or a temporary crippling of the U.S. Pacific Fleet.
Procedure: To conduct a Knock-Out Blow, you must have at least 1 Army-Navy Resource, and spend two Actions (not just the usual one) plus one Oil Resource (which you must also have).
Only one Knock-Out Blow Attack is allowed per turn (this includes 8.2.2).
All regular DRMs (8.2.4) apply (including the -2 DRM for the fortified Allied red-bordered space), and the Bushido re-roll (7.3.2) can be used.
If the Attack succeeds in retreating that Allied Front, it is temporarily "knocked-out." It is inactive (see 6.1) and placed in the Not in Play Box. Also, the player gains +1 Prestige.
As in any other Attack, a roll of 1 always fails while a roll of 6 always succeeds.
Military Victory: If you manage to have any three Knocked-Out Allied units in the Not in Play Box at the same time, you instantly win the game (11.0). Note: This should be extremely difficult to achieve!
The ABDA unit is ineligible for a Knock-Out Blow since upon reaching Java, it is flipped during the Housekeeping Phase (see 9.3) to its "Oil Rolls Allowed" side and is thus already eliminated from the game.
They Shall Return: An inactive Allied unit in the Not in Play Box remains there until it is instructed to Advance. If a "Retreated" unit is already in its highest numbered box... (see 6.3): a roll higher than the unit's Battle Value advances it back into play and it is placed into the last (highest numbered) space on its track. That Front is active again, and the unit operates normally. If the roll equals or is less than its Battle Value, keep the unit in the Not in Play Box and place (and retain) a +1 DRM marker on it for each failed Advance attempt. The unit remains inactive until its next Advance is called for, and the process is then repeated but with the accumulated failed DRM markers also applied (only; not any card-listed DRMs for that Front).
Returning to play is similar to a Front confronting a fortification unit (6.4), but using its own Battle Value for this "Reorganization Check" instead. With enough DRMs from prior failed attempts, a unit will eventually re-enter the game even if a 1 is rolled. And while it is true that the American Fronts become stronger in Late War (Card #41), the chances of the player being in a position to Knock-Out an Allied Army at that point should be very low.
Important: Regardless of the above Reorganization Check outcome, the card's other effects (Resources gained or lost, DRMs, and Actions) are all performed normally.
8.2.4 Attack Die Roll Modifiers: Because there are several Die Roll Modifiers (DRMs) that might be applied to an Attack Action, they are listed here:
- Event cards can list DRMs ranging from -2 to +2 and are symbolized during play by placing a DRM marker directly on the affected Allied unit.
- The Elite Early War bonus of +1 to all Attack Actions only (see 7.3.1).
- The Kamikaze bonus of +1 to a specific Attack Action (see 10.3).
- The Fortified Space penalty of -1 for attacking a black dashed-outlined, or -2 for attacking a red dashed-outlined or Knock-Out space (see Map Key).
- The Oil Production Bonus of +1 DRM (see 7.3.3).
For Example: It is Late War and MacArthur (Battle Value of 4) has Advanced this turn into Luzon (its track's 2 space), which also triggers the immediate arrival of Japan's Kamikaze markers; see 6.5 and Rule 10.0). Using an Attack Action to attempt to Retreat MacArthur back to Mindanao, the Japanese Player consults the DRMs. There is no Event card DRM versus MacArthur this turn, but a -1 DRM is applied because that unit is in an Allied Fortified space (Luzon). This means that only a die roll of 6 (-1 = 5, which is greater than the unit's Battle Value of 4) would succeed.
The player decides to commit one of his newly-received Kamikaze markers to support the Attack, garnering its +1 DRM against Island (island icon) spaces; this Attack Action now succeeds on a roll of 5 or 6.
8.2.5 No Army-Navy / No Oil Attack Restriction: If the Army-Navy or Oil Resource marker is in its 0 box, only one Action may be spent that turn as an Attack or Battle (see 8.3) Action (and Knock-Out Blows are prohibited; see 8.2.3) until more of that zeroed Resource is acquired. Exception: Kamikaze and Banzai (see 8.2.6) Attacks are "free" Actions that do not require any of these Resources on hand.
Other Actions that turn may still be used to Fortify (8.4) or to increase Resources (including Army-Navy or Oil; see 8.5), but you cannot spend a second Action to Attack or Battle again that turn until you have at least 1 Army-Navy and 1 Oil. This restriction is lifted the instant you have at least 1 Army-Navy and 1 Oil on the track.
8.2.6 Banzai and Kamikaze Bonus Attacks: These bonus attacks are initiated differently but conducted similarly as follows:
-
Banzai Attacks: The first Action(s) you must conduct during the Orders Phase are any Banzai Attacks. One is made against each Allied unit that Advanced into its space 0 (i.e., Japanese Home Islands). Designate an invading Allied unit as the target and roll the die (see below). Banzai Attacks represent expending the last air assets and troop reserves to fend off probing Allied forces.
If a Banzai Attack fails, the player must Retreat the Allied unit(s) with his other Actions that turn (or make a Kamikaze Attack, if available), or else the game will end in defeat during the Housekeeping Phase (see 9.1)!
-
Kamikaze Attack: Once acquired (see 6.5), a Kamikaze may be spent to conduct a Kamikaze Attack. Designate a non-rotated Allied Front on an island (island icon) space as the target and roll the die (see below).
Their "Bonus" Nature: These Banzai and Kamikaze bonus attacks are "free," requiring no expenditure of Actions from the player's allotment that turn. Also, no Resources are required to make them (see 8.2.5).
Procedure: There are no DRMs (8.1) or re-rolls (7.3.2) allowed for Banzai/Kamikazes. On a single, natural throw of 6, that Allied Front Retreats and is rotated. A roll of 1 through 5 is no effect.
8.3 Battle Action
"Battle" Event cards, whose Titles show an Aircraft Carrier, allow you a special opportunity to challenge the historical outcome printed on that card. By conducting a Battle Action, you may roll on that card's Battle Table and gain additional outcomes (for better or worse).
For Example: The Battle of Coral Sea card allows you to use a Battle Action to roll on the Battle of Coral Sea Table.
Cost: Only one Battle Action is allowed per card. It consumes one Action (which is subject to the No Army-Navy / No Oil Restriction of 8.2.5) or one Kamikaze marker (see 10.1) to roll on a card's Battle Table.
Procedure: There are no DRMs (8.1) or re-rolls (7.3.2) allowed in Battle.
Apply the Battle Table's results. If a Front is instructed to Retreat, do not alter its current rotation (see 8.2)!
Note that the Battle Table's results are in addition to the card's previously applied effects; they supplement, and do not replace, the card's printed effects.
Be careful when choosing this option. Not only is an Action (or Kamikaze marker) spent, but matters could become worse!
8.4 Fortify Action
The Japanese start the game with their Home Island Fortification unit in Japan and later receive two others during play via Events.
8.4.1 Fortress Unit Comings and Goings: The Solomons Fortification unit is placed in the Available Box when card #20 (Solomons Campaign) is revealed, or placed on the map (space 5 of the Nimitz track only) as a result of the Battle of the Eastern Solomons Battle Table (card #22).
It is removed from play (i.e., returned to the Not in Play Box) when it is no longer on the Solomons space (Nimitz track, space 5) after the card #31 (Imperial Intervention) Event has occurred. Flip this unit over to its "Imperial Intervention" side as a reminder if it is in the Solomons space and, once removed from that space by Nimitz's occupation, it is removed from play and can't be rebuilt.
The Islands Fortification unit is placed in its Available Box with card #39 (Truk and Rabaul Subdued) or placed on the map as a result of the Battle of the Eastern Solomons Battle Table (card #22) and is never permanently out of play.
8.4.2 Placing Fortification Units: An available Fortification unit (i.e., one in the Available Units Box) can be placed on a Japanese controlled Island (island icon) space that is not currently occupied by a Fortification unit by performing a successful Fortify Action.
Control of Spaces: Spaces that are currently occupied by an Army unit are Contested spaces. You cannot attempt to Fortify a contested Island (island icon) space. Higher-numbered spaces behind Allied Army units are Allied Controlled. Lower-numbered spaces in front of Allied Army units are Japanese Controlled.
Procedure: Designate the available Fortification unit and the Japanese controlled Island (island icon) space where it will be placed (note: the Solomons Fortress unit can only be placed on the Solomons space) and roll the die, applying appropriate DRMs.
- If the result is less than or equal to (≤) the Fortification's Battle Value, it is not placed and there is no effect; it remains in the Available Units Box.
- If the result is greater than (>) the Fortification's Battle Value, it is successfully placed in the designated space.
8.4.3 Sustained Efforts: There is no limit as to how many Fortification Actions may be performed each turn, subject to the availability of Fortification units to place and spaces to place them in. Failure on prior attempts does not limit future attempts.
8.4.4 Fortification Units in Defense: See Case 6.4 for the benefits of Fortification units placed in on-map spaces (to possibly block Allied advances).
8.4.5 Removal of Fortification Units: During the Housekeeping Phase, Fortification units in the same spaces as an Allied Front unit are removed from that Island (island icon) space (see 9.2).
If an Allied Front succeeds in Advancing onto an Island (island icon) space with a Fortification unit (see 6.4), then you must decide if you will spend precious Actions to try and Retreat it in order to preserve the Fortification unit or simply abandon it for removal during Housekeeping (9.2).
8.4.6 Allied Fortified Spaces: Unlike spaces with a Japanese Fortified unit, Fortified spaces with the thick dashed-line borders always benefit Allied Fronts (either a -1 or -2 DRM when Attacked; see the Map Key) occupying those spaces. Allied fortified spaces are never destroyed and never benefit the player.
8.5 Resource Actions
This Action is used to increase the means of support necessary to sustain the Japanese Empire.
Various effects for having a lack of a given Resource type are explained in Rule 7.0.
Important: If all three Resource Tracks are at zero (0) at any point in the game, the player instantly loses (see 11.0).
Procedure: When conducting a Resource Action, designate which single specific Resource (Army-Navy, Prestige or Oil) that you are attempting to increase and roll the die, applying all appropriate DRMs.
- If the result is less than or equal to (≤) the target Resource's Improvement Value, that Action is unsuccessful and there is no effect; that Resource marker remains in its current box.
- If the result is greater than (>) the target Resource's Improvement Value, that Action is successful and the player gains one (+1) of that Resource and its marker is moved one box to the right.
8.5.1 Sustained Efforts: In general, there is no limit as to how many Actions may be used to gain a specific Resource type per turn, save the number of Actions available to do so. Failure on prior attempts does not limit future attempts.
8.5.2 The Oil Must Flow: You cannot roll for Oil Resources until the turn after the ABDA unit has been retreated to Java (the last box on its track). During the Housekeeping Phase of that turn (see 9.3), the ABDA unit will be flipped and the Oil Resource marker placed on its track to indicate that the oil is now flowing and you can now start making Oil Resource rolls.
8.5.3 US Submarines: There is a US Subs track on the map below the Oil Resource track. It starts at 0 and is increased one box each during Mid and Late War, depending on when the card's event is revealed. It provides an increasingly negative (-1 or -2) DRM for all subsequent Oil Resource die rolls only.
Thus it gets harder and harder to successfully roll for Oil as the game progresses. The US submarine campaign, once it overcame problems such as older boats, dud torpedoes, and organizational difficulties, absolutely devastated the Japanese merchant marine.
9.0 Housekeeping
During this Phase, certain procedural steps are performed in the order listed below before either the game ends or is continued to the next turn.
9.1 Japanese Defeat
If an Allied unit occupies the 0 space on its track (Japanese Home Islands) – OR – if both the Army-Navy and Prestige Resource markers are in their respective 0 boxes, the game ends immediately in a defeat (see 11.0).
9.2 Refresh the Map
First, return all of the DRM markers placed in play this turn to the Not in Play Box. (Those on Knocked-Out units in this box remain on those units and accumulate there, see 8.2.3.)
Second, return Fortification units to their Available Box if they are currently sharing their space with an Allied Front. Exception: the Solomons Fortification unit is instead placed in the Not in Play Box (i.e., it is removed from the game) if it is in the Available Fortification Units Box after card #31 (Imperial Intervention) Event has occurred (see 8.4.1).
Third, rotate back Allied units that were Attacked and Retreated this turn. They can be attacked again next turn.
9.3 Check Oil Flow and Production
If the ABDA unit is in Java (its 5 box), it is flipped over to its "Oil Rolls Allowed" side. The "No Oil Rolls" marker on the Oil Resource track is replaced in the box it currently occupies with the Oil marker and then flipped to its Island Fortification side and placed in the Not in Play Box for later entry into the game.
Lastly, if the Oil Marker currently occupies its (maximum) 6 box, flip it to its reverse (Production) side (if not already there) and place a +1 DRM marker on the map in accordance with 7.3.3. This marker remains in play until the Housekeeping Phase of the next turn, when it is removed along with all other DRM markers (9.2).
10.0 Kamikaze Markers
Three Kamikaze markers are received once per game, either by Americans encroaching upon the islands near Japan (see 6.5) – OR – via card #48's Event (Kamikazes).
General Rules
Only one Kamikaze can be used per turn, maximum, and it is used at no Action cost to the Japanese Player. That is, their use is "free" and they are immune from Resource restrictions (8.2.5).
Each Kamikaze marker is "spent" (i.e., returned to the Not in Play Box and out of the game) after its use.
There are three different functions that an available Kamikaze marker may be spent to perform, as explained below:
10.1 A Battle Table Roll
In lieu of spending an Action to roll on a card's Battle Table, the player may spend an available Kamikaze marker instead. No Resources are required to Battle with a Kamikaze.
10.2 A Kamikaze Attack
This is a special "desperation" attack against an Island (island icon) space (including the Japanese Home Islands). It is explained fully in Case 8.2.6.
10.3 A Kamikaze Support DRM
A Kamikaze marker can be spent before an Attack Action die is rolled against an Island (island icon) space to provide that Attack with a +1 DRM against an Allied unit there.
11.0 Victory & Defeat
There are two ways to lose and two ways to win in We Must Tell the Emperor.
The game is purposely designed to test your skills and is extremely challenging!
Losing the Game
You have suffered a Complete Collapse if, at any time, all three Resource markers are in their 0 boxes. Without these necessities, Japan's ability to wage war no longer exists and the Empire is forced to immediately sue for peace. Facing this unthinkable end, many of Japan's leaders would likely commit suicide to preserve their family's honor and, in this case (were this not a game), the player would be expected to join them!
You are Defeated if, during the Japanese Defeat Step of the Housekeeping Phase (see 9.1), an Allied unit occupies the Japanese Home Islands space – OR – if both the Army-Navy and Prestige Resource markers are in their respective 0 boxes. Although China lacked the capability to invade Japan, Imperial Headquarters knew of the potential for an Allied assault from across the Sea of Japan. Thus, in game terms, China can "reach" the Home Islands.
How soundly you are defeated depends on how many cards you played up to that point.
If there is still an unplayed Early War card, yours is a Catastrophic Defeat. Japan's initial expansionism fails miserably and the government is torn apart by violent internal conflict. The lack of cooperation between the Japanese Army and Navy allows the Allies to take advantage of the situation and they rapidly converge on the Home Islands. The Emperor is deposed and put on trial as a war criminal. With the attacks on Pearl Harbor and Singapore still fresh in their minds, the Allies carve up the former island nation in their own nationalistic interests. As an independent nation, Japan no longer exists.
If there is still an unplayed Mid War card, yours is a Disastrous Defeat. Japan's early successes failed to be consolidated and the Empire spiraled into indecision and atrophy exacerbated by inter-service rivalry. The subsequent string of military defeats that followed caused the government to lose face at home and all credibility abroad. Disgraced, the moral fabric of the nation completely breaks down. The Emperor is coerced into exile, the military is overthrown, and the Allies demand harsh reparations which relegate Japan to a minor nation status for decades.
If there are no unplayed Mid War cards, yours is an Unconditional Surrender Defeat. The nation has been shattered by war and casualties have been horrific. In recognition of fanatical resistance, one condition is granted for a Japanese surrender, and that is to keep their Emperor on his throne. The military establishment is denounced, and the country must endure the unendurable – occupation by foreign troops. However, with a new Cold War looming the Allies seek to rebuild Japan. Over time, this battered and impoverished nation slowly reestablishes itself as a world power through economic and diplomatic means.
Winning the Game
You have achieved a Survival Victory if you have not already lost the game and there are no cards left to play. The war has taken a terrible toll on Japan and the Emperor is granted honorable conditional Allied peace terms to end hostilities in the face of unyielding Japanese resistance. The nation's rebirth begins soon thereafter, forming a stronger country from the ashes of the old. There is an uneasy co-existence with the other great nations of the world as Japan rebuilds for prosperity and peace.
You instantly achieve a Military Victory and have won the war if you have knocked out any three Allied Fronts and they all are currently in the Not in Play box (see 8.2.3). Japanese domination in India, China, Australia – or a crippling of the U.S. Pacific fleet - forces the Allies to acknowledge their enemy's conquests. Japan negotiates terms that consolidates her gains, which include the East Indies, the Philippines, and most of the Pacific islands save for Midway to Hawaii, also leaving Australia as an Allied nation. Signed away by treaty into a Japanese co-prosperity sphere, the Asian subject-peoples are abandoned to their fate.
12.0 Optional Rules
These provide for variations in gameplay and may be added in any combination.
12.1 The Historical Game
Players desiring to encounter the events of the Great Pacific War in their historical sequence can simply arrange all of the cards in ascending numerical order into a single deck and play them thus.
In this Historical Game, ignore Rules 3.0 #6 and 5.0 about setting up the card decks. For the B-29 card (#53), just re-shuffle it back in to the remaining deck – this may put the last few cards out of sequence.
The "Doolittle to Downfall" Expansion Kit: You will note that the game's 48 cards are not consecutively numbered; there are gaps in the numbering to account for the historical sequencing of 12 supplemental cards in an Expansion Kit. This is also why the Chinese Army has a 3 BV side, and the Japanese Home Island Fortified marker has Invasion Preparation on its reverse. These events, while interesting, are off the main narrative of this game and, like a "Director's Cut" of a film, will be provided separately for those who are interested.
12.2 The War in Europe
(player handicap): When card #41 (Imphal and Kohima) is revealed commencing the Late War Epoch, flip the British unit to its "4" Battle Value side (General Slim) in addition to the two American Fronts.
This Optional Rule presumes that the war in Europe proceeds more rapidly to the Allies' advantage, allowing the British to shift additional forces to the Pacific sooner.
13.0 Example of Play
After setting up as per Rule 3.0, the game begins.
Card #1: Battle at Pearl Harbor: The game always begins by flipping over the first Early War card, which was seeded as card #1. The Military section of the card states "None," so no Allied armies Advance along their tracks this turn.
The strike at Pearl Harbor was a surprise attack and the Allies were caught unprepared. The Resource section shows a gain of three (+3) Prestige, moving the Prestige marker from its starting 0 box to its 3 box. There is also a loss of one (-1) Oil, so that marker is moved from its starting (3) box to its 2 box.
Pearl Harbor stunned the world, and Japan reveled in its apparent success. The Japanese main strike force, the Kido Butai, consumed fuel as it travelled the long distance from Japan to Hawaii and back. Using its Striking Force at Pearl Harbor was a major operation, so those mighty ships were not available for other operations. Other cards in the deck will reflect Japan's carefully planned opening moves.
In the Orders section we reference the Battle Table and find only 2 Actions, plus a harmful -1 DRM vs. ABDA this turn (so a round -1 DRM marker is placed on the ABDA unit).
With these two Actions, the player has several interesting options. First, an Attack Action (8.2) can be launched against any of the Allied Fronts. The Nimitz (3 Battle Value) unit is at the Hawaiian Islands with its intrinsic -2 DRM fortification modifier (8.2.4). The player would have to roll a 6 to Retreat Nimitz back to the West Coast; that's not very good odds. Similarly, the MacArthur unit (3 Battle Value) in Luzon has an intrinsic -1 DRM fortification modifier in that dashed black-bordered space, which means a 5 or 6 would have to be rolled in order to Retreat it a space; that's better, but still not good odds.
Not wanting to spend actions in China just yet, the player considers the ABDA unit in Dutch Borneo. There is the -1 DRM penalty versus ABDA shown on the card, but the unit is weak (2 Battle Value). Losing -1 Oil this turn for the Pearl Harbor strike makes it compelling to start pushing back ABDA to get the Oil rolls flowing once Java falls (8.5.2).
So, Dutch Borneo will be attacked! The first allowed Action this turn is expended and a Die Roll of 1 is cast. This is not greater than the strength of the ABDA unit, so it remains in its current space and is not Retreated. (A Natural roll of 1 always fails anyway – just as a natural roll of 6 always succeeds, per Case 8.1.)
Undeterred, the player considers attacking ABDA again (this is allowed because the first attack failed, see Case 8.2.1), or perhaps taking a Resource Action (8.5) to increase his Army-Navy marker to its (6) box in order to receive the +1 DRM Elite Bonus for all Attacks. This bonus is only available during the Early War period (7.3.1), so the sooner it is obtained, the better.
But this Event card is also a Battle card, so the player opts to explore that opportunity and expends his second (and final) Action this turn to conduct that Battle (as per Case 8.3).
The Japanese task force launches another strike or hunts for the US aircraft carriers that escaped the carnage at Pearl Harbor! Checking the Battle at Pearl Harbor Table, a die is cast with a result of 3, success! The Nimitz unit is retreated to its West Coast space. (The -2 DRM fortification modifier in the Hawaiian Islands space only applies to the player's Attack Actions versus Allied units there; Battle rolls always stand alone and are unmodified as per Case 8.3.)
With no more Actions, the only Housekeeping task is to return the -1 DRM marker from the ABDA unit back to the Not in Play Box. The first turn is over.
Card #10: U.S. Carrier Raids: The second turn reveals card #10.
The Attack section indicates that the Nimitz unit advances, so it moves from the West Coast back to the Hawaiian Islands box. The player loses one (-1) Prestige as shown in the Resource section on the card. This shifts the Prestige marker down from 3 to 2.
While the American raids inflicted negligible military damage (thus the player's Army-Navy track is not affected), it did boost Allied morale and caused the Japanese government strategic concerns.
The Orders section provides 3 Actions, but also indicates the placement of a -1 DRM marker on the Nimitz unit making it more difficult to Retreat Nimitz via an Attack (especially since that unit again now occupies the Hawaiian Islands space with its intrinsic -2 DRM). There is also a -1 DRM versus Oil, but since Oil rolls aren't allowed until Java is captured (8.5.2), there is no point placing a -1 DRM marker on the Oil marker as a reminder.
With his three Actions, the player has several options to consider as he carefully surveys the situation on the map to formulate his strategy.
A decision reached, the player first rolls to increase his Army-Navy Resource, and the die roll of 4 exceeds that marker's Improvement Value (of 3). The Army-Navy marker is thus increased from its 5 to its 6 box, then flipped over to its reverse side showing that the +1 DRM Elite Bonus is now in effect.
Armed with this new +1 DRM to all Attack Actions (while it lasts) Elite Bonus, the second Action chosen is an Attack Action against ABDA. The roll for that Attack is a 4, which is increased to a "5," resulting in an easy victory; the ABDA unit is Retreated to its Sumatra (2) box and rotated 90 degrees, which means the ABDA unit cannot be attacked again this turn since it has already been Retreated by an Attack Action (see 8.2).
The player has one Action remaining. This card does not have a Battle notation in its title, so no Battle will be fought this turn. Feeling lucky, the third choice is an Attack Action against the MacArthur unit. The die roll yields a 3, but the +1 DRM Elite Bonus is cancelled out by the Allied -1 DRM for the intrinsic Luzon space's Allied fortification, and the result remains a "3". This is not greater than MacArthur's Battle Value of 3, so it is not Retreated.
Mac's troops are holding out in the Philippines! During the Housekeeping Phase, the -1 DRM marker is removed from Nimitz and the ABDA unit is rotated back to its normal facing.
Card #15: Battle of Coral Sea: The third turn sees card #15 revealed.
Working down the card, Nimitz Advances from the Hawaiian Islands to the Midway space.
Next, one of each Resource type is lost. Oil is getting critically low now at just 1 (there are penalties when it reaches 0; see 8.2.5), Prestige drops to 1, and the Army-Navy marker is moved off its highest space (from 6 to 5), thus being flipped back to its normal side (indicating that the +1 DRM Elite Bonus has been lost for the time being).
With 3 Actions, a -1 DRM marker is placed on both the ABDA and Nimitz units and the player leans back to study the situation…
Well, the ABDA unit is an obvious target for an Attack Action since the Empire is so low on Oil, but the -1 DRM against ABDA this turn and the just-lost +1 DRM Elite Bonus causes the player to pause. Infused with Samurai spirit, the player spends his first Action to Attack ABDA and rolls a 3. With the -1 DRM applied from the card, the result is reduced to a "2," so there's no effect!
If the player had first regained the +1 DRM Elite Bonus, it would have cancelled out the card's -1 DRM and the Attack would have succeeded… bad luck! We must tell the Emperor...
Hoping for a change of luck, a second Attack Action is taken against ABDA, and this time the result is a 5, reduced to a "4" from the card's -1 DRM in effect this turn, which is enough to succeed. The ABDA unit Retreats to its Celebes (3) space and is rotated 90 degrees.
Two more spaces to go and the player can start rolling for precious Oil.
For his last Action, the player considers initiating the card's Battle in hopes of gaining +1 Prestige and to retreat Nimitz (a roll of 1 or 2 is needed), but he doesn't want to risk losing both an additional Army-Navy and Prestige Resource for failure (rolling a 5 or 6) at this early juncture.
China hasn't been addressed yet, but the China unit's Battle Value of 4 is a bit daunting until some positive modifiers turn up (either via upcoming Events or recouping the +1 DRM Elite Bonus). MacArthur is still defiant in the Philippines (the Luzon space, with its -1 DRM), and the British are still sitting in Hong Kong. Both of these units are much too close for comfort.
Perhaps it would be best to plan ahead and regain the +1 DRM Elite Bonus for next turn?
What would you do with the last Action of the Turn? Continue the game from this point forward, or reset (3.0) and start anew.