Undaunted: Normandy – Promo Scenario 17: Battle of San Pietro
Undaunted: Normandy – Promo Scenario 17: Battle of San Pietro Rulebook
Table of Contents
Table of Contents
Objectives
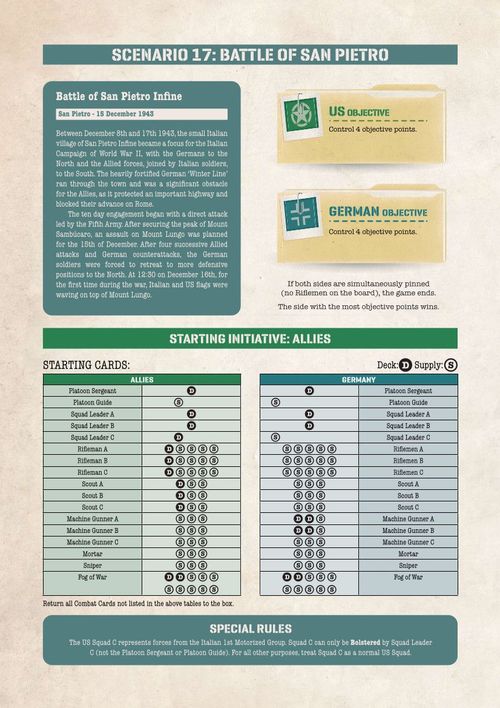
- US objective: Control 4 objective points.
- German objective: Control 4 objective points.
- If both sides are simultaneously pinned (no Riflemen on the board), the game ends.
- The side with the most objective points wins.
Starting Initiative
- Starting initiative: Allies.
Starting Cards
Each side begins with the combat cards listed below. Deck (D) cards go into the player's deck; Supply (S) cards go into the player's supply. The number of symbols in each cell is the number of cards of that type.
| Card | Allies Deck | Allies Supply | Germany Deck | Germany Supply |
|---|---|---|---|---|
| Platoon Sergeant | 1 | 0 | 1 | 0 |
| Platoon Guide | 0 | 1 | 0 | 1 |
| Squad Leader A | 1 | 0 | 1 | 0 |
| Squad Leader B | 1 | 0 | 1 | 0 |
| Squad Leader C | 1 | 0 | 0 | 1 |
Return all Combat Cards not listed in the above tables to the box.
Note: the card names above follow the Allies column of the printed table. The German column prints the same cards as Platoon Sergeant, Platoon Guide, Squad Leader A/B/C, Riflemen A/B/C, Scout A/B/C, Machine Gunner A/B/C, Mortar, Sniper and Fog of War; the figures above are the counts of the Deck and Supply symbols printed in each row.
Special Rules
- The US Squad C represents forces from the Italian 1st Motorized Group. Squad C can only be Bolstered by Squad Leader C (not the Platoon Sergeant or Platoon Guide). For all other purposes, treat Squad C as a normal US Squad.
Setup
The printed setup page shows the map as a grid of 18 tiles, with the starting unit tokens, objective markers and squad-letter markers. Set up the map as shown on the printed setup diagram.
Tiles: 1B, 2A, 3B, 4A, 5A, 6B, 7B, 8B, 9A, 10A, 11B, 12A, 13B, 14B, 15B, 16A, 17B, 18B
Map layout (as printed, top row first, left to right):
- Row 1: 9A, 11B, 18B, 17B
- Row 2: 5A, 16A, 3B, 15B
- Row 3: 12A, 14B, 10A, 2A
- Row 4: 1B, 8B, 6B, 4A
- Row 5: 7B, 13B
The rows are offset from one another as drawn in the diagram; the diagram is the authority for exact alignment.
Markers shown on the setup diagram:
- Objective markers (tan flags): 9A (2), 5A (1), 16A (2), 14B (1), 10A (1), 2A (2).
- Squad markers: a white marker labelled A beside tile 12A; a white marker labelled B beside tile 1B; a white marker labelled C beside tile 13B.
- Allied unit tokens (green): Scouts A and Riflemen A on tile 12A; Riflemen B and Scouts B on tile 1B; Riflemen C and Scouts C on tile 13B.
- German unit tokens (teal): Gunners A on tile 16A; Gunners B on tile 2A.
- Sniper / Mortar marker: a white marker reading "Sniper / Mortar" on tile 1B.
- Round green and teal tokens: the diagram also places unlabelled round tokens (green for Allies, teal for Germany) on tiles 5A, 12A, 1B, 7B, 13B (green), and 18B, 17B, 2A, 8B, 6B (teal), and a teal square marked "ALL" on tile 17B. These round icons carry no printed text in the scenario book; the placement is taken from the diagram.
Note: the setup diagram is a picture. The descriptions above were read from it and the printed labels; where a token has no printed text, its placement is transcribed from the diagram only and should be checked against the printed page.