The Order of Veiel
The Order of Veiel Rulebook
Table of Contents
Table of Contents
Goal of the Game
The Order of Veiel is a cooperative game for 1 to 7 players in which a team of adventurers faces a dungeon master and his hordes of monsters. The players must cooperate to defeat the torments of the crypt using every tool at their disposal. They must equip themselves and gain levels to master their abilities if they hope to defeat the threat hanging over Ednel.
1 to 7 players. Ages 15 to 99. 1h30 per game.
Box Contents
- 1 board
- 4 boss sheets
- 13 hero sheets
- 31 monster cards, including 5 powerful monsters and 4 boss miniatures
- 231 cards, including: 86 weapons; 31 armors and shields; 30 runes, phylacteries and mandolin; 29 consumable items; 35 events; 20 rooms
- More than 100 tokens
- 1 cotton bag printed with the Order of Veiel logo + 5 plastic pouches
- 40 black crystals
- 16 red and green cubes
- 8 twenty-sided dice and 6 six-sided dice
- 15 plastic card holders
Setup
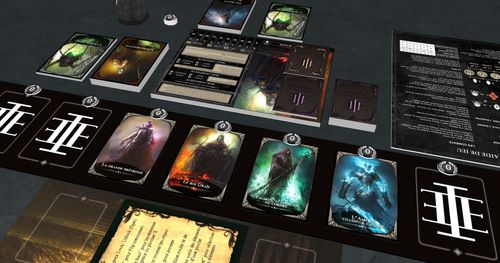
- Place the game board in the centre of the table, making sure the end of the dungeon points toward the dungeon master (DM, "MDD" in the French text).
- The players choose a boss among the four available, then take its descriptive sheet, its boss card, its event card and its special room card (see "The Bosses" below).
- Place the 5 powerful monsters in front of the DM. Then shuffle the basic monster cards and the event cards and place them in front of the DM.
- The DM places the first room cards in the dungeon. He must first place 1 MONSTER card at the start of each wing, then 1 EMPTY ROOM card and 2 CHEST cards so that each wing contains 2 cards.
- Each player chooses the character they will play during this game and takes the corresponding sheet. Then look for your starting equipment (visible at the bottom right of your sheet) in the blacksmith and alchemist piles. Place a level 1 token in the level slot (see "The Character Sheet"). Determine with which phylacteries the adventurers begin their adventure (see "The Phylacteries" below). Then choose the defender (shield token), who will be the monsters' preferred target. Place a red cube in the VIT column based on your character's VIT value. Do the same with a green cube for END.
- Take the alchemist cards, take from them one alchemical bomb and one poisoned knife, and distribute them as you wish among all the players. Place the remaining cards face up on the ALCHEMIST slot. Take the blacksmith cards, shuffle them, then make two face-down piles that you place on the BLACKSMITH slots.
- Finally, place the token representing the players in the middle of the REST ZONE and give a 20-sided die to each player. You are now ready to enter the dungeon.
The Phylacteries
If your team masters the rules or is comfortable with this type of game, at the start of the game, once your team is formed, half of your players (rounded up) may have a phylactery. To determine which phylactery you are granted, draw them at random. Phylacteries are placed on an item slot.
Note: phylacteries can be used as many times as you wish. They cannot be exchanged or lost. If you wish to part with them, simply put them back in the game box.
Beginner players: do not hesitate to read the section "Building a Well-Balanced Team" before choosing your characters.
The Character Sheet
A - Above the central illustration is the character's class; below it is the slot for the level token. To the left and right of your hero's image are respectively the vitality counter and the endurance counter.
B - On the left are your characteristics. In order: "VIT" or vitality, which is your total of hit points; "END" or endurance, which allows you to use your abilities. "FOR, DEX, INT and FOI" (strength, dexterity, intelligence and faith) are the characteristics linked to equipment. These characteristics are used to carry and use the game's weapons/armor. They are also added to your attack and ability rolls, increasing your chances of hitting the enemy. The first column, called "LEVEL", will receive the points you gain when changing levels, while the second, called "RUNE", will receive your temporary rune points.
C - On the last line of the characteristics are your "DEF" or defense and your "RED.DÉG" (damage reduction), as well as any bonuses given by your armor and shield. These characteristics are used when you suffer a monster's attack.
D - On the right are your character's abilities. The first is available at level 3 and the second at level 5. Each ability comes with a text describing its effect and its conditions of success, its possible cost, and a short flavor phrase related to your hero.
E - At the bottom are the slots where you can place your blacksmith equipment cards. In order:
- the armor
- the first one-handed weapon
- the second one-handed weapon or a shield
- overlapping the two previous slots, the two-handed weapon slot
- the rune
F - At the top are the slots where you can place your two alchemist items.
Note: all equipment not carried by the players takes no slot on the character sheet. Conversely, consumable items must be stored in one of the two ITEM slots of the character sheet.
The Rest Zone
The neutral zone, or rest zone, is your haven of peace. The members of the Order and its craftsmen await you there. When the adventurers enter the rest zone, they recover all their hit points (including adventurers who are out of combat), they regain their endurance, and curses are dispelled. In this zone it is also possible to spend the game's currency (the crystals) with the various merchants, or to make your heroes progress.
Gaining Levels
Each time you return to the rest zone, you may spend your crystals to gain levels. Each level gained gives you one point to assign to the characteristic of your choice.
Note: gaining levels unlocks an ability at level 3 and at level 5.
A character can gain several levels simultaneously by paying the total cost.
How to Gain Levels
To move up to the next level, you must pay as many crystals as your current level. To go from level 1 to level 2 you must therefore pay 1 crystal, then from level 2 to level 3 you must pay 2 crystals, and so on, up to your last level-up, which will cost you 4 crystals. Then place the token showing your new level on your character sheet.
Finally, increase one of your characteristics (VIT, END, FOR, DEX, INT, FOI) by 1 point per level gained by placing the token in the corresponding "Level" column.
(Levels 1 to 5; each level gained gives +1 characteristic point.)
The Alchemist
The alchemist pile is freely accessible throughout the game; do not hesitate to consult it regularly.
The alchemist is in the rest zone, marked by a draw slot and a discard slot.
Buying an Item
To buy an item from the alchemist, simply pay the price shown on the card and have an item slot available on one of the team's characters.
Consumable Items
Consumable items are all the cards bought from the alchemist pile. Unless "Unlimited use" is noted, each time a consumable item is used it is placed in the alchemist's discard pile.
Note: each time you return to the rest zone, put the consumable items discard pile back into the alchemist pile.
Each player can carry up to two consumable items maximum. You must therefore discard or use a consumable item before taking a new one if your two slots are already filled. Items bearing the broken shield symbol mean that monsters take the full damage dealt by them; their damage reduction is therefore ignored.
The Blacksmith
The blacksmith is in the rest zone, marked by two draw slots and a discard slot. It is in these piles that the players draw the loot obtained while exploring the dungeon.
Buying Equipment
Each time the players return to the rest zone, they may reveal 5 cards from the blacksmith piles. You then only need to pay the price shown on the card to obtain the equipment. Everything that is not bought goes into the discard pile and is permanently lost.
Selling Equipment
The blacksmith buys back all equipment at 1 crystal each, regardless of its rarity level. Equipment sold is placed in the blacksmith's discard pile and is permanently lost.
New Stock
If the 5 cards revealed at the blacksmith do not suit the players, they may pay 3 crystals to draw 5 cards again.
Equipment
Equipment is all the cards recovered from the BLACKSMITH piles. This includes weapons, armors, shields and runes. All equipment not worn is stored in a bottomless box of unlimited capacity. Note that it is impossible to exchange or equip weapons/armor/runes in combat or in an unresolved room. However, there is no limit to exchanging or equipping in a resolved room or in the rest zone. It is possible to take equipment from, and give equipment to, an ally who is out of combat under the same conditions. The ribbons (gold, silver, bronze) indicate the rarity of the equipment.
Equipment has the following characteristics:
A - The name B - The prerequisites necessary to use it. Runes have none. C - The purchase price D - The effect, bonus or damage of the card
Weapons
Weapons have additional information positioned at the top left of the card:
- One-handed weapon: can be carried with a shield or another one-handed weapon.
- Two-handed weapon: occupies two slots. It is impossible to carry another weapon or a shield.
- Melee weapon: you can only target the first enemy on the battlefield.
- Ranged weapon: you are free to target any enemy on the battlefield.
- A pictogram indicates the characteristic that will be added to attack rolls or validation rolls.
- Some weapons allow you to improve your allies. To do so, you must make a validation roll following the characteristic and the value indicated by this pictogram. Practical case: the player must roll FOI greater than or equal to 16.
Course of the Game
We will first describe briefly how a game goes, then go into detail. Once the setup is done, the characters equipped and the master ready to defend himself, a game proceeds as follows:
- The adventurers choose a wing to explore. The DM draws his event card(s).
- The players turn over the card of the chosen wing to resolve its effect (see "Combats" for cards involving a fight).
- Once the room is resolved, the players may exchange and equip the items won or use their support abilities (heal, resurrect, seal a room, etc.). They then choose either to continue their progression or to return to the rest zone.
- The two previous steps repeat until the adventurers have resolved the last card of the wing. They can then choose to face the boss or return to the rest zone. Note: facing the boss is a final decision. If the adventurers die during the final confrontation, the game stops, so be sure of your abilities before committing to the ultimate combat.
- Once back in the rest zone, the players may spend their crystals or save them. Note: you lose all your saved crystals if you die.
- The DM shuffles the room cards placed on the board following the rules explained in "The Corruption".
- The players may go back into the dungeon. Repeat these steps in a loop until your 5th incursion.
Players can change wings while advancing in the dungeon, but each time they make this decision, the DM draws a new event card.
Each time the players progress by one room, all characters recover 1 endurance point.
End of the Game
The game ends if the players are defeated or win the final combat. Likewise, the players have a limited number of round trips into the dungeon. The adventurers will be forced to face the boss on their 5th entry into the dungeon. If they do not reach the boss during this crossing, they also lose the game.
Events
The DM has "event" cards allowing him to hinder the adventurers' progress. These cards can be played at any time in the dungeon (except in specific cases indicated in the card's description). The DM draws his event cards before the players enter the dungeon; he starts the game with one card.
The number of event cards drawn by the DM can vary according to the number of players (see "Balancing") and the corruption of the dungeon (see "The Corruption - The dungeon becomes more complex" below). On returning to the rest zone, all unused cards are discarded.
The DM systematically has priority over the players. For example, if the players decide to continue their progression, the DM can interrupt their advance and play the "Horde Attack" card to trigger a new combat. He can also wait for a player to succeed on a DEF roll to use "Curse of Defense" and ensure the player's failure.
The Corruption
The corruption represents the evil entity controlling the dangers of the crypt. It defends itself against the adventurers' intrusion and manifests in several forms.
The Dungeon Constantly Changes
Each time the players return to the rest zone, the DM takes from the board as many room cards as there are adventurers. Then he replaces them as he wishes, always making sure there is the same number of cards in the 3 wings of the dungeon. In this way, the players never know what to expect when they enter the crypt.
The Dungeon Becomes More Complex
Each time the players return to the rest zone, the DM increases the difficulty of the dungeon. This increase takes several forms:
- The DM draws one additional event card for each difficulty level.
- Each wing of the dungeon stretches. After swapping as many room cards as there are players, the DM adds 3 cards at the end of the dungeon (see the sidebar below).
Reminder of the cards added at each stage:
- First 6 cards: 3 MONSTERS, 2 CHESTS, 1 EMPTY ROOM
- 1st difficulty: 1 CORRUPTED VINE, 1 POWERFUL MONSTER, 1 TRAPPED ROOM
- 2nd difficulty: 1 UNIQUE CHEST, 1 SPECIAL ROOM, 1 RIDDLE
- 3rd difficulty: 1 REST ROOM, 1 TRAPPED ROOM, 1 POWERFUL MONSTER
The Special Room
Once the special room has been revealed, the DM replaces it with a "Powerful Monster" card whether the adventurers succeeded or failed. Note that the special room is added at the 2nd difficulty.
The Throne Room
This card can be placed in place of the powerful monster room of the 1st difficulty. Once the throne room is resolved, the DM replaces it with a powerful monster room card. Only add this card if your adventurers are used to travelling the crypt and want more difficulty.
The Bosses
The DM or the players choose a boss at the very start of the game. The boss gives the DM a specific power, a special dungeon room, and an A4 sheet to use during the final confrontation.
Boss powers behave like events except that they can only be played 2 times during the game and only 1 time per crossing of the dungeon. A boss power cannot be used during the final combat.
Using your power at the right moment can swing the game in the DM's favor. Special rooms are far more perilous; flee, poor fools! The boss's vitality depends on the number of players (see "Balancing").
Which One to Choose?
Some additional information to guide your choices:
- The High Priestess is the easiest of the four proposed bosses as long as your team has at least 4 players. You can choose her when the players are inexperienced. Moreover, her mind-control mechanics will let new players get familiar more easily with the defense roll mechanics. On the other hand, she is atrociously difficult when your team has only 3 players or fewer.
- King Urais is an intermediate-level boss. He has a great number of hit points at 6 players. A team without a defender worthy of the name will have no chance of victory. An ill-prepared team will run out of steam against this tough threat.
- The Apprentice of the Order is the greatest threat in the crypt when your team has at least 5 players. If there are only 2 or 3 players in the team, the necromancer will probably be the easiest boss to face. Favor him against a team prepared for an exhausting and stressful final confrontation.
- The Soul of the Charred Hunter was unlocked during the crowdfunding campaign. He will adapt perfectly to all teams by offering a balanced challenge, whatever the number of players around the table.
Specific Case of "The Priestess's Lair"
If the adventurers decide not to actually fight during the "Priestess's Lair" confrontation, the DM is allowed to send the group back to the rest zone. This choice counts as a defeat and the players lose all their crystals.
To vary the game experience, do not hesitate to mix the bosses and their associated cards.
Combats
The battlefield is symbolized by the stands holding the cards upright. The monsters line up from left to right from the DM's point of view. This means that players without a ranged attack or weapon must always focus on the first monster of the battlefield, located on the left from the DM's point of view.
Facing Basic Monsters
After determining the number of enemies following the rule specified on the room card, the DM draws his monsters and places them on the battlefield in the order he wishes.
Facing Powerful Monsters
Unlike basic monsters, a powerful monster can only be chosen again when all the other powerful monsters have been faced.
Note: when a powerful monster attacks several times, for each attack it may choose a different target and a different ability.
Detail of a Monster Card
A - The name B - The attack and defense characteristics (ATT, DEF) C - The hit points D - The damage reduction E - The damage and its special abilities
The Defender
The defender is represented by a tower token. It determines the player who will suffer the attacks of the DM's monsters. Monsters must attack the defender unless the mention "Ignores the defender" appears in their description. The player who holds the defender token may pass it to another player at any time: before the monsters' attack, between each monster attack, or between 2 attacks of powerful enemies.
Fleeing a Combat
It is impossible to flee the boss combat. It is possible to flee a combat against basic monsters or powerful monsters. The roll is made at the start of the players' turn.
- The defender rolls a d20. The value must be greater than or equal to 7 + the number of enemies present on the battlefield.
- If he fails, the combat resumes its course; otherwise the players return to the rest zone keeping all the loot gathered.
Players' Turn
The players always begin the combat. At the start of each players' turn, the adventurers determine who will attack first, then the players attack in turn, clockwise.
Each player has the following actions; he can only perform one per turn:
- Attack with a weapon
- Use an ability
- Use a consumable item
- Perform a contextual action
Attacking with a Weapon
To attack with a weapon, choose your target taking into account the weapon's possibilities (ranged or melee), then make an attack roll by rolling a 20-sided die. Then add to this result the characteristic linked to your weapon. Example: if your weapon is an axe that uses strength, you add your character's strength bonus (see "Equipment - Weapons").
In opposition, the DM makes a defense roll by rolling a 20-sided die to which he adds the monster's DEF (see "Combats - Monster"):
- If the player wins, the DM announces that the attack hits, then reduces the monster's vitality, taking into account any damage reduction.
- If the player loses, the DM announces that the attack misses and the player's turn ends.
- If the result is a tie, the DM and the player re-roll their dice.
Criticals
- If the player rolls a 20 on the die and the DM does not roll a 20 on defense, this is called a critical success. The player necessarily hits and deals double the damage of his weapon.
- If the DM rolls a 20 when defending and the player does not roll a 20, the player will never hit his target.
- If both sides roll a 20, the combat proceeds by the normal rules.
- If the player rolls a 1 on his die, this is called a critical failure. The player will never hit his target even if the DM rolls a 1 in DEF in turn.
- If the DM rolls a 1 when defending: the player deals double the damage of his weapon.
- If the player rolls a 20 and the DM rolls a 1, the damage is multiplied by 4.
Practical Case
Jacques attacks a zombie with his barbarian who has a strength of 11. He uses a Great Axe that is based on the FOR characteristic (see "Equipment - Weapons"). He rolls his die and gets a 12. He therefore announces 12 + his strength to the master, that is 23. Lola, who is DM today, then rolls her 20-sided die and gets a 6, then adds her zombie's defense bonus. She compares the two results and announces that the attack goes through. Jacques, jeering with joy and hatred, announces that he has just dealt 9 points of damage to this cursed zombie.
Using an Ability
To use an ability, in most cases, you must pay the endurance cost then follow the ability's descriptive text. There are several major types of abilities:
- Abilities noted "At the cost of a roll greater than or equal to" (called a validation roll) require a d20 roll added to the characteristic(s) relating to your ability.
- For abilities noted "At the cost of a normal attack", simply follow the rules for "attacking with a weapon". If you hit, the ability triggers.
- Abilities noted "Without using your turn" can be used at will during a turn as long as you meet the ability's prerequisite. You may also perform another action in the turn, no matter how many times you used the ability.
- Passive abilities, or those that require no roll.
- Abilities with a "Ranged attack" icon similar to the one found on weapons allow you to aim at any enemy.
- Abilities bearing the broken shield symbol mean that monsters take the full damage dealt by the ability; their damage reduction is therefore ignored.
You recover 1 END point each time you change rooms. A thoughtful team knows how to use this mechanic to its advantage.
Case of a Critical Hit on an Ability Requiring a Roll
If the ability begins with "At the cost of a normal attack", the critical rule linked to weapons applies. For example, an assassin using his sneak attack would deal double damage. For abilities requiring a validation roll, such as the healer's heal or the magician's magic missile, a critical by the player lets him recover the endurance points used to cast the ability.
Practical Case Using the Magician
Yoan, a magician with an INT of 9, decides to cast a MAGIC MISSILE at an animated statue. He deducts 2 END points before rolling his die. He rolls a 10, to which he adds his INT. The total is 19 and the prerequisite for his attack to hit is 15, so the MAGIC MISSILE succeeds. As indicated on his character sheet, the monster therefore takes (9 INT / 2) + 2 points of damage, i.e. 6.5 points of damage, rounded up to 7 points of damage. This action ends his turn.
Practical Case Using the Shaman
Helene, who plays the shaman today, decides to heal Thomas the knight. She wants to use her "ENERGY TRANSFER" ability. After succeeding on her FOI roll, she lowers her VIT gauge by 2 points to give 4 hit points back to Thomas. Before ending her turn, she uses the second part of her ability. It is noted "without losing her turn", so she activates it 2 times and lowers her END gauge by 2. She recovers the 2 VIT points she just used. Not wishing to transfer more END to VIT, she ends her turn.
Using a Consumable Item
If the player uses an item in his inventory, he resolves the item's effect before discarding it. Using an item uses up your turn unless the card specifies otherwise.
Contextual Actions
For specific cases, simply refer to the descriptive text accompanying the effect (see the "Imprisonment" event card).
Master's Turn
The DM plays all the monsters one after another, starting with the one furthest to his left.
Attacking with a Monster
To attack with a monster, choose its target taking into account its possibilities, that is, whether it can ignore the defender or not. Then make an attack roll by rolling a 20-sided die. To this result add the monster's attack characteristic (see the box on monster cards).
In opposition, the player makes a DEF roll by rolling a 20-sided die to which he adds his natural DEF as well as that of his armor:
- If the DM wins, he announces that the attack hits then states the damage dealt by the monster. The player lowers his vitality taking into account the possible damage reduction of his shield and armor. It is also at this moment that certain monster abilities such as poison trigger.
- If the DM loses, he announces that the attack does not hit and attacks with the next monster.
- If the result is a tie, the DM and the player re-roll their dice.
Criticals
- If the DM rolls a 20 on his die and the player does not roll a 20, he necessarily hits and deals the monster's damage, ignoring the damage resistance of the player's shield.
- If the player rolls a 20 when defending and the DM does not roll a 20, the DM will never hit his target.
- If the DM and the player both roll a 20, the combat proceeds by the normal rules.
- If the DM rolls a 1 on his die, this is called a critical failure. The DM will never hit his target even if the player rolls a 1 in turn.
- If the player rolls a 1 on his die, this is called a critical failure. The DM deals the monster's damage ignoring the damage resistance of the player's shield.
A combat that would be hopeless for the players or the monsters can be resolved without further delay. The DM is not obliged to show his dice rolls. He is free to cheat to create dramatic tension among the jittery players.
Special Monster Abilities
- Ignores the defender: allows the monster to attack a player other than the defender.
- Poison: a poisoned player loses hit points at the start of his turn. The value lost is indicated on the monster's card. Poison dissipates when the combat ends or when the character dies.
- Ignores defense: the player adds no DEF bonus to his die roll to avoid being hit.
- Ignores damage reduction: the player's armor and shield do not reduce damage when he is hit.
End of the Combat
The combat ends when all the monsters are dead or all the players are out of combat.
Victory of the Adventurers and Loot
When the players win a combat, they gain:
- 2 crystals per basic enemy defeated
- 6 crystals per powerful enemy defeated
Then they roll:
- 1 die per basic enemy defeated
- 4 dice per powerful enemy defeated
For each die rolled showing an even number, the adventurers draw 2 cards from the blacksmith pile.
Deaths, Resurrections and Defeat of the Players
If a player's vitality reaches 0, he is out of combat. To let him keep playing without going through the rest zone, a teammate can use a resurrection stone or the resurrection ability. The player then returns with all his hit points; his endurance remains unchanged. If the resurrected hero is after the player who revived him in the combat order, he may then play his turn. Otherwise, he will not play this turn. As a reminder, a player who is out of combat regains all his hit points in the rest zone.
If the whole group is out of combat, the players lose all their unspent crystals and return to the rest zone.
As a reminder: if the group is out of combat during the confrontation against the boss, the game is over and the master wins.
(Summary diagram: loot dice per enemy defeated: 2 x number of basic enemies, 6 x number of powerful enemies, etc.)
Balancing
All monsters were created and tested in an environment with 4 players. Here is a table showing how to adapt the game according to the number of players.
| Number of players | 2 | 3 | 4 | 5 | 6 |
|---|---|---|---|---|---|
| Boss HP | -30 | -20 | 0 | +20 | +40 |
| Powerful monster HP | -8 | -5 | 0 | +5 | +10 |
| Event cards | -1 | -1 | 0 | 0 | +1 |
This table is a standard indication of balance; you are free to modify these values according to your players to increase or decrease the difficulty.
Playing Without a DM
Preparing the Dungeon
Place a "Monster" room card at the start of each wing, then take the cards that would be placed in the dungeon by the DM and shuffle them before laying them out randomly. At each return to the rest zone, take the rooms visited and as many unvisited rooms, then shuffle everything and lay them out randomly. For example, if your group visited 3 rooms of the dungeon, collect these as well as 3 other face-down cards before laying them out randomly.
Combats
Combat Values
As there is no DM to roll the dice, the players fix the monsters' attack and defense values, so consider that the monsters always make the same roll. The initial value of the enemies' attack and defense roll is 5 (as if the DM only rolled 5s on his die), then for each new line added to the dungeon, increase this value by 2. If you want to increase the difficulty, you can play with a starting value of 7 instead of 5.
Ordering the Monsters in Combat
Always randomly:
- Place the zombies
- Place the defenders
- Place the enemies with no particular effect
- Then those who hit at range
- Finish with those who trigger effects
You are free to change this order by looking at each card and placing the enemies to increase the challenge.
Ignores the Defender
For monsters ignoring the defender, roll a six-sided die to determine the player who will suffer the attack. Do not include the defender in the possibilities.
Events
Before starting the game, remove the "Ambush" and "Secret Door" cards from the event pile. Then add the boss events "Mental Attack", "Covetousness of the Dead" and "Reanimation" to the pile.
Before each entry into the dungeon, draw the appropriate number of event cards using the rules in the "Events" section. Place them face down.
In combat, the first time a player rolls less than or equal to 5 when attacking, turn over one of his event cards and carry out its effect on the player who failed his roll. Continue until the pile of events drawn for this incursion into the dungeon is empty.
Specific Case "Muteness"
If you trigger a muteness, it will target in priority the level 5 ability of the player who triggered the event; failing that, it will target the level 3 ability. If the player has no ability, then target the player on his left. Repeat the operation until you have gone around the table. If nobody has reached level 3, the event has no effect.
Specific Case "Lost Item" and "Breakage"
If you trigger a lost item or a breakage, target an item or a piece of armor at random on the player who triggered the event. If he has no item that can be affected by these two events, then target the player on his left. Repeat the operation until you have gone around the table. If nobody meets the criteria, the event has no effect.
Specific Case of Traps
If a trap must deal damage to several players, target the player who triggered the event and then the adjacent players for the Spike Slab, or the player on the left for a Rockfall.
Specific Case "Strategic Error"
If a player activates the strategic error event, roll a six-sided die to determine who will carry the defender this turn. Do not include the defender in the possibilities.
If the players are numerous enough, they would do well to plan a backup defender. Equipping the defender should always be an absolute priority; the group's survival depends on his.
Playing Solo
You have probably read the whole manual to get this far. We have good news: you do not need to know more to play alone. Simply take two characters that you will control alone and play without a DM. Then keep an eye on the balancing section to modify the monsters' hit points accordingly.
Building a Well-Balanced Team
If forming a functional team seems an insurmountable task, this section is for you.
Every good team should have at least one defender, one healer and one striking force. For beginners, we advise starting with the knight, the healer and the barbarian.
As the knight is the defender par excellence, it will be easier for you to survive. The healer will efficiently treat the group's ills while the barbarian offers a good compromise between damage and survivability if the knight were to be put out of combat.
If your team has more than three players, add so-called support characters to interact with the board (sealer, scholar) or ranged striking forces (adventurer, magician, pyromancer, assassin...).
Never give a resurrection stone to a key character of the team. Remember that an item carried by a corpse is unusable until the end of the combat.
The Defenders
They are the team's rampart, the characters trained in close combat who will not hesitate to take blows for their comrades.
Knight: Simple difficulty. The knight is the defender par excellence. Equip a good shield and a good armor to easily survive any form of threat. In case of a critical failure or a violent attack, do not hesitate to use your perfect block to stem the problem. Conversely, if an enemy that is too resistant shows up, use your guard breaker to lower its defense and damage reduction while dealing excellent damage. Aim first for FOR then DEX to reach the prerequisites for your equipment.
Barbarian: Simple difficulty. The barbarian is a simple hero who ensures constant damage. Perfect for a player of limited cognitive potential, he only needs to maximize his strength and endurance to carry the most imposing weapons and slaughter his enemies without difficulty. One by one, they will fall under your attacks. After all, no monster will have the chance to strike if it is crushed under a bone-breaker. The barbarian also has the assets necessary to become the defender; it would be a pity, however, not to equip him with a two-handed weapon.
Horde Breaker: medium difficulty. The horde breaker is a strategic choice if your team has many heroes specialized in melee. From level 3, he can pull a dangerous enemy out and place it in the front line. He can also charge and deal his weapon's damage to the first three enemies of the battlefield. As with the barbarian, increasing his strength and endurance will be enough to push this character to the doors of excellence.
Brigand: hard difficulty. If there is one hero who will solve all your worries, it is the brigand. But whether as defender or striking force, it is not in combat that this old trouper will shine. His smuggler ability will allow you, at first, to push exploration more easily by buying a resurrection stone or a potion in the middle of the dungeon. An immeasurable asset that improves over time. At level 5, the "Guild Member" ability offers you the possibility of buying, exchanging or giving the alchemist's consumable items without losing your turn, and this in the middle of combat. An urgent need? If you have the funds, ask the brigand.
Some characters are more effective against a single target while others excel at mass elimination. Remember to read everyone's abilities before deciding.
The Striking Forces
Pyromancer: easy difficulty. The pyromancer is to magic what the barbarian is to martial arts. He has only one goal in life, to spread death by fire. For this, he has a powerful fireball capable of igniting any target for several turns. But if burning one enemy is good, burning all the enemies is better! For his ultimate level, the pyromancer acquires one of the most devastating abilities in the game: Born of Flames. This attack lets him deal a large amount of damage to all adversaries on the battlefield while healing his own wounds at the same time. Just raise his intelligence and faith to make any horde of enemies bend.
Magician: easy difficulty. Like the pyromancer, the magician is an easy character to approach. He has a magic missile capable of finishing off most basic enemies in a single blow, while his second ability eradicates the rank and file of the battlefield with disconcerting ease. If you like magic and the robes that go with it, the magician is made for you. Just raise his intelligence and endurance to optimize his damage and ravage the monsters flooding the crypt.
The Healers
Healer: hard difficulty. The healer is one of the most competent characters in the game. Inflicting wounds in melee or at range, healing, reviving or strengthening allies, his versatility makes him a pillar among the heroes of the order. Of course, the healer also has his weaknesses. Beware of his lack of resistance to enemy attacks. It takes little for him to perish, but if you manage to protect him effectively, he will repay you. Faith and endurance are your priorities; however, do not neglect to raise his total hit points a little.
Shaman: hard difficulty. Although the shaman is formidably effective, she remains hard for a neophyte to grasp. Unlike the healer, her group-healing ability costs her hit points, not endurance. However, there is no need to be afraid: the shaman has an ability of her own that lets her transform her endurance into hit points. You will therefore have to juggle your two gauges throughout the game to keep your team afloat. In addition to her healing ability, the shaman can, at her last level, drastically improve an ally's characteristics, a unique asset that will maximize the team's effectiveness. To level the shaman, you can raise her life and endurance to let her use her abilities more often. To improve your healing abilities, raise her faith. Her dexterity gives her access to a wide range of weapons.
Keeping your healer alive is crucial to the success of your mission!
The Supports
Assassin: medium difficulty. The assassin is the single-target striking force par excellence, but that is not her only use. With her smoke screen ability she is, along with the knight, the only hero able to change the situation after an unsuccessful defense roll. However, do not forget to equip assassin weapons so you can play your sneak attack ability. A good practice for this character is to increase her dexterity to equip the best weapons possible. Nevertheless, do not forget that the assassin relies on her endurance to deal her damage.
Adventurer: easy difficulty. The adventurer is the ideal character for loot aficionados. In addition to starting the game with an item that lets him open all the dungeon's chests for free, at level 3 he has a unique ability offering the possibility of re-rolling lost loot dice. Of course, recovering equipment is not his only use. At level 5 the adventurer acquires a devastating single-target ability dealing three times his weapon's damage. If you like making a mouthful of a powerful enemy, the adventurer will delight you. Favor dexterity to increase your chances to hit and endurance to annihilate the enemy with several hits.
Scholar: medium difficulty. The scholar lets you, at any time, reveal the dungeon's cards. The possibility of choosing your wing with full knowledge and foiling the DM's pitfalls is a power not to be neglected. In addition to his infinite knowledge, the scholar has a crystal shrapnel, a good way to get rid of an annoying trio of enemies. A good practice for this character is to increase his faith as well as his intelligence to be able to use the best magic weapons. Secondly, do not hesitate to increase your endurance points so as to cast as many abilities as possible.
Sealer: hard difficulty. The sealer can, before leaving a resolved dungeon room, freeze it to prevent the DM from moving it. Making sure of the position of a unique chest, preventing a powerful enemy from wandering about, or planning an easy path before going to face the boss are all strategies at your disposal. The sealer has a unique ability allowing him to cure poison. In addition to his support abilities, the sealer has a destructive attack at level 5. Remember to take a Seal of the Last Chance from the alchemist. A good practice for this character is to increase his faith as well as his intelligence to be able to use the best magic weapons. Secondly, do not hesitate to increase your endurance points so as to cast as many abilities as possible.
Bardess: hard difficulty. The bardess is the ultimate character created for chapter 1 of the Order of Veiel. Unlocked during the crowdfunding campaign, she acts as a truly versatile character. Her mandolin lets her heal, deal damage, restore endurance or save her allies from death. But to counterbalance her versatility, the bardess cannot part with her mandolin, so she can only carry a single consumable item. The bardess can be improved in many ways. You can maximize your endurance to play a large number of spells with reduced effectiveness, or optimize your intelligence to raise your healing and damage values. Do not forget to raise your dex as well to better succeed at your validation rolls.
Do not neglect the usefulness of supports. Each one, in its own way, eases your incursions into the dungeon. Remember to always keep a few crystals for the alchemist before heading back into the dungeon.
Game Tokens
The box contains many tokens indicating the effects applied to players or monsters. Without being mandatory, they serve as reminders during the game. We encourage you to make them your own.
Some examples of tokens and their use in the game:
- This token tracks the poison inflicted on a player.
- This token lets a player remember that he has received the bonus of the beginner's talisman.
- This token lets the DM remember that his monster suffers the knight's guard breaker penalty.
- This token helps remember the rooms frozen by the sealer.
Player Aid
The Dungeon
First 6 cards: 3 MONSTERS, 2 CHESTS, 1 EMPTY ROOM
1st difficulty: 1 CORRUPTED VINE, 1 POWERFUL MONSTER, 1 TRAPPED ROOM
2nd difficulty: 1 UNIQUE CHEST, 1 SPECIAL ROOM, 1 RIDDLE
3rd difficulty: 1 REST ROOM, 1 TRAPPED ROOM, 1 POWERFUL MONSTER
Combats
Attacking with your weapon: d20 + characteristic bonus indicated on the weapon. Damage x 2 on a player critical or DM critical failure. The attack fails on a player critical failure.
Avoiding an attack: d20 + DEF bonus + armor bonus. You automatically dodge on a player critical or DM critical failure. The dodge fails on a player critical failure.
Taking damage: monster damage - armor reduction - shield reduction. On a player critical failure or a DM critical on the dodge, the shield does not reduce damage.
Using a consumable item: perform the item's effect then place the card in the discard pile.
Ability noted "at the cost of a roll greater than or equal to": d20 + characteristic bonus. Do not pay the END cost on a player critical. The ability fails on a player critical failure.
Ability noted "without using your turn": usable as many times as you wish at any time during your turn.
Ability noted "at the cost of a normal attack": d20 + characteristic bonus indicated on the weapon. Damage x 2 on a player critical or DM critical failure. The ability fails on a player critical failure.
The DM
- 6 cards in the dungeon = 1 event card
- 9 cards in the dungeon = 2 event cards
- 12 cards in the dungeon = 3 event cards
- 15 cards in the dungeon = 4 event cards
| Number of players | 2 | 3 | 4 | 5 | 6 |
|---|---|---|---|---|---|
| Boss HP | -30 | -20 | 0 | +20 | +40 |
| Powerful monster HP | -8 | -5 | 0 | +5 | +10 |
| Event cards | -1 | -1 | 0 | 0 | +1 |
Rest Zone
- All players recover their VIT and END.
- The blacksmith sells 5 cards. Pay 3 crystals to draw 5 new blacksmith cards.
- Selling equipment earns 1 crystal.
- Consumable items are freely accessible.
- You can gain levels.