The Lord of the Rings Board Game
The Lord of the Rings Board Game Rulebook
Table of Contents
Table of Contents
Object of the Game
Each player in the game starts at Rivendell with their very own Fellowship of the Ring. The object of the game is to be the first player to defeat the powers of evil, save the countries of Gondor and Rohan, and return to the Shire to write the Red Book of Westmarch and thus preserve your honored place in history.
To win the game, you must accomplish the following Six Goals:
- go to Moria and defeat the Balrog;
- go to Edoras and awaken Theoden;
- go to Isengard and taunt Saruman;
- go to Pelargir by way of Erech and defeat the Black Fleet;
- go to Minas Tirith and supplant Denethor; and
- go to Mount Doom and throw the Ring into the Fire.
The first player to accomplish all six goals and return safely to the Shire is the winner. Once a player wins, all the other players have to Praise Them With Great Praise!
What You Need to Play
Here's what you'll need to play the Lord of the Rings Board Game:
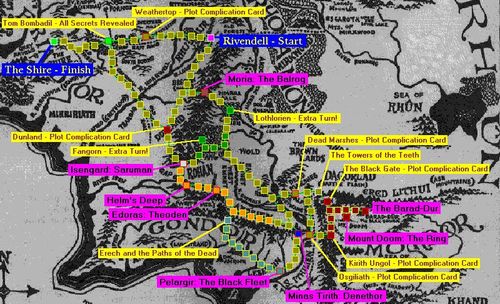
- The specially-designed Middle-earth gameboard. To look at the gameboard in detail, just click on the picture.
- A deck of plot complication cards. There are 72 cards in the deck, described later. For games with five or more players, though, you might find it useful to use more than one deck.
- A set of checklists, one for each player, so they can keep track of what goals they've accomplished. Obviously a few pencils might be a good idea, too.
- A set of appropriate markers, used to represent each of the players in the game.
- Lastly, you'll need an ordinary six-sided die.
How to Play
Starting the Game
To begin, all players place their markers at Rivendell. Each receives a checklist from Elrond (or whoever the owner of the game is) listing the Six Goals they have to accomplish to win. The Plot Complication cards are shuffled and set face down on the table. It's up to you to decide who goes first.
Movement
Players move by rolling the die and moving the number of squares indicated in whatever direction they wish to go. For the most part, it's that simple.
There are, however, Plot Complications which may cause a player to move faster, or slower, or back up, or indeed even drop what they're doing and go in a different direction entirely. There are also special squares on the gameboard which affect movement; these are described in detail in the next section.
If a player decides before rolling the die that he doesn't want to move, then he can stay put without penalty. However, once the player rolls the die, they are obligated to move. (Particularly clever players, however, can stay put anyway by just moving repeatedly back and forth between the square they're on and the immediately-adjacent square.)
The Different Kinds of Squares
There are a handful of different kinds of squares on the map. They are listed below in no particular order:
- Common squares. Most of the squares on the map are common, ordinary squares.
- Extra-Turn squares. There are only two of these on the entire board: one is at Lorien, and the other at Fangorn. If you end your turn by landing directly on one of them, you immediately get a free opportunity to move again. (In addition, landing on the extra-turn square in Fangorn can be beneficial in dealing with Saruman.)
- Squares of the Rohirrim. The land of Rohan is demarked by orange squares. There are certain Plot Complications that only affect movement while in Rohan; those take effect on these squares.
- Squares of the Dead. Between Erech and Pelargir is a succession of grey squares. When a player is accompanied by the Dead, they must stay in this area; the Dead will not follow you around through Rohan or past Pelargir.
- Squares of Mordor. The squares within Mordor are filled with a dark red. It's a really really really bad place.
- Plot Complication Squares and Goal Squares. A number of the squares on the map have red borders; these are the squares where Plot Complication cards are dispensed. You cannot pass through these squares without stopping; regardless of the roll on the die, you must stop when you arrive on one of them.
On the Plot Complication squares, you stop and draw a Plot Complication card. The Plot Complication squares are:
- Weathertop;
- Dunland;
- the Dead Marshes;
- the Black Gate;
- Osgiliath; and
- the Pass of Kirith Ungol.
The Goal squares are more complex, and will be described in detail later. However, you still have to stop at them. In no particular order, they are:
-
the Mines of Moria;
-
Isengard;
-
Helm's Deep;
-
Edoras;
-
Pelargir;
-
Minas Tirith; and
-
Mount Doom.
-
Erech. Erech is the square where the Dead wait whenever they are not otherwise occupied.
-
Rivendell and the Towers of the Teeth. Rivendell is only special in that you start the game there. The Towers of the Teeth are only special in that the square has a name. Apart from that, they're common squares.
-
The Barad-dur. Sauron's dark tower of Barad-dur can be walked into just like any other square, though it's hard to imagine why you would want to. Leaving it, however, is more difficult.
If you are trapped in the Barad-dur, you may only leave it by:
- rolling a six on the die during your turn, which allows you to move one square outside; or
- sacrificing two Plot Complication cards you have in your hand, allowing you to roll the die during your turn and move normally; or
- taking three more Plot Complication cards from the deck.
If you've been stranded in the Dark Tower for three consecutive turns, Sauron will give you a single Plot Complication card on the fourth turn and let you go free out of the goodness of his heart.
- Tom Bombadil's square. When heading for the Shire you must stop when you land on this square, and you must lay down all the Plot Complication cards you may be holding so that all can see what secrets you've been hiding. Tom didn't get a chance to meet you on the way to Rivendell in this game, so it's only fair you should stop there and say hello on your way back.
- The Shire. Once you've completed all your goals and returned to the Shire, you win the game. However, you have to land directly on the Shire; if you're standing one square away from it and roll a two or a four, for example, no amount of clever finagling will get you onto the proper square during that turn.
The Goals
Each of the players has to accomplish the Six Goals which will free Middle-earth from tyranny and make for a really exciting book. The goals can be accomplished in any order.
As each player completes a goal, they check it off of their list and continue with the other goals. Once all six goals are completed, they can race to the Shire to win the game. Be warned, however, that there are Plot Complications which may force you to do certain goals over again.
Each of the goals is covered below.
The Balrog in Moria
Once you have landed on Moria, roll a six-sided die. The results are as follows:
- 1: Gandalf can't get the door to the Mines open. Try again next turn.
- 2: You all get hopelessly lost in the Mines. Try again next turn.
- 3: Gimli insists on reciting the entire Book of Mazarbul aloud, as a tribute to Balin. Two members of the Fellowship get captured and eaten by trolls in the meantime. Try again next turn.
- 4, 5: Gandalf and the Balrog plunge into the abyss. You have been successful. Take a Plot Complication card and check the Balrog off your list.
- 6: The Balrog falls to its death, but instead of taking Gandalf along with him it takes Pippin by accident. Check the Balrog off your list. You don't need to take a Plot Complication card, but you can if you want to.
If you make subsequent trips through Moria after the Balrog is defeated, you have to stop when you reach the square but you don't have to take a Plot Complication card.
Edoras and the Healing of Theoden
Once you have reached Edoras, roll a six-sided die. Interpret the results as follows:
- 1: Grima won't let you in to see Theoden. Try again next trun.
- 2: You just missed him! Theoden just left to Helm's Deep. Ride to Helm's Deep on your next turn and try again there.
- 3: Eowyn seduces Aragorn. Theoden becomes infuriated. Try again next turn when he's calmed down.
- 4, 5, 6: Gandalf heals Theoden, and Theoden mobilizes the Rohirrim against the enemies. Take a Plot Complication card and check Theoden off your list.
If you make subsequent trips through Edoras after Theoden is healed you do have to stop when you reach the square, but you don't have to take a Plot Complication card.
Helm's Deep and the Healing of Theoden
Helm's Deep is a standard Plot Complication square most of the time: you have to stop when you reach it, and you have to take a card. In the event that you have been sent here from Edoras while seeking Theoden, however, you may roll the die with the results as follows:
- 1, 2, 3: You just missed him! Theoden just rode back to Edoras. On your next turn, go back to Edoras and try again there.
- 4: Eomer tries to kill Aragorn, demanding to know Aragorn's intentions towards his sister. Try again next turn.
- 5, 6: Gandalf heals Theoden, and Theoden makes his heroic stand against the armies of Saruman. Take a Plot Complication card and check Theoden off your list.
On subsequent trips through Helm's Deep, it acts as a standard Plot Complication square as described above.
Saruman at Isengard
Once you have landed on Isengard, roll a six-sided die. The results are as follows:
- 1: You taunt Grima Wormtongue by mistake. Try again next turn.
- 2, 3: Saruman refuses to come out to talk. Try again next turn. However: if you came here by way of Fangorn and landed on the Extra Turn square there, the Ents will tear Isengard to shreds and Saruman will have to listen. In that case, ignore this roll and roll again.
- 4: Saruman comes forth, and Gandalf breaks his staff. Take a Plot Complication card and cross Isengard off your list.
- 5: Not only does Saruman forth, but he repents of all his evil deeds. Cross Isengard off your list, but don't bother taking a card.
- 6: Not only does Saruman come forth and repent, but he joins you in your quest. A little later on temptation gets the better of him and he tries to steal the Ring. You end up having to kill him. Cross Isengard off your list, but take two Plot Complication cards.
If you make subsequent trips through Isengard after Saruman is defeated, you have to stop when you reach the square but you don't have to take a Plot Complication card.
Pelargir, Erech and the Paths of the Dead
In order to defeat the black fleet of the Corsairs, each player has to summon the Dead Men of Dunharrow from their uneasy resting-place at Erech. Once a player brings the Dead to Pelargir, their victory is assured. The problem, however, is this: no matter how many players there are in the game, there is only one group of the Dead available to do all the work.
Special rules apply to the Dead, and to the grey squares comprising the road between Erech and Pelargir. Once a player lands on Erech, the Dead will accompany him; he must then take the Dead to Pelargir to stop the black fleets of the Corsairs. In these squares, the following rules apply:
- Only one player at a time may be accompanied by the Dead. Other players who want to defeat the Corsairs will have to wait for the Dead to return to Erech.
- When a player is accompanied by the Dead, he must stay in the grey squares between Erech and Pelargir. If they leave this area and try to take the Dead elsewhere, the Dead will return to Erech to await whatever player can pick them up next.
- If a player who has the Dead with him ever rolls a six, the Dead will immediately chicken out and return to Erech. When this happens, the Dead are again available to any player who lands on Erech. The player who lost the Dead must go back to Erech to reclaim them.
Once a player has successfully taken the Dead and landed on Pelargir, the Dead will return to Erech to await the next player. Meanwhile, the player who has defeated the Corsairs may cross them off his list and take a Plot Complication card.
If you make subsequent trips through Pelargir after defeating the black fleet of the Corsairs, you have to stop but you don't have to take a card. If you pass through Erech again, note that the Dead will never accompany you again once you've captured the fleet.
Minas Tirith and the Removal of Denethor
Once you have arrived at Minas Tirith, roll a six-sided die. Interpret the results as follows:
- 1: Denethor seems really glad to see you. He greets Aragorn warmly and takes him to the Vaults of Lore. He locks him in. Try again next turn when Aragorn gets free.
- 2: Boromir shows up unexpectedly and demands to know what's going to happen to his pension payments. Try again next turn.
- 3: Denethor agrees to give Aragorn the crown, but only if Aragorn will prove his loyalty to Gondor by marrying Ioreth. Try again next turn when Aragorn's less nauseous.
- 4, 5: Denethor is satisfied that Aragorn is indeed the heir of Elendil, and grants him the kingship of Gondor. Take a Plot Complication card and cross Minas Tirith off your list.
- 6: Denethor goes crazy, tries to kill Faramir in Rath Dinen and finally dies in a horrible suicide. Take a Plot Complication card and cross Minas Tirith off your list anyway.
If you make subsequent trips through Minas Tirith after Denethor is supplanted, you must stop at the square but you do not need to take a Plot Complication card.
Mount Doom and the Destruction of the One Ring
Once you land on Mount Doom, roll the die. The results are as follows:
- 1: Frodo tries to throw the Ring into the Fire, but just can't part with it yet. Try again next turn.
- 2: Gandalf grabs the Ring away from Frodo, yelling that he's a Maia too and should get to take on Sauron mano-a-mano. Try again next turn.
- 3: The Eye of Sauron spots you! Roll the die again immediately. If you roll a 1, 2, 3 or 4, move that many squares away from Mount Doom and hide. If you roll a 5 or a 6, your attempt to hide has failed bitterly. GO DIRECTLY TO THE BARAD-DUR in your honored new position as Sauron's captives.
- 4: Frodo throws the Ring into the Fire. Cross Mount Doom off your list; you do not need to take a Plot Complication card.
- 5: Frodo fails and he claims the Ring for himself, but Gollum takes the Ring from him and falls into the Fire. Eagles come out of nowhere and fly everyone out of Mordor, and Frodo feels vaguely guilty about the failure for the rest of his life. Take a Plot Complication card, cross Mount Doom off your list, and move your party to the Towers of the Teeth.
- 6: Frodo fails and he claims the Ring for himself, but Sam realizes his duty as a good servant and pushes Frodo into the Fire. He, too, feels guilty about it for the rest of his life. Take a Plot Complication card and cross Mount Doom off your list.
If, for some reason, you make subsequent trips to Mount Doom, you must stop on the square and you must take a Plot Complication card.
The Plot Complication Cards
Whenever you land on a Plot Complication square, or you're instructed to take a card by a Goal square, you take a card from the Plot Complication deck and read it. Unless the card specifically says "Hang onto this card", you must immediately reveal it to the other players, announce its contents, and take whatever action is described on the card. The card then goes into a "discard" pile.
If the card says "Hang onto this card", however, you keep the card in your hand until you decide you're ready to play it. To play a card you're holding, you likewise reveal it and announce its contents, act on it, and then discard it. You can play the cards you are holding at any time.
Sacrificing Cards
Towards the end of the game, you may have a player who has completed all six of their Goals and is on their way back to the Shire. The other players in the game may wish to slow them down. Therefore, once a player has completed all of their Goals the other players can slow them down by sacrificing any two Plot Complication cards they may be holding.
It works like this: By revealing and sacrificing two Plot Complication cards they are holding, a player can force another player to lose a turn. As well, two players can sacrifice one card each in order to make a third player lose a turn. The instructions on the cards themselves are not acted upon, with the lone exception of the Narya card (described below). The sacrificed cards are added to the discard pile, and the player selected as victim loses their turn.
This tactic can only be used on players who have all of their Goals completed.
The Narya Card
One of the cards you are permitted to hang onto is the Narya card, Narya being Gandalf's Elven Ring. If you hold this card, be careful not to show it to anybody. It's a secret. If you ever reveal it to anybody, you lose a turn. If someone correctly guesses you have it, you lose a turn. If someone guesses you have it but you don't, they lose a turn. If someone else takes this card from you, it is immediately revealed to all and discarded and both of you lose a turn.
Note that having this card will automatically force you to lose a turn when you are compelled to reveal it at Tom Bombadil's.
Precedence of Cards
Hopefully, you won't have any situations where cards conflict with one another and make a horrendous tangle of the rules. If you do, however, straighten it out with this rule: Cards played later in the game take precedence over cards played earlier. Hopefully that'll straighten everything out.
The Deck
There are 72 Plot Complication cards. In no particular order, they go like this:
1. Orcs Ambush The Fellowship. The Fellowship is broken. Boromir dies. You're following the book perfectly. Take an extra turn.
2. Eagles. A sign of divine intervention from Manwe. Take an extra turn.
3. Eagles. A sign of divine intervention from Manwe. Take an extra turn.
4. Fickle Eagles. Hang onto this card. Any time another player plays an "Eagles" card, you can play this card on top of it. Instead of gaining a turn, they lose one instead.
5. Go To The Barad-dur. Go directly to the Barad-dur. Do not pass GO. Do not collect $200.00.
6. Get Out Of Mordor Free! Hang onto this card. If you get a "Go To The Barad-dur" card, you can cancel it with this. This card can also be played any time you're within the borders of Mordor. When played this way, you will immediately move out of Mordor to The Black Gate.
7. Get Out Of Mordor Free! Hang onto this card. If you get a "Go To The Barad-dur" card, you can cancel it with this. This card can also be played any time you're within the borders of Mordor. When played this way, you will immediately move out of Mordor to The Black Gate.
8. Boromir Steals The Ring. You must proceed directly to Minas Tirith, forsaking all other goals until this is accomplished. (Ignore this card if you have already destroyed the Ring.)
9. Wrong Ring! Bilbo has given you a perfectly ordinary gold ring and kept the One for himself. You must return to Rivendell and get the real Ring. If you've already thrown a ring into Mount Doom, you'll have to go get the right Ring and try it again.
10. Tom Bombadil. Hang onto this card. Next time a plot complication appears that's not to your liking, play this card and Tom Bombadil will skip and prance and eliminate it for you.
11. Tom Bombadil. Hang onto this card. Next time a plot complication appears that's not to your liking, play this card and Tom Bombadil will skip and prance and eliminate it for you.
12. Somebody Else's Problem. Next time you land on a Plot Complication square, you may either draw the card yourself or make another player of your choosing draw it instead.
13. Frodo Succumbs to the Lure Of The Ring. Lose a turn while Gandalf beats some sense into him.
14. The Nazgul. Go back three squares in the direction you came.
15. Black Riders. Go back three squares in the direction you came.
16. The Sword That Was Broken Breaks Again. Lose a turn while Aragorn glues it back together.
17. The Voice of Saruman. The Voice has lulled you into a false sense of security. If you've already gone to Isengard and confronted Saruman, you'll have to go back and do it again.
18. Radagast the Simple. Radagast deceives you with false information from Saruman. Back up two squares.
19. Radagast the Fool. Radagast stupidly tells Saruman where you are. Lose a turn.
20. Radagast the Bird-tamer. Radagast agrees to help you in your Quest, but then wanders away into the forest to look at the trees at a critical moment. Next time you draw a Plot Complication card, draw a second one to go with it.
21. He's Not Quite Dead. The Balrog was only wounded. If you've already defeated the Balrog, you'l have to go back and kill it again.
22. Ent Vengeance. Gimli bows before Treebeard, his axe falls to the ground, and Treebeard mistakes him for a woodsman and stomps him. Lose a turn.
23. Rabid Horses. All players currently within Rohan lose a turn.
24. Rabid Horses. All players currently within Rohan lose a turn.
25. Hoof-And-Mouth Outbreak. Once this card is played, all movement in Rohan is restricted to a maximum of three squares per turn... for the rest of the game.
26. The Hands of a Healer. Hang onto this card. It can be used at any time to remove the Black Breath, Rabid Horses, Hoof-And-Mouth Disease, or Pipe-weed cards from play.
27. The Hands of a Healer. Hang onto this card. It can be used at any time to remove the Black Breath, Rabid Horses, Hoof-And-Mouth Disease, or Pipe-weed cards from play.
28. The Black Breath. The hobbits become violently ill. No matter what the dice say, you can move no more than three squares per turn for the next three turns.
29. Dernhelm. Just when you think everything's going fine, Eowyn shows up and starts trying to seduce Aragorn. If you haven't healed Theoden yet, you must drop whatever you're doing and go and heal him now. If you've already healed Theoden, you just lose a turn.
30. The Witch-king. Everybody gets all scared. Lose a turn.
31. The Witch-king. Everybody gets all scared. Lose a turn.
32. Smeagol Brings Nice Fishes. Take an extra turn.
33. Smeagol Brings Nice Fishes. Ptomaine poisoning. Lose a turn.
34. Killer Rabbit. Sam tries to stew a rabbit. It goes for his throat. Lose a turn while he recovers.
35. Shelob Bites Frodo. Lose two turns.
36. Shelob's Web. Next turn, you can only move one square no matter what the dice say.
37. Gollum Meets Grima. The two learn much from each other. The plot becomes unstable. Take two more cards.
38. Ghân-buri-Ghân. Hang onto this card. When you're inside the borders of Rohan, you can redeem this card and the Wild Men will give you an extra turn.
39. Grima the Thief. If you are holding any Plot Complication cards, you must give one of them up.
40. Gollum the Thief. If you are holding any Plot Complication cards, you must give one of them up.
41. Baggins the Thief. You can steal one Plot Complication card out of the hand of another player (assuming someone has a card to steal).
42. Baggins the Thief. You can steal one Plot Complication card out of the hand of another player (assuming someone has a card to steal).
43. Cats of Queen Beruthiel. You have to backtrack to avoid the feline hell-cats. Roll the dice and immediately go that many spaces back the way you came.
44. The Blue Wizards. Alatar and Pallando return unexpectedly from the East. They bear surprising tidings. Take two more cards.
45. Lembas. It nourishes both body and spirit. Move three more spaces.
46. The Deed of the Three Friends. Aragorn, Legolas and Gimli run for four days without rest. Move three more spaces.
47. The Sea-longing. Legolas hears the sea-gulls and waxes poetic. Lose a turn.
48. Arwen. She shows up unexpectedly. Aragorn gets all side-tracked, but later on goes forth with fresh resolve. Lose a turn. The turn after that, take two turns.
49. Arwen Meets Eowyn. They get in a big fight over Aragorn. Lose a turn.
50. The Witch-king. Everybody panics and runs. Go back three squares the way you came.
51. The Witch-king. Everybody panics and runs. Go back three squares the way you came.
52. Eowyn. Hang onto this card. You can play it to stop any Witch-king card or Arwen card that comes into play, regardless of whether it's yours or somebody else's. (Note: This card will not affect the "Arwen Meets Eowyn" card.)
53. Arwen Sends Aragorn Tidings. Also a banner and flowers. Move three extra squares.
54. Pippin Uses the Palantir. He gets terrified by the Enemy. If you haven't defeated Saruman yet, lose a turn. If you have, Gandalf is in haste; take an extra turn.
55. The White Rider. Gandalf returns from the dead. Take an extra turn.
56. Wisdom of Galadriel. Hang onto this card. If you lose a turn for whatever reason later in the game, you can use this card to get it back.
57. Faramir. Hang onto this card. It doesn't do anything, but hang onto it anyway.
58. Eomer. Hang onto this card. It doesn't do anything, but hang onto it anyway.
59. Narya. Hang onto this card. Don't show it to anybody. It's a secret. If you ever reveal it to anybody, you lose a turn. If someone correctly guesses you have it, you lose a turn. If someone guesses you have it but you don't, they lose a turn. If someone else takes this card from you, both of you lose a turn.
60. Aragorn Uses the Palantir. All secrets are revealed. Look and see what cards are being held by every other player.
61. The Black Stone. Hang onto this card. If you are on the Paths of the Dead, you can play this card and the Dead will accompany you - even if they have to leave another player to do it. If you are not on the Paths of the Dead, you can still play this card during your turn to cause the Dead to forsake another player and return to Erech.
62. Lore of Elrond. Hang onto this card. You can redeem it at any time to move an additional five squares.
63. Blasting Fire. Hang onto this card. If another player takes it from you, it explodes and they lose two turns.
64. Bill Ferny. Sam insists on going back to punch him. Go back two squares the way you came.
65. Smeagol's Birthday. Give this card to the player of your choice. They lose a turn.
66. Pipe-weed. Roll the die immediately and interpret the result thusly:
- 1: You're out of pipe-weed. No effect.
- 2-3: You have a very refreshing smoke. Take an extra turn.
- 4-5: Coughing fit. Lose a turn.
- 6: Severe coughing fit. Merry gives up smoking. Gandalf continues to smoke nearby. Merry gets short-tempered, goes berserk and tries to kill him. Lose two turns.
67. Bill The Pony. Move 2 extra squares for each of your next two turns.
68. Mirror Of Galadriel. Hang onto this card. You can play this card to stop one of the following six cards from taking effect: "Go To The Barad-dur", "Wrong Ring!", "Boromir Steals The Ring", "The Voice of Saruman", "He's Not Quite Dead" and "Dernhelm".
69. Phial Of Galadriel. Hang onto this card. You can play this card to stop one of the following six cards from taking effect: "Go To The Barad-dur", "Wrong Ring!", "Boromir Steals The Ring", "The Voice of Saruman", "He's Not Quite Dead" and "Dernhelm".
70. Mouth Of Sauron. He tells you really bad depressing stuff, and you believe it. Then uncounted thousands of your enemies come forth from nowhere and besiege you. Lose two turns while you straighten things out.
71. The Eye of Sauron. The Eye is seeking for the Ring. You have to hide from its' gaze. Go back three squares in the direction you came, and then lose a turn.
72. The Burden. The Ring is almost too heavy to bear. Once this card is played, all movement in Mordor (for players who have not yet destroyed the Ring) is restricted to a maximum of three squares per turn... for the rest of the game.
Advanced Rules
If you're playing this game with a group of other Tolkien fanatics, you can choose to make the game more interesting by implementing some or all of the highly-unstable Advanced Rules given below. They will make the game a great deal more difficult to play sensibly or fairly, but on the other hand the game will be good for a lot more laughs.
The Overland Rule. Rather than confining your movement to the squares on the gameboard, players can move via direct overland routes at a mutually-agreed-upon speed. At the discretion of the majority of the players, however, overland routes may have difficulties of their own introduced (for example: Caradhras could be used as a way to bypass Moria, but it would take three turns to cross). Such rules can be made up and implemented by a majority of the players as the game progresses. (Please note that this rule can not be used to avoid Tom Bombadil at the end of the game.)
The Interference Rule. The various Fellowships are allowed to interfere with each other. For example, one Fellowship landing in a square occupied by another might try to talk their Frodo out of the Quest; for another example, one player landing in Minas Tirith might leave instructions for the Gates to be shut to members of the next Fellowship. A majority ruling of the uninvolved players can be used to determine what effects, if any, result. Particularly farfetched and imaginative forms of interference are particularly encouraged.
The Clever Hobbit Rule. Whenever a player draws a Plot Complication card, or more generally suffers any kind of setback, he can use the Clever Hobbit rule in an effort to get out of it. The Clever Hobbit rule requires that, once the setback is revealed, the player quickly announce a way in which Merry, Pippin, Frodo or Sam suddenly take some unexpected action to solve the problem in truly hobbitlike fashion (for example: faced with a forest fire, Pippin quickly shows the Fellowship "how we used to put out all the annual bonfires in Tuckborough"). Again, solutions that are particularly imaginative, farfetched or humourous - but in character for the Hobbit selected - should be most actively encouraged.
The Plot Coherance Rule. With this rule, during the course of the game all players must endeavour to explain to the others why the plot they're following is internally consistent, and the way Tolkien should have written the story. Particularly imaginative explanations can be rewarded with an extra turn. However, if something happens which is particularly hard on the coherance of your plot, you may get assessed a slight penalty.
The Psychotic Rule. An alternative to the Plot Coherance Rule (though not incompatible with it) is to try to come up with the most farcical, farfetched explanations for the actions you take during the game. Extra turns can occasionally be rewarded for particularly hysterical behaviour. (Penalties can be assessed, if necessary, if someone starts taking the game too seriously.)