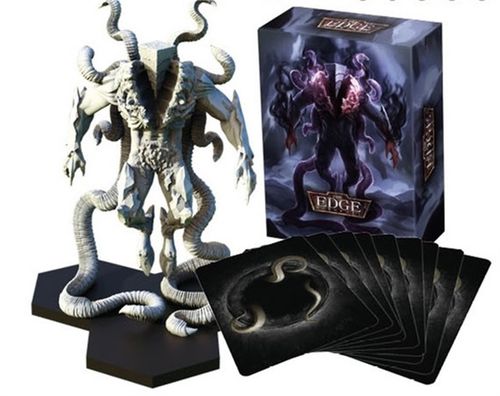
The Edge: Dawnfall – Prime Shadow
The Edge: Dawnfall – Prime Shadow Rulebook
Table of Contents
Table of Contents
Prime Shadow Solo Mode
Prime Shadow is a mini-expansion for Darkness solo mode, introducing Prime Shadow model (or token), its Squad card and Action cards.
During Game Setup Prime Shadow can be chosen as 1 of 5 Darkness Squads.
MIRROR MODE: In Mirror mode INI, ATT and DEF Attributes of Prime Shadow during Combats (including Backstabs) are always equal to the corresponding Attribute of the enemy model Prime Shadow is fighting. Prime Shadow mirrors the value of enemy's Attribute printed on the Squad card, including any reroll bonus the enemy may have (but ignores all other Attribute bonuses the model is using).
Caution: If you do not have the Prime Shadow model, use Prime Shadow token instead.
Note (printed in the Darkness Faction setup, page 8): If a player decides to include the Prime Shadow Squad, make sure to check the Cavalry rules (page 10) before playing the game!
Cavalry
The general Cavalry rules, as printed on page 10. The Chapter and Demons Cavalry card examples on that page are omitted.
What Are Cavalry Squads?
Cavalry is a new type of Squad. Cavalry Squads may be chosen as one of your Squads during step 7 of the Game Setup, but they are not deployed on the board during step 13. Instead, they will enter play at your command, in a most spectacular way, often swinging the balance back in your favor.
Cavalry Setup
During Game Setup, Cavalry cards are placed in the Squad slots as any standard Squad.
However, their models are not placed on the board during the Deployment step (13) and remain on their Squad card. To get them on the board, the player will have to use the Cavalry Deployment card.
The Endurance tokens of a Cavalry Squad may not be spent to pay for Actions unless their models are deployed on the board.
Each player may choose to field their Cavalry Squad or not.
Deploy Models Changes
Players take turns setting up one of their Squads. The Positioning player places Squad first. Players take turns until there are no more models left to deploy. If only one of the players picked Cavalry Squad as one of their Squads, they wait for the other player to finish Deploy step before resolving Dispersal step.
Cavalry Enhancement Card
This special Enhancement can only be used by a Cavalry Squad. It is attached to the Cavalry Squad at the start of the game, with 1 Charge token. It cannot be discarded or moved to any other Squad. A Cavalry Enhancement may not be Charged unless the Cavalry Squad is deployed on the board. A Cavalry Squad may not receive any other Enhancement unless their models are deployed on the board.
Enhancements cards with a Passive Action (with a "—" cost) become active as soon as the Cavalry Squad is deployed.
Deployment Card and Deploying Cavalry
Deployment cards are a new type of Action card. When you choose to field a Cavalry Squad during Game Setup, place your Deployment card below the Cavalry Squad card, next to the Enhancement card.
Deployment cards are additional Action cards, with an Upper and a Lower Action. Like other Action cards, they have Crystal cost that must be paid in order to use them.
When used, a Deployment card allows the player to place their Cavalry models according to the rules of the chosen Action. Once the Squad is deployed, the card is removed. A Cavalry Squad is always deployed in Basic Mode, unless the Deployment Action used says otherwise. Deploying a Cavalry Squad on the Board does not count as an activating a Squad, meaning you can activate a Cavalry Squad that was just deployed.
When placed on the board, Cavalry models are NOT subject to the normal deployment restriction (See Game Setup, page 17), but must follow the rules indicated on the chosen Action of their Deployment card.
Deployment card doesn't count against 25 cards deck limit.
Prime Shadow Squad Card
Printed on page 12. The Squad card has a Basic Mode and a Dark Mode. ⬡⬡ means Base to Base contact, as in the base rulebook.
Prime Shadow – Basic Mode
- Initiative (INI): 4
- Attack (ATT): +1
- Defense (DEF): +3, with a Reroll symbol (gray die icon)
- Movement (MOV): 2
- Endurance: 2
- Change Mode arrow (no cost shown)
Prime Shadow – Dark Mode
- Initiative (INI): 2
- Attack (ATT): – (the Squad cannot use this Attribute in this Mode)
- Defense (DEF): +0
- Movement (MOV): 0
- Endurance: 2
- Change Mode arrow (no cost shown)
Prime Shadow Action Cards
Printed on page 12, Darkness column. Each card shows an Upper Action and, where printed, a Lower Action restricted to Prime Shadow. The number shown beside each card is the number of copies.
Birth / Darkness Herald (Deployment card, x1)
Upper Action – Birth (cost: 1 Crystal): Place the Prime Shadow ⬡⬡ with the Darkness Shrine.
Lower Action – Darkness Herald (cost: 3 Crystals, Prime Shadow): Place the Prime Shadow ⬡⬡ with any enemy model. Its Squad card may be in any Mode. You gain 1 DP for each enemy model ⬡⬡ with the Prime Shadow.
Darkness Herald – the Prime Shadow cannot Push. Count all enemy models ⬡⬡ with Prime Shadow and gain this many DP to your Pool.
Deceit / Dark Reflection (Enhancement, x1)
Attachment rule: SETUP: ATTACH & CHARGE BY 1. Attachment cost: the red cost box, 1 (see Enhancement Cards in the base rulebook).
Upper Action – Deceit: Place Prime Shadow on any Space within Range 1 (It cannot Push).
Lower Action – Dark Reflection (Prime Shadow, cost 0): Only in Dark Mode. All enemy models ⬡⬡ with Prime Shadow replace their INI, ATT, DEF Attributes with those of the Prime Shadow.
Dark Reflection – value of Attributes before applying any modifiers (eg. Wisdom token).
Editor's note: the Dark Reflection card shows a round green symbol beside its cost that this transcription does not decode. Check the printed card against "Passive Actions on Enhancements" in the base rulebook.
Dark Surge / Well of Darkness (x3)
Upper Action – Dark Surge (cost: 0): Spawn [Dark Point icon]. The card shows the number of Dark Points only as this icon.
Lower Action – Well of Darkness (cost: 2, Prime Shadow): Teleport any number of models (yours or enemy) within Range 1 ⬡⬡ with the Darkness Shrine. Teleported models cannot Push.
Well of Darkness – the chosen models have to be within Range 1 of the Prime Shadow. The Prime Shadow can be Teleported this way. Range is counted from the Prime Shadow model. You choose how Teleported models are placed ⬡⬡ with the Darkness Shrine.
Shadow Way / Leech (x3)
Upper Action – Shadow Way (cost: 0): Place 1 chosen Darkness model ⬡⬡ with the Additional Darkness Shrine token.
Lower Action – Leech (cost: 0, Prime Shadow): Only in Dark mode. Choose 1 enemy model ⬡⬡ with the Prime Shadow. Add an amount of Darkness tokens to your Pool equal to the number of Endurance tokens on the chosen model Squad card.
Leech – count only Endurance tokens currently on the Squad card, not starting Endurance.
Last City Campaign – Scenario 3: Heart of the City
Printed on page 33 (right column). This is the final scenario of the Last City mini-campaign, the only one that features the Prime Shadow. The campaign's earlier scenarios, the narrative introduction to this scenario, and the Ending 1 and Ending 2 narrative on page 34 are omitted. Ending 2 is the reward for this scenario; the Ending 1 text closes with "RESTART THE CAMPAIGN!" and the Ending 2 text closes with "CONGRATULATIONS!".
Setup
- Use the alternative, Darkness-themed battle map and place four Crystal Sources according to the standard rules.
- Deploy your forces within three central Spaces of the Darkness map (the red zone). If there aren't enough empty hexes, place any remaining models ⬡⬡ with the ones already present on the map.
- Place a Shadow Gate one Space away from any edge of the map.
- Place a Prime Shadow model one Space away from the edge of the map directly opposite the Shadow Gate.
- Deploy Void Specters ⬡⬡ with the Prime Shadow and Shadows ⬡⬡ with the Shadow Gate. The remaining models will arrive during the battle.
- The Remnants take the first turn.
YOUR FORCES: Use any of your remaining Squads.
YOUR OBJECTIVE: Kill the Prime Shadow and then win through Victory Points.
REMNANTS FORCES: Shadow Squad, Void Specter Squad, Impostor Squad, Slaughter Crow Squad, Prime Shadow.
REMNANTS DECK: Select all Shadow, Void Specter, Impostor, Slaughter Crow and Prime Shadow cards. Shuffle them and take the top 24.
DIFFICULTY: Play 3 Darkness cards each turn. Use the "Now or Never" difficulty card. Its effect is permanent!
SPECIAL RULES: Even if you gather enough Victory Points, the battle cannot end until the Prime Shadow is dead.
REWARD: Read ENDING 2.
PENALTY: +2 Casualties. Replay this scenario.