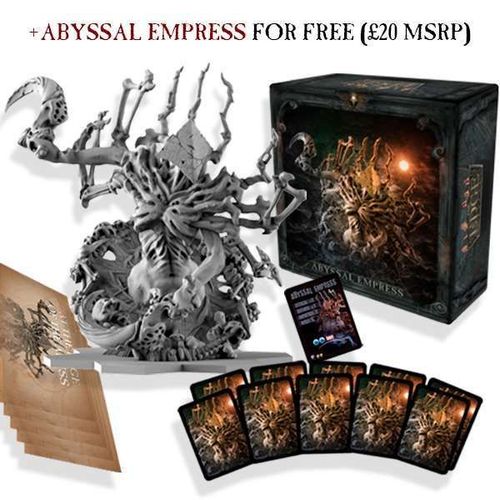
The Edge: Dawnfall – Abyssal Empress
The Edge: Dawnfall – Abyssal Empress Rulebook
Table of Contents
Table of Contents
Abyssal Empress Solo Mode
Abyssal Empress is a mini-expansion for Darkness solo mode introducing Abyssal Empress model, her Squad card and Action cards as well as a special card - Apocalypse.
During Game Setup Abyssal Empress can be chosen as 1 of 5 Darkness Squads.
APOCALYPSE CARD: When Abyssal Empress Changes Mode to Apocalypse mode, place the Apocalypse card anywhere on the board. If Abyssal Empress is not removed from the board in the next 3 Darkness turns, Darkness faction wins the game (at the end of the third Darkness turn).
If the Darkness Action deck runs out before the 3 Darkness turns are over, shuffle the Darkness discard pile and add appropriate number of cards to the deck.
General Rules for Solo & Co-op Campaigns
IMPORTANT! Please note that some of the campaign rules overwrite the standard guidelines for a Player vs Player game. Any exceptions are specified in the appropriate scenarios. If a scenario does not mention a certain aspect of the battle (such as a player order, unit deployment, or starting Crystal Pool), it always means this aspect remains unchanged and plays out according to the standard rules found in the Rulebook. The same goes for the "Setup" section of each scenario – it only contains unusual elements and non-standard placements that overwrite the regular battle setup procedure.
Playing the Campaigns
All campaigns in this booklet were created for solo or CO-OP play. You can attempt them with any faction, fighting the AI-controlled enemy in a series of branching battles, often including a territory control mini-game.
The enemy models fight according to the standard Darkness AI rules, explained in the previous sections of this booklet. Most often, the cards and algorithms only provide you with a general direction (e.g., "Activate all Shadow models, move them towards the closest enemy AND initiate Combat with every Shadow model"). This means, sometimes you may have several valid options on how to move the enemy models.
In such cases, simply pick an option that's least harmful or most beneficial to you, the human player. Trust us: beating the enemy will be a challenge regardless!
Starting Units and Decks
Unlike in standard games, players start these campaigns with a pre-determined force. The details can be found in introductions to specific campaigns. Additionally, the standard rule that restricts your deck to cards of Squads present in your army is lifted. Your deck carries over between the battles, and sometimes it may contain cards that don't refer to any Squad present in a particular engagement. Please remember that in this case the Top Action of the card is still available and may be used by any Squad!
Unlike in standard games, campaign battles do not end when human players run out of Action cards. If that happens, simply shuffle all your discarded cards and use them as your new deck.
Time Track
Many battles of these campaigns use the Time Track instead of (or in addition to) the Victory Points track. Time Track usually shows the end of the battle and all special events that happen during the encounter. Before a scenario begins, place a Time Marker on slot 1 of the track, and then set up any Event Markers listed in the scenario on their corresponding slots. They will help you remember when the next event triggers.
Please note that you move the Time Track only after ALL human players and the AI have taken their turns. This means the game progresses according to this sequence:
- Set the Time Track to 1, check for any initial events
- Player A Turn
- Player B Turn (when in CO-OP mode)
- AI Turn
- Move the Time Track to 2, check for any events
- Player A turn
- Player B turn (when in CO-OP mode)
- AI Turn
- Move the Time Track to 3, check for any events
- (…)
PLEASE NOTE: any Actions that grant a specific player extra turns (such as the Time Jump) do not move the Time Track!
Campaign Map and the Battle Map
The Darkness, Lord of Light and Last City campaigns play out on their own maps and include territory control aspects. Sometimes, a script will ask you to leave a sticker on a slot of the map. These stickers represent the decisions you've made that will influence future battles in many ways.
To keep the campaign map intact, you're never asked to remove any stickers from it. Instead, whenever a scenario requires you to disable any sticker (for example, when a buff runs out or a special unit dies), place a Cancelled sticker on top of it so that the number of the original sticker remains visible.
Some battles also use an alternative, Darkness-themed battlefield layout, printed on the back of the standard battle map. It has less available Spaces and more impassable obstacles. Please keep in mind that these obstacles DO NOT count as the edge of the map – only Spaces on the true border of the map do.
In the middle of this Darkness-themed map is the Red Zone – a cluster of four Spaces that's sometimes referenced in the setup rules of scenarios (see the diagram below).
(The leaflet's Red Zone diagram is not reproduced in this transcription.)
Co-operative Mode
Most campaigns in this booklet can optionally be played in a two-player CO-OP mode. In this case, simply split the starting force in half (e.g. instead of four Squads, each player controls two), and if the number is uneven, choose the player who receives a smaller force randomly.
These two forces may be of different factions. In this case, players need to choose which one receives the Shrine and which one gets the Banner card! There can never be two Shrines and Banner cards in the battles against AI.
Each player builds a separate deck of Action cards, picking five Action cards for each Squad they get to control (but no less than 10 cards).
Both players determine their player order and then take turns deploying their Squads. During the battle, they take turns one after the other, before the AI turn.
The Victory Points track (if a scenario uses it) is shared between the players. Any lost model or any killed enemy move the VP track exactly like in a single-player game.
The Crystal Pool is also shared. When Harvesting, both forces count as a part of the same army.
If a scenario grants a special buff, reward or a sticker that enables a special rule, apply it like you would when playing a single army. For example, if a debuff requires you to remove 1 Endurance token from any of your models at the start of each battle, you still remove only 1 Endurance token in the CO-OP play – and both players have to agree upon which model it affects.
Abyssal Empress Campaign
Solo / Co-op vs AI campaign.
Prologue
This place is mentioned only in whispers. The fortress crumbled long ago, only the outside walls still stand sheltering a sphere of pure black beyond the overgrown gate. Scholars and priests have long tried to discover the origins of this sphere.
The grim, mysterious people who live in the vicinity repeat a tale of a lord whose sickly, lamebrained son wrote a blasphemous tome, one page each night, though during the day he didn't even know how to hold a quill. His father studied the tome, looking for clues that could help him understand his only child. He found something else. One day, the entire household disappeared, leaving only a void that consumed everyone who touched it. In time, the place fell into ruin and was forgotten — until you came along.
Why did you arrive at this place? Was it for wisdom? To pry the ancient powers from the void? Or maybe just to solve an age-old riddle? Doesn't matter. As you stand in front of the sphere, looking into its total blackness, you can only think about what may be slumbering inside...
Campaign Rules & Setup
Apart from the standard rules found at the beginning of this booklet, the following rules also apply during the Abyssal Empress campaign.
The Abyssal Empress campaign has been created for solo or CO-OP play.
Saving the Campaign Progress
Abyssal Empress is a relatively compact campaign, and as such it has no progress stickers or map, though there are still some choices and bonuses that carry over from scenario to scenario. To keep track of them, please prepare a piece of paper that will act as your save sheet.
Scenario 1: Clues from the Past
You were expecting this place to have been looted a long time ago, yet there are still some derelict items scattered around the perimeter of the sphere. Red candles peer at you from the dust. The remains of an old book sit on a stone table, cut in half by the black void. The horrific nature of this place repelled visitors, preserving many valuable clues as to what had happened here.
You try to pick up the remnants of the book — and at this very moment, a twisted hand reaches out of the void and grabs you by the wrist. You feel the touch of a slimy, cold bone. You sever the hand with one quick stroke while your men grab their weapons. Shadows emerge from the void and attack.
So THAT's the real reason why everyone left this place intact...
SETUP:
- Use the standard battle map.
- Place a large token at least 3 Spaces away from the edge of the map. This token, and all adjacent Spaces, represent the Void Sphere (See Special Rules). In total, the Void Sphere contains 7 Spaces and there are 12 Spaces adjacent to the Void Sphere.
- Place eight small tokens in Spaces adjacent to the Void Sphere — no more than 1 per Space. They represent Unsettling Clues that may help you understand what happened here a long time ago.
- Place two Crystal Sources, your Shrine, and your forces according to the regular rules.
YOUR FORCES: Select any 2 Squads and build a deck of up to 15 Action cards.
YOUR OBJECTIVE: Survive the enemy assault.
YOUR SPECIAL OBJECTIVE: Collect as many Unsettling Clues as possible.
ABYSSAL FORCES: One Shadow Squad, one Impostor Squad.
ABYSSAL DECK: Select all Shadow and Impostor cards. Shuffle them and then draw the top 12 cards.
SPECIAL RULES:
- The Abyssal force will draw & resolve TWO Darkness cards each turn.
- No model can stand on any of the Void Sphere Spaces. Any models even partially pushed or moved inside are immediately destroyed.
- The Void Sphere counts as a Shadow Gate for the purpose of this scenario. Darkness models will deploy at the Edge of the Void Sphere whenever a Darkness card calls for it.
- If your model gets into contact with the Unsettling Clue, it may collect the Clue as a free action.
- The battle ends once you collect all the Unsettling Clues, the enemy runs out of Darkness cards, or you lose all of your models.
YOUR REWARD: If you have gathered six or more Unsettling Clues, go to Scenario 3. Otherwise, go to Scenario 2.
YOUR SPECIAL REWARD: If you have gathered all eight clues, mark the "Vigilant and Prepared" event on the save sheet and go to Scenario 3.
YOUR PENALTY: You die, ripped apart by the spawn of darkness. Restart the campaign.
Scenario 2: The Sacrifice
Once the Shadows were defeated, you pulled back from the ruins, unwilling to tempt another attack. The clues you have collected are perplexing. The objects around the sphere seem to hold some ritual meaning, but while many are as old as the ruins, others feel fairly new. Too bad you weren't able to reach the remnants of the book or copy the inscriptions scribbled on the floor.
Your warriors rest after the battle when a surprise attack swarms and overwhelms you. The last thing you notice is a humanoid wearing a triangular mask who is about to smash your head with a club.
You wake up tied, next to the Void Sphere, with some sort of ceremony underway. Inhabitants of nearby towns and villages, all wearing similar masks, chant around the sphere. A priest just finished slaughtering one of your warriors. You try to free yourself, cutting the rope with a sharp stone. Then, something responds to the chants deep inside the Void Sphere. A horrific shape starts to materialize — crowned with an enormous, pyramid helmet.
SETUP:
- Place the Abyssal Empress model at least 3 Spaces away from the edge of the map. She acts as the Shadow Gate for the purpose of this scenario.
- Deploy all Impostors, Void Specters, and Shadows in contact with the Empress.
- Select any edge of the map and deploy all your models no more than one Space away from the selected edge. Then, place a small token in contact with each of your models, except one. They represent Bonds (see Special Rules).
YOUR FORCES: Select any 4 of your Squads. Create a deck of up to 25 Action cards.
YOUR OBJECTIVE: Win through Victory Points or survive until the Darkness deck depletes.
YOUR SPECIAL OBJECTIVE: Free your entire force.
ABYSSAL FORCES: Abyssal Empress (starts inactive, see Special Rules), Shadow Squad, Void Specter Squad, Impostor Squad.
ABYSSAL DECK: Select all Shadow, Void Specter, Impostor and Abyssal Empress cards. Shuffle them and then draw the top 16 cards.
SPECIAL RULES:
- The enemy will draw & resolve TWO Darkness cards each turn.
- The Abyssal Empress starts the battle inactive, surrounded by the writhing darkness. She cannot activate, perform any actions, become attacked, pushed or affected in any way. Her Endurance value is 0.
- All Bound models are Blocked (they cannot Move in any way, but they may still perform other Actions, initiate Combat, defend etc.)
- To remove a Bond token, Attack it with any model that's not Bound.
- Use the time track to count completed turns of the battle. Mark Turns III, IV, and V on the track.
- Turn III: The Empress notices you're about to escape. She emerges from the void, though this causes her visible pain. From now on, the Empress activates and acts according to the regular Darkness AI rules.
- Turn IV: The masked followers of the Empress finally take notice that you're about to flee and they rush in to stop you. If there are any Bound models left, one of them is immediately killed.
- Turns V+: From now on, at the beginning of each turn, kill one Bound model (if there are any left).
YOUR REWARD: Go to Scenario 4.
YOUR SPECIAL REWARD: If you have managed to free all your models, mark the "No One Left Behind" event on the Save Sheet, and go to Scenario 4.
YOUR PENALTY: Many of your companions die violent deaths and the Abyssal Empress is now walking through your world, but at least you have managed to escape. Mark the "Feast for the Empress" event on the Save Sheet and go to Scenario 4.
Scenario 3: Suspicions Confirmed
Once the Shadows are defeated, you retreat from the ruins, unwilling to tempt another attack. Fortunately, you were able to gather nearly all of the clues scattered around the Void Sphere. The findings are unsettling. It seems this permanent void was conjured into existence during some ritual. Even worse, someone seems to repeat the ritual in regular intervals.
You double the guards, keeping the grim and suspicious folk of this land in mind. Intuition does not fail you. Just before the break of dawn, your men are attacked by masked shapes. You defeat those, and then hear chanting coming from the ruins.
You approach, only to find more figures circling the Void Sphere. No doubt you were supposed to be their offering. Seeing as that's no longer possible, some of the followers plunge daggers into their own hearts. As soon as their blood flows down the stones and reaches the void, it begins to spin faster. Within, a colossal shape with a geometric head begins to materialize.
SETUP:
- Place the Abyssal Empress model at least 3 Spaces from the edge of the map. For the purpose of any rules, her model acts as the Shadow Gate in this scenario.
- Place two Crystal Sources one Space away from the Empress.
- Place two Shadows in contact with each Crystal Source.
- Deploy all your Squads no closer than 3 Spaces from the Abyssal Empress.
YOUR FORCES: Select any FOUR of your Squads. Create a deck of up to 25 Action cards.
YOUR OBJECTIVE: Survive until the Abyssal deck depletes.
YOUR SPECIAL OBJECTIVE: Kill the Abyssal Empress.
ABYSSAL FORCES: Abyssal Empress (starts inactive, see Special Rules), Shadow Squad, Void Specter Squad, Impostor Squad.
ABYSSAL DECK: Select all Shadow, Void Specter, Impostor and Abyssal Empress cards. Shuffle them and then draw the top 16 cards. If the "Vigilant and Prepared" event is on the Save Sheet, discard the top four cards from the Abyssal deck.
SPECIAL RULES:
- The enemy force will draw & resolve TWO Darkness cards each turn.
- The Abyssal Empress starts the battle inactive, surrounded by the writhing darkness. She cannot activate, perform any actions, become attacked, pushed or affected in any way.
- At the beginning of each turn (except the first one), place one Endurance token on the Empress' Squad card for each Crystal Source on the map.
- If you successfully Harvest a Crystal from a Crystal Source, remove it from the map.
- Once both Crystal Sources are gone, or the Empress' Endurance is full, she joins the battle. She can now be attacked and activated as normal.
- Players don't earn Victory Points in this battle and the Victory Points track remains unused.
YOUR REWARD: Go to Scenario 4.
YOUR SPECIAL REWARD: If you have managed to kill the Abyssal Empress, she will return weaker in the next scenario. Write "The Maimed Empress" on your Save Sheet and go to Scenario 4.
YOUR PENALTY: Many of your companions die violent deaths and the Abyssal Empress is now walking your world, but you have managed to escape. Write "Feast for the Empress" on your Save Sheet and go to Scenario 4.
Scenario 4: A Black Tide
The battle dies down. Dead bodies are strewn across the ruins and blood trickles down the cracked stones, feeding the Void Sphere. The Empress limps away from the battle, flanked by several of her followers. You don't want to let her get away — otherwise, your warriors would have died here in vain.
You pursue her, her wide trails just as revealing as her unearthly stench. You pass many mutilated bodies of her followers. It seems every half-mile she kills someone to gain more strength.
Finally, you approach a small, secluded town. The streets are empty and the houses are quiet. A trail of black blood leads into a dilapidated town hall. Inside, the Empress feeds on men, women and children from the town who walk towards her one by one, in a long, quiet queue, her masked followers watching from the sides. She notices you and lets out a piercing howl. The acolytes start to weave some strange magic and the lights inside the room dim as its floor begins to sink into the darkness.
SETUP:
- Place eight small tokens along the far edge of the map, one per Space. They represent the Choking Darkness — a wave that will slowly sweep through the battlefield (see Special Rules).
- If the "Feast for the Empress" event is on the Save Sheet, move all the Choking Darkness tokens two Spaces towards your edge of the map and add 1 extra Endurance token to the Abyssal Empress.
- Place the Abyssal Empress at least three Spaces away from any Choking Darkness tokens and two Spaces away from the edge of the map.
- Place all Slaughter Crows in contact with the Empress.
- Deploy models and two Crystal Sources according to the regular rules.
- If the "Maimed Empress" perk is on the Save Sheet, remove 2 Endurance tokens from the Abyssal Empress.
YOUR OBJECTIVE: Defeat the Abyssal Empress before the Choking Darkness reaches your edge of the map.
ABYSSAL FORCES: Abyssal Empress (starts inactive, see Special Rules), Shadow Squad, Void Specter Squad, Impostor Squad, Slaughter Crow Squad.
ABYSSAL DECK: Select all Abyssal Empress, Shadow, Void Specter, Impostor and Slaughter Crow cards. Shuffle them and then draw the top 16 cards. If the "Vigilant and Prepared" event is on the Save Sheet, discard the top four cards from the Abyssal deck.
SPECIAL RULES:
- The Abyssal force draws and plays TWO Darkness cards per turn.
- The Spaces marked by the Choking Darkness tokens act like Shadow Gates for the purpose of this scenario. New Abyssal units are deployed on their edge when a Darkness card calls for it.
- At the beginning of each turn, move all Choking Darkness tokens one Space forward, towards your edge of the map.
- Any of your models present on the Spaces affected by the Choking Darkness are Weakened. They receive -1 to all of their stats.
- Any of Abyssal forces present on the Spaces affected by the Choking Darkness are Empowered. They receive +1 to all of their stats and deal 2 wounds with each successful attack, instead of 1.
- All Spaces beyond the Choking Darkness tokens also count as being affected.
- Players don't earn Victory Points in this battle and the Victory Points track remains unused.
YOUR REWARD: Go to Scenario 5.
YOUR PENALTY: Replay this scenario — or start the campaign over.
Scenario 5: Burning Shadows
You defeated the Empress, but moments later her body was consumed by a rolling wave of darkness and you and your remaining warriors had to flee. It enveloped the entire center of the town, leaving a perfect sphere of void behind, just like in the ruins. Another scar in this world left by the creatures of the abyss.
The taste of victory turned into ash inside your mouth, and a powerful feeling that something was left unfinished enveloped you. Seeing the influence the Empress had over sentient beings, you needed to be sure she's dead for good.
It took a while to gather new men and find the means to penetrate her lair, but once preparations were complete, you stood yet again on the edge of the void. As you crossed it, the crushing weight of the dark world bent your back. The ground on the other side is porous, and thick, black liquid oozes through with every step, caking your feet like tar.
Fortunately, she's close — tending to her wounds and resting in a cradle of twisted sinew, protected by dozens of dark shapes. She raises her head, and even though she has no eyes, you know what she's looking at: the two large Dvergar depth charges you brought here in case you ever saw this monstrosity again. You only need to bring them close enough, but seeing how many enemies stand in your way, this won't be easy.
SETUP:
- This battle takes place on an alternate Darkness-themed battle map.
- Place a Shadow Gate no more than 2 Spaces away from your edge of the map.
- Deploy all your models in contact with the Shadow Gate. If there's not enough space, deploy the remaining models in contact with your other units.
- Place the Abyssal Empress model no more than 2 Spaces away from the opposite edge of the map.
- Place 4 Crystal Sources at least 2 Spaces away from the Shadow Gate and the Empress, as well as 2 Spaces away from each other.
- Place all Shadows in contact with the first Crystal Source, all Impostors in contact with the second, all Void Specters in contact with third and all Slaughter Crows in contact with fourth.
- Deploy your Squads according to the regular rules. Then, put two Bomb models on the bases of two of your models. They represent the Dvergar depth charges (see Special Rules).
YOUR FORCES: Select any FIVE of your Squads. If you play in co-op, toss a coin to determine who will have two, and who will have three Squads.
YOUR OBJECTIVE: Place two Bombs in the Red Zone of the map and return through the Shadow Gate.
ABYSSAL FORCES: Abyssal Empress, Shadow Squad, Void Specter Squad, Impostor Squad, Slaughter Crow Squad.
ABYSSAL DECK: Select all Abyssal Empress, Shadow, Void Specter, Impostor and Slaughter Crow cards. Shuffle them and then draw the top 18 cards.
SPECIAL RULES:
- The enemy draws and plays THREE Darkness cards during each turn.
- A Bomb is considered Ready once it's located in the middle of the map (the Red Zone).
- Bombs can be passed between your models in contact, dropped or picked up as a free action. They also drop when a carrying model dies.
- Once both Bombs are Ready, you can Detonate them at any point, ending the scenario.
- Any time your model is in contact with the Shadow Gate, you may decide to Evacuate it. Simply remove the model from the map and put it back on its Squad card.
- Players don't earn Victory Points in this battle and the Victory Points track remains unused.
- Use the time track to count completed turns of the battle. Mark Turn VIII on the track.
- Turn VIII: The Empress starts to weave her most powerful magic. Change her Mode.
YOUR REWARD: Go to the "Final Score" section.
YOUR PENALTY: You lose the campaign!
Final Score
Tally the final score for this campaign:
- +1 for each model successfully Evacuated from the final mission.
- +3 if the "Vigilant and Prepared" event is on the Save Sheet.
- +3 if the "No One Left Behind" event is on the Save Sheet.
- -2 if the "Feast for the Empress" event is on the Save Sheet.
If the Final Score is equal to at least 7, read Ending 2. Otherwise, read Ending 1.
Ending 1
The bombs are set. You're almost back by the gate, preparing to dive back into your world. Then, you take a quick peek behind you, and your heart sinks. Nearly everyone from your squad was slaughtered. The men who were supposed to prime the bombs lie dead on the porous ground, surrounded by dozens of shadows.
There's only one thing you can do now. You run back into the fray, and fight your way towards one of the bombs. You crack a small, runic tablet on its cover. The runes set the charge alight. A blinding flash. A rolling wave of heat. A piercing wail from the Empress cut short by the blast.
Then, a triangle burns brightly in the blackness. Feeling slowly returns to your body – only the body is not yours anymore. As the madness slowly begins to creep in, you look down upon yourself and see a cloud of darkness, full of yellowed bones.
You thought death would be an escape. A noble sacrifice. Sadly, in this realm of horror, it wasn't.
As one of the Shadows, you will now roam this strange land, awaiting the return of your mistress.
Ending 2
A blinding flash. A rolling wave of heat. A piercing wail from the Empress cut short by the blast. Then, the void spits you out, mangled and bloodied. Around you, a handful of your warriors moan curled up on the ground.
It takes a while before you're all ready to act again – and notice that the Void Sphere has finally disappeared from your world. To be sure it never returns, you burn the remains of the town. You scour the ruined fortress and destroy any clues. While doing that, you find an old, dusty tome left in a forgotten corner of the castle. You open it and feel a shiver passing down your spine. Page after page written by a young human boy in his own blood. Childish depictions of the beast with the pyramid head. Chants and rituals of undefined nature.
You toss it into the fire. Then, you head home, hoping it's all over.
Many months later, on a dim, foggy morning, you wake up from your sleep feeling strangely lightheaded. Beside you, there's a freshly written page. A monstrous, triangular head watches you from a crude illustration.
You look at your hands, specked with ink marks, wondering if you'll be brave enough to cut them off when the time comes.