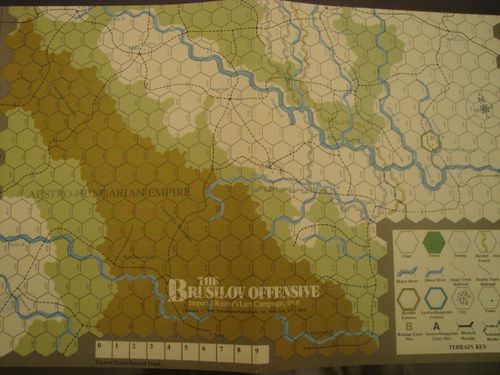
The Brusilov Offensive: Imperial Russia's Last Campaign, 1916
The Brusilov Offensive: Imperial Russia's Last Campaign, 1916 Rulebook
Table of Contents
Table of Contents
-
- 1.0 Introduction
- 2.0 Game Equipment
- 3.0 Setting Up the Game
- 4.0 Sequence of Play
- 5.0 Movement
- 6.0 Stacking
- 7.0 Zones of Control
- 8.0 Combat
- 9.0 Supply
- 10.0 Command Control
- 11.0 Fortresses
- 12.0 Cavalry
- 13.0 Replacement of Lost Steps
- 14.0 Reinforcements
- Designer's Notes
- Charts: Terrain Effects Chart (5.4)
- The Brusilov Offensive: Exclusive Rules
1.0 Introduction
[The Introduction is reproduced in the Table of Contents block above.]
2.0 Game Equipment
2.1 The Game Map
Each 16" by 22" mapsheet portrays the area in which a crucial campaign of World War I was fought. A hexagonal grid overlays the terrain features to regularize movement and positioning of the playing pieces. The mapsheet also displays the Terrain Key, the Turn Record Track, and various visual aids.
2.2 Game Charts and Tables
Various visual aids are provided for the Players in order to simplify and illustrate certain game functions. These are the Terrain Effects Chart, the Combat Results Table, and charts and tables specific to each game, including the exclusive rules.
2.3 The Playing Pieces
The cardboard pieces represent the actual military units that took part in the original battle. The numbers and symbols on the pieces represent the strength, movement capability, and the type of unit represented by the piece. These playing pieces are referred to as "units."
2.31 How to Read the Units
[Diagrams of a Typical Combat Unit (front and back) and a Typical Headquarters Unit (front and back) appear on the printed page. Their labelled parts are: Unit Size; Superior Unit Designation; Individual Unit Designation; Attack Strength; Defense Strength; Unit Type; Set-Up Hex (or Game-Turn and hex of entry); Movement Allowance; Reduced Strength due to Combat Result; Command Strength; Command Radius; Attack Shift; Designation; Combat Strength.]
2.32 Unit Size Symbols
III = regiment; X = brigade; XX = division; XXX = corps.
2.33 Unit Type Symbols
- Infantry
- Cavalry
- Artillery
- Naval Infantry
- Supply Depot
- Mountain Infantry
Note that not all types appear in all games.
2.4 Definition of Terms
Attack Strength: The quantification of a unit's strength in terms of attack for the type of combat represented on the Combat Results Table.
Defense Strength: The quantification of a unit's strength in terms of defense for the type of combat represented on the Combat Results Table.
Movement Allowance: The quantification of a unit's mobility in terms of Movement Points. Basically, a unit expends one Movement Point for each hex of Clear terrain it enters.
Reinforcements: Units which do not begin the game placed on the Game-Map, but rather appear at a scheduled time and hex during a future Game-Turn.
Stacking Point: The number of units a Player may have in any hex at the end of any Phase is regulated by means of Stacking Points. Each unit is worth a number of Stacking Points which is never changed throughout the game, ranging from one to four Stacking Points per unit. Note: It is important that Players not confuse Stacking Points with Steps. Unlike Steps, a unit may never lose Stacking Points.
Step: Part of the total strength of a unit which is lost due to combat or other causes, with an attendant reduction in Attack and Defense strengths. Each unit has between one and four Steps. When a unit has lost all its steps, it is eliminated and removed from play.
Tactical Competence Rating: One of the more important concepts in the game is Tactical Competence Rating (TCR), which is referred to throughout the rules. Each army on each side will be given a Tactical Competence Rating in the Exclusive Rules. This is a quantitative evaluation of each army's capabilities. They range from 1 (excellent) to 4 (poor).
Zones of Control: The six adjacent hexes surrounding a unit which that unit is said to control.
2.5 Game Scale
See the Exclusive Rules of each game for its precise scale.
2.6 Parts Inventory
| Part | Individual Game | Quadri-Game |
|---|---|---|
| Game Map | 1 | 4* |
| Die-Cut Counter Sheet | 1 | 4* |
| Standard Rules Folder | 1 | 2† |
| Exclusive Rules Folder | 1 | 4* |
| Historical Article | 0 | 1 |
| Plastic Die | 0 | 1 |
| Game Box | 0 | 1 |
*different †identical
Note: Game Box and Plastic Die not included in subscription edition.
If any of the above parts are damaged or missing, write:
Customer Service Simulations Publications, Inc. 44 East 23rd Street New York, N.Y. 10010
2.7 Rules Questions
Questions concerning the rules for The Great War in the East Quad will be answered if phrased so that a simple yes or no reply will suffice and if the questions are accompanied by a stamped, self-addressed envelope. Mark the envelope "Rules Questions: Great War in the East Quad."
3.0 Setting Up the Game
Before the game can begin, a number of counters are placed on the Game-Map. Each counter is placed in the hex whose four-digit number appears printed on the unit. Units which have a one- or two-digit number accompanied by a letter are reinforcements. The number refers to their Game-Turn of arrival and the letter to the hex they arrive in. Some games have Scenarios in which this initial set-up varies (see Exclusive rules). Once the starting units have been set on the map, play may begin.
4.0 Sequence of Play
Each game is played in Game-Turns, each of which comprises two alternating Player-Turns. The Player whose Player-Turn is in progress is called the Phasing Player. Each Game-Turn proceeds strictly in accordance with the following Sequence outline. No action or function contrary to the Sequence of Play is permitted. To determine which Player is the Phasing Player, consult the Exclusive rules for each game.
A. First Player-Turn
-
MOVEMENT PHASE: Each Movement Phase is divided into the following segments:
a. Initial Supply Determination Segment: The Phasing Player determines which of his units are out of supply (their Movement Allowances are halved for that Movement Phase, see Case 9.2).
b. Reinforcement Segment: The Phasing Player places his reinforcements on the Game-Map.
c. Command Control Segment: The Phasing Player determines which of his units he will place in Command Control by allocating Command Strength. Units to which Command Strength is allocated must be within the Command Radius of a HQ unit. For each of the remaining units he then rolls the die to see if they are in Command Control. He then places an "Out of Command Control" marker on all units that are not in Command Control.
d. Movement Segment: The Phasing Player may move all of his units which are in Command Control after which he removes all "Out of Command Control" markers.
e. Attrition Segment: The Phasing Player determines which of his units are not out of supply and then rolls the die to determine if each one suffers attrition.
-
CAVALRY WITHDRAWAL BEFORE COMBAT PHASE: The non-Phasing (second) Player may now roll the die, if he wishes, for each of his cavalry units which are adjacent to an Enemy (Phasing Player) unit to determine if the unit may withdraw two hexes (see Case 12.1).
-
COMBAT PHASE: Each Combat Phase is divided into two Segments:
a. Command Control Segment: The Phasing Player determines which of his units he will place in Command Control for combat purposes by allocating Command Strength. Units to which Command Strength is allocated must be within the Command Radius of a HQ unit. He then places "Out of Command Control" markers on all units not in Command Control.
b. Combat Resolution Segment: The Phasing Player may use his units to attack the non-Phasing Player's units in accordance with the rules of combat. During this Phase neither Player may move his units except when forced to do so as a result of combat.
B. Second Player-Turn
The second Player now becomes the Phasing Player and repeats the actions performed in Phases 1 through 4.
C. Game-Turn Record Interphase
The Game-Turn marker should be advanced one space on the Game-Turn Record Track to mark the end of one Game-Turn and signal the start of another.
5.0 Movement
GENERAL RULE: During the Movement Phase, the Phasing Player may move as many or as few of his units as far as he desires (within the restrictions of Command Control, Case 10.4), as long as each unit's Movement Point Allowance is not exceeded in a single Phase.
PROCEDURE: Move each unit individually, tracing the path of its movement through the hexagonal grid. As each unit enters a hex the unit expends one or more Movement Points from its Movement Allowance.
CASES:
5.1 Movement Restrictions and Prohibitions
5.11 Friendly units may be moved only during the Friendly Movement Phase, although there may be some movement as a result of combat in terms of advances and retreats and withdrawal of cavalry before the Combat Phase. These are not considered movement per se and do not require the expenditure of Movement Points.
5.12 Movement is calculated in terms of Movement Points. Basically, one Movement Point of a unit's total Movement Allowance is expended for each Clear terrain hex the unit enters; other terrain costs more than one Movement Point to enter or cross. These effects are summarized on the Terrain Effects Chart (5.4).
5.13 Units may never be moved into an Enemy-occupied hex or undestroyed Enemy fortress.
5.14 A unit may never expend more Movement Points than its total Movement Allowance in any one Movement Phase. Unused Movement Points may not be accumulated until another Movement Phase, nor may they be transferred to another unit.
5.15 A unit may be moved from an Enemy-controlled hex during the Friendly Movement Phase (even into another Enemy-controlled hex, see 7.22) subject to all movement costs.
5.16 Only units using Railroad Movement (see 5.3) benefit from Railroad lines.
5.17 A unit that has expended no Movement Points in a given Movement Phase may always move at least one hex, regardless of Movement Point limitations, unless it is out of Command Control.
5.2 Effects of Friendly Units on Movement
5.21 A Friendly unit may be moved through hexes occupied by other Friendly units at no additional Movement Point cost.
5.22 There is no limit to the number of Friendly units which may pass through a given hex in any one Segment, and Friendly units may be overstacked at the end of any Segment as long as all Stacking limits are met at the end of each Phase (see Section 6.0).
5.3 Railroad Movement
5.31 During each Movement Phase, the Phasing Player may move a specified number of Stacking Points (see Case 6.1) of Friendly units, plus any of his HQ units, a specified number of hexes along Friendly railroad lines. These specifications vary from game to game and from army to army and are referred to as Rail Capacity and Railroad Movement Rate, respectively. All units which move by rail in a Movement Segment or remain entrained at the end of their Movement Segment (without moving) count toward Rail Capacity.
5.32 To use Rail Movement, a unit must first be moved to a non-Enemy-controlled hex containing a Friendly railroad line (as defined in the Exclusive rules). [Exception: Units with a Tactical Competence Rating of 1 may entrain in Enemy Zones of Control.] Once in a hex containing a Friendly rail line, a unit must expend additional Movement Points equal to its Tactical Competence Rating in order to be entrained. Once entrained, place an Entrained marker on that unit (this marker remains on that unit until it detrains). Only units which are in supply and in Command Control may be entrained.
5.33 Once entrained, a unit may be moved from one contiguous adjacent Railroad hex to another, following the railroad line. This unit may be moved up to the maximum number of hexes permitted by the Railroad Movement Rate. Entrained units may not enter an Enemy-controlled hex or any hex last occupied by an Enemy unit.
5.34 After a Player has finished moving a unit by rail, he may detrain at no additional Movement Point cost and resume moving that unit normally, provided that it has Movement Points remaining. However, only units with a Tactical Competence Rating of 1 may be used in an attack in the Combat Phase immediately following a Movement Phase in which they used Rail Movement.
5.35 Entrained units which are out of Command Control in the Movement Segment may freely engage in Rail Movement only. They may not detrain, entrain, or use normal movement.
5.36 Entrained units do not possess a Zone of Control and may not attack. Entrained units defend at half Defense Strength, rounded down. If attacked, they are automatically detrained.
5.37 In some games, Players will see that certain rail lines that exit the map are linked by rail lines off the playing area of the map. An entrained unit which exits from a friendly rail map-exit hex may be moved "off the map" paying the indicated number of Movement Points until it reenters the map at the appropriate hex. However, the unit may not re-enter the map into an Enemy Zone of Control (see Case 14.22).
5.38 All Off-Map Movement is Rail Movement. All units (except for HQ units) performing Off-Map Movement count against Rail Capacity. A unit may end its movement off-map. If it does so, the Phasing Player must note how many Movement Points the unit has moved toward its destination. These Movement Points may be applied to the next Game-Turn's Movement.
5.4 Terrain Effects Chart
See Page R11 (Terrain Effects Chart; reproduced in the Charts section below).
6.0 Stacking
GENERAL RULE: Each Player is restricted as to the number of Stacking Points he may have in a hex at the end of any given Phase. The number of Stacking Points permissible per hex varies from army to army and from game to game (see Exclusive rules).
CASES:
6.1 Stacking Restrictions
6.11 The Stacking Point Value of units are as follows:
- HQ units: 0 Stacking Points
- Regiments: 1 Stacking Point
- Brigades: 1 Stacking Point
- Divisions: 2 Stacking Points
- Corps: 4 Stacking Points
6.12 Fortresses and game markers never count toward Stacking limits.
6.13 Friendly units of different types and nationalities may stack together.
6.14 Any units in excess of the stacking restrictions at the end of any given Phase (not Segment) are eliminated, with the owning Player choosing which units to eliminate. Note: Losing a part of a unit does not reduce that unit's Stacking Point Value.
6.15 Units may overstack while retreating after combat. However, if a unit is forced to overstack at the end of its retreat, it is eliminated.
6.16 A unit's Stacking Point Value is a constant. It is never reduced, even if that unit is weakened due to step losses.
6.2 Stacking and Movement
6.21 There is no limit to the number of Friendly units that may enter or move through any hex during a Phase as long as Stacking limits are met at the end of that Phase.
6.22 There is no additional Movement Point cost to stack or unstack Friendly units.
7.0 Zones of Control
GENERAL RULE: The six hexagons immediately surrounding a hex constitute the Zone of Control of any units in that hex. Hexes upon which a unit exerts a Zone of Control, called controlled hexes, inhibit the movement of Enemy units. Fortresses and units in fortresses that would do so normally exert Zones of Control in the same manner as normal units. Units in an Enemy Zone of Control are never required to attack. Combat is completely voluntary.
PROCEDURE: All units must expend one additional Movement Point (above and beyond terrain costs) to enter an Enemy-controlled hex.
CASES:
7.1 Extent of Zones of Control
7.11 Zones of Control extend into all six hexes adjacent to the controlling unit's hex. Zones of Control do not extend across Prohibited hexsides.
7.12 All units exert Zones of Control at all times during the Game-Turn.
7.2 Effects of Zones of Control
7.21 Friendly units must pay one additional Movement Point to enter an Enemy-controlled hex, in addition to any cost incurred due to the terrain in the hex being entered.
7.22 Units may be moved directly from one Enemy-controlled hex to another, as long as they have sufficient Movement Points remaining to enter that hex (the terrain cost plus one for entering that Enemy-controlled hex).
7.23 There is never any additional Movement Point cost to move from an Enemy-controlled hex into a hex that is not Enemy-controlled.
7.24 The presence of Friendly units or fortresses (but not friendly Zones of Control) negate the effect of Enemy-controlled hexes for the purposes of tracing supply and retreat after combat. They do not negate Enemy Zones of Control for the purposes of movement.
7.25 If there are both Enemy and Friendly Zones of Control exerted into the same hex, both Zones co-exist, and that hex is mutually controlled by both Players. There is no additional effect of having more than one unit exerting its Zone of Control onto a given hex.
7.26 HQ units and supply depots never exert a Zone of Control.
8.0 Combat
GENERAL RULE: Combat occurs between adjacent opposing units at the Phasing Player's discretion. The Phasing Player is the Attacker, the non-Phasing Player is the Defender, regardless of the overall strategic situation.
PROCEDURE: Total the Attack Strengths of all the attacking units involved in a specific attack and compare it to the total Defense Strength of the units in the hex under attack. State the comparison as a ratio: Attacker's strength to Defender's strength. Round off the ratio in favor of the Defender to conform to the simplified odds found on the Combat Results Table (see 8.8); roll the die and read the results on the appropriate line under the odds. Apply the result immediately, consulting the Combat Results Option Table (8.9) before resolving any other attacks being made during that Combat Phase.
CASES:
8.1 Which Units May Attack
8.11 Friendly units may attack during the Friendly Combat Phase. They may then attack any and all Enemy units which are adjacent to them. Only those units directly adjacent to a given Enemy unit may participate in an attack upon that unit.
8.12 Attacking is completely voluntary; units are never compelled to attack, and not every unit adjacent to an Enemy unit need participate in any attack. A Friendly unit in a stack that is not participating in a given attack is never affected by the results of that attack. Units with an Attack Strength of zero and units with Combat Strengths in parentheses (see Case 10.51) may never attack.
8.13 An Enemy-occupied hex may be attacked by as many units as can be brought to bear in the six adjacent hexes.
8.14 No unit may attack more than once per Combat Phase, and no Enemy unit may be attacked more than once per Combat Phase.
8.2 Multiple Unit and Multi-Hex Combat
8.21 All units in a given hex must be attacked as a single Defense Strength. The Defender may not withhold a unit in a hex under attack. Different units in a hex may not be attacked separately, nor may one unit be attacked without involving the other units in the same combat.
8.22 Other units in a hex containing an attacking unit need not participate in that combat or any other attack. Thus when one unit in a stack is attacking a given hex, the other units in the stack could attack another hex, or not attack at all.
8.23 If a unit(s) is adjacent to more than one Enemy-occupied hex, it could attack all of them in a single combat. Thus, units in a single hex may attack more than one hex. The only requirement is that all attacking units must be adjacent to all defending units.
8.24 A given unit's Attack and/or Defense Strength is always unitary; that is, it may not be divided among different combats either for attack or defense.
8.3 Effects of Terrain on Combat
See Terrain Effects Chart, Case 5.4.
8.4 Combat Resolution
Combat odds are always rounded off in favor of the Defender. For example, an attack with a combined Attack Strength of 26 against a group of units defending with a Strength of 9 (26 to 9) would be rounded off to the next lowest combat ratio column on the Combat Results Table "2-1." The combat ratio column used is modified by the Tactical Competence Rating of the attacking units and the attack shift of the HQ units involved in the combat. The die is then rolled and the result dictated by the Combat Results Table is applied using the Combat Option Table.
8.5 Explanation of Combat Results
Each of the units in the Great War in the East QuadriGame has a number of strength levels called Steps. The results on the Combat Results Table direct the Players to an entry on the Combat Option Table (8.9). Under each entry are one or more options, one of which must be fulfilled by the units affected by the combat. These options will require the affected units to lose steps, be retreated, or a combination of both.
8.51 Regiments, most brigades (see Exclusive rules), and supply depots (which are treated as combat units) have one Step. Therefore, if such a unit is reduced one step, it is eliminated.
8.52 Divisions (and some brigades) have two Steps. The second Step being printed on the reverse side of the counter. Should such a unit be reduced one Step, it is flipped over to its weaker strength. Should it then be reduced another one Step, it would be eliminated. Note that some units (in some Scenarios) begin the game in a reduced state.
8.53 Corps have four Steps. The first (full strength) and third (half strength) are represented by the front and back, respectively, of each corps counter. The second and fourth Steps of corps are indicated by placing a Corps Reduction marker on top of the counter representing the corps.
Example:
- No Step reduction (first Step): The corps unit at full strength (face-up) with no marker present.
- One Step reduction (second Step): Place a Corps Reduction marker "-1 from Full Strength" on top of the full strength side of the corps counter. This has the effect of reducing the full Attack and Defense Strengths of that corps by one.
- Two Step reduction (third Step): Flip the corps unit over to its weakened strength. No marker is placed on the corps counter.
- Three Step reduction (fourth Step): Place a corps reduction marker "-1 from Half Strength" on top of the weakened strength side of the corps counter. This has the effect of reducing the weakened Attack and Defense strengths of the corps by one.
- Four Step reduction: The corps is eliminated.
8.54 Each result on the Combat Results Table has two results (e.g., "1/2"). The first number is the Combat Result for the attacking units. The second number is the combat result for the defending units. Each number result refers the Players to an entry on the Combat Results Option Table (Case 8.9), which lists the options available to both the Attacker and Defender. Note: Only defending units may ever retreat as a result of combat. When both the Attacker and Defender suffer a combat result, the Defender always applies his combat result first, regardless of which option he selects.
8.6 Retreat After Combat
8.61 Only defending units may retreat — never attacking units. The defending Player may elect an option on the Combat Results Option Table that requires an affected stack or unit to retreat one or two hexes. A unit may never be retreated into or through an Enemy unit or through Prohibited hexsides.
8.62 Retreats of Friendly units are conducted by the owning Player, within the parameters of Case 8.63. Units in a stack which retreat must retreat together and may not retreat individually.
8.63 Units must observe the following priorities in deciding which hex to retreat into:
- Toward the nearest Friendly supply source.
- If the retreating unit has a Tactical Competence Rating of 1, into non-Enemy-controlled hexes (this priority is superseded by priority 1).
Units are never eliminated, however, if they are not able to observe the retreat priorities. Units may never end their retreat in a hex in violation of the Stacking restrictions. Units which would be forced to do so are eliminated instead.
8.64 If forced not to observe retreat priority 2, units with a Tactical Competence Rating of 1 may be retreated into or through an Enemy-controlled hex. Units with a Tactical Competence Rating of 2, 3, or 4 may not be retreated into or through an Enemy-controlled hex (unless that hex is occupied by a Friendly unit; see Case 7.24). If forced to so retreat they would be eliminated.
8.65 Units may be retreated through other Friendly units, within the bounds of Case 8.63, without disturbing the non-retreating units. The non-retreating units are not affected by the retreating units; they do not have to move out of the way of the retreating units.
8.66 If a unit is forced to retreat into a Friendly-occupied hex (either as a result of combat or cavalry withdrawal before combat) and that hex then undergoes an attack, the retreated unit does not add its Defense Strength to the units in the hex. Nor are its Steps counted to see whether the defending force is the larger side in that combat. If the units with which the retreated force is now stacked suffers a combat result causing them to retreat or be eliminated, the previously retreated force is eliminated. If the units with which the retreated force is stacked loses half its Steps, the retreated force would also lose half its Steps (rounding up).
8.7 Advance After Combat
8.71 Whenever an Enemy force is forced to retreat (or is eliminated) leaving the hex it originally occupied vacant as a result of combat, any or all Friendly victorious units which participated in the combat are allowed to advance into that hex, subject to the Stacking limit (Exception: see Case 8.75).
8.72 Advancing victorious units may ignore Enemy Zones of Control.
8.73 The option to advance after combat must be exercised immediately, before any other combat resolution. Units are never forced to advance after combat. After advancing, units may not attack in that Phase, even if their advance places them adjacent to Enemy units whose battles are yet to be resolved or who were not involved in combat. However, advances are useful in cutting off the retreat of Enemy units whose combat has not yet been resolved.
8.74 Victorious defending units may never advance after combat — only victorious attacking units.
8.75 "Ils Ne Passeront Pas!" In certain cases where all the defending units have been eliminated, if they were in supply at the moment of combat, no attacking units may advance into the vacated hex. This happens:
- When all defending units have been eliminated as a result of selecting option "1" after a combat result of 2.
- When all the defending units have been eliminated as a result of selecting option "1" after a combat result of 3.
In either of these two events, no attacking units may advance into the vacated hex. This represents the fact that the defending units have been eliminated due to holding their ground to the last man — "Ils ne passeront pas!"
8.8 Combat Results Table
Combat Ratios (Attacker to Defender), by Attacker's Tactical Competency Rating.
| Col. 1 | Col. 2 | Col. 3 | Col. 4 | Col. 5 | Col. 6 | Col. 7 | Col. 8 | |
|---|---|---|---|---|---|---|---|---|
| TCR1 | 1-4 | 1-3 | 1-2 | 1-1 | 2-1 | 3-1 | 4-1 | 5-1 |
| TCR2&3 | 1-3 | 1-2 | 1-1 | 2-1 | 3-1 | 4-1 | 5-1 | 6-1 |
| TCR4 |
| Die | Col. 1 | Col. 2 | Col. 3 | Col. 4 | Col. 5 | Col. 6 | Col. 7 | Col. 8 |
|---|---|---|---|---|---|---|---|---|
| 1 | 1/1 | 1/1 | -/1 | -/2 | -/3 | -/3 | -/E | -/E |
| 2 | 1/1 | 1/1 | 1/1 | 1/2 | -/2 | -/2 | -/E | -/E |
| 3 | 1/- | 1/1 | 1/1 | 1/1 |
Key: Result to left of slash refers to Attacker; result to right of slash refers to Defender. # = Combat result, to be used on Combat Results Option Table; - = no effect; E = mandatory elimination of affected unit(s).
Note that units may not attack at less than the minimum ratios listed. Attacks at greater than the maximum ratio listed are resolved as though they were at the maximum combat ratio. See Section 8.0 for complete explanation of Combat Results.
8.9 Combat Results Option Table
Attacking Unit Options
- Combat Result 1: The attacking force must lose a number of Steps equal to one-half the total number of affected Steps. The total number of affected Steps is always equal to the number of Steps present in the smaller force at the moment of combat, regardless of whether the smaller force is the Attacker or Defender.
- Combat Result 2: The attacking force must lose a number of Steps equal to the total number of affected Steps. The total number of affected Steps is always equal to the number of Steps present in the smaller force at the moment of combat, regardless of whether the smaller force is the Attacker or Defender. Thus, if the attacking force is the smaller, all attacking units are eliminated.
Defending Unit Options
- Combat Result 1:
- Half of the total Steps of all affected units are eliminated.
- Each affected unit (or stack containing any affected units) is retreated one hex.
- Combat Result 2:
- All affected units are eliminated (Case 8.75).
- Half of the total Steps of all affected units are eliminated and each surviving unit (or stack containing any surviving units) is retreated one hex.
- Each affected unit (or stack containing any affected units) is retreated two hexes.
- Combat Result 3:
- All affected units are eliminated (Case 8.75).
- Half of the total Steps of all affected units are eliminated and each surviving affected unit (or stack containing any such units) is retreated two hexes.
- Combat Result E: All affected units are eliminated.
Explanation:
Any unit(s) receiving a result on the Combat Results Table refer to the Combat Result Option Table. Affected defending units refer to the Defending Unit portion of the Table; affected attacking units refer to the Attacking Unit portion. A defending unit that receives a combat result of 1, 2, or 3 has a choice of options; a defending unit that receives a combat result of E is automatically eliminated. An attacking unit that receives a combat result of 1 or 2 must follow the instructions listed for that combat result on the Combat Result Option Table.
Note that, if the force (unit or stack of units) which receives a combat result (i.e., attacker or defender) is smaller (in Steps) than its opponent, all units in that force are affected and must undergo a combat result option. If the force which receives a combat result is larger (in Steps) than the opposing force, only a number of Steps equal to the number of affected Steps in the opposing force is subject to a combat result option. The player who owns the larger force chooses which of his units are affected.
The size in Steps of each force is determined at the moment of combat. When a Combat Result Option calls for a stack or single unit to lose half its total Steps, any fraction is rounded up. An option requiring a defending stack(s) or the defending force to lose a number of Steps may be satisfied from any unit or combination of units in each affected stack or force, as the owning Player sees fit, so long as the required number of Steps are eliminated.
The defending Player chooses one option for the entire defending force in an individual combat. If any units in a defending stack undergo an option that requires them to retreat, then all units in the stack (including any unaffected units) must also retreat along with those units along the same path and retreat to the same hex.
All surviving Steps must be retreated when a Player elects to retreat a force as a combat result option. All units of both forces are affected if neither force is larger than the other. A defending force always undergoes its combat result option first.
9.0 Supply
GENERAL RULE: Units not in supply are penalized with respect to their movement and attack abilities. They may also lose Steps through attrition as a result of being out of supply (however, see Case 9.24).
CASES:
9.1 Supply Determination
9.11 Supply for Phasing units is determined with respect to the following:
- For movement purposes: during the Initial Supply Determination Segment.
- For attrition: during the Attrition Segment.
- For combat purposes: at the instant of combat.
9.12 Units are in supply if they can trace a line of supply to a supply source. This line of supply may not exceed that unit's Supply Range (see Exclusive rules).
9.13 The line of supply is traced from the unit in question to a Friendly supply source (do not count the hex the unit occupies). A unit may trace supply to a supply source which is either a Friendly railroad, Friendly mapedge (where a Friendly railroad line exits the map), or a supply depot unit that is itself in supply.
9.14 A supply line may not be traced through an Enemy-occupied hex; it may be traced through a maximum of two Enemy-controlled hexes only if the unit whose supply line is being traced has a Tactical Competence Rating of 1.
9.15 A Friendly rail hex is a supply source only if a path of contiguous rail hexes, free of Enemy-occupied and Enemy-controlled hexes, can be traced from it to a Friendly map edge and the hex was not last occupied by an Enemy unit.
9.16 A supply depot is in supply only if it is within its Supply Range (free of Enemy-occupied and Enemy-controlled hexes) of another supplied Friendly supply depot, or within Supply Range of a Friendly railroad hex which can be used for supply. Supply depots may form a chain from a Friendly railway hex to supply Friendly units (including other supply depots).
9.17 Lines of supply may be traced through hexes which contain only Enemy HQ units.
9.2 Effects of Being Out of Supply
9.21 All units which are out of supply have their Movement Allowances and Attack Strengths (not Defense) halved (round fractions down, but never below one). Being out of supply has no effect on Rail Movement.
9.22 All Phasing units which are determined to be out of supply during the Attrition Segment of the Friendly Movement Phase must roll for attrition. The Phasing Player rolls the die individually for each of his own units that is out of supply. On a die roll of 1, 2, or 3, that unit loses half of its remaining Steps (fractions rounded up). Any other die roll has no effect.
9.23 Attacking (not defending) units determined to be out of supply at the instant of combat must check for attrition as per Case 9.22. This die roll takes place immediately before the odds are computed and that unit's combat is resolved.
9.24 HQ units are the only units immune from attrition under Cases 9.22 and 9.23.
10.0 Command Control
CASES:
10.1 HQ Units
10.11 The HQ units represent the various commanders and their staffs. Each HQ unit is rated according to the ability of the commanding officers. This ability is represented by the Attack Shift, Command Radius, Command Strength and Combat Strength, which have the following effects:
- Attack Shift: Each HQ unit may provide a Shift to the right of a number of columns equal to its attack shift on the Combat Results Table, for one attack per Friendly Combat Phase.
- Command Strength: The maximum number of units, represented in Stacking Points, within a given HQ unit's Command Radius (see below) which may receive from it the benefits of being in Command Control.
- Command Radius: The maximum distance (in hexes) that a unit may be from a HQ unit eligible to be in Command Control and receive that HQ's Attack Shift.
- Combat Strength: The Defense Strength of normal HQ units, and the Attack and Defense Strength of Heroic leader HQ units.
10.12 HQ units which have an "H" next to their Combat Strength are "Heroic" leader HQ units. They differ from other HQ units only with regard to their additional effect on combat (see Case 10.2).
10.2 Effects of HQ Units on Combat
HQ units have the following effects on combat:
- Heroic Leaders and normal HQ units may aid one attack within their Combat Radius each Combat Phase with their Attack Shift, which enables the Combat Results Table odds column to be shifted a number of columns to the right equal to the HQ unit's attack shift (see Case 10.21).
- Heroic Leader HQ units may use their Combat Strength for attack and defense, and normal HQ units may use their Combat Strength for defense, when stacked with two or more Stacking Points of Friendly units (see 10.41).
- HQ units may place units in Command Control. Attacking units out of Command Control have their Attack Strength halved (see Case 10.32).
10.21 Attack Shift: Each HQ unit has an attack shift. It may not be used for defense. This represents the ability to shift the final combat odds of one attack a number of columns on the Combat Results Table to the right equal to the Attack Shift of the HQ unit. Thus, an HQ unit with an attack shift of 2 could use it to turn a 2-1 attack into a 4-1 attack by shifting it two columns to the right. For an HQ unit to give the benefit of its Attack Shift to an attack, at least half of the attacking units (in terms of Steps, excluding other HQ units and depots) must be within that HQ unit's Command Radius.
10.22 Attack Shift Limit: A given attack may receive only one Shift per Command Level (subject to Case 10.21). For example, an attack could receive a shift from a Corps HQ and shift from an Army HQ. It could not receive a Shift from two Corps HQ or two Army HQ units.
10.23 Heroic Leaders: Certain HQ units are designated as being Heroic leaders. Heroic leaders are those with an "H" next to their Combat Strength. In addition to the Attack Shift they may, when stacked with two or more Friendly Stacking Points, add their Combat Strength to the attack or defense in which that stack is participating.
10.24 Heroic leaders may not apply their Attack Shift to a different combat from the one in which they are applying their Combat Strength.
10.3 How to Determine Command Control
10.31 At the start of the Command Control Segment of the Movement Phase, the Phasing Player must determine the Command Status of all his units, and place an Out of Command Control marker on all those that are not in Command Control. The number of Stacking Points worth of units which may be in Command Control may not exceed the Command Strength of the HQ unit to which they are tracing command. Once placed in Command Control, a unit is in Command Control until the end of that Movement Phase.
10.32 A unit may be placed in Command Control if it is within the Command Radius of a HQ unit. The owning Player then decides which of his units to apply an HQ unit's Command Strength to. Note that if a unit is in Command Control due to Case 10.41, it does not count toward any HQ's Command Strength. Optional: Players who value simplicity may decide to treat the Command Strength of all HQ units as unlimited — they may benefit all the units in their Radius.
10.33 The Command Radius is traced through the hex grid from the hex the HQ unit is in (exclusive) to the hex occupied by the unit being commanded (inclusive). The Command Radius may never be traced through Prohibited terrain, Blocked hexsides, or Enemy-occupied hexes.
10.34 If the Tactical Competence Rating for a given HQ unit is 1, that HQ unit's Command Radii may be traced through Enemy Zones of Control. If an HQ unit's Tactical Competence Rating is 2, 3, or 4, that HQ unit's Command Radii may not be traced through Enemy Zones of Control. For this purpose, the presence of Friendly units in an Enemy-controlled hex negates the Enemy Zone of Control's effect.
10.35 Being entrained or out of supply has no effect on HQ units whatsoever.
10.36 Remember that a Player determines which of his units are in Command Control for movement purposes in the Command Control Segment of his Movement Phase, and for combat purposes in the Command Control Segment of the Combat Phase.
10.4 Effects of Being Out of Command Control
10.41 At the end of each Movement Phase Command Control Segment, the Phasing Player may roll the die for each of his units which are out of Command Control. If the die roll is greater than that unit's Tactical Competence Rating, the Out of Command Control marker is removed from it and the unit is in Command Control for that Movement Phase. If the die roll is less than or equal to that unit's Tactical Competence Rating, that unit remains out of Command Control.
10.42 Attacking units determined to be out of Command Control in the Command Control Segment of the Combat Phase have their Attack Strength halved. This may result in them being halved twice, thus reducing their Attack Strength to ¼ of normal (if they are also out of supply). Units out of Command Control due to being outside a Command Radius during the Command Control Segment of the Combat Phase may not reenter Command Control through a die roll as in 10.41.
10.43 Units with a Tactical Competence Rating of 3 or 4 which are out of Command Control (or out of an HQ unit's Command Radius if they are the non-Phasing units) at the instant of combat add one to the result on the Combat Results Table, with 3 on the table becoming an E.
10.5 Effect of Enemy Actions on HQ Units
10.51 Attack shifts may be used only to benefit Friendly attacks. They may not be used to aid the defense of Friendly units. In addition to the use of their Attack Shift, Heroic leader HQ units may attack and defend with their full Combat Strength, and normal HQ units may defend with a Strength of 1 when stacked with two or more Stacking Points of Friendly combat units. The Combat Strengths of HQ units are never reduced by being unsupplied.
10.52 All HQ units, including Heroic leaders, do not exert Zones of Control. They do not block Enemy lines of supply, retreat or Rail Movement — these can both be traced over and adjacent to them. A Friendly combat unit with an Attack Strength of greater than zero may even move into the hex only containing an Enemy HQ unit (this is an exception to Case 5.13), in which case the Enemy HQ must immediately displace to the hex containing the nearest Enemy unit and/or fortress. Friendly unit retreats may also displace Enemy HQ units. Enemy Displacement may not occur if all six hexes surrounding the Enemy HQ unit are occupied by Friendly units or (if the HQ units have a Tactical Competence Rating of 2, 3, or 4) by Friendly-controlled hexes. Thus, only HQ units with a Tactical Competence Rating of 1 may displace through Enemy Zones of Control. HQ units not stacked with Friendly combat units must displace, at any time during the Enemy Movement Phase if Enemy units are adjacent to it. HQ units stacked with Friendly combat units may never displace.
10.53 HQ units which are part of a defending stack defend with their full Combat Strength provided they are stacked with two or more Stacking Points of Friendly defending units. If there are fewer than two Friendly Stacking Points in the defending hex, HQ units may not add their Defense Strength, regardless of whether they are Heroic or not. HQ units always suffer the same combat results as the Friendly units they are stacked with. If all the Friendly combat units a HQ unit is stacked with are eliminated it also is eliminated (exception: see 10.54). Defending HQ units may only retreat when one or more of the units they are stacked with retreats.
10.54 Certain army-level HQ units have a reverse side, printed with reduced Strengths. Such units may, if eliminated as a result of combat, displace as in Case 10.52 instead of being eliminated. The Enemy Player still receives any Victory Points for eliminating the unit, however. (This represents setting up an alternate HQ under surviving elements.)
11.0 Fortresses
GENERAL RULE: Fortresses are permanent elaborate defensive positions. They are printed on the map.
CASES:
11.1 Fortresses and Combat
11.11 Fortresses may never attack. They defend with their printed Defense Strength only. If a Friendly unit is defending in a fortress hex, that fortress adds its Defense Strength to the Defense Strength of those units being attacked.
11.12 Fortresses are affected by combat results in the same manner as normal units with the exception that they must absorb all losses in Steps. They may never retreat.
11.13 All fortresses have four Steps. For purposes of absorbing losses (only), each fortress Step loss is equivalent to two combat unit Steps. Example: If two divisions are stacked with a fortress (8 Steps: 4 for the fortress and 4 for the two divisions) and the combat result is a 1, the defending Player would have to lose one half of 8 Steps, which would be 4 Steps. They could absorb this loss either by losing the two divisions (4 Steps) or by losing 2 fortress Steps. If an unoccupied fortress is attacked, with a result of 3, the defending Player would have to lose 3/2 (150%) of four Steps, which would be 6 Steps. The loss must be absorbed by using 3 fortress Steps.
11.14 Fortresses which have lost two of their fortress Steps use the smaller of their two Defense Strengths. Players should place a "Fortress Destroyed" or "Fortress Weakened" marker in the hex the fortress occupies to reflect this. Players should use Corps Reduction markers to record intermediate Fortress Step losses.
11.15 Once a fortress loses a Step or is eliminated, it may never be replaced.
11.2 Fortress Supply
11.21 Fortresses never count against Stacking limits.
11.22 Fortresses are always in supply. In addition, a maximum of one unit of any size, which is stacked with a Friendly fortress, may be in supply provided it does not attack. This is called "feeding off a fortress." If the unit were to attack, the owning Player would roll for attrition as described in Case 9.22.
12.0 Cavalry
CASES:
12.1 Cavalry Withdrawal Before Combat
Each Player has a Cavalry Withdrawal Before Combat Phase. This occurs between the Enemy Player's Movement and Combat Phases.
12.11 In this Phase, any Friendly Cavalry units (whether or not they are in Command Control) which are adjacent to Enemy units may attempt to withdraw two (no more or less) hexes.
12.12 Cavalry withdrawal is not automatic. The owning Player must roll one die for each cavalry unit attempting such a withdrawal. A die roll higher than the unit's Tactical Competence Rating indicates a successful withdrawal before combat. If the unit does not roll higher than its Tactical Competence Rating, it may not withdraw.
12.13 If the withdrawal is successful, the withdrawing unit is moved two hexes. Only units with a Tactical Competence Rating of 1 may withdraw into or through an Enemy-controlled hex. A unit should withdraw toward the Friendly supply source, but if this is not possible, it may withdraw to another hex.
12.14 Cavalry Withdrawal Before Combat costs no Movement Points.
12.15 If a cavalry unit is not withdrawn or if it ends its withdrawal in an Enemy-controlled hex, it may be attacked in the ensuing Combat Phase.
12.16 Any of the Phasing Player's units (i.e., on the side that is not making the withdrawal) which are adjacent to a hex which is vacated by Cavalry Withdrawal Before Combat may be moved immediately into that hex at the owning Player's discretion, subject to all Stacking rules.
12.17 Cavalry units which Withdraw before Combat into a hex which contains Friendly units never add their combat strength to the Defense Strength of those units during the ensuing Combat Phase; withdrawn units are, however, affected by all combat results which apply to units in that hex (see Case 8.66).
12.2 Cavalry Combat Limitations
12.21 Cavalry may use their full Attack Strength only when attacking hexes containing only Enemy cavalry, depot, or HQ units. If the hex being attacked contains any other type of unit, the attacking cavalry units have their total Attack Strengths reduced by 75% (round fractions down). Thus it would require cavalry units with a total Attack Strength of 4 to attack a hex containing a non-cavalry unit with a combined Attack Strength of 1. Fractional Attack Strengths are ignored.
13.0 Replacement of Lost Steps
Divisions which have lost one Step, and corps which have lost one or two Steps, may be restored to full strength during the Step Replacement Phase. The Phasing Player may roll the die for a number of such units and/or Steps (see Exclusive rules for the number of units for each game) which meet all the following criteria:
- There may be no Enemy units within a specified distance of that unit (see Exclusive rules).
- That unit may not have participated in combat (attacked or defended) during the preceding Game-Turn.
- The unit may not have been moved in the preceding Movement Phase of this Game-Turn.
If the die roll for a unit (see Exclusive rules for the range of the die-roll) is successful, that unit is returned to full strength. Cavalry units, fortresses, and supply depots are not eligible for replacement of lost Steps.
14.0 Reinforcements
GENERAL RULE: Both Players receive reinforcements. These appear during the owning Player's Movement Phase on the Game-Turn and lettered Entry Hex specified on the counter.
CASES:
14.1 Movement of Reinforcements
14.11 A reinforcement unit expends no Movement Points to be placed on the map in its specified, lettered Entry Hex.
14.12 Certain reinforcement units are designated as arriving entrained. In the Movement Phase when they enter the map on a rail line as a reinforcement, such units are considered already entrained and pay no additional Movement Point cost.
14.13 In several cases, more than one unit is scheduled to appear in the same Game-Turn. These units may appear stacked in the Entry Hex during the Reinforcement Segment. (Remember that the Stacking limit only applies at the end of a Phase.)
14.14 Once a unit is placed on the map as a reinforcement, it may be moved normally beginning with the subsequent Movement Segment of that Movement Phase.
14.2 Restrictions
14.21 Reinforcements may not enter the map in a hex which is currently occupied by an Enemy unit or in an Enemy Zone of Control.
14.22 If, and only if, a scheduled entry hex is Enemy-occupied or Enemy-controlled, the reinforcing unit may enter the nearest unblocked mapedge hex to the scheduled entry hex in the direction of the nearest Friendly fortress. However, reinforcements so blocked are delayed by one Game-Turn in their arrival (e.g., they appear during the next Friendly Movement Phase; Exception 14.32).
14.23 Entrained reinforcement units whose Entry Hex is blocked have the additional option of using Off-Map Movement (see Cases 5.37 and 5.38).
14.24 A Player may deliberately withhold reinforcements from Game-Turn to Game-Turn, bringing them into play (if at all) on some later Game-Turn. However, reinforcements must appear on their scheduled hex, alternate hex, or travel off-map by rail.
Designer's Notes
Tannenberg and the Great War in the East QuadriGame are simple games on broad and colorful subjects. The QuadriGame format (Tannenberg is formatted as the "fifth wheel" of the quadrigame) has dictated that the rules be concise and easy to grasp, yet have the scope to deal with disparate situations. However, I have attempted to bring together all these different elements into a game system that, while simple, is not primitive. Those who have studied World War I in the East will see where the simplifications have been made, thus keeping bookkeeping to a minimum (remember, the players are supposed to be Field Marshals, not company clerks). But I believe that these elements do not detract from the overall historical validity of the game system. If I thought otherwise, I wouldn't have done the game.
The Great War in the East QuadriGame system was designed to make certain points about the nature of warfare in the Russian and Italian fronts of 1914–18. First, the most "cost-effective" way of destroying large amounts of enemy units is to encircle them. The combat system is built to reward those who can break through and encircle an enemy. Frontal assaults are costly, and the attacker can find himself presented very quickly with a butcher's bill that would sicken Attila the Hun. But this is not to say that frontal assaults should be avoided — often they cannot be, and frequently they should not be. Each player must weigh the risks against the benefits for each attack before rolling the die. Attrition can be a useful tactic, and if done on wide enough a scale can cause an enemy collapse; if not, it will merely cause the loss of some territory.
On the Eastern Front, the railroad was the key to strategic mobility. The side with greater Rail Capacity and Railroad Movement Rate — usually the Central Powers — has a great advantage, for he can shift troops to meet developing enemy threats and rapidly deploy reinforcements at the front. But Players must not overlook the possibilities of using railroads offensively. A German corps detraining behind Russian positions was the decisive element in the Battle of Tannenberg. Thus, a Player operating in territory where his units can use the Railroad should always keep a sharp eye for an unguarded rail line leading to an enemy's weak spot, where troops moving by rail can repeat this key maneuver.
The railroads are also vital for supply. On the Russian Front, units cut off from friendly railheads were soon reduced to armed mobs. In these games, if troops are cut off, they will begin to suffer losses almost immediately. Players must always maintain their supply lines at all costs and cut those of the enemy. This applies in Caporetto as much as the Russian front games. Despite the lesser distances involved, being unsupplied is as critical in the Alps as in the endless plains of Eastern Europe.
Command Control and HQ units are vital to the success of any army. An army without adequate leaders will find that whatever strength its individual units have may be wasted. Units out of Command Control are liabilities rather than assets, even for the Germans. Russian and Austro-Hungarian units are particularly dependent on their HQ units. This often limits these armies to a few crucial points to mount their operations, so that the important units will be within a Command Radius. Regardless of whether or not he has a good Tactical Competence Rating and many effective HQ units, a Player will have to come to grips with the Command Control rule and execute whatever plans he may formulate with their limitations in mind.
The comparative Tactical Competence Ratings run throughout these rules like a leitmotif. They represent how radically the different armies on the Russian and Italian fronts could differ in terms of command, control, combat, and movement abilities. Most German victories in the East were due to these qualities, and not to any preponderance or superiority in men and material. The size of an army is seldom more important than its skill or its substance. In each game, you will see that the exclusive rules treat the specific strengths and weaknesses of each Army — the professionalism of the Germans, the rear-area confusion of the Russians, the demoralization and often utter hopelessness of the hapless Austro-Hungarians — are all reflected not only in the Tactical Competence rating, but throughout the rules.
Charts: Terrain Effects Chart (5.4)
| Terrain Type | Movement Cost, Tactical Competence Rating 1–2 | Movement Cost, Tactical Competence Rating 3–4 | Effect on Combat |
|---|---|---|---|
| Clear (all) | 1 | 1 | None |
| Forest (B,S,T,V) | 1 | 2 | None |
| Broken (S,T,V) | 1,2 | 2 | None |
| Swamp (all) | 2 | 2,3 | None |
| Rough (B,S,V) | 2 | 2 | None |
| Ridge hexside (C) | See Note in Case 16.0 | 1 is added to the die roll if any unit in an attack attacks across Ridge hexside. |
Notes:
- Terrain effects on combat are cumulative. Thus in an attack directed against a unit in a City by units attacking across a Minor River, the defending unit would be doubled and the stacking units would be halved.
- The left-hand column under Movement Costs refers to units with Tactical Competency Ratings of 1 and 2; the right-hand column refers to units rated 3 and 4. Whenever only one number is listed, it applies to both Ratings appropriate to that column. When two numbers are listed, the first number applies to units with Rating of 1 or 3, and the second number to units with Rating of 2 or 4, as appropriate to that column. Example: In Broken terrain, a unit Rated 1 expends 1 Movement Point per hex; a unit Rated 2 expends 2 Movement Points; and a unit Rated 3 or 4 expends 2 Movement Points.
- Letters refer to the games in which the Terrain Types appear: B = Brusilov; C = Caporetto; S = Serbia/Galicia; T = Tannenberg; V = von Hindenburg.
The Brusilov Offensive: Exclusive Rules
15.0 Introduction
The Brusilov Offensive is a simulation of the massive Russian offensive against the Austro-Hungarian army and its German allies along the Galician front in June, 1916. In terms of territory captured and losses inflicted, this offensive was the most successful operation conducted against the Central Powers during the entire war. The failure of the Russians to eliminate the Austro-Hungarians from the war dictated their eventual military collapse, deepening the despair that was a factor in fomenting the "October Revolution" of 1917.
In addition to the historical scenario, several other scenarios have been provided, illustrating various options and possibilities that could have affected the battle. The Game-Scale is 14 km. from hexside to hexside and 72 hours per Game-Turn.
16.0 Stacking Limits
GENERAL RULE: No more than 8 Stacking Points of units can end a phase in any hex.
17.0 Tactical Competence Ratings and Austro-Hungarian/German Attacks
GENERAL RULE: All units of each nationality have the same Tactical Competence Rating. They are: Russian TCR 3, Austro-Hungarian TCR 4, and German TCR 1. Whenever Austro-Hungarian and German units are used together in an attack, the "TCR 2 and 3" row on the Combat Results Table is used for the determination of the Combat Odds Column.
18.0 Movement Restrictions
18.1 First Turn Russian Movement
Only Russian HQ units may be moved by the Russian Player during his Movement Phase of Game-Turn One. There is no such restriction for the Central Powers Player. This rule also applies to Game-Turn Five in the "Attack On Schedule" scenario.
18.2 Railroad Restrictions
18.21 The Russian Player may move no more than 6 Stacking Points of units by rail per Game-Turn. Each Russian unit employing rail movement may move no more than 20 hexes per Game-Turn.
18.22 The Central Powers Player may move no more than 8 Stacking Points of units by rail per Game-Turn. Central Powers' units employing rail movement may move no more than 25 hexes per Game-Turn.
18.23 Reinforcements employing rail movement on the Game-Turn of their arrival do count against the Rail Capacity Stacking Point limitations.
18.24 All supply depots always have a Stacking Point value of 2.
18.25 A unit with a Movement Allowance less than its Tactical Competence Rating may be entrained at the cost of its entire Movement Allowance (exception to Standard Rules Case 5.32). Such a unit may only entrain if it begins a Movement Phase on a hex through which a Friendly rail line passes.
18.26 Units that have been judged to be in command control may entrain immediately. There is no die roll to determine the availability of trains.
18.27 Players may only employ Friendly rail lines for rail movement. For the Russian Player, all rail lines east of the start line (i.e., hexes lying between Russian and Austro-Hungarian trenches) are considered "Friendly". All rail lines west of the start line are considered "Friendly" for the Central Powers Player.
18.3 Track Limitations
Note: This rule is optional. Players are, however, strongly urged to use it.
18.31 There is a limit to the number of Stacking Points that may cross each hexside on each railroad line in a single Game-Turn. The limits are as follows:
| Railroad Type | Russian (Stacking Points) | Central Powers (Stacking Points) |
|---|---|---|
| Single-Track | 2 | 4 |
| Double-Track | 8 | 8 |
18.32 Players must keep track of which rail lines have had the maximum number of Stacking Points moved over them in that Movement Phase, either mentally or by placing inverted markers on them.
18.33 This limit is expressed in rail lines per hexside. If there is more than one rail line going through a hexside, units may still move over one rail line after the other has had its capacity for that Movement Phase "used up."
19.0 Supply
CASES:
19.1 Supply Sources
To be considered in supply, a Russian or Austro-Hungarian unit must be within 3 hexes of a "friendly" rail line or supply depot. A German unit must be within 5 hexes of a friendly supply source to be in supply. Rail lines east of the start line may be used as supply sources by the Russian Player. Rail lines west of the start line are supply sources for units of the Central Powers. (See Standard Rules Case 9.15.)
19.2 Massed Artillery Fire
19.21 Both Players may temporarily double the attack strengths of any or all units participating in a given attack by "burning up" a supply depot. A supply unit used to support an attack in this fashion is removed from play immediately after the attack has been conducted. Thus, a supply unit can only be used to support one attack with Massed Artillery Fire.
19.22 To benefit from Massed Artillery Fire, attacking units must be within three hexes of the supply unit being used.
19.23 Central Powers units may use Massed Artillery Fire to double the strengths of units on defense. This procedure is in all ways identical to that used for support of attacks. The Russian Player cannot employ Massed Artillery Fire when defending.
19.24 A Central Power supply unit cannot be used for Massed Artillery Fire defensive support in the same Combat Phase in which it is attacked.
19.3 Supply Depots Zones of Control
All supply depots exert Zones of Control. They represent masses of replacements as well as ordinary supply.
19.4 Cavalry Supply South of the Dniester
19.41 Cavalry units that are south of both the Dniester River and hex row 1900 may move and remain out of supply without suffering attrition. However, there may be no more than two Stacking Points of units in the hex at the end of the Movement Phase.
19.42 Cavalry units "living off the land" (as described above) defend and move normally. These units may attack at half their normal strength. If they attack they must check for attrition, according to Standard Rules Case 9.23.
19.43 Cavalry units "living off the land" do not exert a Zone of Control.
20.0 Reinforcements
CASES:
20.1 Arrival of Reinforcements
20.11 All reinforcements must enter the map entrained. Reinforcements do count toward the Rail Capacity Stacking Point limit on their turn of arrival.
20.12 Reinforcements must enter the map at any one of the appropriate friendly entry hexes indicated on the map.
20.13 A Player may voluntarily delay the arrival of reinforcements, as stated in Standard Rules Case 14.24. The arrival of supply units may not, however, be delayed.
20.2 Supply Reinforcements
20.21 Each Game-Turn, starting with Game-Turn Two, the Russian Player receives one supply depot as a reinforcement. The Central Powers Player receives one supply depot on Game-Turns One and Two, and two supply depots on every Game-Turn thereafter.
20.22 Supply units may not have their arrival delayed to be accumulated. The Russian Player can never receive more than one supply depot on any given Game-Turn. The Central Powers Player can never receive more than two supply depots on any given Game-Turn. A Player may elect not to receive a supply unit.
20.23 The Russian Player can never have more than 11 supply depots on the map at one time. The Central Powers can never have more than 10 supply depots.
21.0 Command Control Additions and Modifications
CASES:
21.1 Headquarters Defensive Shift
21.11 All headquarters units have a "Combat Shift" capability. They can shift the odds column to favor Friendly units for an attack and can also provide a defensive shift.
21.12 The defensive shift is applied by shifting an Enemy attack the appropriate number of columns to the left on the Combat Results Table.
21.13 The defensive shift is subject to the same restrictions as the attack shift. See Standard Rules Section 10.0.
21.2 Russian First Turn Command Control
21.21 All Russian units are considered to be in command control for the Russian Player's Combat Phase of Game-Turn One. (This rule applies to Game-Turn Five in the "Attack On Schedule" scenario.)
21.3 Supply Depot Command Control
21.31 A supply depot is in command control as long as it is in supply. (See Standard Rules Section 9.0 and Exclusive Rules Section 19.0.) It does not require a headquarters unit for command control.
21.4 Central Powers Command Control
21.41 German H.Q. units can command Austro-Hungarian units and vice versa with one restriction: Command control for Austro-Hungarian units cannot be traced through a Russian-controlled hex unless the hex is occupied by a Friendly unit. This rule is an exception to Standard Rules Case 10.34.
22.0 Step Replacement
GENERAL RULE: A Player may attempt to replace lost steps of any or all of his units. This is possible provided the unit is not adjacent to any enemy units, is in supply, did not participate in combat during the previous Game-Turn, and has not moved in the current Game-Turn.
CASES:
22.1 Restrictions on Step Replacement for Central Powers Units
22.11 Austro-Hungarian Step Replacement Table:
| Game-Turn | Die Roll Needed to Replace Steps |
|---|---|
| 1-2 | Not Allowed |
| 3-4 | 1 |
| 5-7 | 1-2 |
| 8+ | 1-3 |
22.12 German units can replace steps with a die roll of 1, 2, or 3 throughout the game.
22.2 Restrictions on Step Replacement for Russian Units
22.21 Russian Step Replacement Table:
| Game-Turn | Die Roll to Replace Steps |
|---|---|
| 1-2 | Not Allowed |
| 3-5 | 1-3 |
| 6+ | 1-2 |
23.0 Austro-Hungarian Panic
COMMENTARY: The Austro-Hungarian army was utterly unprepared to deal with the Russian offensive of June 4 on both tactical and strategic levels. Much of the Austro-Hungarian army suffered from very poor morale. The net result was the total collapse of large sectors of the Austro-Hungarian front line.
GENERAL RULE: To simulate the panic of the Habsburgs' army in the first days of the Brusilov offensive, the following rules are employed, on Game-Turn One only. (These rules apply to Game-Turn Five in the "Attack On Schedule" scenario.)
CASES:
23.1 Effect of Panic on Combat
23.11 On Game-Turn one, all Austro-Hungarian units (except those cited in Case 23.42) defend with a Defense Strength of "1" and receive no defensive benefit from trenches. There is no reduction of Austro-Hungarian Attack Strengths. Note: This rule does not apply to German units.
23.12 Any Austro-Hungarian unit receiving an adverse combat result during the Russian Player's Combat Phase of Game-Turn one must be retreated. Any Austro-Hungarian division receiving an adverse combat result against it must lose a step at the completion of the unit's retreat. Although brigades are retreated in the same fashion as divisions, they do not lose a step.
23.13 When the panic rule is in effect, Austro-Hungarian units receiving an adverse combat result must be retreated a number of hexes equal to the number of the defender's result indicated on the Combat Results Table. In the case of an "E" (eliminated) result, such units are not eliminated, but retreated 4 hexes instead. Note: This Case is an exception to the Defending Units' option in Standard Rules Case 8.9. No step losses are inflicted beyond the mandatory loss described in Exclusive Rules Case 23.12.
23.14 All Austro-Hungarian units subject to panic which are stacked in a hex and which receive an adverse combat result must follow the mandatory step loss and retreat procedure, even if the attacking force has fewer steps. Part of a stack of such units cannot remain "unaffected". Any adverse loss for the Russian Player is treated normally.
23.15 Austro-Hungarian units are eliminated during the Austro-Hungarian Combat Phase of Game-Turn One only if they have been forced to retreat and have no legitimate path of retreat available. Austro-Hungarian units cannot be destroyed voluntarily by the Central Powers Player to employ the "Ils Ne Passeront Pas" rule (Standard Rules Case 8.75).
23.16 During Game-Turn One, attacking Russian units that have forced an Austro-Hungarian unit(s) to retreat may be advanced along the path of retreat. The advance of the Russian units need not be limited to the vacated hex, but may follow the path of the retreating unit, stopping anywhere along the defeated unit's path of retreat. Note: This is an exception to Standard Rules Case 8.71.
23.2 Contagion of Panic
23.21 All Austro-Hungarian units (except those mentioned in Case 23.42) which were adjacent to a Friendly unit (including those in Case 23.42) now retreating as a result of combat during the Russian Combat Phase must be retreated one hex. If such an adjacent unit is a division, it immediately loses a step. Note: This movement is an exception to Standard Rules Case 5.11.
23.22 Austro-Hungarian units that were adjacent to a defeated Friendly unit are retreated before the Russian Player conducts his advance after combat. Panicked Austro-Hungarian units cannot retreat into the path of the Russian Player's advance after combat.
23.23 Russian units cannot advance into a hex vacated by a panicked adjacent Austro-Hungarian unit which has not been directly involved in combat.
23.24 Austro-Hungarian units may retreat through Enemy Zones of Control during Game-Turn One (Exception to Standard Rules Case 8.64), if there is no other path of retreat. Otherwise, they are subject to the Standard Rules of retreat.
23.25 Austro-Hungarian units in a hex not adjacent to an Austro-Hungarian retreating unit at the moment of combat, but in a hex through or into which such a unit subsequently retreats, are not subject to full panic. Such a unit is retreated one hex, but is not disrupted.
23.26 A unit which has been panicked and has ended its retreat adjacent to an Austro-Hungarian unit that subsequently receives an adverse combat result suffers no further penalty. A unit may only be panicked once.
23.3 Effect of Panic on Cavalry Withdrawal
23.31 During Game-Turn one, Austro-Hungarian cavalry units cannot attempt to withdraw before combat.
23.4 German Stability
23.41 German units in no way suffer the effects of panic. When a German unit is attacked during Game-Turn One, the combat is resolved and results are applied, according to the Standard Rules for combat.
23.42 Historically, Austro-Hungarian units under the command of the German Sud Armee held fast during the initial Russian attack, ostensibly because of superior German leadership and the presence of reliable German troops. Thus, the following Austro-Hungarian units defend normally and are not subject to the effects of panic: 54 I.D., 55 I.D. (hex 2013), 38 I.D. (hex 1914), 19 I.D., 32 I.D. (hex 1812).
23.5 Restrictions on Reduced Austro-Hungarian Units
NOTE: The following rules apply to the entire game.
23.51 Austro-Hungarian units that have lost a step do not receive the defensive benefit from being in a trench.
23.52 Austro-Hungarian units that have lost a step are subject to possible elimination if they are moved more than one hex and expend more than two movement points. Thus, such units may always move one hex safely, and, if in clear terrain, two hexes safely. For each hex entered by such units above this limit, a die must be rolled to determine whether the unit has been eliminated. On Game-Turn one (or Game-Turn five in the "Attack On Schedule" scenario), a die roll of one or two eliminates the unit. On each Game-Turn thereafter, a die roll of one eliminates the unit. Units eliminated in this fashion count towards the Russian Victory Point Total.
23.53 When an Austro-Hungarian unit that has lost a step attempts to entrain, a die must be rolled as outlined above. If the unit entrains successfully, the die need not be rolled again for that unit until it detrains and moves above the limit set in Exclusive Rules Case 23.52. If the unit does not entrain successfully and is eliminated, the Rail Stacking Points it would have used are expended for that Movement Phase.
24.0 The Russian Armored Car Unit
CASES:
24.1 Armored Car Attack Shift
24.11 The Russian armored car unit aids an attack it participates in by shifting the combat odds one column to the right, and by employing its printed Attack Strength.
24.12 The armored car attack shift may only be received when there are at least two Russian units participating in the attack.
24.2 Armored Car Withdrawal Before Combat
24.21 During the Russian cavalry Withdrawal Before Combat Phase, the Russian Player may also retreat the armored car unit if it is adjacent to an Enemy unit.
24.22 Withdrawal of the armored car unit is automatic. No die need be rolled to determine if the unit can retreat. In all other ways, withdrawal of this unit follows the rules for cavalry withdrawal. (See Standard Rules Section 12.0.)
24.3 Stacking of the Armored Car Unit
24.31 The Stacking Point Value of the armored car unit is always zero.
24.32 The armored car unit has only one step. (The back side of the counter represents a "breakdown"; see Exclusive Rules Case 24.42.) If forced to lose a step, it is eliminated.
24.4 Armored Car Movement Restrictions
24.41 The armored car unit can never enter a mountain hex. If forced to retreat into a mountain hex, it is eliminated.
24.42 Whenever the armored car unit expends more than four Movement Points in any given Movement Phase, it is subject to "breakdown" (i.e., mechanical failure of a large proportion of the unit's cars), according to the following procedure. At the end of a Movement Phase in which the armored car has expended 5 Movement Points, a die is rolled. If the die is 1, the unit has broken down. If 6 Movement Points have been expended, the unit breaks down with a roll of one or two. If the armored car unit breaks down, its counter is flipped over.
24.43 Repair for the armored car unit follows exactly the procedure for Russian step replacement.
25.0 Victory Conditions
GENERAL RULE: Victory is determined by Victory Points. Victory Points are awarded for the destruction of Enemy units and for control of certain cities at the end of the game. Only the Russian Player receives Victory Points recorded on the Victory Point Index. The Victory Points that the Central Powers Player earns are immediately subtracted from the Russian Victory Point Total. Thus, the Victory Point Index shows the net Russian Victory Point Total.
CASES:
25.1 Victory Points
25.11 The Russian Player receives Victory Points at the end of the game for controlling those towns having point values printed with their names on the map.
25.12 The Russian Player is considered to control a town or city at the end of the game if a Russian unit was the last to occupy or move through it (or it is currently occupied by a Russian unit), and the town or city is in supply (see Standard Rules Section 9.0).
25.13 For purposes of victory conditions, a unit is considered to be surrounded if it cannot trace a contiguous line of six hexes or less free of Enemy units and their Zones of Control, to a Friendly supply source or a supplied Friendly unit.
25.14 NOTE: Certain Victory Point awards are given in "minus" sums. These are for Central Powers actions. The effect of these actions is reflected by reducing the Russian Victory Point Total at the moment they occur.
25.15 The Victory Point Total may be a negative number, and in certain scenarios the game will begin with a negative Victory Point Total. When this is the case, the Russian Player should use the negative side of the Victory Point Index markers.
25.16 The Central Powers Player may reduce the Russian Victory Point Total by permanently withholding certain units he is to receive as reinforcements. Once the Central Powers Player decides to permanently withhold a unit and the Victory Points are subtracted, that unit may not be brought into play.
25.2 Victory Point Schedule
| VPs | Action |
|---|---|
| 1 | For each Stacking Point of Central Powers units eliminated. |
| 2 | For each Stacking Point of Central Powers units eliminated while surrounded (see Exclusive Rules Case 25.13). |
| 1 | For each Central Powers HQ unit eliminated. |
| −1 | For each Stacking Point of Russian units eliminated. |
| −2 | For each Stacking Point of Russian units eliminated while surrounded (see Exclusive Rules Case 25.13). |
| −1 | For each Russian HQ unit eliminated. |
| −4 | For each reinforcement unit permanently withheld during Game-Turns 5 through 7. |
| −2 | For each reinforcement unit permanently withheld during Game-Turns 8 through 12. |
25.3 Levels of Victory
| VP Total | Type of Victory |
|---|---|
| 9 or less | Central Powers Decisive |
| 10–19 | Central Powers Substantive |
| 20–29 | Central Powers Marginal |
| 30–39 | Russian Marginal |
| 40–49 | Russian Substantive |
| 50 or more | Russian Decisive |
26.0 Scenarios
26.1 The Glorious Fourth of June: Historical Game
This scenario begins with Game-Turn 1 and ends with Game-Turn 14, using the set-up designation on each counter. The Russian Player is the first Player.
26.11 Both sides receive their reinforcements according to the turn of arrival printed on the counters.
26.12 The Russian VP Total at the beginning of the game is 0.
26.2 Attack On Schedule
Originally, the Russians had planned to open their offensive on June 15. Pleas from the French and the Italians for the Russians to attack and relieve the pressure on the other fronts convinced the Tsar and Stavka to begin the offensive on June 4. Had it not been necessary to attack ahead of schedule, the Russian chances for a strategically decisive victory would have been greater. Not only would the Russians have had a larger stockpile of reserves immediately on hand, but many of the units that the Central Powers used as reinforcements in the campaign would already have been committed to the Trentino and at Verdun, delaying their arrival at the Eastern Front.
This scenario begins at Game-Turn 5 and ends with Game-Turn 18. The Russian Player is the first Player.
26.21 Set-Up: Both Players use their historical set-ups. The Russian Player adds the following units:
| Unit Type | Designation (Hex) |
|---|---|
| 2-4-4 | 95 (0907), 105 (0907), 45 (1007), 46 (1007) |
| 1-2-6 | NC (0907) |
| 0-1-3 | (0908), (2110) |
26.22 Reinforcements: The Russian Player receives reinforcements according to the historical schedule. The Central Powers reinforcements arrive according to the following schedule:
| Turn | Unit Type (Designation) |
|---|---|
| 7 | 2-3-5 (BI, JA), HQ (BH) |
| 8 | 1-2-6 (1), 4-6-5 (108) |
| 9 | 0-1-6 (3) |
| 10 | 2-4-4 (61), 0-1-6 (GR) |
| 11 | 4-6-5 (105) |
| 12 | HQ (10), 4-6-5, (19, 20, 107) |
| 13 | 2-4-4 (48), 4-6-5, (11B, 43R) |
| 14 | 2-4-4 (44), 4-6-5, (1R, 59, 119) |
| 15 | 2-3-5 (37), 4-6-5, (22) |
Note: All withheld Central Powers reinforcements are worth −4 VPs.
26.23 Supply: The Russian Player receives one supply depot on Game-Turns 6 through 18. The Central Powers Player receives one supply depot on Game-Turns 5 and 6, and two depots on each Game-Turn thereafter. [The printed text reads "two depots one each Game-Turn thereafter"; it is transcribed here as two depots per Game-Turn.]
26.24 All special rules for Game-Turn 1 of the historical game are in effect for Game-Turn 5 in this scenario.
26.25 The Russian VP Total at the beginning of the game is −8.
26.3 Scenario Variations
The Russian army high command, Stavka, and the Russian Commander-in-Chief, Tsar Nicholas, often displayed ineptitude in victory as well as in defeat. The brilliant planning of General Brusilov and the bravery of his troops were to a great extent wasted through the jealousy and stupidity then rampant in the Russian officer corps. The following options represent actions that Stavka could have taken to support Brusilov, but did not. One or more of these options may be used with either the "Glorious Fourth of June" scenario or the "Attack On Schedule" scenario. For each option employed in a game, the initial Russian VP Total is reduced by the indicated number of points.
26.31 Early Release of the Russian Special Guards Army: The best offensive troops of the Russian army were the Guards Army. The reluctance to use these troops resulted in their being committed to the battle in late July against the strong German forces near Kovel, when there was little chance for success. Had they been used when first available, the Russian gains would surely have been greater. When this option is employed, all Russian units marked "SGA" become available as reinforcements on Game-Turn 6. The Initial VP Level is reduced by 6.
26.32 West Front Offensive: Just north of Brusilov's southwest front was the Russian west front. Originally, the west front was supposed to attack in concert with Brusilov's. However, the west front commander, General Evert, was not only incompetent, but also cowardly. Fearing failure, he consistently put off his attack, allowing the Germans to concentrate their reinforcements against Brusilov. When this option is used, the arrivals of all Central Powers reinforcements are delayed one Game-Turn. The Initial VP Level is reduced by 6 points.
26.33 Increased Supply and Rail Capacity: Although the Russian supply and rail capacity was limited, they still did not use all they had. Much of the Russian logistic system was wasted in support of the inactive west front. When this option is used, the Russian Player may receive two supply depots per Game-Turn, with a maximum of 11 on the map at any given time. The Russian Rail Capacity is increased to 8 Stacking Points per Game-Turn. The Initial VP Total is reduced by 6 points. This option cannot be used in conjunction with the West Front option.
26.34 Better Commanders: The two newest Russian commanders had not been promoted on the basis of competence. Consequently, more able officers had been passed over. In this option, the Russian H.Q. unit 8 KA is replaced with 8 KL at the start of the game. If the Special Guards option is being employed, H.Q. unit GBZ is replaced with GGU. Each replacement reduces the Initial VP Total by 1 point.
27.0 Unit Designation
27.1 Unit Designation Abbreviations
27.11 Central Powers
B: Bavarian; BI: Biss; GR: Gruppe; JA: Jachmann; R: reserve; PL: Polish Legion; RF: Rifle.
27.12 Russian
AC: armored car; C: Cossack; DC: Don Cossack; F: Finnish; GD: guard; NC: Native Cossack; OR: Orenburg; RF: rifle; S: Siberian; SI: Sarat; TBC: Trans-Baikal Cossack; TR: Transumer; TRF: Terek rifle; TU: Turkostan; UC: Ussuri Cossack; VOL: volunteer; Z: combined.
27.2 H.Q. Unit Abbreviations
27.21 Central Powers
BH: Bernhardi; SA: Sud Armee; BA: Baltin; BE: Boehm-Ermolli; FE: Archduke Ferdinand.
27.22 Russian
GBZ: Guards Army, Bezob; GGU: Guards Army, Gurko; KA: Kaledin; KL: Klembowski; LE: Lech; SA: Sakharov; SH: Shscherbachev.
Game Markers
[Counter-sheet graphic, not text. The printed markers are: Victory Points (positive) ×1 and ×10 (front); Victory Points (negative) (×1) and (×10) (back); Out of Command Control (OCC); Corps Reduction markers, Full Strength −1 and Half Strength −1.]
Counter Sheets and Map
The printed pages 13–15 of the source are the front and back counter-sheet artwork (the Brusilov order of battle as die-cut counters) and the game map with its Terrain Key, Victory Point Record Track, and Turn Record Track. They are graphics, not rules text, and are not transcribed here. Unit designations and abbreviations needed to read the counters are given in Cases 27.1 and 27.2 above; the Game-Turn schedule for reinforcements and Central Powers arrivals is in Case 26.22.