The Battle of Helm's Deep
The Battle of Helm's Deep Rulebook
Table of Contents
Table of Contents
II. Game content
2.1 The game plan
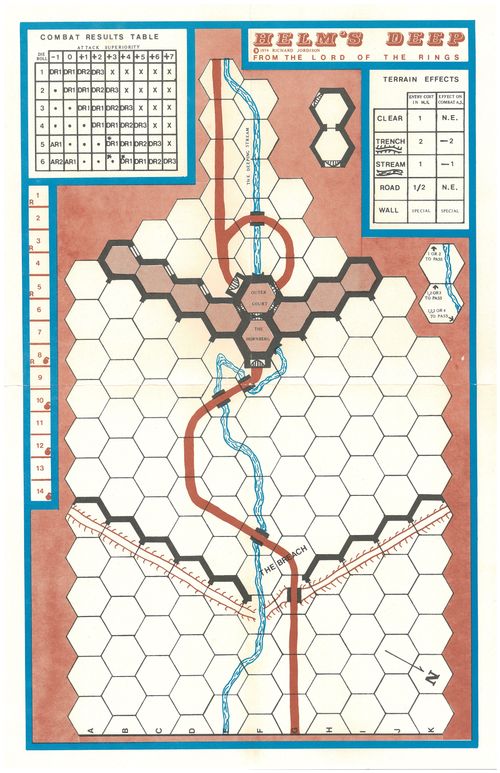
The A3 sized playing field represents the part of the mountain gorge in which the fortress Helm's Deep is located.
The ground area on the game board is surrounded by steep mountain cliffs, with the exception of the northern side, where the entrance to the valley is located, and the southernmost hex, where the Klammbach flows into the gorge.
The terrain movement map, the combat result table and the time table are also located on the playing field.
Each hex is defined by a letter on the northern edge of the board and the number of hexes south of the letters. Thus, the hex field representing the Hornburg would be F-11 and the two hexes of the passage in the outer wall would be F-5 and G-5.
The game pieces
The three colored sheets of game pieces form the three main groups of fighters in the battle.
- The red stones represent the forces of the Men of Rohan defending the gorge.
- The green stones form the dark Dunlendings under the command of Saruman.
- The blue stones also represent the dark Uruk-Hai under Saruman.
Example unit
The source shows an example unit for each type, labelled Unit Type: Sword and Unit Type: Archers, with the labels Melee Strength, Movement Points, Shooting Strength and firing range. The labels are explained under Definition of terms below.
Definition of terms
There are two basic types of units: sword and archers. Sword units can only engage in close combat and archers can only engage in ranged combat.
The number in the bottom left corner represents the melee strength and defense value of the sword units, as well as the shooting strength and melee defense value of the archer units.
The number in the bottom right corner represents the movement points each unit has available per turn.
The small number in the middle at the bottom of the archer unit stones represents the maximum range of that unit and indicates how many hexes the unit can shoot.
III. Round sequence
Basics
The game is played in successive rounds, during which each player performs specific actions, moves his units, and engages in close and long-range combat. Each round consists of several phases that must be followed precisely.
The player leading Saruman's forces always moves first each round and is henceforth referred to as the "First Player." The second player takes the forces of the good under Theoden.
The first player's turn
- Remove ladders: The first player removes all ladders that are no longer needed from the playing field.
- Destruction phase: The first player announces the explosion of his bombs.
- Ladder storming phase: The first player can carry out attacks via ladders.
- Ladder erection phase: The first player can try to set up all the ladders he wants.
- Movement phase: The first player may move some or all of his units.
- Close combat phase: The first player can perform all the close combat he wants.
- Distance combat phase: The first player can conduct all the ranged bow battles he wants.
The second player's move
- Knocking down ladders: The second player can try to knock down any ladder he wants.
- Movement phase: The second player may move some or all of his units.
- Close combat phase: The second player can perform all the close combat he wants.
- Distance combat phase: The second player can conduct all the ranged bow battles he wants.
Pull the lap counter
After completing a turn, the round marker is moved to the next space and the round sequence begins again.
IV. Movement
4.1 General
During the movement phase, the player can move some, all or none of his units that he wants. Each unit can move as many hexes as desired, up to the number of movement points it has. This is limited by the effects of the terrain and the presence of enemy or friendly units.
How to move
Movement is calculated using movement points. A unit must spend one movement point to move into an adjacent free terrain hex. The terrain movement card shows any differing movement costs when moving into different terrain hexes. A unit may move in any direction and may also change direction during its turn, as long as it does not exceed its movement points or end up in a space already occupied by another unit, whether friendly or enemy.
Movement restrictions
- A. Each unit must be moved individually and cannot be moved or withdrawn once it has been moved.
- It is not allowed to stack units on top of each other. No unit may move in such a way that at the end of the movement phase it ends up in a hex of another unit. A unit can move through (over) its own units but may not end up in a hex of its own unit at the end of the turn. A unit that would end up in a hex already occupied by one of your own units at the end of the turn is removed from the board.
- A unit may never move through or over a hex occupied by an enemy unit. Your unit must stop if it touches a hex occupied by an enemy unit. The six hexes surrounding a unit are called the "area of control" and force enemy units to stop when they move into this area.
- No combat actions or enemy movements are allowed during the movement phase.
- A unit may not move further than its movement points allow. It may not move into a hex whose entry cost exceeds its remaining movement points.
- Movement points cannot be accumulated from one round to another or transferred from one unit to another.
Movement on streets
- The movement cost to enter a road hex is ½ movement point if you move into that hex from another road hex. Otherwise, the cost is the same as in the hex you moved into the road hex from.
- The road hexes that cross the castle wall or the tunnels are considered road hexes for movement.
Movement through castle walls
There are two castle wall sections on the board that affect movement.
- The first section is the castle wall hexes A-6 to E-4 and H-5 to K-6. This castle wall divides the lower ground to the north and the higher ground to the south. When a unit crosses the castle wall from north to south, it is considered a "wall climbing" unit. If it crosses the castle wall from south to north it is considered a "wall climbing" unit.
- The second and main section is the castle wall on both sides of the hex rows B-13 to E-11 and from G-11 to I-12. The two massive castle wall hexes F-11 and F-12 are called "the Hornburg" and are part of this wall. This wall system is a breastwork with a row of wall hexes that are higher than the ground on either side. Thus, a unit moving from one wall hex to another non-wall hex is considered to be "climbing down the wall." A unit moving from a non-wall hex into another wall hex is considered a "wall climbing" unit.
Movement restrictions on the wall
- No unit may "climb the wall" into a hex if there is no open gate or constructed ladder in the hex field.
- Any unit may "climb the wall" if a ladder is built there by spending all four of its movement points for that turn. The piece is moved from the non-wall hex to the wall hex, or higher hex, and may not move further in that round.
- E. Gate hexes do not restrict the movement of the second player, but may not be passed through by the first player unless the gates have been destroyed by bombs or attacks.
- F. Any unit may climb down the wall by spending all four of its movement points for that turn. The piece is moved from the wall hex to the non-wall hex. This movement is called jumping and is the only way to climb down the wall.
- The Hornburg's two hexes, F-11 and F-12, are considered unclimbable and cannot be climbed using ladders. Access is only possible through the four gates of the outer courtyard.
- The "area of control" does not extend to the hexes, up the wall, or down the wall. A unit moving at the base of a wall is not forced to stop if it touches a hex of an enemy unit that is on the wall and vice versa.
- Units that have climbed a ladder after a successful ladder attack may not move further for that round.
The road tunnel
Description
- The two hexes of the Hornburg, labeled "The Hornburg" and "Outer Courtyard" on the game board, are 3-story towers that are treated as three separate terrain spaces. The top story is the two hexes on the main game board. The middle story is the tunnel through which the road leads from the north through the Hornburg and further south into the ravine.
- The two hexes of the road tunnel are located on the side of the game board for better visibility. They are considered separate terrain pieces from F-11 and F-12 on the game board.
Movement restrictions
- The two hexes of the road tunnel can only be entered via the hex F-10 or E-10, through the "big gates".
- The two hexes of the road tunnel are considered road hexes for the movement.
- Units moving through the road tunnel are not considered to be in the same space as any other unit that may be on the floor above them. They are considered separate from the terrain hexes above and below them.
- Units that move into the tunnel or remain inside are placed at the edge of the game board to avoid confusion.
The passage of the Klammbach
Description
- The third floor of the Hornburg is the passage through which the Klammbach flows from the interior of the gorge, through the Hornburg, to the north. The culvert is treated in the same way as the road tunnel.
- The two hexes of the passage are located on the side of the game board for better clarity. They are considered separate terrain pieces from F-11 and F-12 on the game board, as well as from the floors above.
Movement restrictions
- The two hexes of the passage can only be entered via hex G-10 or F-13.
- The second player can consider it as free terrain for movement.
- The first player is limited in the speed at which he can move through the passage. To move into hex F-11, the First Player must roll a 1, 2, 3 or 4 to move into that hex. He must also roll a 1, 2 or 3 to move into hex F-12 and a 1 or 2 to move out of the passage into hex F-13.
- Movement from south to north is not restricted for the first player. These hexes will consider them as open ground for movement.
- F. Units moving through the passage are not considered to be in the same space as any other unit that may be above them in the road tunnel or on the top floor of the Hornburg.
- Units that move into the passage or remain inside are placed at the edge of the game board to avoid confusion.
V. Fight
5.1 Close combat
Description and process
- Melee combat is a skirmish between adjacent enemy units using melee weapons such as swords.
- To determine the attack result, the defensive strength of the attacked unit is compared with the terrain-modified melee strength of the attacking unit. This is called attack superiority and after rolling a die, the combat result is read from the combat result table.
Attack restrictions
- During the melee phase of a player's turn, there is no movement or any other type of combat.
- An attack is always voluntary. A player is never obliged to attack other neighboring enemy units. However, he can attack some or all enemy units. This is up to him.
- All attacks are handled separately, one at a time.
- No enemy unit can be attacked more than once per combat phase, nor can a friendly unit attack more than once per combat phase. However, a unit can be attacked by archers once per round in close combat and then at range.
- Two or more of your own units can combine their attack strength in battle if they are in the adjacent field of the attacked enemy unit.
- A unit may not split its attack strength into two separate attacks.
- Under no circumstances can units engage enemy units in close combat that are at the foot of a castle wall.
- The First Player may never attack an enemy unit on the other side of a gate hex unless the gate has been destroyed. The second player, on the other hand, can always attack an enemy unit on the other side of a gate hex.
- A close combat with a unit fighting up a wall with a ladder deployed is called a "ladder charge" and is considered a special type of close combat. A ladder charge can only take place during the First Player's Ladder Charge phase.
- Units that have been involved in a ladder storm, whether successful or not, may not engage in close combat in the same round.
Terrain modifiers to attack strength
- The attack strength of a unit can vary depending on the terrain the unit is currently on.
- If the attacking unit is in the moat hex, its attack strength is reduced by 2 points.
- If the attacking unit is in the Klammbach hex, the attack strength is reduced by 1 point.
- If the attacking unit is in the F-4 hex, the attack strength is reduced by 3 points.
- If the attacking unit is in the road hex, it is considered open terrain for combat purposes.
- If the attacking unit(s) are engaged in a ladder charge, their total attack strength is reduced by one point, as is any reduction from terrain.
5.2 Ladder storming battle
Description
- Ladder storms are a special form of close combat in which the First Player attacks the Second Player's units on a castle wall hex.
Attack restrictions
- All ladder storms are handled separately, one after the other.
- No unit may perform a ladder storming more than once per turn.
- Ladder storms can only take place on a castle wall hex where a ladder has been built.
- The unit conducting a ladder assault must begin at the base of the ladder.
- The combat strength during ladder storming is reduced by 1 point for the entire attack, even if more than one unit participates in this attack.
- The ladder storming is successful if at the end of the fight the castle wall hex is free of the defending unit.
- If the first player is successful, he can move one of the attacking units into the castle wall hex that was previously occupied by the defending unit. This is a special case of movement during combat.
- The two hexes of the Hornburg cannot be attacked by a ladder attack. This can only happen through the gates.
- A unit involved in a ladder charge cannot move or engage in close combat this round.
Long-range combat with archers
Description
- Ranged archery combat is combat in which arrows and bows are used to attack non-adjacent units.
- To conduct a long-range battle with archers, simply use the shooting strength points as attack superiority. After rolling a die, the battle result is read from the battle result table.
Example: An archer unit with a shooting strength of 2 uses the +2 attack superiority column, while 2 such units attacking together would use the +4 column, and so on.
Attack restrictions
- Archer attacks may only be made during a player's ranged combat phase.
- Each attack is handled separately, one at a time.
- A unit cannot attack more than once per turn, nor can it split its fire power between two attacks.
- Only archer units can intervene in ranged combat. Archer units are prohibited from engaging in close combat, but can defend themselves in close combat with their shooting strength.
- Archer units may attack any unit within their firing range. Each hex is considered open terrain when determining range.
- Multiple units can combine their attack strength, but the attacked unit must always be within firing range of both units.
- Archer units can attack enemy units on castle wall hexes and can attack from castle wall hexes, but they cannot attack units that are beyond two severing castle wall hex sides.
- Units in the Hornburg, regardless of the level, can never be attacked by archers, even from an adjacent hex.
Combat result table
Source heading: KAMPFERGEBNISTABELLE (combat result table), with the column heading ANGRIFFSÜBERLEGENHEIT (attack superiority) and the row heading WÜRFELZAHL (die roll). Transcribed from the table image in the source document. The dot (·) is no result. The asterisk () marks the ladder storm result described below.*
| Die roll | -1 | 0 | +1 | +2 | +3 | +4 | +5 | +6 | +7 |
|---|---|---|---|---|---|---|---|---|---|
| 1 | VR1 | VR1 | VR2 | VR3 | X | X | X | X | X |
| 2 | · | VR1 | VR1 | VR2 | VR3 | X | X | X | X |
| 3 | · |
Explanation of the results
- X: The attacked unit is destroyed and its field is taken.
- ·: No result.
- *: If the attack was a ladder storm, one of the attacking units, at the attacker's choice, is destroyed and removed.
- VR1, AR1 (and the other VR/AR numbers in the table): The attacker (A) or the defender (V) must retreat the specified number of hex spaces.
Retreat restrictions
- The winner of a battle determines the retreat route.
- The following types of retreat are not permitted:
- Through forbidden territory, like a castle wall hex.
- A route that leads down from the game board.
- Into or through an enemy-controlled area.
- Into a field that is already occupied by another unit.
- If no other route is possible other than the 4 above restrictions, the unit is destroyed instead.
- If the unit being retreated is on a castle wall hex or in the Hornburg, the unit does not retreat, even if there is a legal retreat route.
The following retreat routes are legal:
- Into an adjacent, unoccupied castle wall hex that is not in a control area of an enemy unit.
- In a free hex field, into which you move over your own units can be.
- In an adjacent non-castle wall hex that is separated by a gate or ladder and is not within the control range of an enemy unit.
Jumping down a wall is not considered a legal escape route. A unit that only has this option is instead destroyed and removed from the field.
VI. Special rules
Ladders
Description
- A. Ladders are used by the first player to climb castle walls and perform ladder storms. The ladders are represented by the eight game pieces that have ladder symbols.
Restrictions
- B. The First Player may never use more than eight ladders at the same time, but a ladder may be used multiple times during the game.
- C. Ladders are not carried by a specific unit. Any unit adjacent to a castle wall hex can attempt to place a ladder.
- Each unit may attempt to set up a ladder once per round, during the Ladder Setup phase. A die is rolled for each unit that attempts to do so. If the result is a 1, 2 or 3, the unit was successful and the first player places a ladder on the castle wall hex side of his choice.
- E. It is possible for a unit to have two ladders on each adjacent castle wall hex side if attempts were successful in different ladder deployment phases.
- F. During the "Remove Ladders" phase, the first player can remove any ladders he no longer wants to have in place. To do so, he simply takes the token off the board.
- A friendly unit must be in the adjacent hex where the ladder is located in order to remove the ladder.
- Ladders removed during the Remove Ladders phase may be re-erected during the Ladder Setup phase of the same turn.
- The second player can attempt to knock over ladders during his "knock over ladders" phase. To do this, the second player rolls a die for each unit that is next to a ladder. On a 1, 2, 3 or 4, this is successful and the token with the ladder is removed from the board.
- J. If there are two ladders on a hex of a second player's unit, the second player may only attempt to knock over one of the two ladders per turn.
- The second player may never attempt to set up ladders.
- The first player may never place ladders against the Hornburg or the outer courtyard.
Bombs
Description
- A. Bombs are crude explosive charges used by the first player to destroy gates and open the way for attacks. The bombs are represented by the four small tokens with the bomb symbol.
Restrictions
- B. Bombs are not carried by a specific unit. Any unit adjacent to a gate hex during the First Player's Destruction Phase can detonate a bomb.
- A bomb destroys any gate hex face it is aimed at without damaging adjacent units.
- Bombs are the only means of destroying the large gates at the ends of the road tunnel through the Hornburg.
- After the explosion, the bomb token is placed on the desired hex side to indicate that the gate has been destroyed.
- The bombs are available from the rounds shown on the time table and may not be used before then.
- Bombs do not necessarily have to be used in the specified round and can also be saved for later. Multiple bombs can explode per round if they are available.
- It is not possible to repair gates.
Attacks on gates
The source heading reads "Attacks on goals"; "goals" is a mistranslation of the gates ("Tore") these rules concern, so it is rendered "gates" here.
Description
- A. Gate attacks are close combat attacks by the first player against easier gates in order to reach the enemy units behind them.
Restrictions
- By attacking gates, only the lighter gates can be destroyed. The four in the outer courtyard are easy gates.
- Attacks on gates are fought like normal melee combat, during the first player's melee phase.
- Gates have a melee strength of 1 and are attacked like an enemy unit. Gates cannot retreat and are only destroyed if the result on the combat result table is an X.
- Units attacking a gate cannot start another melee in the same turn.
- The large gates leading to the road tunnel cannot possibly be destroyed.
- Once First Player units occupy both sides of a gate hex, the gate is opened and remains open to First Player units until Second Player units move into a gate hex and close it again.
VII. Game line-up
First player line-up
The first player has no units on the board at the start of the game, but receives reinforcements during the game.
First player reinforcements
The first player's reinforcements come into play at the northern edge of the game board. The first full hex is counted as the first movement point. The reinforcements come into play in the round in which they are scheduled to appear during the movement phase and can fight as soon as they appear. Multiple units can enter play in the same space, but no units can end up in the same space at the end of the movement phase.
- In the first round, the first player receives:
- Dunlending: FIVE 5-4 swordsmen and ONE 2-4 archers.
- Uruk-Hai: TWO 4-4 swordsmen, TWO 3-4 swordsmen, TWO 2-4 swordsmen and TWO 1-4 archers.
- In the third round, the first player receives:
- Dunlending: TWO 5-4 swordsmen and ONE 2-4 archers.
- Uruk-Hai: ONE 4-4 swordsman, ONE 3-4 swordsman.
- C. In the fifth round, the first player receives:
- Dunlending: TWO 5-4 swordsmen.
- Uruk-Hai: ONE 3-5 swordsmen (sic, as printed), TWO 2-4 swordsmen.
- D. In the eighth round, the first player receives:
- Dunlending: TWO 5-4 swordsmen.
- Uruk-Hai: ONE 4-4 swordsman, ONE 2-4 swordsman.
Bombs are available in the 8th, 10th, 12th and 14th rounds and can be used at any time thereafter.
Second player line-up
The second player places all his units before the start of the game.
- TWO 3-4 "shearers" (sic, as printed) must be set in hex F-5 and G-5.
- ONE 2-4 archer unit must be set in hex F-6.
- The 5-4 Theoden unit is placed on the Hornburg and may not be moved from there during the game.
- All other units must move to the castle wall hex, inside the Hornburg or south of the hex line from B-13 through F-11 to I-12.
After the start of the game, the second player can also move all of his units, with the exception of the Theoden unit, north of the main castle wall.
VIII. Victory conditions
8.1
Victory depends on the victory points of the first player. He gets these points during the game for completing certain tasks.
8.2
Victory points are awarded for the following tasks:
- If the first player has a successful ladder storming he gets 30 points.
- If the First Player destroys the Theoden unit before the end of the game, he gets 25 points.
- If the first player manages to destroy all enemy units by the end of the game, he gets 75 points plus the 25 points for the Theoden unit.
- For each unit that the First Player pushes off the field via hex E-17, he gets 10 points. Such units may not return to the game.
8.3
The level of victory depends on the number of victory points of the first player.
- Superior victory for Saruman: over 100 points.
- Tactical victory of Saruman: between 75 and 100 points.
- Draw: between 45 and 70 points.
- Tactical victory for Theoden: between 15 and 40 points.
- Superior victory for Theoden: 10 points or less.
Example moves
The source illustrates these two examples with diagrams of unit positions (units A to Z); the diagrams are not reproduced here and the text is transcribed as printed.
Example 1
The first player's turn: Unit Z can move onto the castle wall next to B and C. W can only jump down the wall to unit Y, but nowhere else. If unit Z moves, it could attack either B or C, or both. W can attack A or B if she does not move. If she does move, she cannot attack.
The second player's move: Units A and B can both attack W. Unit C can attack any of the enemy units.
Example 2
The first player's turn: Units W and X can attack C with a +6 via a ladder charge, requiring a 1, 2, 3 or 4 to succeed. U can climb the castle wall hex and engage either A or B in close combat. The Y and Z units can attack either B or C together, Y can attack A but not D. The V unit cannot attack at all.
The second player's move: Unit C can attempt to knock over either ladder leaning against its castle wall hex or attack any of the enemy units. A and B could attack U if U has moved to the wall.
Appendix: The game pieces
The source appendix shows the first player's pieces (Dunlending and Uruk-Hai counters, ladder and bomb tokens) and the second player's pieces (Rohan counters, including Theoden). These are counter images only and are not reproduced as text; the unit strengths and counts are given in the rules above.