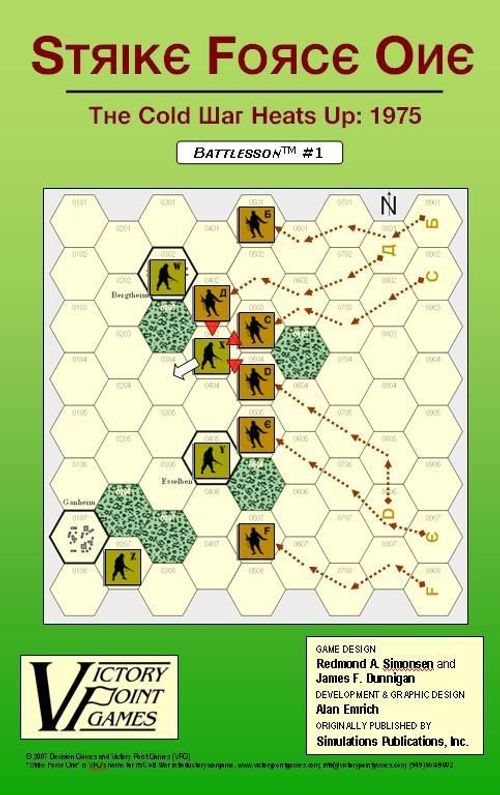
Strike Force One: The Cold War Heats Up – 1975
Strike Force One: The Cold War Heats Up – 1975 Rulebook
Table of Contents
Table of Contents
[0.0] Using These Rules
New gaming terms, when they are initially defined, appear in dark red lettering for quick referencing.
The instructions for this game are organized into major "Rules" sections as shown in large green SMALL CAPS font, and represented by the number to the left of the decimal point (e.g., rule 4.0 is the fourth rule). These rules generally explain the game's subject matter, its components, the procedures for play, the game's core systems and mechanics, how to set it up, and how to win.
With each Rule, there can be "Cases" that further explain a rule's general concept or basic procedure. Cases might also restrict the application of a rule by denoting exceptions to it. Cases (and Subcases) are an extension of a Rule shown in the way that they are numbered. For example, Rule 4.1 is the first Case of the fourth Rule; and Rule 4.12 is the second Subcase of the first Case of the fourth Rule.
Important information is in red text.
References to examples of a Rule or Case are in blue text and this font.
Text in shaded boxes, like this, provides the voice of the game's designer, who is addressing you to explain an idea or concept that is not, itself, a Rule or a Case.
[1.0] Introduction
STRIKE FORCE ONE is played on a small map that represents an important section of West Germany at the height of the Cold War circa the mid 1970s.
The map is divided up into spaces (called "hexes") in order to position the playing pieces and to regulate their movement. These hexes perform the same function as squares on a checkerboard.
Each player represents a Lieutenant Colonel commanding a battalion of troops. The playing pieces (called "units") represent companies of U.S. or Soviet soldiers. A company is 62 to 190 soldiers, plus their equipment, organized into three to five platoons and commanded by a Captain. Four to six companies (i.e., each player's entire force in the game) make up a battalion of 300 to 1000 soldiers.
General Description of Play: One player controls the movement and combat of the U.S. units and the other player controls the movement and combat of the Soviet units. Each player moves and attacks with his units, in turn, in an attempt to capture (or prevent from being captured) the Town hexes on the map.
The players take turns, moving and attacking (initiating "Battles") with their units until each has had four turns of play. The game is then over and the winner is determined. Basically, the Soviet Player is attempting to capture at least two Towns and the U.S. Player is trying to prevent him from doing this.
How to Learn This Game: Read these rules first, then look over the sample game sheet. You should then be very prepared to play a game of STRIKE FORCE ONE.
It cannot be stressed too much that it is important for you to read all the Rules. Even though STRIKE FORCE ONE is an easy-to-play game that can be finished in fifteen minutes, you'll cause yourself a lot of needless trouble by not having a complete grasp of the Rules before you play.
You may find it helpful to set up the pieces on the map before you read any further, then as you read the Rules, try the various actions shown in the examples.
In addition to the other components used to play this game, you'll need to provide a single, six-sided die.
[2.0] Equipment Used
The Map: The map represents a typical piece of ground in West Germany. It is divided into 68 spaces (hexes) to regulate the movement and location of units.
Three of the hexes on the map are dark-bordered Town hexes with the town's name located an adjacent hex. It is the mission of the Soviet Player to occupy these hexes with his units to win the game.
Five of the hexes on the map are Woods hexes. In the Standard Game, no units may enter, pass through, or occupy Woods hexes (i.e., it is "prohibited terrain"). The remaining hexes represent Open (or "Clear") terrain.
Note that the hexes on the map are numbered using a four-digit system where the first two digits indicate the hex column and the last two digits count down to the hex row. These Hex ID Numbers are used only if the players desire to record the course of a particular game. They have no effect on play.
Also included on the map is the Game Turn Track and Sequence of Play.
The Playing Pieces: In the Standard Game, the playing pieces (called "units") represent U.S. and Soviet infantry companies. All units are considered to be of equal strength and capability. The six Brown Companies are the Soviet units; the four Green Companies are the U.S. units.
Game Setup: When the game begins, the units are placed in the starting positions printed on the map. Note that the units are letter-coded for identification purposes.
The Player Aid Sheet: Thus sheet includes the Combat Results Table, which is used to find the result of a particular Battle conducted by either player. Its Advanced Game side also includes a Terrain Effects Chart for more realistic map use.
The Die: The die is used only with the Combat Results Table to determine the result of Battles. The die has nothing to do with the movement of units.
[3.0] Sequence of Play
Procedure
Set up each of the units on the appropriately coded hexes and begin the first turn. Each complete turn of STRIKE FORCE ONE proceeds strictly according to the following Sequence of Play:
- Step 1: The Soviet Player moves any or all of his units, as he wishes, within the limitations of the rules of movement.
- Step 2: The Soviet Player may now make attacks against any U.S. units that are in hexes directly adjacent to (next to) Soviet units. Results are applied as each Battle is completed.
- Step 3: The U.S. Player may now move any or all of his units, as he wishes, within the limitations of the rules of movement.
- Step 4: The U.S. Player may now make attacks against any Soviet units that are in hexes directly adjacent to U.S. units. Results are applied as each Battle is completed. After all US Battles are finished, advance the Game Turn marker.
The above four Steps make up a complete Game Turn, these steps are repeated in order until four complete Game Turns have been played. The game is then over and the winner is determined.
Extremely Important Note #1: Testing has shown that, at first, most people have some difficulty clearly understanding two very important rules of this game. Pay special attention to these rules and you'll be sure to interpret them correctly. The first is:
Rule 3.0: The Sequence of Play
Each complete Game Turn must proceed exactly according to this step-by-step procedure. Doing something out of sequence violates the rules.
As an example of how the procedure works, let's suppose that you are the Soviet Player (Brown playing pieces) and I am the U.S. Player (Green playing pieces). Each turn we would follow this order of activities:
First, you would move some, none, or all of your playing pieces that you wished to move. While you are doing this, I do nothing. While you are doing this you are not allowed to attack any of my playing pieces.
After you have finished moving your pieces, you then have a chance to attack my pieces. You may only attack those of my pieces that are right next to (adjacent to) your pieces. While you are doing this, I do nothing except retreat my units as called for by the results of combat (see the Combat Results Table).
After you have finished conducting all the Battles that you wish to make, it becomes my portion of the turn. Now I move as many of my playing pieces as I wish (while you do nothing).
After I've finished all of these movements, I have a chance to attack those of your playing pieces that are right next to my playing pieces. You do nothing while I'm attacking except retreat any of your pieces that are forced to do so as a result of combat.
After all my attacks are over, we have played a complete Game Turn. We advance the Game Turn marker to the next box on that track and repeat this Sequence of Play again and do the next Game Turn.
[4.0] Unit Movement
General Rule
During his Movement Step, a player may move none, some or all of his units up to four hexes each. A player does not move any of the opposing player's units.
Procedure
The player moves his units one at a time in any order he wishes. They are moved from hex to adjacent hex in a continuous path of hexes. There is no skipping or jumping over hexes allowed. Units may be moved in any direction or combination of directions. The path of a unit's movement may be as straight or as crooked as the moving player desires.
Diagram caption: This diagram shows some of the possible paths of movement that units can take.
[4.1] Four "Movement Points:" During his Movement Step, a player may move each of his units a maximum of four hexes. That is, each unit has four Movement Points to spend each turn. Each may be moved less than four hexes in a turn, but it does not "save" unused Movement Points for use later, nor can they be transferred to other units.
[4.2] Prohibited Movement: The following moves are forbidden:
- A player's units can never enter or pass through a hex while it contains one of the opposing player's units.
- Units can never move off the map.
- In the Standard Game, units can never enter or pass through any Woods hexes on the map.
- In the Standard Game, a player may move one or more of his units through a hex containing one of his own units, but he can never end the movement part of the turn with more than one of his units in any hex.
Diagram caption: The top two movement paths shown in the diagram below are not allowed (and have been marked "NO"). The bottom movement path is allowed (marked "YES") because it does not enter or pass through either the Woods hex or the hex occupied by the opposing unit.
[4.3] Enemy "Zones of Control": A unit's Zone of Control (abbreviated "ZOC") is constituted by the six hexes immediately surrounding it as shown in this illustration.
- All units exert a ZOC at all times.
- The presence of Zones of Control is never affected by other units, enemy or friendly.
[4.31] Entering an Enemy ZOC: Units must cease their movement for that turn when entering an enemy Zone of Control. That is, whenever a unit enters a hex that is directly adjacent to any of the opposing player's units, the moving unit must immediately stop in that hex and move no further that turn.
Extremely Important Note #2: The second rule that people have difficulty with is:
Rule 4.31, Stopping In Hexes Adjacent to Opposing Units
This rule states that whenever a player is moving one of his pieces and he moves it into one of the spaces adjacent to (right next to) one of the other player's pieces, the moving piece must stop immediately and not be moved any further that turn.
Put a Brown piece and a Green piece on the map with one empty space between them. Move the Brown piece next to the Green piece. That's as far as it can go that turn.
Assume it's the next turn and the Brown piece is still next to the Green piece. Move the Brown piece so that once again there is an empty space between the two pieces. The Brown piece could now move another three spaces except if one of those spaces was adjacent to the Green piece, in which case it would have to stop again.
Diagram caption: The Soviet (brown) unit on the right must stop as it moves adjacent to (next to) the U.S. (green; i.e., the opposing player's) unit on the left because it has entered an Enemy Zone of Control.
[4.32] Leaving an Enemy ZOC: If a player's unit begins his movement part of the turn in a hex in an Enemy Zone of Control, the unit may leave that hex and move normally, however:
[4.33] No "Infiltration" Movement: During his movement part of the turn, a player may never move one of his units directly from one hex to another if both those hexes are in Enemy ZOCs (i.e., adjacent to one or more of the opposing player's units). A moving unit may begin and end its move adjacent to enemy units if one (or two) of the hexes it enters during the middle of its move are not adjacent to the opposing player's unit(s).
Diagram caption: Here you see a Soviet unit that begins its turn in an Enemy Zone of Control (i.e., next to an opposing unit). Note how the Soviet unit is limited as to where and how it can move because it began its turn in an Enemy ZOC. The two paths marked "NO" are violations of the rules; the path marked "YES" is one of the possible legal moves the unit may make. Note that this path also ends adjacent to an opposing unit. This is a legal move, however, because the first hex the unit entered was not adjacent to an opposing unit.
Sometimes a particular unit will be unable to move because of this rule.
Diagram caption: In this illustration, the Soviet unit in the middle cannot be moved at all because any hex it would enter as its first hex of movement would be either a hex adjacent to, or occupied by, an enemy (U.S.) unit.
[5.0] Combat
General Rule
During his Combat Step, a player may use his units to conduct "Battles" by attacking any of the opposing player's units that are in hexes adjacent to his units, rolling a die, and consulting the Combat Results Table located at the end of this Rules Booklet.
Diagram caption: Note that in the situation illustrated above on the left, a Battle cannot take place because the two opposing units are not adjacent to (next to) each other. In the example next to it on the right, the Soviet unit is attacking the U.S. unit. It can conduct a Battle because it is adjacent to the unit it is attacking.
Only the player whose combat part of the turn it is may initiative Battles.
Battles are made in any order the attacking player wishes, as long as the results of one Battle are applied before going on to the next Battle.
How Units Attack
[5.1] Attacking is Voluntary: Units are never forced to attack simply because they are adjacent to one or more of the opposing player's units. Attacking is completely voluntary. Defending against an attack, however, is not voluntary. The defending unit has no choice as to whether or not it will "accept" the attack.
[5.2] Attacking with More Than One Unit in a Single Battle: More than one attacking unit may take part in a single Battle. Because all the units must be adjacent to the unit that they are attacking, no more than six units could take part in an attack against a single opposing unit.
Diagram caption: In the above example on the left-hand side, the two Soviet units attack the upper U.S. unit ("X") while the lower U.S. unit ("Y") is ignored. In the right-hand version of the same situation, each Soviet unit initiates a Battle against one of the U.S. units.
In such situations where there is more than one possible way to set up a Battle (or Battles), the player whose turn it is decides which opposing units he will engage in Battle and which (if any) he will ignore.
[5.3] Limitations: No more than one of the opposing player's units may be the object of a particular attack. No unit may be attacked more than once per turn. No unit may take part in more than one Battle per player's turn.
Designer's note: Because of the number of units in the game, it is impossible to initiate more than four Battles per turn for either player.
[5.4] Conducting a Battle: A "Battle" (or "attack") is defined as one or more "attacking" units targeting a single adjacent "defending" unit, rolling a die, and consulting the Combat Results Table to determine the outcome.
[5.5] Using the Combat Results Table: The result of each Battle is determined by rolling a die and cross-indexing the results with the appropriate column of the Combat Results Table.
The number of attacking units in that Battle determines which column of the Combat Results Table is used, and the die roll result determines which row of that column is read to find the Combat Result. The die is thrown only once for each Battle, regardless of how many attacking units are involved in it.
Diagram caption: Assume that three Soviet units are attacking one adjacent U.S. unit. Refer to the Standard Game Combat Results Table (below).
[5.6] Explanation and Application of Combat Results
Note that the player who is making the attack is referred to as the "attacker" and the player whose unit is the object of the attack is referred to as the "defender."
The following paragraphs define the results indicated on the Combat Results Table:
- Defender Eliminated: The defending unit is eliminated (removed from the map) and the attacker may Advance After Combat (see 5.7).
- Defender Retreats 1 Hex: The defending player retreats his unit one hex away from the attacking unit(s); the attacker may Advance After Combat (see 5.7).
Diagram caption: Here you see that two Soviet units have attacked the U.S. unit and obtained a "Defender Retreat" result against it, forcing it to retreat as shown.
Retreat Restrictions:
- Retreats may not be made into hexes presently occupied by either player's units.
- Retreats may not be made into Woods hexes or off the edge of the map.
- Retreats may not be made into a hex in an Enemy ZOC (i.e., a hex adjacent to any of the opposing player's units).
If the only retreat available to a unit is one of the types forbidden, the unit is eliminated instead.
- Attacker Retreats: All of the attacking units in this Battle are moved back one hex by the attacker as per the above Retreat Restrictions.
- Attacker Eliminated: The unit making that attack is eliminated (immediately removed from the map).
[5.7] Advance After Combat: When the defender's hex has been vacated (through Retreat or Elimination) due to Battle, the attacker may Advance After Combat any one of his units that took part in that particular Battle into the defender's vacated hex.
- Advance After Combat is completely voluntary.
- This Advance must be made immediately, before the attacker goes on to resolve any remaining Battles during that Step.
- This one-hex Advance is not considered normal movement for that unit, and it may be made regardless of the presence of Enemy Zones of Control (4.3) and regardless of the number of hexes it moved during his Movement Step that turn (4.1).
- Victorious defending units may never Advance After Combat; only victorious attacking units.
[6.0] How to Win
At the end of four complete Game Turns, the Soviet Player wins if his units physically occupy at least two out of three of the Town hexes on the map. The U.S. Player wins if he prevented this from happening.
Designer's note: Note that the number of units eliminated by either side has no direct bearing upon which Player is declared the winner. No tie games are possible.
Standard Game Combat Results Table
The Standard Game Combat Results Table is printed on the Player Aid Sheet. Die roll is the row; the number of attacking units in the Battle is the column.
| Die Roll | One unit | Two units | Three units | Four units | Five units | Six units |
|---|---|---|---|---|---|---|
| 1 | Defender Retreats 1 Hex | Defender Retreats 1 Hex | Defender Eliminated | Defender Eliminated | Defender Eliminated | Defender Eliminated |
| 2 | Defender Retreats 1 Hex | Defender Retreats 1 Hex | Defender Retreats 1 Hex | Defender Eliminated | Defender Eliminated | Defender Eliminated |
| 3 |
Note: the printed table shows each die face as pips; the die roll is given here as the pip count (1 to 6).
[7.0] The Advanced Game
Once you've played STRIKE FORCE ONE several times and have mastered the Standard Game Rules (1.0 through 6.0), you may wish to use the following Advanced Game Rules set.
Note that these Advanced Game Rules supersede the Standard Game Rules whenever there is a conflict.
Important: This Advanced Game Rules set (i.e., Rule 7.0) is an integrated whole and must be used in its entirety. If any Advanced Game Rule is used, all of these rules must be used.
[7.1] Stacking: Players may have more than one friendly unit in a hex (changing Rule 4.2).
[7.11] Stacking Limit of Two: A player may move a single unit into a hex that already contains one of his units and leave it there. Thus, a hex may contain any two (2) of a player's units at the end of his Movement Step.
- No more than two of a player's units may be stacked in a hex.
- A player's units may never enter or pass through a hex while it contains one of the opposing player's units.
[7.12] Combat Integrity: Units stacked together in a hex are not be treated separately during combat.
- If a player wishes to make an attack into a hex that contains two enemy units, he must attack both of the units in that hex.
- If a Player wishes to attack from a hex containing two of his units, he must attack with both of his units in that hex (modifying Rule 5.1).
Diagram caption: The two Soviet (brown) units stacked together may not attack into two different hexes; the Soviet player may choose to attack only one of the adjacent hexes that contain opposing units.
[7.2] Woods Terrain: Units may use Woods hexes (changing Rule 4.2).
[7.21] Moving Into and Through Woods Hexes: A player may move his units into or through the Woods hexes on the map at a cost of two (2) Movement Points each. That is, each Woods hex counts as two "clear" hexes against the maximum of four hexes that a unit may move during its Movement Step.
Diagram caption: Each unit has moved as far as possible in a single turn along its indicated path. Each Woods hex entered counting as two clear hexes. The unit that begins its move in the Woods hex is not penalized, and may move its full four Movement Points.
[7.22] Defending in a Woods Hex: When units in a Woods hex are attacked, their strength in defense is increased by one (+1) when determining the Combat Differential (see 7.31 below). Thus, one unit defending in the Woods counts as two units; and two units defending in the Woods counts as three units. See the Terrain Effects Chart when playing the Advanced Game.
[7.3] Advanced Game Combat: There is a slightly modified methodology when calculating Battles in the Advanced Game.
[7.31] The Combat Differential: When a hex is being attacked, the number of attacking units in that Battle is totaled, and then the number of defending units (+1 if they are in a Woods hex) is subtracted from the attacker's total. The difference is called the "Combat Differential." The column of the Combat Results Table used to resolve a Battle is the one headed by the same differential.
Attacks cannot be made at a differential less than "0."
Diagram caption: On the left side of the illustration below, the single Soviet unit may not attack into the hex containing two U.S. units (the differential would be "-1," which is less than "0").
Diagram caption: On the right side, four Soviet units are attacking two U.S. units. Four minus two equals two (4 – 2 = 2): therefore, the Combat Differential of this attack is "+2." The outcome of this Battle will be found under the "+2" heading of the Advanced Game Combat Results Table.
Diagram caption: In the above example, the defending U.S. units are in Woods hexes. On the left side, the three Soviet units are attacking a single U.S. unit in a Woods hex. The U.S. unit counts as two units (1 + 1 for defending in the Woods) when determining the Combat Differential. Three minus two equals one (3 – 2 = 1): the Combat Differential for this Battle is "+1." On the right side, the five Soviet units are attacking the two U.S. units in a Woods hex. The two U.S. units count as three units when determining the Combat Differential (2 + 1 for defending in the Woods). Five minus three equals two (5 – 3 = 2): the Combat Differential for this Battle is "+2."
[7.4] Advanced Game Combat Results: There are new Combat Results, and slight modifications to existing Combat Results, in the Advanced Game.
The following paragraphs define the results indicated on the Advanced Game Combat Results Table:
- DE (Defender Eliminated): One defending unit is eliminated (removed from the map); if a defending unit remains in the hex, it is Retreated. The attacker may Advance After Combat.
- DR (Defender Retreats 1 Hex): The defending player retreats his unit(s together) one hex away from the attacking unit(s); the attacker may Advance After Combat.
Retreat Restrictions:
- Retreats may not be made into hexes presently occupied by enemy units.
- Stacked units may Retreat into different adjacent hexes at the owning player's discretion.
- One friendly unit may Retreat into a hex occupied by one other friendly unit provided that hex is not also in an Enemy Zone of Control. That is, you can Retreat within the Stacking Limit.
- Retreats may be made into Woods hexes.
- Retreats may not be made off the edge of the map.
- Retreats may not be made into hex in an Enemy ZOC (i.e., a hex adjacent to any of the opposing player's units) regardless of the presence of another friendly unit there.
If the only retreat available to a unit is one of the types forbidden, the unit is eliminated instead.
- AR (Attacker Retreats 1 Hex): All of the attacking units in this Battle are moved back one hex by the attacker as per the above Retreat Restrictions.
- AE (Attacker Eliminated): One unit making that attack is eliminated (immediately removed from the map); all other attacking units in that Battle must Retreat.
- NE (No Effect): Nothing happens. Neither side loses a unit, retreats or advances.
- EX (Exchange): Both sides eliminate one unit that participated in this Battle; if a defending unit remains in the hex, it is Retreated. The attacker may Advance After Combat.
Advance After Combat: Even though stacking is allowed in the Advanced Game, only one unit may still Advance After Combat.
[8.0] Advanced Game Optional Rules
After you're familiar with the Advanced Game, you may with to experiment with any or all of the following Optional Rules. These Optional Rules may be used separately or together in any combination that the players can agree to before play commences.
[8.1] Soviet Second Echelon Replacement Units: Once per game, the Soviet player may replace up to two of his previously eliminated units.
[8.11] When Replacements are Taken: Beginning on Game Turn 2 or any turn thereafter, the Soviet play may declare that he is taking his replacements at any point during his Movement Step.
[8.12] Replacements Units Received: Up to two previously eliminated Soviet units are returned to play when the Soviet player makes this one-time declaration.
[8.13] Where Replacements Arrive: Soviet replacement units return to play during the Soviet Movement Step by entering from off the east map edge and paying 1 Movement Point for the first hex they enter along the 09xx column of hexes. This initial entry hex may not be in an Enemy Zone of Control.
[8.2] The West German Reinforcement Unit: Once per game, when the situation is desperate, the U.S. player receives the West German "Reinforcement" unit. This West German unit functions as a normal U.S. unit for all purposes after it arrives.
[8.21] When the West German Unit Arrives: If, at the beginning of a U.S. Player Movement Step, the Soviets occupy two or three Town hexes on the map, the U.S. Player receives the West German Reinforcement unit.
[8.22] Where the West German Unit Arrives: The West German Reinforcement unit enters play during the U.S. Movement Step by entering from off the west map edge and paying 1 Movement Point for the first hex they enter along the 01xx column of hexes.
Important: This initial entry hex may not be in an Enemy Zone of Control.
Advanced Game Combat Results Table
Die roll is the row; the Combat Differential is the column (see 7.31).
| Die Roll | 0 | +1 | +2 | +3 | +4 | +5 |
|---|---|---|---|---|---|---|
| 1 | DR | DR | EX | DE | DE | DE |
| 2 | DR | DR | DR | EX | DE | DE |
| 3 | NE | DR | DR | DR | EX | DE |
| 4 | AR | NE | DR |
- AE = Attacker Eliminated. Eliminate 1 attacking unit in that Battle; all other attacking units in that battle must retreat.
- AR = Attacker Retreats. Retreat all attacking units in that Battle 1 space to adjacent hexes.
- DE = Defender Eliminated. Eliminate 1 defending unit in the hex; if a defending unit remains in the hex, it is retreated. The attacker may advance 1 unit.
- DR = Defender Retreats. Retreat all defending units in the hex to an adjacent hex. The attacker may advance 1 unit.
- EX = Exchange. Both sides eliminate 1 unit in this Battle; if a defending unit remains in the hex, it is retreated. The attacker may advance 1 unit.
- NE = No Effect. Neither side loses units, retreats, or advances.
Terrain Effects Chart
| Type | Movement | Combat¹ |
|---|---|---|
| Open and Town | 1 | 0 |
| Woods | 2 | +1 |
| Enemy Zone of Control | ● Stop | May attack; blocks retreat |
¹ = This value is added to the defender's Combat Strength. ● Stop = Must cease movement upon entering this hex.