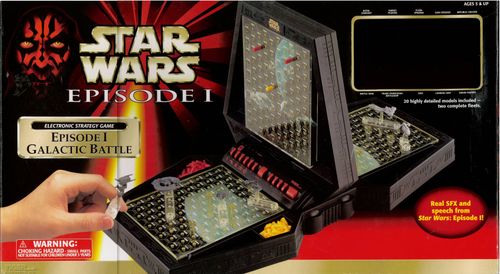
Star Wars: Electronic Galactic Battle
Star Wars: Electronic Galactic Battle Rulebook
Table of Contents
Table of Contents
Getting Started
Your GALACTIC BATTLE should contain:
- base unit
- center divider
- 168 blue pegs
- 84 red pegs
- an assortment of clear plastic bases
- Rebel Fleet: 3 A-wing, 2 X-wing, 2 Y-wing, 2 Transports, 1 Star Cruiser
- Imperial Fleet: 3 TIE-Fighters, 2 TIE-interceptors, 2 TIE-Bombers, 2 Victory class Star Destroyers, 1 Imperial-class Star Destroyer
- this Instruction Manual, including the STANDARD FLEET DEPLOYMENTS
Batteries
Unscrew the battery door to replace batteries. Turn the base unit over and remove the battery cover. Insert 4 AA/LR6 batteries (not included) into the game unit, making sure to align "+" and "-" as shown. Replace the battery cover.
To ensure proper function:
- Do not mix old and new batteries.
- Do not mix alkaline, standard or rechargeable batteries.
- Battery installation should be done by an adult.
- Non-rechargeable batteries are not to be recharged.
- Rechargeable batteries are to be removed from the toy before being charged (if removable).
- Rechargeable batteries are only to be charged under adult supervision (if removable).
- Only batteries of the same or equivalent type as recommended are to be used.
- Batteries are to be inserted with the correct polarity.
- Exhausted batteries are to be removed from the toy.
- The supply terminals are not to be short-circuited.
Assembling the Game
Now place the center divider onto the base unit. The center divider is keyed so that it will only fit one way. One side of the center divider shows a view from a Rebel starfighter; the other side shows the view from an Imperial starfighter.
Carefully open the plastic bags containing the pegs, bases, and ships. Divide up the pegs and place them in the compartments on the base unit. Make sure that both players have a fair number of blue and red pegs.
Next, separate the ships. Put all the Rebel ships on the Rebel side, and all the Imperial ships on the Imperial side. (Extra storage space is available beneath the plastic target plate on the base unit.) Keep the clear bases to one side.
The Ships
- Rebel Alliance: A-wing, X-wing, Y-wing, Rebel Transport, Star Cruiser
- Galactic Empire: TIE Fighter, TIE Interceptor, TIE Bomber, Victory Star Destroyer, Imperial Star Destroyer
Using the Bases and Ships
The clear plastic bases are designed to fit onto the target plates in three directions. Simply plug the bases into the holes on the target plate along any straight line. Once the base is in place, you can put the ships on the vertical support. (There is a hole on the underside of each ship that will fit onto the peg at the top of each base.)
Notice that the ships are free to move on the bases. During play, you can turn the ships to one side in order to reach the peg holes on the top of each base.
Using the Control Pad
The control pads on the base unit include:
- ON/OFF: To turn the unit on or off. The unit features an energy-saving mode and will automatically shut off if no keys are pressed for 5 minutes.
- FIRE/SELECT: To fire weapons and to confirm selections.
- LAUNCH/CANCEL: To cancel a selection; to launch a new ship (GAME 3 only).
- 10 LOCATOR BUTTONS (labeled 01 through 10): To select target locations and to enter numbered choices. Also use these buttons (in GAME 3 only) to select new ships for launching.
The Rebel control pad has 1-6 locator buttons and 7-10 locator buttons, plus ON/OFF, FIRE/SELECT and LAUNCH/CANCEL. The Imperial control pad has the same layout. Each pad shows enlarged icons of its ships for reference: the Rebel pad shows the A-wing, X-wing, Y-wing, Rebel Transport and Star Cruiser; the Imperial pad shows the TIE Fighter, TIE Interceptor, TIE Bomber, Victory Star Destroyer and Imperial Star Destroyer.
Using the Target Grids
There are 4 target grids on the game: 2 horizontal target grids on the base unit (for placing the clear bases and ships) and 2 vertical target grids on the center divider (for keeping track of hits and misses).
The target grids are divided up into 100 "hexes" (6-sided shapes). Each target hex has a label that corresponds to the column and row of that hex. The first 2 digits of the hex refer to the column, and the next 2 digits to the row. For example, all of the hexes in the first column (on the left) begin with 01. So the first hex in the first column is called 0101 (pronounced oh-one-oh-one), the second hex in the first column is 0102 (oh-one-oh-two), and so on. The tenth hex in the tenth column would be 1010. Right now, this probably sounds like a bunch of encoded Imperial transmissions, but don't worry. The label of each hex is printed on every target plate, for your reference. After just a few games, when you are familiar with the labeling system, it will become second nature to you.
Set Up
Insert the batteries, attach the vertical divider to the base unit, and divide up the pegs, clear bases, and ships as explained above.
The next step is to prepare the ships for play. You will need one of each ship from each fleet. The ships are:
- Rebel Alliance: A-wing, X-wing, Y-wing, Transport, Star Cruiser
- Galactic Empire: TIE-Fighter, TIE-interceptor, TIE-Bomber, Victory Star Destroyer, Imperial Star Destroyer
Find a clear base for each of the ships. Notice that each base has a number of holes in the top surface: either 2, 3, 4 or 5. These holes correspond to the size of the ship: the bigger the ship, the bigger the base you will need.
- The smallest ships (A-wings and TIE-fighters) are placed on a size-2 clear base.
- The medium starfighters (X-wing, Y-wing, TIE-interceptor, and TIE-Bomber) should each be placed on a size-3 base.
- The next largest ships (the Transports and Victory Star Destroyers) should be placed on size-4 bases.
- Finally, the largest ships (the Star Cruisers and Imperial Star Destroyers) should be placed on the size-5 bases.
Each player begins the game with only 1 of each kind of ship. You will have some ships and bases left over. Set these aside for now.
Each player should take a seat on one side of the game. (If you are playing a 1-player game, make sure you sit on the side with the ON button.) Turn the unit on by pressing the ON button once. You will hear the opening sequence and the narrator will walk you through the rest of the setup process.
Note: At any time during the setup you can press the LAUNCH button to cancel your last selection and back up to the previous step.
Select Game
When prompted to Select Game, you should press 1, 2, or 3 to select the type of game. They are:
- Game 1, Lieutenant: This is the beginner's level. In this game, players take turns, one turn at a time. We recommend that you begin play at this level.
- Game 2, Commander: An intermediate level. In this game, players get one turn for each ship they have left, then play passes to their opponent.
- Game 3, Admiral: Expert level. This is the most challenging of all three games. It has all the features of Game 2, but in this level, players can actually launch new ships in the middle of the game! We recommend this level for advanced players only.
Select Players
Next you will be asked to select the number of players. For a 1-player game, press 1. For a 2-player game, press 2. If you select a 1-player game, the computer will play as your opponent.
Select Fleet
Decide which fleet you would like to command. If you wish to be the Rebel Commander, press 1. If you wish to be the Imperial Commander, press 2. Your opponent will automatically play the other side.
In a 1-player game, you can play as the Empire, but you will still sit on the Rebel Alliance side of the board. Only this control pad is active in a 1-player game.
Select Fleet Location
The next step is to place your starships on the board, then enter their locations into the computer. You can choose either STANDARD FLEET DEPLOYMENT or you can choose MANUAL FLEET DEPLOYMENT.
To choose a STANDARD FLEET DEPLOYMENT, flip to the back of this instruction booklet. There you will see 100 pre-programmed set-up patterns for your fleet. Choose one of the patterns, then place your ships on the board as shown. Pay close attention to the code number shown for the pattern you choose. When the narrator prompts you to "SELECT FLEET LOCATION" you should enter the code number and press FIRE/SELECT to lock in your selection.
An option for experienced players only is MANUAL FLEET DEPLOYMENT. To choose manual deployment, when the narrator prompts you to "SELECT FLEET LOCATION" you should immediately press the FIRE/SELECT button. This will put you into manual deployment mode. The narrator will now prompt you to enter the exact location of each of your ships. Starting with your smallest ship (either the A-wing or TIE-fighter) the narrator will ask you to "SELECT LOCATION 1." Use the keypad to enter the location of one end-point of the ship, and press FIRE/SELECT to confirm your selection. The narrator will now ask you to "SELECT LOCATION 2." Use the keypad to enter the other end-point of your ship, and press FIRE/SELECT to confirm your selection. Your selection is now locked in, and the narrator will respond "READY." Repeat this process for each ship. Make sure you do not try to position any ships off the board, or across any hexes already occupied by another ship, or your selection will be canceled.
It is possible for one player to choose STANDARD FLEET DEPLOYMENT and the other to use MANUAL FLEET DEPLOYMENT.
If you are playing a 1-player game, don't worry about setting up the computer's side. The computer will randomly place his ships on the board, and keep track of all ships during the game. There is no need to place ships on the opposite side.
Standard Fleet Deployments
The booklet's back pages contain the 100 pre-programmed Standard Fleet Deployment grids, headed "STANDARD FLEET DEPLOYMENTS." Each grid is a target-grid diagram showing the shaded hexes a fleet occupies and is labeled with a code number of the form X-Y (for example 1-1, 1-2 ... 10-10), so that each set-up can be entered by its code. The grids are reference diagrams, not prose rules, and are not reproduced hex by hex here; consult the printed grid with the matching code when playing a Standard Fleet Deployment.
May the Force Be With You!
After you have finished the setup process, you will hear an alarm sound. Now the computer decides which player goes first. If the Rebel Alliance goes first, you will hear Admiral Akbar. If the Galactic Empire goes first, you will hear Grand Moff Tarkin. Now the battle begins!
The object of the game is to destroy all of your opponent's ships and claim control of the galaxy. In order to destroy a ship, you must find and destroy each location on that ship. If you can eliminate all of your opponent's ships before he destroys all of yours, you win the game!
Fire Turbolasers!
When it is your turn, the narrator will prompt you to "SELECT TARGET, FIRE!" You must now try to guess the location of your opponent's ships, and destroy them. Pick a target hex and use the keypad to enter its coordinates, then press FIRE!
All of your remaining ships will concentrate their lasers on the target hex. You will hear the sound of the lasers firing. If you hear the lasers, followed by silence, you will know that you missed! Take one of the blue pegs and place it on the vertical target plate as a reminder.
However, if you hear your lasers fire, followed by an explosion, you will know that you have HIT! The narrator will tell you exactly what ship you hit. Place a red peg in the vertical target plate to mark that spot. Your opponent may place a red peg into the base of the target ship as a reminder that it has been hit.
Once you have located your opponent's ship, you should try to hit the remaining locations on that ship. Remember that each ship lies in a straight line, and fire at the surrounding hexes to find the remaining points of the target. We call this strategy Identify, Isolate, and Incinerate.
The Force Is Strong With This One!
If you can hit your opponent's ships two turns in a row without missing, you will be rewarded with additional sound effects from the movie. Try not to miss and see how many sounds you can discover!
Launching New Ships
This is an option that is available in GAME 3 ONLY and is only recommended for very experienced players. This option allows you to gain reinforcements during the battle.
If your fleet is intact, you will not gain any reinforcements. However, if you start to lose, you will begin to slowly build up energy that you can use to launch new ships. Watch the green energy meter above your control pad. As energy builds, the energy meter will light up. To launch the smallest ships (size-2) you must have 2 energy. To launch a size-3 ship, you must have 3 energy, size-4 requires 4 energy, and size-5 requires 5 energy.
You can store up energy if you wish to save up for a bigger ship, but you can never store more than 5 energy. Also, when you launch a new ship, you lose ALL your energy. So, even if you have 5 energy, if you launch a size-2 ship, you will lose all 5 energy. Watch your energy carefully!
To launch a new ship on your turn, press the LAUNCH button. The energy meter will flash, showing you exactly how much energy you have available. Next, select the type of ship you wish to launch. The buttons 01 through 05 are labeled with the type of ship, so use these buttons to make your selection. If you do not have enough energy for the ship you choose, you will hear an error beep and your LAUNCH will be canceled.
However, if you have enough energy to launch a new ship, the narrator will ask you to "SELECT LOCATION 1." Use the keypad to select one end-point of the new ship, and press FIRE/SELECT to confirm. The narrator will then ask you to "SELECT LOCATION 2" and you repeat the process to select the other end-point of the ship. (This process is identical to MANUAL FLEET LOCATION.) Make sure when you add your new ship to the board that you do not try to add it to a location already occupied by another ship, or your LAUNCH will be canceled.
Strategy Tips
Game 1: Lieutenant
This is the easiest game, so you have time to experiment with various strategies. Since you only get to fire once each turn, there is no advantage or disadvantage to firing at many different targets. Take your time and play this level several times before you move on to the next level.
Game 2: Commander
This is the intermediate game. In this game, you get to fire once each turn for every ship you have left. So, if you have all 5 ships remaining, you get to fire 5 times before your opponent takes his turn. In this game, unlike in Game 1, it is important to destroy your opponent's ships as quickly as possible. Once you find a ship, zero in on it quickly and finish it off. You should spend a great deal of time mastering this level before you move on to GAME 3.
Game 3: Admiral
This is undoubtedly the most difficult level, recommended only for very experienced players. In this game, you can actually LAUNCH NEW SHIPS in the middle of the game! This makes it very difficult to keep track of your opponent's ships. You will need to play many times to perfect your strategy. Should you eliminate your opponent quickly and systematically? Or should you try to cripple his ships one by one, then crush them all in one swift stroke?
The Force Will Be With You, Always
To win the game, you must destroy all of your opponent's ships before he destroys yours. When the game is over, you will hear 3 loud explosions signaling the defeat of the losing fleet, followed by a short victory sequence played for the benefit of the winner. And remember: The fate of the galaxy is in your hands!