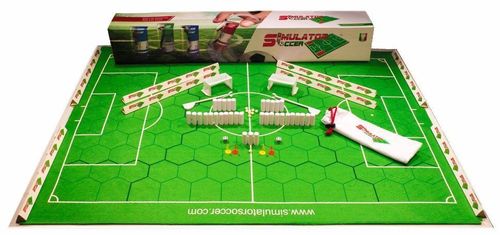
Simulator Soccer
Simulator Soccer Rulebook
Table of Contents
Table of Contents
Tiered Rules
In Simulator Soccer you have 3 tiered rule sets: basic, complete, tournament. As you advance in level the rules do not change, but new dynamics are added that make the game ever more complete. Here are the differences:
Basic Rules
Start playing Simulator Soccer with the BASIC rules. This mode lets you quickly learn the main dynamics of the game. It is designed to help you involve less experienced friends and is also recommended for those who play occasional matches.
In the BASIC rules the 16-player squad is the same for everyone. All the basic dynamics of the game are present, but it is lightened by 3 mechanics that you can discover later, after a few matches, thanks to the complete rules.
Even so, the BASIC rules are designed to give you a simulation experience, able to let you live all the emotions of a football match!
Complete Rules
After a few matches you will have fully understood the turn dynamics and will be ready to immerse yourself in the COMPLETE rules, which make the match more fun, unpredictable and realistic. They are meant to increase realism, especially if we imagine comparisons with real players and teams. Recommended for those who play a little more often.
What is added with the complete rules?
- Duels with the die (dribbling or tackles)
- Pressing
- PRO skills
- Creation of your own team respecting a budget.
Tournament Rules
If you organise or take part in leagues or tournaments, these rules let you add elements that are not indispensable in a single match, but are in a competition! The rules of the match are always those of the complete rules; the variants that are added make the game more varied, both in the management of your squad and across the various matches.
What is added with the tournament rules?
- Home advantage (home/away)
- Weather
- Suspensions
- Fatigue
- Injuries
- Substitutions
- VAR
- Referee strictness
Fan App
A free web app has been made that is a real support. You can manage your match (time, score, scorers, bookings, substitutions, etc.). Through the exclusive app you have access to many free extra contents, such as the kits of real teams with real players, which you can download, cut out and apply to your pawns. Use it on PC, tablet or mobile. www.simulatorsport.com/soccerapp
Setup
The Teams
Teams are always made up of a squad of 16 players, 11 on the pitch and 5 on the bench. To assemble a complete team you need 16 plastic cylinder-shaped Pawns on which 2 stickers are applied (kit and player):
- the 16 rectangular stickers around the cylinder = KIT
- the 16 round stickers on top of the cylinder = TYPE OF PLAYER
Initially apply the 16 standard player stickers, made up only of basic skills; the squad will be the same for both teams.
The Playing Field
The Simulator Soccer pitch is divided by a hexagonal grid. Each hexagon is called a cell. The thicker lines determine the various zones: defence zone, midfield zone, attack zone, cross zone, save zone (PARATA) and side lanes (fasce laterali).
Lineup and Kick-off
Both players place their 11 starting players on the pitch as they like; they must be placed inside the cell and never on the line.
In each cell there can be only one player per team.
Place referee no. 1 near the corner flag; it is used to keep the time. (see p. 12) Toss a coin to decide who takes the kick-off and consequently starts the turn.
Physical Interaction
How to Move
Take the pawn and place it in the cell where you want to go. Inside a cell there can be at most 2 players, but of different teams. The opponent must always keep a distance from the ball of at least 1.2 cm, equal to the diameter of the pawn. Once you take your fingers off the pawn, you cannot take it back.
How to Kick the Ball
You can kick the ball using the pawn:
-
KICK ALONG THE GROUND: Using the pawn, hit the ball making it roll. (ideal for carrying the ball, passing, crossing and shooting along the ground).
-
KICK RAISING THE TRAJECTORY: Pinch the ball on the pitch making it jump. (ideal for lobs, high shots, free kicks and crosses).
-
HEADER OR BALL IN HANDS: Place the ball on the head of the pawn and strike it with your finger. (for headers, throw-ins, ball in the goalkeeper's hands).
-
If when you kick the ball you knock down the opponent with your hands or with the pawn, it is a foul.
-
After kicking the ball, reposition the pawn used in its cell; you can put it wherever you want inside it except on the line.
-
If when you head the ball you knock down an opponent (except the goalkeeper), or the pawn rolls beyond the adjacent cell, it is a foul.
Calculating Who Gets the Ball
Every time the ball is hit you must calculate who takes possession of it:
A - The ball is always reached by the closest player; count the cells. B - When two or more players are at the same distance, if one of them touches the ball, the one who touched it last always reaches it. If the touch comes from a farther player, it is irrelevant. C - The most frequent case, two or more players are at the same distance and none of them touches the ball:
| PRO-ATTACK CALCULATION | PRO-DEFENCE CALCULATION |
|---|---|
| The attacking player reaches the ball after these moves: | The defending player reaches the ball after these moves: |
| - Short pass (within 4 cells) | - Long pass (beyond 4 cells) |
| - Carry the ball | - Shot or Cross |
| - First pass of the counter-attack (after a lost ball) | |
| - Pressing (complete rules) |
LOST BALL: If you lose the ball, time does not run and the opponent starts a new turn with the counter-attack. If the opponent loses the ball in the following counter-attack, time moves by 1 cell.
The Turn
Simulator Soccer is a turn-based game for 2 players. In each turn the attacking player manages the ball and the players by choosing 1 of 5 moves: 3 build-up moves and 2 finishing moves.
BUILD-UP: Precise pass; Pass and move the team; Carry the ball and move the team. FINISHING: Cross and header; Shot on goal.
The defence can always make its counter-move according to the move chosen. At the end of each turn time runs, varying according to what happened.
Precise Pass
- KICK the ball; if it ends in the cell where a teammate is, you have made a precise pass (1).
- CALCULATION: if short pass (distance between ball and kicker from 1 to 4 cells), PRO-ATTACK CALCULATION; if long pass (distance between ball and kicker beyond 4 cells), PRO-DEFENCE CALCULATION.
THE DEFENCE The defence moves one player by 1 cell + the goalkeeper by 1 cell. STEP-UP (SCALATA): Move the player into the cell where a teammate is, who in turn moves for free into an adjacent cell that is empty or occupied by an opponent. (3)
TIME: Time does not run (0) and a new turn begins.
Pass and Move the Team
- KICK: Kick the ball; if it ends in an empty cell you have made a pass into space and you must calculate which player will reach the ball.
- CALCULATION: if short pass (distance between ball and kicker from 1 to 4 cells), PRO-ATTACK CALCULATION (1); if long pass (distance between ball and kicker beyond 4 cells), PRO-DEFENCE CALCULATION (5).
- EXTRA TOUCH (at most once per turn): If a free teammate can reach the pass by moving only 1 cell, he can make an extra touch to carry the ball (9) or make a pass. In this case, however, you must proceed only with the movement of the team, no skills and no tactical movement.
- MOVE THE TEAM: after the pass, if you keep possession, all your players without the ball can move in any direction up to a maximum of 3 cells each.
- If you reached the ball by moving only 1 cell, instead of moving the whole team, you can choose to make a tactical movement so as to limit the opponent's defensive movements (see rule on page 6).
- If you lose the ball, time does not run and the opponent starts a new turn with the counter-attack.
THE DEFENCE The defence can move all players in any direction, 2 cells each. If in this turn the attack moved even just 1 player by 3 cells, then the defence can move all players in any direction, 3 cells each.
TIME: Time runs by 2 cells and a new turn begins.
Carry the Ball and Move the Team
- KICK: To carry the ball, kick it along the ground and direct it into the empty cell where you want to go. (1) Limitation: you must be free (no opponent in the cell), otherwise it is a lost ball. (3)
- PRO-ATTACK CALCULATION to establish who takes possession of the ball.
- MOVE THE TEAM: If you keep possession, all your players without the ball can move in any direction up to a maximum of 3 cells each.
- If you carried the ball by only 1 cell, instead of moving the whole team, you can choose to make a tactical movement so as to limit the opponent's defensive movements (see rule below).
- If you lose the ball, time does not run and the opponent starts a new turn with the counter-attack.
THE DEFENCE The defence can move all players in any direction, 2 cells each. If in this turn the attack moved even just 1 player by 3 cells, then the defence can move all players in any direction, 3 cells each.
TIME: Time runs by 2 cells and a new turn begins.
Tactical Movement
When you move the team, if the requirements are met you can make a tactical movement. It serves to move only some players by 1 cell and limit the movements of the defence. REQUIREMENT: You must carry the ball or make a pass and reach the ball by moving only 1 cell. TACTICAL MOVEMENT: Move from 1 to 3 teammates by 1 cell only.
THE DEFENCE The defence moves by 1 cell the same number of players moved by the opponent, plus the goalkeeper. STEP-UP (SCALATA): Move the player into the cell where a teammate is, who in turn moves for free into an adjacent cell that is empty or occupied by an opponent. The latter can no longer move in this turn.
LIMITATIONS: You cannot make the tactical movement if you make the following stop. When you use the tactical movement, you can use it again only after having moved the team. If you occupy the opponent's half of the pitch with at least 7 players, you have 2 tactical movements available to use consecutively, which you will have again after the teams have moved.
TIME: Time runs by 1 cell and a new turn begins.
Cross and Header
When you are in the cross zone with any player, you can make a cross:
- DECLARE THE CROSS
- KICK: kick the ball along the ground or raising it, directing it towards the teammate who must head it. (1)
- The first player in the penalty area who touches the ball will head it, regardless of the direction the ball takes after the teammate's touch. (1)
- Pick up the ball and place it on top of his pawn.
- HEADER: you can make a knock-down (sponda) (2) that you resolve like a pass, or declare the shot (3) and, after your opponent's OK, head the ball trying to score a Goal.
- In case of a Goal play resumes with the lineup. (see referee on p. 12)
- In case of a saved header see rebounded shot on p. 9.
THE DEFENCE When the shot is declared, the defence has the right to prepare with the goalkeeper (without the rod) before the attacker performs the header. (see saving with the goalkeeper on p. 10)
Failed Cross
If you make the cross and do not hit any player in the penalty area, the cross has failed and there will be no headers. Proceed as follows:
- PRO-DEFENCE CALCULATION to establish who takes possession of the ball.
- MOVE THE TEAM: If you keep possession, all your players without the ball can move in any direction up to a maximum of 3 cells each.
- If you lose the ball, time does not run and the opponent starts a new turn with the counter-attack.
THE DEFENCE The defence can move all players in any direction, 2 cells each. If in this turn the attack moved even just 1 player by 3 cells, then the defence can move all players in any direction, 3 cells each.
TIME: Time runs by 2 cells and a new turn begins.
Counter-attack (Lost Ball)
When you lose the ball (1), your opponent, after reaching it, immediately starts a new turn. The first time the ball is kicked after the recovery is called counter-attack.
The CALCULATION to reach the ball on the counter-attack is always PRO-DEFENCE.
Shot on Goal
When you are in the attack zone you can declare "shot". The goal is valid only if the shot was declared. If the goalkeeper is outside the penalty area you can declare the shot from the whole opponent's half (3).
- DECLARE THE SHOT
- SHOT ON GOAL: Kick the ball along the ground or raising the trajectory to take a shot and try for a Goal.
- In case of a Goal play resumes with the lineup. (see referee on p. 12)
- In case of a saved shot see rebounded shot below.
THE DEFENCE When the shot is declared, you must always wait for the defence to prepare with the goalkeeper:
- Without using the rod if the shot comes from inside the penalty area (1)
- Using the rod if the shot comes from outside the penalty area (2). Only after its OK can the shot on goal proceed.
Rebounded Shot
After a rebounded shot (save, post, defender's deflection), if the ball stays in the field, proceed as follows:
- PRO-DEFENCE CALCULATION to establish who takes possession of the ball.
- SHOT AFTER REBOUND: If the rebounded ball is reached by a player with the "first-time shot" (tiro di prima) skill, he can immediately shoot at goal. The shot can be repeated only once per turn; if you have already done it previously you cannot repeat it.
- The defence can move only the goalkeeper by 1 cell and place him only lying down.
- If the shot is rebounded again, re-read this paragraph without considering point 2.
- MOVE THE TEAM: If you keep possession, all your players without the ball can move in any direction up to a maximum of 3 cells each.
- If you lose the ball, time does not run and the opponent starts a new turn with the counter-attack.
THE DEFENCE The defence can move all players in any direction, 2 cells each. If in this turn the attack moved even just 1 player by 3 cells, then the defence can move all players in any direction, 3 cells each.
TIME: Time runs by 2 cells and a new turn begins.
Reaching the Ball by Moving Beyond 3 Cells
If to reach the ball you must move more than 3 cells, the rest of the teams (attack and defence) can also move by the same number of cells used by the player who reached the ball.
Ball on the Line
If the ball ends on the line of a hexagon, you must establish in which of the 2 or 3 cells involved the ball is.
- After a pass or carrying the ball, the attacking player chooses one of the 2 or 3 cells before proceeding with the calculation.
- After a shot or cross, the defending player chooses one of the 2 or 3 cells before proceeding with the calculation. The ball is considered on the line if, looking from above, the line is interrupted by the presence of the ball.
Restart of Play
If play is interrupted (ball out, goal, foul, etc.) proceed with the restart of play. (see referee, p. 12)
Defensive Counter-moves
After every attacking move, the defending player can always make a defensive counter-move depending on the type of action being played.
After a Precise Pass
Move 1 player by 1 cell (also with step-up) + the goalkeeper. STEP-UP (SCALATA): Move the player into the cell where a teammate is, who in turn moves for free into an adjacent cell that is empty or occupied by an opponent. The latter can no longer move in this turn.
After the Movement of the Team
Move all the players you wish, in any direction, 2 cells each.
- If in this turn the opponent moved even just 1 player by 3 cells, then the defence can move all the players it wishes, in any direction, 3 cells each.
- If the opponent reached the ball by moving 4 or more cells, then the defence can move all the players it wishes, in any direction, 4 or more cells each.
After the Tactical Movement
Move by 1 cell the same number of players moved by the opponent + the goalkeeper. STEP-UP (SCALATA): Move the player into the cell where a teammate is, who in turn moves for free into an adjacent cell that is empty or occupied by an opponent. The latter can no longer move in this turn.
Entering the Ball's Cell
When you move a defending player, to enter the cell in which the opponent with the ball is, you must be in one of the 6 adjacent cells, otherwise you commit a foul and are booked:
- If you are in one of the 3 front cells* you enter regularly.
- If you are in one of the 3 cells behind you risk a foul: roll a die: 1 to 3 = foul and booking; 4 to 6 = you enter regularly.
NB.: When an opponent carries the ball, you can enter his cell from any direction, even moving 2 or more cells, without committing a foul, but in this case you cannot tackle him.
Simple Tackle
During the defensive phase, as a first action, if you are in or enter the ball's cell, you can make a tackle:
- Declare "tackle" and roll 1 die; if you roll 6 the tackle succeeds and you can immediately start the counter-attack. If the tackle fails you can move the other players if allowed.
Limitation: It must be your first move, otherwise you cannot tackle.
Saving with the Goalkeeper
When the opponent declares the shot, he can proceed only after your OK. Prepare with the goalkeeper:
SAVE WITH ROD
- If the shot comes from outside the area and the goalkeeper is in the small area you can insert the rod, give the OK and attempt the save.
- After the shot the rod is removed and the goalkeeper is placed in the central cell of the small area.
SAVE WITH POSITIONING If the shot comes from inside the penalty area or you are outside the small area, you can only position yourself:
- Standing or lying if you move forward 1 cell or if you stay in the cell where you are.
- Lying if you move 2 cells or if you move back 1 cell.
GENERAL GOALKEEPER RULES
- On a rebounded shot the goalkeeper can always try to reach the ball during the calculation, even if lying.
- During defensive movements, the goalkeeper can always move at least 1 cell.
- If you move the team the goalkeeper behaves like all the other players.
Basic Skills
Thanks to the basic skills you can kick the ball several consecutive times during your turn. The players' skills are on the upper part of the pawn (each skill is identified by a colour).
- GOALKEEPER (purple skill): When the opponent declares the shot on goal from outside the area, if the goalkeeper with the purple skill is in the small area, he can use the rod to save.
- MARKING (blue skill): When a player with the blue skill marks the opponent (places himself in the same cell), he cancels pass, cross and first-time shot.
- A player who reaches the ball after the movement is at that moment not marked, but the initial position, before the movement, counts.
- In case of a dribble suffered, the player with the green or red skill can cross or shoot first time. (see dribbling in the complete rules).
- FIRST-TIME PASS (yellow skill): When a player with the yellow skill receives a precise pass (in his own cell) he can make another pass or carry the ball in the same turn, without the defence moving.
- FIRST-TIME CROSS (green skill): When a player with the green skill reaches the ball in the cross zone with a movement, he can declare and make the cross in the same turn.
- FIRST-TIME SHOT (red skill): When a player with the red skill, with or without movement, takes possession of the ball in the penalty area, he can declare the shot and, after the goalkeeper's OK, take it in the same turn. You can also change your mind and make a pass.
Referee
Time - Length of the Match
At the start of the match place referee 1 near the corner flag; it simulates the time running. Move the referee along the side lane every time you end a turn.
Time runs differently depending on the type of move chosen:
- PRECISE PASS: time does not move
- IF THE TEAMS MOVE: time moves by 2 cells
- TACTICAL MOVEMENT: time moves by 1 cell
- LINEUP: time moves by 1 cell
15th min - Referee 1 covers the whole side lane (11 cells) 30th min - Referee 2 goes back and covers the whole side lane again 45th min - Referee 3 repeats the process a 3rd and last time. (Referee 1 = 0-15 min, 2 = 15-30 min, 3 = 30-45 min.) Changing referee helps to see the minutes and the arrow reminds in which direction it is moving.
Web app: keeps time and score, simulates real minutes, fills in match sheets in real time.
Added Time
On reaching the 45th minute the half ends only if the ball is outside the attack zone; otherwise play continues, playing turns until the ball goes out of the pitch or out of the attack zone. In case of a free kick, penalty, corner or throw-in from the attack zone, the referee always lets it be taken.
Restart of Play
LINEUP To restart play, in case of free kick, penalty kick, corner kick, goal kick, play restarts with the lineup:
- The team that must take the kick (attack) places all its players on the pitch as it likes.
- The opposing team (defence) places all its players as it likes.
- The attacking team starts the turn by taking the kick. In corners and free kicks, the distance from the ball is 9.6 cm, equal to the height of 3 pawns.
THROW-IN
- Place the ball in the cell where it went out, which must always remain empty. (kick point)
- The attacking team moves all players up to 3 cells each. One of the players must reach the kick point; otherwise proceed with the lineup.
- The defending team moves all players up to 3 cells each.
- The turn starts with the throw-in, which is taken with the hands, therefore placing the ball on the head of the pawn. (see p. 5)
FREE KICKS When there is a free kick from the attack zone the wall can be placed (only outside the small area). In this case up to 3 players of the same team can be placed in the same cell.
PENALTY KICKS The goalkeeper can be used with the rod; at the moment of the kick the pawn must be on the goal line and standing; it cannot start lying down.
SUBSTITUTIONS During the match you can substitute up to 5 players. To do so, during the lineup, remove the player going out and place the substitute. If you call a substitution during a throw-in, play restarts with the lineup.
OFFSIDE If you pass the ball to a player positioned behind the last opposing defender it is offside. Cells are not looked at but the position of the player relative to the last opposing man. The foul is whistled if the offside player moves to reach the ball, or if the pass passes through his cell.
Edge Cases
If when you kick the ball, it remains in the cell, you keep possession and proceed as a precise pass. The defence will move 1 player by 1 cell (with step-up). If it is a free kick, corner kick or kick-off, since you cannot take it for yourself, a teammate or an opponent (the nearer of the two) can enter the cell to take possession of the ball, as if the player who touched it were not there.
Complete Rules (2026)
Attack
Feint of Shot and Cross
When you declare the shot or the cross, after any moves by the defence (goalkeeper positioning or slide) you can change your mind and make a pass with PRO-DEFENCE CALCULATION.
After the pass:
- The only skill allowed to the teammate in attack (only once in the turn) is the first-time shot (red) or the first-time shot from outside the area to finish the action.
- If you cannot go to the shot and remain in possession of the ball, you always proceed with the movement of the teams. No following stop, no tactical movement.
- If you manage to go to the shot the defence moves only the goalkeeper by 1 cell, lying. No slides.
After the first-time shot: In case of a rebounded shot proceed with the PRO-DEFENCE CALCULATION
- If you lose the ball the opponent can restart with the counter-attack.
- If you remain in possession of the ball you always proceed with the movement of the teams, no tactical movement.
Carry the Ball in Dribbling and Move the Team
If you want to carry the ball but there is an opponent in your cell (1) you must win a dribble to be able to do so. Even if there is an opponent in the adjacent cell you can attempt the dribble to try to get past him (2). You can also dribble following the following stop (stop a seguire).
Web app: duels with one click; simulates dice rolls and coefficient automatically.
-
DUEL: Both players roll a die and add the result to the skill coefficient to obtain the dribbling value and the 1vs1 defence value.
DRIBBLING COEFFICIENT +2 for each colour present on the pawn up to a maximum of 6. The maximum total result will be 12 (6 die and 6 skill). This is the dribbling value.
1VS1 DEFENCE COEFFICIENT +2 for each colour present on the pawn up to a maximum of 6. The maximum total result will be 12 (6 die and 6 skill). This is the 1 vs 1 defence value. Foul: If he is in the defence zone and rolls 1 on the die he commits a foul but is not booked. The exact point where the foul occurs is where the defender who commits it is.
IF THE DRIBBLING VALUE IS HIGHER PROCEED. Otherwise the opponent immediately makes a winning tackle without using the die.
-
KICK THE BALL along the ground and direct it into the empty cell where you want to go.
-
PRO-ATTACK CALCULATION without taking into account the dribbled defender, who will be placed lying down.
-
MOVE THE TEAM: If you keep possession, all your players without the ball can move in any direction up to a maximum of 3 cells each.
- If you carried the ball by only 1 cell, instead of moving the whole team, you can choose to make a tactical movement so as to limit the opponent's defensive movements (see rule above).
- If you lose the ball, time does not run and the opponent starts a new turn with the counter-attack.
THE DEFENCE Except for the player who lost the dribble, who can only get up, the defence can move all the players it wishes, in any direction, 2 cells each. If in this turn the opponent moved even just one player by 3 cells, then the defence can move all the players it wishes, in any direction, 3 cells each.
TIME: Time runs by 2 cells and a new turn begins.
Dribbling on the Goalkeeper
When you declare the first-time shot thanks to the red skill, after the goalkeeper's positioning, you can give up the shot and attempt the dribble on the goalkeeper if he is in your cell or in an adjacent cell. (3) The procedure is as indicated above with the following exceptions:
1VS1 DEFENCE COEFFICIENT +2 for each colour present on the pawn up to a maximum of 4. The maximum total result will be 10 (6 die and 4 skill). This is the 1 vs 1 defence value. Foul: If he is in the defence zone and rolls 1 on the die he commits a foul but is not booked. The exact point where the foul occurs is where the defender who commits it is.
Outside the area: If the goalkeeper is outside the penalty area, he rolls only the die, no bonus. If you win the dribble on the goalkeeper, he must remain lying inside the cell where he is and after his OK you can shoot at goal without any other move by the defence. If the ball stays in play after the shot the ball is lost and is always reached by the defence with the nearest player or with the goalkeeper.
Defence
Pressing
You can press only in the midfield zone. (1) If during the defensive phase, you are in or enter the ball's cell, you press the opponent with the ball, who if he makes a pass must use the PRO-DEFENCE CALCULATION even if it is a short pass.
Tackle
TACKLE: During all defensive movements, only as the first move, if you are in or enter the ball's cell, you can declare a tackle:
-
DUEL: Both players roll a die and add the result to the skill coefficient to obtain the tackle value and the ball defence value.
TACKLE COEFFICIENT +2 if you are in the midfield zone. +2 for each colour present on the pawn up to a maximum of 4. The maximum total result will be 12 (2 field, 4 skill, 6 die). This is the tackle value. Foul: If he is in the defence zone and rolls 1 on the die he commits a foul but is not booked. The exact point where the foul occurs is where the defender who commits it is.
BALL DEFENCE COEFFICIENT +2 for each colour present on the pawn up to a maximum of 6. The maximum total result will be 12 (6 die and 6 skill). This is the ball defence value.
FINAL OUTCOME:
- If you win the tackle you immediately start a new turn with the counter-attack (the opponent must place himself at 1.2 cm distance, equal to the diameter of a pawn).
- If you lose the tackle, you can proceed with the movement of the teammates if allowed, but in the next turn the opponent can dribble this player, without a duel with the dice. The effect of pressing is active even if the player attempted the tackle and is in midfield.
- If you want to tackle with the goalkeeper you must make a low rush (uscita bassa).
Goalkeeper's Low Rush
When you position the goalkeeper in the penalty area following the opponent's first-time shot, if you enter the ball's cell you can lie down and tackle by declaring low rush.
The duel procedure is the same as the tackle except for the tackle coefficient:
LOW RUSH (TACKLE) COEFFICIENT +2 for each colour present on the pawn up to a maximum of 4. The maximum total result will be 10 (4 skill, 6 die). This is the tackle value. Foul: If he rolls 1 on the die he does not commit a foul.
- If you lose the tackle the opponent will shoot at goal immediately.
PRO Skills
The PRO skills are added to the basic skills. When we read "move for free (gratis) by 1 cell", this movement must never be counted as movement to establish the type of turn. Example: If a player moves 2 cells and adds a free movement of 1 cell, physically he has moved 3, but for the course of the turn he has moved 2 and the opponent in defence will move up to 2 cells, not 3.
(The colours in brackets show the wedges that make up each skill on the pawn.)
Yellow skills (build-up play)
PLAYMAKER (REGISTA) (1 yellow): When he makes a pass of 5 cells, it is considered a short pass. In the calculation to reach the ball, in case of a tie if no one touches it, the teammate reaches it and not the opponent.
ASSIST (2 yellow): The teammate with the red or green skill who reaches his pass is not blocked by the opponent's blue skill, allowing him the first-time shot or the first-time cross.
LONG BALL (LANCIO LUNGO) (3 yellow): When he makes a long pass (beyond 4 cells) it is considered a short pass.
- GAME VISION (VISIONE DI GIOCO): Pressing on him has no negative effect.
Red skills (attack)
COOLNESS (FREDDEZZA) (1 red): When he declares the first-time shot, after the goalkeeper's movement, he can give up the shot and attempt the dribble. If it succeeds, the goalkeeper must lie down where he wants inside the cell before proceeding with the shot.
BOMBER (2 red): When he shoots from inside the penalty area, the goalkeeper can position himself standing only if he is inside the small area, without crossing the line. Outside the small area he can position himself only lying down.
OFFSIDE LINE (FILO DEL FUORIGIOCO) (3 red): When he is in an offside position, before receiving the pass, he moves for free into the cell where he is or the cell behind him, to put himself in a regular position, and proceed with the pass.
Green skills (play on the wings)
RUN (CORSA) (1 green): During movements without the ball in attack, only along the side lane, he can add 1 cell for free. It works even if he is marked; he can pass through cells occupied by teammates and opponents. If accompanied by blue (blue + green), add 1 cell for free also in defensive movements.
WIDENED CROSS ZONE (ZONA CROSS ALLARGATA) (2 green): He can declare "cross" from the cells adjacent to the cross zone.
- FILL THE AREA (RIEMPI L'AREA): Every time you declare the cross, you can assign the header skill to one or two teammates. The opponent will do the same. These players behave as if they had the black colour on the pawn.
PRECISE CROSS (CROSS PRECISO) (3 green): The cross succeeds even if the ball does not touch the teammate, but touches the cell where he is. The ball must not touch any opposing player, otherwise it will be he who heads. LOW CROSS (CROSS BASSO): After declaring the first-time cross, if he feints the cross and chooses to make a pass, he will have the PRO-ATTACK CALCULATION instead of the pro-defence calculation.
Blue skills (defence)
SLIDE (SCIVOLATA) (1 blue): If he is no more than 2 cells away from an opponent who declares a first-time shot or cross, he can oppose:
- He does not move and repositions himself standing in the same cell where he is.
- He moves 1 cell and positions himself lying down. (if he enters the ball's cell he risks committing a foul as per the basic rule, p. 10) Only one player at a time can make the slide. Player lying down: getting up costs a movement of 1 cell.
RECOVERY (RECUPERO) (2 blue): During defensive movements, if he enters the cell where the opponent with the ball is passing through the 3 rear cells, he commits a foul only if he rolls 1 on the die.
WALL (MURO) (3 blue): When he makes the slide to oppose the opponent's first-time shot or first-time cross, if he moves only forward (with respect to the opposing goal) he can position himself standing.
Goalkeeper skills (purple)
BALL IN HANDS (PALLA IN MANO) (1 purple): When he reaches the ball kicked by the opponent, he can take it in his hands, physically putting it on the pawn. With the ball in hands, you can proceed with the movements of the team, goalkeeper included. In the next turn you can put the ball on the ground and start the turn by kicking.
REFLEXES (RIFLESSI) (2 purple): When the opponent shoots on goal using the bomber skill, roll a die: if the result is 4 to 6 he can position himself standing even outside the small area.
GOAL KICK (RINVIO) (1 purple + 1 yellow): When he makes a long pass (beyond 4 cells) it is considered a short pass. In the calculation to reach the ball, in case of a tie if no one touches it, the teammate reaches it and not the opponent.
Other skills
HEADER (COLPO DI TESTA) (black): When the cross is declared, all players with this skill (free or marked) move 1 cell for free. The movement must end in the penalty area. The attack moves first, then the defence. Offside is calculated before these movements. Whoever uses this skill does not take part in the calculation to reach the ball if the cross does not succeed.
SPRINT (SCATTO) (1 green + 1 grey, or 1 red + 1 grey): In attack, when the ball ends in an empty hexagon, with all adjacent cells empty, he moves for free 1 cell, into an empty cell before the calculation to reach the ball. If accompanied by the blue skill (blue + grey), the defence can do the same. The sprint skill can be activated by only one player per team.
INSERTION (INSERIMENTO) (1 yellow + 1 grey): During movements without the ball in attack, only along the central lane of the pitch, he can move for free +1 cell. It works even if he is marked; he can pass through cells occupied by teammates and opponents. When the area is filled thanks to the green skill, he can move for free +1 cell even changing direction.
BATTERING RAM (ARIETE) (1 black + 1 red): When defending from a tackle, he will always add +6 to the die roll. The presence of these 2 colours together guarantees +6 instead of +4 even without the presence of other wedges.
FIRST-TIME SHOT FROM OUTSIDE (TIRO DI PRIMA DA FUORI) (1 red + 1 yellow): When he reaches the ball with a movement outside the penalty area, he can immediately declare the shot. If you do not reach the ball with a movement you cannot shoot. It is cancelled by the basic blue skill.
INTERCEPTOR (INCONTRISTA) (1 blue + 1 yellow): During defensive movements, if the opponent is in midfield, he can enter the ball's cell by moving 2 cells, but he must pass through one of the 3 front cells. When he does so, he can always tackle. His tackle value to be added to the die roll is fixed at 2.
OPPORTUNIST (OPPORTUNISTA) (1 red + 1 grey): When the player with the opportunist skill is in the penalty area and a teammate could make a cross, you can activate this skill:
- Declare "shot-cross" (tiro-cross) instead of cross.
- The player with the opportunist skill, if not offside, moves for free 1 cell forward and positions himself lying down in the penalty area.
- The defence positions the goalkeeper standing only.
- The player in possession of the ball makes the cross and if the ball ends in the net after the touch of the lying opportunist player, the Goal is valid.
- When you declare "shot-cross", headers cannot be made and consequently the header and fill-the-area skills cannot be activated.
- If after the "shot-cross" the ball stays in the field, if a player touched it he will not head and you proceed with the PRO-DEFENCE CALCULATION.
- Offside must be calculated before the movements due to this skill.
- Player lying down: getting up costs a movement of 1 cell.
Customising the Squad
On top of each pawn you can stick the round sticker that contains the player's skills. The skills are represented by the coloured wedges. Each player will have a minimum of 1 and a maximum of 4. The value of the player is determined by how many coloured wedges are present, minimum 1 and maximum 4. Some colours can be repeated up to 3 times, giving even more strength to a certain fundamental: build-up play (yellow), attack (red), play on the wings (green), defence (blue).
- Yellow: BUILD-UP PLAY. Even better if he has 2 or 3 yellows.
- Red: ATTACK. Even better if he has 2 or 3 reds.
- Green: PLAY ON THE WINGS. Even better if he has 2 or 3 greens.
- Blue: DEFENCE. Even better if he has 2 or 3 blues.
- Grey: SPEED
- Black: HEADER
- Purple: GOALKEEPER
How to Build Your Squad
Depending on the type of strategy you intend to adopt, select 16 of the 112 players and stick them on your pawns. Every player must be different. You cannot have two the same, except for players with value 1.
BUDGET Every player has a value from 1 to 4. The total value of the 16 players must be 36.
Create New Players
If you do not find a combination that satisfies you, you can create a player of your own choosing.
App
You can enter your customised team in the app. You will assign the colours and the counter will give you the total. Duels will be calculated with a couple of taps. (Web app: enter your customised team in the app, ready to be used.)
Fan Made: Customise the Team
You can use the plastic pawns of the game also to play with different teams; download the new kits for free, cut out and roll them using double-sided tape. With this system, you can create dozens of teams to slip on and off the pawns. Here is how:
- DOWNLOAD PDF: Access the app www.simulatorsport.com/soccerapp for free and download all the PDFs you want. You can choose among dozens of club, national and classic teams.
- PRINT: Print on A4 120 gram paper, apply a strip of double-sided tape on the back of the sheet, in the centre.
- CUT OUT: Cut out and you will obtain the 16 kits which, thanks to the double-sided tape applied previously, will have the final part adhesive. To increase speed you can use a paper cutter.
- ROLL AND STICK: Roll the kit around the cylinder (the cap of the pawn must be in the lower part) and stick it thanks to the double-sided tape. You will obtain a kit that you can keep and use whenever you want.
- SLICE-IN SLICE-OUT: With a simple gesture you can remove the kit from the pawn and replace it with another. You just need to slip the cardboard cylinder off and on the plastic pawn.
Simulate Real Squads
In Simulator Soccer you can customise the kits by downloading the PDFs for free. With a little DIY you can cut out and stick the cylinders to slip on and off your pawns. Once you have obtained your team you can choose or create the players that make it up. The budget can vary to increase realism. To evaluate the team you have created consider these guidelines:
- TOP TEAM: competes to win national and international trophies.
- STRONG (FORTE): competes to win national trophies and take part in international competitions.
- NORMAL: competes to win minor national trophies and take part in international competitions.
- WEAK (DEBOLE): regularly takes part in national leagues.
- POOR (SCARSA): competes to avoid relegation.
| TEAM VALUE | TOP TEAM | STRONG | NORMAL | WEAK | POOR |
|---|---|---|---|---|---|
| BUDGET | 45 | 40 | 37 | 34 | 32 |
| PLAYERS WITH VALUE 1 | NO | max 2 | max 3 | max 4 | max 5 |
| Value on the pitch with the worst 5 players on the bench | 35 | 32 | 30 | 28 | 27 |
The overall budget also determines the maximum number of players with value 1:
- Budget 45 = 0 No player with value 1
- Budget 40 = 2 Maximum 2 players with value 1
- Budget 37 = 3 Maximum 3 players with value 1
- Budget 34 = 4 Maximum 4 players with value 1
- Budget 32 = 5 Maximum 5 players with value 1
Analysing the team values, if we consider the worst 5 players on the bench, we will notice that the 11 starters have a value whose difference is not large and will not affect the match too much. In short, you can play competitive matches even if 2 teams of a different level face each other.
Tournament Rules
Introduction
These rules serve to regulate the official Simulator Soccer competitions. In the next pages you will find realistic additions for longer competitions. Variants that could affect the match, such as the weather, the referee's strictness, etc. You will also find the information needed to organise a tournament and how to run it.
The Matches
The rules to apply are those of the complete Simulator Soccer rules. Each match is made up of two halves. Each turn must be played in about 60 seconds. The estimated time for a match is about one hour. If a player takes too long to play his turn it is necessary to call the match director or use an hourglass or, even simpler, a timer.
The Teams
PLAYERS For the whole duration of the tournament the squad of 16 players must be the same. There can be no changes along the way. The standard budget to use is 36. However you can organise tournaments with teams of different levels, or of the same level with stronger teams. Customised players are allowed as long as their value goes from 1 to 4; the value is represented by the number of coloured wedges, remembering that, except for players with value 1, you cannot have two identical players.
KIT Each player must have at least 2 chromatically different kits (one dark and one light) so as to always be distinguishable from the opponent. Customised shirts are allowed, downloaded for free or drawn by you.
Home Advantage
In some tournament structures or in leagues there may be home advantage. The home team chooses the kit first, the away team adapts accordingly. The home team, 4 times during the match, can roll the die twice and choose the higher of the two values. It must be declared before the roll. This is the push of one's own crowd!
Type of Referee
At the start of the match you must establish what type of referee will officiate. Roll a die:
- If the result is 3 to 6 = Normal referee: proceed normally as per the rules.
- If the result is 1 or 2 = Strict referee. There is a variation of the rules: During duels with the die, the referee will whistle a foul if the result is 1-2 and not only 1.
VAR
If during the duel with the die a foul is committed, causing a penalty kick, the VAR is used!
- The defending team rolls a die and if it gets 6 the penalty is removed by the VAR. Play restarts with a goal kick or with the confirmation of the penalty kick.
Suspensions
When a player is sent off for a direct red or for a sum of yellows, or if he collects 3 bookings during the competition, he is suspended.
- He will miss the next match. (4 players will go on the bench).
Physical and Mental Fatigue
From the 60th minute all the players on the pitch begin to feel fatigue. From that moment on they can use only 1 skill: the first one clockwise after the white space. (the player with value 4 has no white spaces; the skill above the collar of the shirt is used)
- If you make 1 substitution after the 60th minute you can use the first 2 skills clockwise.
- If you make 2 substitutions after the 60th minute you can use the first 3 skills clockwise.
- If you make 3 substitutions after the 60th minute you can use all 4 skills.
Substitutions
During the LINEUP you can make substitutions, maximum 5 players. Simply remove the player going out and place the substitute. If you call a substitution during a throw-in, play will restart with the lineup. You have no obligation to make substitutions. Goalkeeper substitution: If the goalkeeper is sent off and you want to make a substitution, you can bring on the reserve goalkeeper in place of a player. Since there is no pawn, use the same one, and his skills are: 1 purple. If you put an outfield player in goal, not having the purple skill, he cannot use the rod.
Injuries
Every time a foul occurs, the player who suffers it rolls a die to check his condition:
- If the result is 1 there is an injury: from that moment on he can use only 1 skill. (the first clockwise starting after the white space)
- If a player suffers 2 injuries in the same match, it is a serious injury: from that moment on he can move at most 1 cell and he will miss the next match. (4 players will go on the bench).
Weather
At the start of the match you must establish what weather conditions there are. Roll a die:
- If the result is 3 to 6 = Clear: proceed as per the rules.
- If the result is 1-2 = Bad weather. There is a variation of the rules: Difficulty in passing: Short passes will be within 3 cells; from the 4th on it is considered a long ball. The short pass for the playmaker (regista) is 4 cells instead of 3. Increased injury probability: An injury is suffered if after the foul you roll 1-2 on the die.
Warning
Not a toy; use by persons under 14 years of age is not recommended. Contains small parts that could be swallowed.