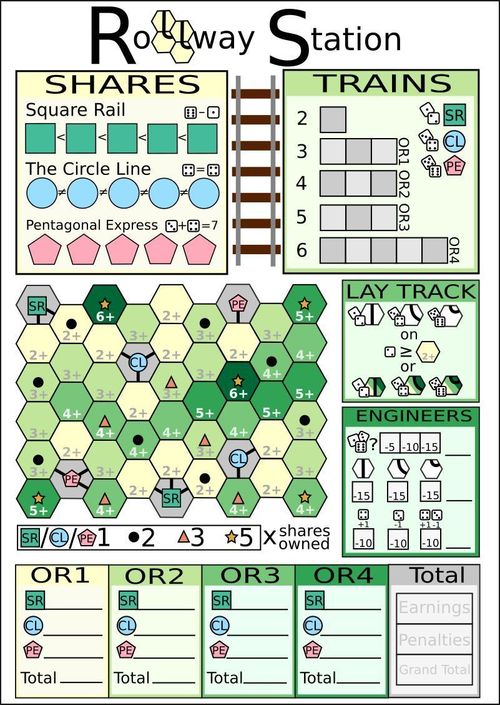
Rollway Station
Rollway Station Rulebook
Table of Contents
Table of Contents
Components
To play Rollway Station you will need:
- 8 standard six sided dice. You can play with only 5 dice but it will be a little fiddly.
- A pencil, pen, or dry erase marker.
- A score sheet. Three different maps are provided, you can choose your favourite or pick at random. You may wish to laminate these sheets and re-use them.
Game Overview
Rollway Station is played over 15 turns. Each turn you will roll 5 dice and assign them to three different actions: investing in train companies, auctioning trains, and laying new railroad track. At the end of the 4th, 7th, 10th and 15th turns, you will perform an operating round where the train companies run their routes and award you points based on how many stops they make and how many shares you have in those companies. After the last operating round, you add up your score and compare it to the target to see how well you've done.
The Score Sheet
The score sheet is divided into 6 sections.
- Shares. This is where you keep track of the shares you own in each company. There are three companies in the game: Square Rail, The Circle Line, and Pentagonal Express. There are five shares available for each company. In Rollway Station, you don't play as a single company, instead you will usually pick up shares in all three while you try to maximise your score.
- Trains. This is where you keep track of the current train auction and which company owns each train. Each row represents a train. This section also doubles as the turn tracker as one box will be filled in per turn, meaning the game is over when the last box is filled in.
- Map. This is where you draw the tracks and try to connect the most valuable stops to your network. The icons in the middle of some of the hexes are called stops.
- Lay Track. This box is a helpful reminder of the dice results needed to lay each type of track and where it can be laid.
- Engineers. Sometimes you don't get the result you need. This section contains Engineers that will lay extra track for you but at the cost of a points penalty at the end of the game.
- Scoring. Space to write down the score for each company in each operating round, as well as a space at the end to tot up your final score.
Turn Overview
Each turn, roll 5 dice and assign them to three different actions. When you assign dice to a section, you resolve an effect based on the value of the die or dice assigned there.
You must assign:
- 2 dice to obtaining a share
- 1 die to the train auction
- 2 dice to laying track
You may assign and resolve these dice in any order you like. Additionally, once per turn you may use an Engineer.
At the end of your 4th, 7th, 10th or 15th turn (when a whole row has been filled on the train auction, except the first), resolve an operating round.
Once everything has been resolved, begin your next turn by rolling 5 dice.
Example: Norm rolls 5 dice. He gets 6, 4, 4, 3, 1. He decides to assign the 4s to Shares, he puts the 1 in Trains, leaving the 6 and the 3 to Lay Track. When he has finished resolving his actions, he checks the score sheet and sees there is not an operating round this turn, so he picks the five dice back up and begins his next turn.
Shares
Each turn you can obtain a maximum of one share in one company. Shares act as a score multiplier, so if you have three shares in a company, you will earn three times as many points from that company than if you only had one.
On your turn, assign two dice to Shares and fill in the leftmost empty box in any of the three companies, this gives you a share in that company. Each company has a different rule for obtaining shares.
- Square Rail: Take the difference between the two dice assigned to Shares and write it in the box. Values in Square Rail must increase from left to right, the difference between the two dice must be larger than all previous Square Rail shares.
- The Circle Line: If the two dice assigned to Shares match in value, write that value into the box. Shares in The Circle Line must have unique values, e.g. if you have a 3 in any Circle Line share, you may not use a pair of 3s to obtain another.
- Pentagonal Express: The two dice assigned to Shares must add up to 7. You may use the same combination multiple times, so just tick a box to show you have a share.
Burning a Share: If you can obtain a share with the dice you assigned here, you must. Otherwise, cross off a share from any company. You cannot obtain this share for the rest of the game. Note that it is not mandatory to obtain a share if it is possible with all five dice, only if it is possible with the two you choose to assign to Shares.
Example: Norm has assigned a pair of 4s to Shares this turn. He has already used a pair of 4s to claim a share in the Circle Line, so he must take the difference between the dice - zero - and write this into the leftmost box in Square Rail.
If instead Norm had assigned his 6 and 1 to Shares, he could claim a share in Square Rail or Pentagonal Express. However, if he claimed Square Rail with a difference of 5, he would lock himself out of any more shares in the company because it is impossible to have a larger value to put in the next box.
Trains
Each turn, one company bids for a train in an auction. Each row in this section represents one train. The number by each row shows how many stops that train can make.
The die you assign here corresponds to a company:
- 1 and 2 are Square Rail
- 3 and 4 are The Circle Line
- 5 and 6 are Pentagonal Express
Write the initials of the corresponding company into the first available box, starting with the leftmost empty box in the top row and working from left to right, top to bottom. This company is said to have made a bid on this train.
When a row is full, whichever company has the most bids in that row owns that train and is the only company that can operate it. If there is a tie, the last tied company to bid owns the train. If a row is partially full, that train is not owned and does not run.
Example: Square Rail owns the 2 train as it has all of the bids. Pentagonal Express owns the 3 train as it has a majority. The Circle Line owns the 4 train as it is the last tied company to bid on it.
Lay Track
Each turn you will add a new piece of track to the map. The dice you assign here determine what you can lay and where.
Choose one die to be your track die, which determines what you place:
- A 1 or 2 places a straight track. Connect one edge of the hex to its opposite edge.
- A 3 or 4 places a gentle curve. Connect one edge of the hex to an edge that is neither opposite nor adjacent.
- A 5 or 6 places a tight curve. Connect one edge of the hex to an adjacent edge.
The above three shapes can be rotated any way you choose.
The remaining die becomes your hex die which determines where you can place track. Each hex has a value, e.g. 3+. The hex die must equal or exceed the value printed in a hex to place track there.
Example: To place the red track here, your track die would need to be a 1 or 2. Your hex die would need to be at least a 3 to match the value of the hex.
Alternatively, you can upgrade a hex that already contains track. Each hex can only be upgraded once. To upgrade track, your hex die must match the value of the track already there.
Example: To add the blue upgrade, your track die would need to be a 3 or 4 as it is a gentle curve, and your hex die would need to be a 1 or 2 to match the track already present in this hex.
To add track to the map, simply draw the appropriate line onto the score sheet. Track must always be connected to an already existing piece of track on at least one edge. You cannot upgrade or change the track on grey hexes.
Engineers
At any point during each turn you may use one engineer, which allows you to either modify a dice roll or lay additional track at the cost of points. To use an engineer, tick off one of the nine engineer boxes. Each engineer can only be used once per game, and the negative number in the box shows you how many points you will lose for using that engineer.
Random Engineer: At any point on your turn, use a random engineer to roll three additional dice and choose two to lay a bonus piece of track. Each time you use this engineer, the cost increases. The first time costs 5 points, then 10, then 15.
You cannot mix the dice received from random engineers with the dice you rolled at the beginning of your turn. The track you lay with this engineer must use only dice rolled by the engineer, and the remaining die is discarded.
Fixed track engineers allow you to lay one additional piece of track in any empty hex, i.e. a hex that contains no stops and no track. You can use any of the three types of track, but only one fixed track engineer of each type can be used per game.
Modifier engineers do not lay additional track. Instead, they modify the dice you assigned to laying track this turn. The leftmost modifier allows you to add one to either your track die or hex die. The middle allows you to subtract one. The right modifier adds one to the track or hex die and subtracts one from the other. You cannot increase the value of a die above 6 or reduce it below 1. You may use these engineers in any order, but each engineer is available only once per game.
Note: Although Engineers can only lay track, it is possible to lay track with an engineer and then upgrade it with your basic track lay during the same turn.
Operating Rounds
After your 4th, 7th, 10th, and 15th turns (i.e. when each train beyond the first is sold) there is an operating round (OR). This is when the companies run their train routes and generate points.
Each company runs each train it owns and adds up the score generated. To run a train, trace a continuous line along the track containing a number of stops up to the value of the train. The number of hexes passed through doesn't matter, only the number of stops. One of the stops on each route must be a station owned by the company currently running a train.
As you go, add up the score for the route as follows:
- 1 per station
- 2 per dot
- 3 per triangle
- 5 per star
A train cannot double back on itself or score the same stop more than once. A train must score any stops it passes through, it cannot skip low value stops in order to reach further, more valuable stops.
You do not need to pass through a stop to score it, the stop at the beginning and end of a journey count towards the score and the number of stops the route may contain.
Each company cannot use the same piece of track more than once in each operating round (even with different trains!). Different lines within the same hex may be used, and different companies can use the same track during an OR.
Once you have added the scores for each route from a single company, multiply it by the number of shares you have claimed for that company and write this value in the appropriate space in the OR section.
Route Examples
- The route in blue contains 4 stops. Square Rail can run a train along this route to score 10 points (2 + 1 + 2 + 5). If it only had a 3 train, it would have to leave out one of the stops at either end. No other company could use this exact route as it does not contain any other company's station.
- The Pentagonal Express cannot reach all of the stops here with a single train because it would need to double back. One way to reach all the stations would be to run a 5 train down the pink and purple track, and a 2 train down the red track. Even though the two trains would be moving through the same grey hex, they would be using different sections of track, so this is absolutely fine.
- As long as they both have a good enough train, both Square Rail and The Circle Line can run the whole orange route above for 11 points. Because they are different companies they are allowed to use the same track.
End of the Game
After the fourth and final operating round, take a moment to admire your handiwork, you should have a wonderful train network! Add up your score from each operating round and subtract the penalties for any engineers you used. This is your final score.
See how your train journey was based on the score you managed:
- 0 - 150: Cancelled due to strike action
- 151 - 200: Delayed due to leaves on the line
- 201 - 250: Standing room only
- 251 - 380: Table Seat
- 381 - 450: First Class
- 450 +: Private Carriage
Advanced Rules
Two of the three score sheets contain additional rules to make the game a little trickier. These are unique to those score sheets.
The Mystery Station
On this map each company only has one starting station. There is also the mystery station. As soon as you connect track to this station, you must decide which company owns it. From that point on, treat it exactly as any other station: it scores 1 point when part of a route, and the company that owns it may draw valid routes containing just the mystery station.
Points of Interest
This map has a new icon: the spiral. There are three of these spirals on the map. Routes that contain one or two of these spirals score just 1 point per spiral. Routes that contain all three instead score a bonus 25 points.
Multiplayer
Give each player a copy of the same score sheet. The game is played the same as solo except for the following changes:
- The 5 dice rolled at the start of turn are shared - each player uses the same values, but may assign them as they wish
- If more than one player uses a Random Engineer during the same turn, the three additional dice are only rolled once. Each player may choose whichever two values they wish.
- Whoever gets the highest score wins the game.