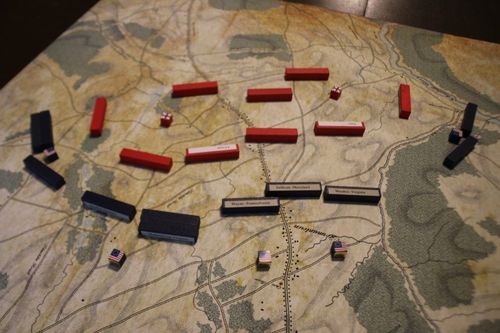
Pub Battles: Germantown
Official rulebook: Command Post Games · PDF
Pub Battles: Germantown Rulebook
Table of Contents
Table of Contents
Germantown Scenario: Special Rules
The following is the scenario section. It is an English translation of the official Japanese-language scenario document (see the source note in the Table of Contents).
Historical Background
On 11 September 1777 the defeat at Brandywine left the colonial Continental Army and its resolute commander George Washington battered, but not broken. He kept his army between the advancing British and Philadelphia, the capital of the colonies. On 26 September, however, Sir William Howe, the British commander-in-chief in North America, occupied Philadelphia. To make navigation of the Delaware River possible, Howe had to detach most of his army, and as a result about 9,000 British troops were encamped near Germantown. At this point Washington saw his chance, and his plan was bold.
The 11,000 soldiers of the Continental Army gathered in four columns. Unexpected delays were caused by thick fog. Sullivan's and Stirling's columns began their attack at about 5:30 a.m., and the New Jersey and Pennsylvania militia engaged the British left by 6:00 a.m. Greene's column did not engage until nearly 7:30 a.m., and the Maryland militia on the far left did not engage until nearly 8:00 a.m. Sullivan and Stirling were further delayed by the British light horse defending Cliveden, a stone mansion. A brigade of Greene's met a brigade of Sullivan's and the two fired on each other, throwing the Continental Army into confusion. Howe at first hesitated, not knowing from which direction the enemy's main force was attacking. He then advanced on Cliveden while calling forward the grenadiers he had left in Philadelphia. Greene's men did succeed in entering the position, but were driven out in a counterattack. The British repulsed the militia on the American right, and then the British Guards and dragoons attacked Greene's left flank and forced it back. Sullivan's column also began to withdraw. By 9:00 a.m. the entire Continental Army had withdrawn.
Despite two defeats in four weeks, Washington and his Continental Army had not lost their unity. They still had spirit and were ready to fight again. The British, for their part, continued to fight for another month to win the free navigation of the Delaware River. Had either army won a more decisive victory, the 1777 campaign might have ended right there!
Units
All cavalry in this battle are dragoons. They roll 2 dice in combat.
Abercromby
Abercromby took part in this battle but had only 2 light battalions. This unit is treated as a "1-step detachment", but it is elite. Therefore it ignores the first hit.
Cliveden
Cliveden (the red marker at the northern edge of Germantown) is a large stone building that is very difficult to attack. Being a single building, it is too small for many units at this game's scale. Only one detachment unit with no support may enter and occupy Cliveden. While it defends there, this detachment unit is under cover and cannot be attacked from the flank.
Rivers and Creeks
Treat the Schuylkill and Wissahickon as rivers. Treat Frankord Creek as a creek.
Transcriber note: the source prints "Frankord Creek" and it is transcribed as printed.
Heavy Fog
Because of heavy fog, on the first day only, visibility limits foot movement to 1/3. Note that artillery cannot fire effectively within this restricted range.
Lost in the Fog
Only on the game's first turn (the special night turn carried out under this scenario's special rules), randomly draw 2 Colonial chits from the pool. The commands of these chits are lost in the fog and cannot move. Keep the 2 drawn chits hidden: the Colonial player keeps it secret from the British which commands are lost during movement.
Note: historically, Armstrong and Greene were delayed in reaching the battlefield by fog. Smallwood was too late to have much effect on the battle.
Headquarters hidden reserves: the rules for hidden reserves by headquarters are the key to simulating the fog. For these rules, see the YouTube video referred to in the scenario document.
Designer's note: friendly fire occurred among the Continentals because of the fog, but casualties and effects at this scale were very small.
Road March Formation
In this scenario, units do not stretch out even when they are in road march formation.
Headquarters Ratings
As shown on the units. The Colonial player decides the order of combat.
British Command
The battle begins with Howe in command of the entire British army. Howe has no command chit. From the start, use the Cornwallis chit, which arrives later as a reinforcement. Knyphausen and all the other British units move when the Cornwallis chit is drawn.
When Knyphausen enters as a reinforcement, put the Knyphausen chit into the pool. From that turn on, the Knyphausen command moves when the Knyphausen chit is drawn.
On the turn Cornwallis enters as a reinforcement, Howe returns to command of the entire army. (Transcriber note: the source prints this name as "Hoe" in this sentence; it is corrected to Howe here.) Once Howe is commander of the entire army, as with the Brandywine special rules, he moves together with whichever of the two British commands moves. Howe can move only once per turn. He can command attacks, and he can hold units in reserve.
Start of the Game
Night march: Washington had the Continental Army march through the night and launch a surprise attack at dawn. In this scenario, before the game starts, carry out one special night turn before the normal Turn 1. Only the Colonial army may move during this special night turn. Apply the Lost in the Fog rule at this time. Then begin the normal Turn 1.
Objectives
The Battle of Germantown was the final culmination of the Philadelphia campaign. The burden of attacking in this battle falls on the Colonial forces. The capital, Philadelphia, lies to the south of the battlefield and has already been taken by the British. To retake the capital, the Colonial forces must defeat the British. The British, for their part, must hold this ground, defeat the Colonial forces and drive them back. Continue this battle for one more day until a decisive result is reached.
Historical Option
The historical order of battle is given below. Historically, Armstrong's command entered the battlefield by Barren Hill Road, Sullivan's command and Washington by Reading Road, Greene's command by Indian Town Road, and Smallwood's command by Shoemaker's Mill Road.
Free Game
Playing the historical option to see what happened is also enjoyable, but this scenario is strongly recommended to be played with free setup. This option, which leaves many choices to the players, simulates the battle more accurately in many respects.
Start Option
For simplicity and speed, omit the "Night March" and "Lost in the Fog" rules. From Turn 1, simply start the normal game.
Designer's Notes
Finding an accurate map of this period is a great challenge. Most maps of the time are very rough and inaccurate. The detailed map we obtained was one made a century later to commemorate this battle, and most of the roads and areas depicted on it, and most of the development carried out there, did not exist at the time of the battle. The map in this game may look a little sparse and rough, but it is more accurate. That is how it was in those days.
We wanted to provide the units for this battle in full, but when we edited the order of battle, it turned out to be nearly identical to that of Brandywine. Is it worth making blocks that differ only in the unit names on the stickers? To keep costs down and the game simple, we have sacrificed some historical accuracy here. Strictly speaking, the Weedon block represents Conway. The British 16th Dragoons represent the Queen's Rangers, who had horses and fought as mounted detachments. Von Donop represents the Hessian grenadiers. Maxwell and Nash took part in this battle but had been greatly reduced in strength, and we incorporated these units into Stirling. Pulaski also took part, but he had no force large enough to become a unit.
Transcriber note: the designer's notes are reproduced as printed. "Weedon" is printed as Weedon in the source.
Campaign Game
Players can play the battles of Brandywine, Germantown and Monmouth in that order as a continuous campaign. The result of one battle affects the next. The result of the Brandywine battle would have directly affected the Germantown battle, exactly three weeks later.
Brandywine
If the British are routed or broken: The British retreat to the sea, the campaign ends, and Philadelphia is saved. No further battles take place, and the war itself might have been nearly over.
If the British withdraw: Continental morale rises, more colonial militia gather, and the defence of the Delaware River after the British take Philadelphia becomes harder. Cornwallis, the Grenadiers and Von Donop are needed on the Delaware and cannot be used in the Battle of Germantown. Mathew's Guards become a reserve in Philadelphia and arrive as reinforcements on Turn 4, without Cornwallis. (Howe remains overall commander and commander of one wing / one command.)
If the British withdraw at night: British morale falls, recruitment of Loyalist militia worsens, and defence of the Delaware becomes harder. The Grenadiers are needed on the Delaware and cannot be used in the Battle of Germantown. Von Donop arrives as a reinforcement at night.
If the Colonial army is routed: Washington's Continental Army is destroyed, and the campaign is a defeat for the colonial forces. Philadelphia can no longer resist and is occupied by the British. No further battles take place, and the war itself might have been nearly over.
If the Colonial army is broken: Washington's army is battered, and the militia in this region lose their morale. Therefore, in the Battle of Germantown the two Colonial militia units are removed from the order of battle and cannot be used. Resistance along the Delaware also weakens, so Cornwallis and the Grenadiers join the rest of the army and are used from the start. Von Donop arrives as a reinforcement on the night turn.
If the Colonial army withdraws: Washington's army is forced to withdraw hurriedly at dusk, which lowers the fighting spirit of the neighbouring states and weakens resistance along the Delaware. Smallwood's MD Militia cannot be used in the Battle of Germantown. Cornwallis and the Grenadiers arrive as reinforcements on Turn 2.
If the Colonial army withdraws at night: This is the historical result. There is no change to the Battle of Germantown.
Germantown
Transcriber note: the source heading for this part is "Germantown" (ジャーマンタウンの戦い); the effects listed under it apply to the Battle of Monmouth.
The Battle of Monmouth came eight months after the Battle of Germantown, so the result of Germantown did not directly affect Monmouth. Nevertheless, it is possible to link the scenarios of these two battles. The changes in that case are as follows.
If the British are routed or broken: The British suffer a crippling blow, fall back down the river to join the fleet, and evacuate to New York. Britain's war aims in America are close to being lost.
If the British withdraw: Holding Philadelphia becomes precarious. Forces are drawn away from the Delaware front, and the naval supply line is endangered. Over the winter the British must fight defensive battles along the Delaware, gather supplies and take greater risks to keep the Colonial army at bay. The British cavalry suffers crippling losses. In the Battle of Monmouth the British cannot use Dragoons, and Von Donop is also needed to escort the retreating supply column, so he cannot be used either.
If the British withdraw at night: The British withdrawal raises the resistance of rebel forces in the region, small battles occur frequently along the Delaware, and over the winter the British cavalry is in terrible condition. In the Battle of Monmouth the British cannot use Dragoons.
If the Colonial army is routed: Washington's Continental Army is shattered and must immediately retreat to its winter quarters. No food supplies are transported during the winter, and the British enter the spring of 1778 in a much better state than they did historically. In the Battle of Monmouth there are few enemy threats around the marching army and supply column, and the British can keep more units nearby, ready for an attack by Washington. The British add Grenadiers and Grant to the Turn 3 reinforcements.
If the Colonial army is broken: Washington's Continental Army, battered in this battle, receives little support over the winter. The British, meanwhile, suffer fewer losses and can strengthen their army, and fewer enemy militia threaten the retreating supply column. In the Battle of Monmouth the Colonial army cannot use Smallwood's militia, and Britain adds Grenadiers to the Turn 3 reinforcements.
If the Colonial army withdraws: In June 1778 the Colonial militia do not want to turn out in large numbers as they did historically. The Colonial army cannot use Smallwood's militia.
If the Colonial army withdraws at night: This is the historical result. There is no change to the Battle of Monmouth.
Order of Battle
The order of battle is shown on the scenario's sticker sheet (戦闘序列). One unit represents a brigade of about 1,500 men. Pieces are identified by their HQ piece and command chit as shown on the sheet.
British army (red)
- Army HQ: Howe (rating piece "Howe"; no command chit). The "Ratings" callout on the sheet points to this piece.
- C Command (Cornwallis; command chit C; HQ piece "Crwl"):
- Unnamed bar with the striped pattern (baggage train pattern on the sheet)
- Unnamed bar with the four-pip pattern (artillery pattern on the sheet)
- 16th (dragoons; shown with the dragoon callout)
- Abercromby Lt (elite; the sheet's callout says Abercromby is treated as an elite detachment)
- Mathew (yellow bar, with the elite gear icon)
- Grenadiers (elite gear icon)
- J Grant
- Grant
- K Command (Knyphausen; command chit K; HQ piece "Knyp"; the chit callout says to group the chits used in that turn into the cup):
- Unnamed bar with the striped pattern
- Grey
- Agnew (infantry callout)
- Stirn (green bar)
- Von Donop (green bar; enters as a night-turn reinforcement, see Setup)
- Detachments: 3 British detachment bars (red), shown as "x 3" on the sheet.
Colonial army (blue)
- Army HQ: Washington (command chit W; HQ piece "Wshtn")
- Unnamed bar with the four-pip artillery pattern
- Stirling - New Jersey
- S Command (Sullivan; command chit S; HQ piece "Sulvn")
- Unnamed bar with the striped pattern (baggage train)
- Sullivan - Maryland
- Wayne - Pennsylvania
- Weedon - Virginia (this unit is commanded by Conway, as the sheet notes)
- G Command (Greene; command chit G; HQ piece "Greene")
- Unnamed bar with the striped pattern (baggage train)
- Muhlenburg - Virginia
- Stephen - Virginia
- McDougall - Connecticut
- A Command (Armstrong; command chit A; HQ piece "Armst")
- Armstrong - Penn. (militia)
- Sw Command (Smallwood; command chit Sw; HQ piece "SmWd")
- Smallwood - NJ (militia)
- Detachments: 3 colonial detachment bars (blue), shown as "x 3" on the sheet.
Transcriber note: the sheet prints a few bars without a name. They are listed above by their pattern only, as the sheet shows them. Check them against the sticker sheet image before applying stickers.
Setup
Colonial army: The Colonial army starts the game in road march formation, placed on Headquarters Hidden Reserve cards. It enters through the special night turn specified in this scenario's special rules, from any road with a blue arrow. However, the player must decide before the game starts which headquarters enters from which road.
British army: The British set up first. Place all units, except the reinforcements listed below, in the area outlined in red on the map. They may not start in road march formation.
- Forward covering force: The British may start Abercromby, or one detachment, in Cliveden.
British reinforcements: Enter in road march formation from the roads marked with red arrows.
| Turn | Reinforcement |
|---|---|
| Turn 3 | Knyphausen (command chit K is placed into the pool; see British Command), plus one unnamed red bar |
| Turn 5 | Cornwallis, plus Grenadiers |
| Night turn | Von Donop |
Transcriber note: the setup diagram shows the map and the arrows. The map sheet itself is not transcribed.