Napoleon at Chattanooga
Napoleon at Chattanooga Rulebook
Table of Contents
Table of Contents
- [1.0] Introduction
- [2.0] Que pasa?
- [3.0] Turn Sequence
- [4.0] Setting Up the Game
- [5.0] The Diplomacy Phase
- [6.0] The Economy Phase
- [7.0] The Supply Phase
- [8.0] The Production Phase
- [9.0] The Event Phase
- [10.0] Spaceship Movement
- [11.0] Spaceship Combat
- [12.0] Planetary Surface Movement
- [13.0] Air Attacks
- [14.0] The Scud Launch Attempt Phase
- [15.0] Regular Combat
- [16.0] Artillery Attacks
- [17.0] Strategic Level Hand-to-Hand Combat
- [18.0] Scud Impacts
- [19.0] Alien Activity
- [20.0] The Victory Point Assessment Phase
- [21.0] Miscellaneous Excuses
- [22.0] Commonly Asked Questions about Napoleon at Chattanooga
- [23.0] Designer's Notes
- Charts (Chart Booklet)
- [3.0.1] Turn Sequence
- [4.3.1] Game Setup Counter Listing Chart
- [5.0.1] Diplomacy Table
- [6.0.1] Economy Table
- [7.0.1] Supply Table
- [2.7.9] Gratuitous Sex and Violence Table
- [8.0.1] Production Table
- [11.1.1] Spaceship Combat Matrix
- [11.1.4.1] Wandering Spaceship Chart
- [12.7.2] Scatter Diagram (1d6)
- [12.8.1] River Crossing Attempt Table
- Track Sheets
- Errata Questions and Answers (as of April 15, 1998)
[1.0] Introduction
[1.1] Overview
NaC is a two-player game.
Players accrue Victory Points (VP) by defeating enemy units in combat, exploring and conquering planets, and controlling cities. There are two ways of winning: being the first player to accumulate 80 or more VP during the Victory Point Assessment Phase of any turn, or being the player with the most VP at the end of 20 game turns.
[1.2] Errata
NaC is the first game (that we know of) that includes an innovative new feature called in-line errata. To save time, confusion, and printing costs, we have included the corrections and errata in the body of the text, rather than printing them on a separate sheet of paper.
[1.3] Dedication
The dedication of this game is determined in the Introduction of the rulebook (see Section 1.3). Players may not change the dedication between game-turns. The dedication may not be saved up for use in later game-turns. The dedication is not determined by a dice roll.
Errata: Ignore this entire paragraph.
[1.4] Components
This game kit consists of:
- four paper counter sheets to be glued to the front and rear of two sheets of cardboard and then cut into 1/2 inch squares: French front side, French rear side, Austrian front side, and Austrian rear side
- two 8.5 x 11 paper map sheets: Earth (the Tennessee Valley), and the other planets (Mars, Jupiter, Saturn, Pluto, and The Bahamas)
- two 8.5 x 11 track sheets
- one booklet of charts
- this rulebook
Players must supply their own six-sided dice.
[1.4.1] Playing Pieces
280 playing pieces or counters are provided on the counter sheets. Infantry, para/commando, armour, guard/grenadier, and cavalry counters are double sided.
[1.4.2] Assembling the Counters
There are many possible ways to put together the counters for this game. Some of these methods involve spot welding and radioactive materials. We suggest that you simply glue the sheet with the front sides of the French counters to a piece of thick cardboard, and glue the sheet with the front sides of the Austrian counters to a different piece of thick cardboard. Once the glue has dried, you can cut out all the counters in the bottom seven rows. We're done with them. The upper six rows of counters on each sheet (infantry, para/commando, armour, guard/grenadier, and cavalry units) still need to have their rear sides glued on. There's two ways of doing this: if you feel lucky, and the cardboard isn't too warped by now, you can carefully glue the entire rear side counter sheet to the back of the cardboard, trying to align each row and column. Otherwise you can cut out each row of counters and glue the rear sides on one strip at a time. Or, you can try the thing with the welding, but don't come crying to us.
Note that the Spaceship counters (18 French and 18 Austrian) are one inch by one-half inch in size; all the rest of the counters are one-half inch by one-half inch.
Source note: this paragraph gives 18 Spaceship counters per side; the Obligatory List o' Counters [2.1] gives 20 per side. Both are transcribed as printed.
Errata: The title at the top of the counter sheets says Napoleon at Chattanooga: Like Hussars They Orbited. That is not the correct name of this game. I am an artist, damn it, I don't have to answer your stupid bourgeoise questions!
[1.5] Dice Rolling Conventions
Conventions are generally fun, but those that are concerned only with rolling dice tend to be rather narrow in scope. However, some people like that sort of thing.
Six-sided dice (d6) are used exclusively in NaC. When the rules or charts mention 1d6, that means you roll one regular six-sided die; 3d6 means you would roll three dice and total the results. If we said 1,000,000,000d6, that means you would have to roll a billion dice and add them all up. We could keep you going a long time on this scam.
Errata: Dice that roll off the edge of the table, fall onto the floor, and are then eaten by your pet hamster do not count. You must re-roll the hamster.
[1.6] Game Scale
The hexgrids on the maps are drawn at a scale of 1 inch = 2.54 centimeters. The space areas are drawn at a scale of 1 inch = 1 metric furlough. Each turn represents the amount of time it takes me to drive to work every morning, give or take.
[2.0] Que pasa?
Each counter represents a military unit or a piece of information, in a metaphysical sort of way. The two-sided counters (infantry, cav, armour, guard/grenadier, and paratroop/commando units) have a full strength side (front) and disordered or bummed out side (rear) with reduced abilities.
The sample Infantry counter is printed with the unit type symbol, the unit name "24 Foot", and a combat and movement figure of 4-2 on its front side and 2-2 on its rear side. The sample labels point to the Combat Factor, the Movement Factor, the Unit type symbol, and the Unit name.
[2.1] Obligatory List o' Counters
Infantry (26 French & 26 Austrian) These are regiments of standard infantry, armed with muskets and bayonets, the foundation building block unit of Napoleonic era warfare.
Guard/Grenadier (5 French Grenadier & 5 Austrian Guard) These are regiments of slightly elite infantrymen, armed with the same muskets and bayonets as regular infantry, but having better élan and esprit de corps and funnier hats.
Paratroop/Commando (8 French & 8 Austrian) These elite units are battalions of lightly-armed but well-trained men, capable of appearing suddenly deep behind enemy lines and disrupting cable TV service, hence the famous "seagull" emblem in the unit type symbol.
Cavalry (13 French & 13 Austrian) These are regiments of guys on horses. During the Napoleonic era there were 197 different types of cavalry, and all of them were highly skilled at picking up babes.
Armour (26 French & 26 Austrian) Tank regiments formed the backbone of many Napoleonic assaults, although French tanks suffered a design flaw that only allowed one crewmember to listen to music on the radio at a time.
Artillery (4 French & 4 Austrian) These are batteries of 12-Pounders, huge brass-barrelled cannons often used to shoot at Russian composers. The sample Artillery counter reads 2-1-R2 (combat, movement, and range).
French/Austrian Economy (1 French & 1 Austrian) Used on the Economy Track [6.0.2] to let everyone know just how bad things really are in this country since the last elections.
French/Austrian Victory Points (1 French VP x 10, 1 French VP x 1, 1 Austrian VP x 10, 1 Austrian VP x 1) Used on the Victory Point and Game Turn Track [3.3.1] to show the current score of the game. The VP x 10 counters go in the lower row of boxes on the track (marked 0 through 90) to represent the tens digit of each player's score, the VP x 1 counters go in the upper row of boxes (marked 0 to 9) to represent the ones digit. You could, in theory, keep track of scores on a piece of scratch paper, but that's not the grognard's way.
Alien (2) These counters represent Alien beings who may appear to alter the course of human events, or maybe just to munch on some doughnuts.
Blank (1) Beyond a doubt the most frighteningly powerful unit in the game. So scary that we're not even going to tell you what it's for.
Diplomacy (1) Used on the Diplomacy Track [5.0.2] to indicate the current sad state of international negotiations.
Game Turn (1) Used on the Victory Point and Game Turn Track [3.3.1] to indicate how many more turns you have to suffer through.
Current Phase (1) Used on the Turn Sequence Track [3.1.1] to mark the passing of the turn sequence.
French/Austrian Supply (1 French & 1 Austrian) Used on the Supply Track [7.0.2] to indicate the logistical condition of the French and Austrian military machines.
Spaceship (20 French & 20 Austrian) When suddenly pressed to build large fleets of spaceships at the beginning of the Era of Solar Conquest, French and Austrian scientists discovered an ancient Japanese comic book that detailed a plan to raise a sunken battleship hulk and convert the derelict into a massively powerful starship. The scientists thought this was a brilliant idea and promptly went about designing and building spaceships around the long-sunken wrecks of their own ships lost in previous wars. It seemed a good idea at the time.
Ship Class (20 French & 20 Austrian) The capabilities of an enemy ship are seldom known until that ship is met in combat; for that matter, one's own ships are rarely understood until they've been tested in the heat of battle. This critical aspect of spaceship combat is simulated in NaC by the use of Ship Class counters which are drawn randomly for each new Spaceship that is built. The ship classes range from A (really awesome, powerful, and nasty) to E (really wimpy, fragile and embarrassing). Each ship's class is kept secret by hiding its Ship Class counter underneath the ship counter itself until that ship is involved in combat.
OMCL (1 French & 1 Austrian) The Orbital Mind Control Laser was a feared weapon during this period, used to confuse and disorient enemy units in the midst of battle. The batteries that powered the OMCL units had a very short shelf life and were very difficult to change while in orbit, so fortunately these fearsome weapons fell into disuse.
Air (4 French & 4 Austrian) These are squadrons of tactical aircraft. Neither the French nor the Austrian aircraft were of good quality during the Chattanooga campaign, but they all looked really cool.
Scud (4 French & 4 Austrian) The Scud missile launchers used during the Napoleonic era were crude and primitive by today's standards, equipped with only rudimentary targeting systems barely capable of hitting city-sized targets with consistency.
Leader (5 French & 5 Austrian) These are the generals that command their armies in battle, including the national soldier-kings: Napoleon himself leading the French, and Archduke Robert leading the Austrians. Each leader counter has the general's level of leadership abilities indicated by an L rating, ranging from L-1 (abysmal) to L-3 (not very good but he's all we got).
[2.2] The Maps
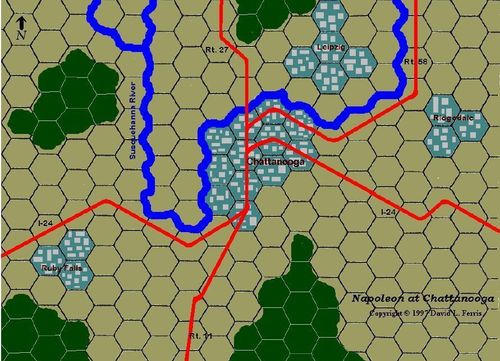
All movement and combat on the surface of the Earth takes place on the Earth Map (the one with Chattanooga in the center. Obviously there is more stuff on the surface of the Earth than the area around Chattanooga, but that's no concern of ours.) All other movement and combat takes place on the Other Map. Each planet (Mars, Jupiter, Saturn, Pluto, and The Bahamas) has its own surface map and a corresponding area representing its orbital space. Earth's orbit and all other space activity takes place in the Solar System (Outer Space) area.
Planet surface movement and combat takes place on each planet's hexgrid. Spaceship movement (orbital or that other kind) uses area movement. The Terrain Effects Chart [2.2.1] lists each terrain type and its effects on the units in that hex or area.
[2.2.1] Terrain Effects Chart
| Terrain | Effect |
|---|---|
| Clear Hex | Open terrain. Costs 1 Movement Point to enter. No other effects. Exception: on the surface of Pluto all units get +1 to their Movement Allowance |
| Road Hex | Costs 3 Movement Points to enter due to traffic and construction |
| City Hex | Costs 2 Movement Points to enter |
| River Hexside | Costs 2 Movement Points for every attempt to cross. All units attempting to cross a River Hexside must roll on the River Crossing Chart [2.3.1] for each attempt. |
| Woods Hex | Costs 2 Movement Points to enter |
| Space Area | Only Spaceships and Aliens may enter. Costs 1 Movement Point to move from any Space Area to any other Space Area. |
Errata (2.2.1 Terrain Effects Chart): Road hexes cost 3 Movement Points to enter FOR ARMOUR UNITS ONLY, due to traffic and construction. Road hexes cost only 1 Movement Point to enter for Infantry, Guard, Para/Commando, Scud, and Artillery units. (Otherwise Infantry units and the like wouldn't be able to cross a road.)
Source note: the printed chart cross-references a River Crossing Chart [2.3.1]. The River Crossing table is printed as [12.8.1] in the Chart Booklet, and the rules text refers to it as the River Crossing Attempt Table [12.8.1]. Transcribed as printed.
[2.3] The Track Sheet
The tracks on the Track Sheet are used to store information pertaining to various functions in the game: the current Game Turn Phase; the current status of Diplomacy; French and Austrian Economy, Supply, and Victory Points (VP). The Track Sheet also includes holding boxes representing the French and Austrian Mobility Pools and Afterlife Staging Areas.
[3.0] Turn Sequence
Each turn is divided into 14 Phases. Two of the phases are further divided into 6 subphases. The exact reason for this is beyond us. The Turn Sequence is listed on the Chart [3.0.1] and Track [3.1.1].
[3.0.1] Turn Sequence
- Diplomacy Phase
- Economy Phase
- Supply Phase
- Production Phase
- Event Phase
- French Spaceship Movement Phase
- Austrian Spaceship Movement Phase
- Spaceship Combat Phase
- French Busy Phase:
- a. French Planetary Surface Movement Subphase
- b. French Air Attack Subphase
- c. French Scud Launch Attempt Subphase
- d. French Regular Combat Subphase (Infantry, Armour, Cavalry, Para/Commando units, OMCL)
- e. French Artillery Attack Subphase
- f. French Strategic Hand-to-Hand Combat Subphase
- Austrian Busy Phase:
- a. Austrian Planetary Surface Movement Subphase
- b. Austrian Air Attack Subphase
- c. Austrian Scud Launch Attempt Subphase
- d. Austrian Regular Combat Subphase (Infantry, Armour, Cavalry, Para/Commando units, OMCL)
- e. Austrian Artillery Attack Subphase
- f. Austrian Strategic Hand-to-Hand Combat Subphase
- Scud Impact Phase
- Alien Activity Phase
- Victory Point Assessment Phase
- Move Game Turn Counter Phase
[3.1] The Current Phase counter should be moved along the Turn Sequence Track [3.1.1] to mark the current Game Turn Phase to help the players avoid going insane.
[3.2] Players who go insane due to incorrect usage of the Current Phase counter automatically lose 10 VP. Players who go insane for other reasons lose 5 VP.
[3.3] The Game Turn counter should be advanced along the Victory Point and Game Turn Track [3.3.1] to keep track of how long the game has been dragging on. The Game Turn counter should be advanced one box during the Move Game Turn Counter Phase.
Errata: Early withdrawal of the Game Turn counter may result in substantial interest penalties. Member of FDIC.
[4.0] Setting Up the Game
[4.1] Place the two maps and the track sheet on a flat playing surface in a manner that is equally inconvenient to both players. Decide who will play the French and who will play the Austrians. Place the Game Turn counter in the box marked 1 on the Victory Point and Game Turn Track [3.3.1]. Place the Current Phase counter in the box marked 1, Diplomacy Phase, on the Turn Sequence Track [3.1.1].
[4.2] Place all of the blue (French) Ship Class counters in a mug or cup and all of the red (Austrian) Ship Class counters in a different mug or cup, so that a counter can be picked at random when a new spaceship is produced during the Production Phase.
Errata: Any player who places the Ship Class counters in a mug or cup that happens to have coffee or soda in it loses 35 VP and has to clean up the mess.
[4.3] The French player selects all the counters listed in the Game Setup Counter Listing Chart [4.3.1]. Place the Infantry, Cavalry, Armour, and Guard/Grenadier counters on any hex along the North edge of the Earth map. The stacking limit (maximum number of units that can be placed in a single hex at the same time) is 5 units of any type or combination (see Stacking Limits [rule 12.1]). Place the Spaceship in the Solar System area on the Other Map. Randomly select a Ship Class counter for the Spaceship by drawing it blindly from the French Ship Class Mug or Cup (reminder: see Errata under Rule 4.2) and place the Ship Class counter underneath the Spaceship counter on the Solar System display, so that the French player knows what the Spaceship's class is but the Austrian player does not. Place all the unused French counters in the French Mobility Pool on Track Sheet #2.
[4.4] The Austrian player selects all the counters listed in the Game Setup Counter Listing Chart [4.3.1]. Place the Infantry, Cavalry, and Armour counters on any hex along the South edge of the Earth map. Place the Spaceship in the Solar System area on the Other Map. Randomly select a Ship Class counter for the Spaceship by drawing it blindly from the Austrian Ship Class Mug or Cup and placing it underneath the Spaceship. The counter, not the mug.
Errata (Game Setup Counter Listing Chart [4.3.1]): add to the chart that each side also starts with one spaceship. These spaceships start on The Solar System (Outer Space) area of the Other Map.
[4.5] Top off the sodas and popcorn bowls and you're ready to begin, Sparky.
[5.0] The Diplomacy Phase
During the Diplomacy Phase of each turn, the Austrian player rolls two dice and consults the Diplomacy Table [5.0.1] to determine the diplomatic conditions for the rest of the turn. This represents the efforts of the French and Austrian diplomats to find an agreeable solution to this senseless waste of human life.
[5.1] Place the Diplomacy counter on the Diplomacy Track [5.0.2] in the appropriate box to indicate the current state of negotiations. The results of the Diplomacy Table affect all French and Austrian units for the remainder of the current game turn. The possible results are:
[5.1.1] All Attacks Allowed. All units (infantry, para/commando, cavalry, armour, artillery, Scud, Air, OMCL, and Spaceships) may launch manly attacks during the appropriate combat phases later in the current turn.
[5.1.2] No Scud or OMCL Attacks Allowed. All units except Scuds and OMCL may attack during the current turn. Scuds and OMCL may move normally but may not attack.
[5.1.3] No Spaceship Combat Allowed. All units except Spaceships may attack during the current turn. Spaceships may move normally but may not attack.
[5.1.4] Only Spaceship Combat Allowed. Only Spaceships may attack during the current turn. All other types of units may move normally but have been forbidden to attack due to a last-minute cease fire agreement in which a clerical error exluded Spaceships.
[5.1.5] Only Scud Attacks Allowed. Only Scuds may attack during the current turn. All other types of units may move normally but have been forbidden to attack due to a last-minute cease fire agreement whipped up by a bunch of diplomats who didn't know how to spell "Scud".
Errata: Scrod units are not allowed to attack either.
[6.0] The Economy Phase
During the Economy Phase, each player rolls 2d6 and consults the Economy Table [6.0.1] to determine the state of his or her nation's economy for the current game turn. Each player's economy, along with his or her supply level, determines the level of production of new units for the current turn.
[6.1] The French and Austrian player each place their respective Economy counter on the Economy Track [6.0.2] to indicate the depths of their current economic woes. The possible results are:
[6.1.1] Serious Recession. Everyone is used to it, so there's not much effect on production.
[6.1.2] Runaway Inflation. Quality of life is reduced so production is adversely affected.
[6.1.3] In the Dumpster. Time to write home to Mom and ask if she can lend you a few squadrons of cavalry until next payday.
[7.0] The Supply Phase
During the Supply Phase, each player rolls 2d6 and consults the Supply Table [7.0.1] to determine the state of his or her military's logistics for the current game turn. Each player's supply level has an effect on his or her country's ability to produce new units.
[7.1] The French and Austrian players each place their respective Supply counter on the Supply Track [7.0.2] to indicate their logistical prowess for the current turn. The possible results are:
[7.1.1] In Full Supply. All units are fully stocked up on food, ammo, and tea, and are ready for action.
[7.1.2] Out of Supply. All units are starting to run low on food and ammo and some of the men have actually used up all their marmalade. The supplies that High Command promised you haven't shown up yet.
[7.1.3] Really Out of Supply. Reports have been coming in that some of your men have been breaking up their rifle butts and using the pieces in salads.
[7.1.4] In Deep Doo-Doo. Your executive officer is starting to look mighty tasty.
[8.0] The Production Phase
During the Production Phase, each player consults the Production Table [8.0.1] to determine how many new combat units are produced.
[8.0.1.1] On the Production Table, find the column with the appropriate Supply condition for that country for the current turn. Cross-index that with the appropriate Economy condition and roll 1d6. The box at the intersection of the Supply column and Economy/1d6 row contains the quantities and types of units received from production.
[8.1] New units are immediately placed on the appropriate map. New Spaceships and OMCL always appear in the Outer Space area. Austrian non-Spaceship non-OMCL units always enter from the South edge of all planet surface maps. French non-Spaceship non-OMCL units always enter from the North edge of all planet surface maps.
Editorial cross-reference (not printed in the rule): the Errata Questions and Answers at the end of this rulebook state where newly produced ground units may be placed.
[8.2] The counter mix represents the maximum number of each unit type available for the duration of the conflict. If the Production Table indicates a unit type that has been entirely used up, e.g, all the counters of that type are in use and none are left in that country's Mobility Pool, that particular unit type is unavailable. No substitutions.
[8.3] Whenever a new Spaceship is indicated by the Production Table, randomly select a Ship Class counter for it by drawing blindly from that country's Ship Class Mug or Cup and hide it under the Spaceship counter without revealing its nature to the opposing player.
Advanced Rule: players should shout "Oh my god!" whenever they draw a Ship Class counter, regardless of the counter's value.
[8.3.1] All Spaceships are pretty much the same size and mass, so there is no external indication of a ship's class. Each ship's class is revealed whenever it is involved in combat, at which point its Ship Class counter is placed face up on top of the ship counter for the duration of the combat. If the ship survives the combat, the Ship Class counter may be hidden again, so that players have to try to mentally keep track of each opposing ship's class.
[9.0] The Event Phase
During the Event Phase of each turn, each player rolls two dice, carefully noting which is the first roll and which is the second, and consults the Event Table [9.0.1]. The results are applied immediately to all appropriate units.
[9.0.1] Event Table
First roll 1 (second roll: result):
- 1-1 Alleged atrocities by enemy nation arouse public outcry - you get one free infantry unit from your Mobility Pool
- 1-2 Alleged atrocities by enemy nation turn out to be false rumours started by Sergeant-Major's mother - you lose 1d6 VP
- 1-3 Arrogant but charismatic leader orders the units to advance regardless of hardships - you are automatically In Full Supply next turn
- 1-4 Your armour units do really well in big inspection - you gain 1d6 VP
- 1-5 Chow is bad today - you lose 1d6 VP
- 1-6 Stray Scud missile hits local house of ill repute - your soldiers go beserk with rage - all your Disordered units everywhere are recovered to Full Strength
First roll 2 (second roll: result):
- 2-1 Road traffic suddenly clears unexpectedly - all your units on Road hexes must move at triple normal speed towards nearest enemy unit along the road
- 2-2 Prominent defense contractor caught in embarrassing scandal - you are automatically In Full Supply next turn
- 2-3 Somebody let the air out of all your tires - all your Armour units are unable to move this turn
- 2-4 Strange unexplained psychic phenomenon - all your units are shifted one hex in the same direction - roll 1d6 on the Scatter Diagram [12.7.2]
- 2-5 Stray Scud missile lands on mime convention - both sides gain 1d6 VP
- 2-6 Lots of rumours about how good your army is - you gain 1d6 VP
First roll 3 (second roll: result):
- 3-1 Enemy accused of telling ethnic jokes about your nation - all your Artillery units can attack twice this turn
- 3-2 Asteroid falls on your Chief-of-Staff - you gain 1d6 VP
- 3-3 Free donuts! All your Armour units have 1 extra Movement Point this turn
- 3-4 You gain 1d6 VP for no apparent reason
- 3-5 Big party - all units within 3 hexes of your Commander-in-Chief (L3) scatter randomly - roll on Para LZ Chart [12.7.1] for each unit's new location
- 3-6 Minister of Defense caught in embarrassing scandal - you are automatically Out of Supply next turn
First roll 4 (second roll: result):
- 4-1 Your commander accused of sexual harrassment by enemy commander - you lose 1d6 VP
- 4-2 Chow is real bad today - all your Infantry units are immobilized for the rest of this turn
- 4-3 Your government falls in a bloody coup - no effect
- 4-4 Dow Jones is up two points today - you gain 1d6 VP from stock options
- 4-5 New king is elected back home - you get 1 free Armour unit from your Mobility Pool
- 4-6 Two of your Infantry units are eaten by land sharks - determine randomly
First roll 5 (second roll: result):
- 5-1 Scud factory on strike - your troops rejoice - you gain 1d6 VP
- 5-2 Nothing worth mentioning
- 5-3 Roll twice more on this table and apply the results of both rolls
- 5-4 An oil-rich country donates lots of money to your cause - you are automatically In Full Supply next turn
- 5-5 Stray Scud missile lands on TV news crew - both sides lose 1d6 VP
- 5-6 Recce unit crossing river meets prominent French scuba diver and gets his autograph - you gain 1d6 VP
First roll 6 (second roll: result):
- 6-1 Your game design wins impromptu contest on the Internet - you gain 1d6 VP
- 6-2 Your OMCL misfires causing all your Infantry units to think they're small bunnies - lose 1d6 VP
- 6-3 President dies leaving vice-president in charge - all your units retreat 1 hex away from enemy
- 6-4 Big inspection coming up - all your Cavalry units are immobilized for the rest of this turn
- 6-5 Glamourous young TV starlet visits your troops and morale soars - you gain 1d6 VP
- 6-6 Glamourous young TV starlet steals all your troops' wallets - you lose 1d6 VP
[10.0] Spaceship Movement
All Spaceship movement takes place during the Spaceship Movement phase. Spaceships may move from any space area to any other space area in one turn. Spaceships may move only one space per turn. Spaceships may not enter planet surface hexgrids.
[10.1] All Spaceships may carry up to 5 Infantry, Guard/Grenadier, Armour, Cavalry, Artillery, Scud, Air, Paratroop/Commando, and/or OMCL units, in any combination. In addition to the 5 units, Spaceships may carry any number of Leaders.
[10.1.1] A Spaceship can pick up friendly units from anywhere on the hexgrid of the planet surface the ship is orbiting, as long as it doesn't exceed the 5 unit load limit.
[10.1.2] A Spaceship can drop off units onto the surface of the planet the ship is orbiting. French units always enter the planet surface hexgrid from the North edge of the map, Austrian units always enter from the South. If there are no open hexes on the entry edge of the map, the units may not leave the Spaceship. For example, if the French player was trying to land troops on Saturn and the Austrian player had units on every hex on the Northern edge of the Saturn surface map, the French player would not be able to disembark the troops.
[10.1.3] OMCL units that are disembarked from transporting Spaceships are dropped off in the orbital space corresponding with the planet where they are to be stationed. OMCL units in the Solar System area are assumed to be orbiting the Earth. OMCL units may be moved freely from one space area to another as often as needed. OMCL units may only move by Spaceship transportation. They have no movement capabilities of their own, and once placed in orbit remain there until moved by a friendly Spaceship. Spaceships may not pick up or transport enemy OMCL units; technically, there's nothing to prevent this from happening, it's just that nobody ever thought about doing this at the time.
[10.1.4] Spaceships that enter orbit around The Bahamas may never leave. Once you get there there's not much incentive to go anyplace else.
[10.2] Example of Spaceship Movement. The Austrian player wants to move some units from Earth to Jupiter. The Austrian ship Personanon Gratus starts the turn in the Solar System (Outer Space) area, which includes orbit around Earth. The ship picks up two Infantry regiments, an Armour regiment, a Cavalry regiment, a Scud, and three Leaders, which were scattered in various hexes on the Earth surface map. The Personanon Gratus, having picked up its cargo, moves from the Solar System area to the Jupiter Orbit area. The ship offloads the two Infantry units, the Scud, and one of the Leaders, which appear on the South edge of the Jupiter surface hexgrid. The Austrian player decides to keep the Cavalry, the Armour, and the remaining two Leaders on the ship to be moved to a different planet next turn.
[11.0] Spaceship Combat
Spaceships may attack any other ship in the same Space area. Spaceships may not attack ships in other Space areas. Ships in the Solar System (Outer Space) are considered to be in the same area, even if some are intended to be orbiting Earth and others are patrolling between planets. Ships may attack friendly ships. Ships do not attack units on planet surfaces. Ships may attack only once per turn, but may be attacked any number of times.
Any number of ships may launch attacks on a given ship, but each attack is resolved separately. Attacks cannot be combined. All Spaceship combat is considered to be simultaneous, so that a ship that is destroyed or moved as a result of combat may still get its attack before it goes away.
The attacking player must declare all the attacking and defending ships he intends to involve in combat before resolving any of the combats, i.e., he can't resolve one combat and then change his mind about the rest of his attacks based on the outcome of the first combat.
Exception: No Spaceship combat may take place in orbit around The Bahamas.
[11.1] Display the Ship Class counters for the attacking and defending ships involved in the combat. Consulting the Spaceship Combat Matrix [11.1.1], find the defending ship's class along the top row. Find the attacking ship's class down the left-hand column of the matrix and roll 1d6. The possible results are:
[11.1.1] A - Attacker Eliminated. The attacking ship is destroyed.
[11.1.2] D - Defender Eliminated. The defending ship is destroyed.
[11.1.3] M - Mutiny. The crew of the attacking ship decides that it's had enough and won't go on. The ship goes into orbit around The Bahamas for the rest of the game and refuses to participate in any more fighting.
[11.1.4] C - Confused. The crew of the defending ship becomes confused and the ship wanders off. Roll 1d6 and consult the Wandering Spaceship Chart [11.1.4.1] to determine the ship's new location.
[11.1.5] P - Pacifists. The crews of both attacking and defending ships suddenly realize the insanity of war and become pacifists. Both ships go into orbit around The Bahamas for the duration of the game.
[11.1.6] N - No effect. Lots of blaster beams and particle torpedoes went back and forth, but no hits were scored. The weapons crews are quite ashamed.
[11.2] If a Spaceship is destroyed in combat, return the Ship Class counter to the appropriate mug, and place the ship counter itself in the owning player's Afterlife Staging Area on Track Sheet #2, in the New Arrivals box.
[11.2.1] Any passenger units aboard a ship that is destroyed end up "washing ashore" on the nearest planet surface, e.g., if a ship orbiting Pluto is destroyed with 4 Infantry units on board, the Infantry would show up on their edge of the Pluto Surface map as if they had disembarked from the ship normally. However, all their luggage was on the ship that got destroyed, which reduces their ability to fight, so all units that "wash ashore" become Disrupted (see rule [15.1]). Since only Infantry, Armour, Cavalry, Paratroop/Commando, and Guard/Grenadier units can become Disrupted (their counters flipped over to their reduced strength side), all other units (Artillery, Air, Scud, Leaders, and OMCL) are unable to continue fighting and all go immediately to The Bahamas to sit out the rest of the war.
[11.3] Leaders have no effect on Spaceship combat. In actuality, the Leader is probably on the command deck of the flagship giving stirring speeches and providing charismatic guidance to his forces, but this is offset by the ship's crew being distracted by yelling at the Leader to get the heck off the bridge and leave everybody alone, so the net effect is that Leaders have none.
[12.0] Planetary Surface Movement
Surface units (Infantry, Artillery, Guard/Grenadier, Para/Commando, Armour, Cavalry, Air, and Scud) each have a number of Movement Points (MP) equal to their Movement Rating. These units execute their movement by shuffling from hex to hex on the Planet Surface maps. Each hex type has an MP cost to enter (see the Terrain Effects Chart [2.2.1]).
Units may move from their current hex to any adjacent hex, providing they have enough MP remaining to enter the next hex, and providing the stacking limit is not exceeded.
[12.1] Stacking Limits. There can never be more than 5 surface units in a single hex at the end of the Movement Phase. Leader units do not count against this 5 unit limit because Leaders usually don't take up that much space. Any number of units may pass through the hex during their movement, but at the end of the Movement Phase there must be no more than 5 surface units in the hex.
[12.2] Partial Hexes. The partial hexes along the edges of the hexgrid maps may be used only if at least half a hex is visible. Units may not enter the edge hexes if there is less than half a hex there. This becomes especially important along the North and South edges of the Other Planet maps, where units are disembarked from transporting Spaceships, so players may wish to discuss which hexes are usable and which are not, before the game starts.
[12.3] Air Unit Movement. When an Air unit moves, its entire supporting airbase is actually being moved from one location to another. The Movement Rating of Air units is correspondingly low, simulating the difficulty in relocating an entire golf course every time the base is moved.
[12.4] Movement on Pluto. Pluto is quite far from the Sun, therefore it is very cold there. To simulate this scientific phenomenon, all surface units on Pluto get 1 extra Movement Point every turn, as the troops are jumping about quite a lot trying to keep warm.
[12.5] Leader Movement. Leaders have unlimited movement within the planet surface hexgrids, i.e., they can move from any hex to any other hex on the same planet, because they get all the best jeeps.
[12.6] Effects of Leaders on Movement. Leaders may have a positive effect on the movement of nearby friendly units, by delivering stirring speeches and inspiring the troops. For instance, King Henry V got his men to move 6 extra hexes at the battle of Agincourt when he delivered this famous speech: "Hey! Let's go fight them French guys!" (abridged translation)
[12.6.1] A Leader may inspire extra movement for a number of friendly units equal to his L rating. The inspired units must start their movement within a number of hexes equal to the Leader's L rating. The extra MP given to each inspired unit is equal to the Leader's L rating.
Example: Napoleon, an L-3 Leader, may inspire extra movement for up to 3 friendly units. Those 3 units must be within 3 hexes of the Napoleon counter. Each of those 3 units would get an extra 3 Movement Points for the turn. Marshall Petain, with only an L-1 rating, can only inspire 1 friendly unit, which must be no more than 1 hex away from Petain, and the inspired unit will only get 1 extra MP.
Terrain has no effect on a Leader's inspiration range.
[12.7] Para/Commando Movement. Paratroops and Commandos are capable of parachuting deep behind enemy lines, in order to create chaos among rear echelon elements and let the air out of the enemy's tires. Para/Commando units have an option of using regular movement or moving by Para Drop. Units may not use regular movement and Para Drop during the same turn.
To perform Para Drop, declare the intended Landing Zone (LZ) hex. The LZ can be any hex on the same planet surface map, as long as that hex is not occupied by enemy units. Roll 1d6 and consult the Para LZ Chart [12.7.1] to determine exactly where the unit ends up.
Units that drift as a result of the Para LZ Chart (in other words, all units that attempt Para Drop) are not affected by terrain during the drop. Units that drift into a hex occupied by enemy units end up in the next clear hex in that direction. Units that would drift off the edge of the map actually end up on the opposite map edge. For example, if the Irvanian Commando unit performed a Para Drop on Pluto and drifted 6 hexes off the Eastern map edge, the unit would actually land on the same row of hexes on the Western edge of Pluto.
Scientific explanation: In reality, if a unit drifted off the edge of the planet while parachuting, it would fly off into space, but the planet's gravity is so strong it would soon draw the unit back to the surface, but since the planet is spinning in space, the unit would end up on the opposite side of the planet.
Errata: We forgot to print the Scatter Diagram on the maps. So sue us! What do you expect for a free game? Give us a break!
[12.7.1] Para LZ Chart
| 1d6 | Actual Landing Spot (roll on Scatter Diagram [12.7.2] for direction) |
|---|---|
| 1 | 2 hexes away |
| 2 | 4 hexes away |
| 3 | 5 hexes away |
| 4 | 6 hexes away |
| 5 | 13 hexes away |
| 6 | The Bahamas |
[12.7.2] Scatter Diagram (1d6)
Transcribed from the printed diagram, which is a ring of six hexes around a centre hex with a north arrow: 1 = North (top), 2 = Northeast, 3 = Southeast, 4 = South (bottom), 5 = Southwest, 6 = Northwest.
[12.8] Units that attempt to cross a river must roll on the River Crossing Attempt Table [12.8.1] to determine the results of the attempt. Units may only attempt a river crossing once per turn.
[12.8.1] Rivers flow from West to East. On the Earth map, the Susquehanna River flows from the map edge Northwest of Chattanooga towards the map edge Northeast of Chattanooga, so units drifting downstream would move from the West edge of the map to the East. Terrain has no effect on the number of hexes that units drift downstream or upstream.
Errata: We forgot to indicate which way the rivers flow on the maps.
[12.9] Units on The Bahamas may move about on the surface but may never leave The Bahamas. See rule [10.1.4].
[12.10] Zones of Control (ZOC). Every surface unit exerts its influence onto the six adjacent hexes, called its Zone of Control (ZOC). However, this has no effect whatsoever on movement, so don't worry about it.
[13.0] Air Attacks
Air units have a choice of attacking with regular combat during the Regular Combat Phase, or using Aerial Bombardment during the Air Attack Phase. Aerial Bombardment works just like regular combat, except it happens earlier in the turn sequence, and Air units can strike enemy units up to 6 hexes away. Terrain has no effect on air strikes. Resolve Aerial Bombardment using the Regular Combat Results Table [15.0.1].
Air units attacking via regular combat may only attack enemy units in adjacent hexes. Air units may not use both regular combat and Aerial Bombardment during the same turn.
Errata: Air attacks have use a combat factor of 3. Air units, when attacked, use a combat factor of 1. Air units using Aerial Bombardment to attack still suffer B, M, and P results on the Regular Combat Results Table, just like ground units.
[14.0] The Scud Launch Attempt Phase
Scud units have a choice of attacking with regular combat during the Regular Combat Phase, or by attempting to launch a Scud missile. Scud units attacking via regular combat may only attack enemy units in adjacent hexes. Scud units may not use both regular combat and launch a missile in the same turn.
When attempting a Scud missile launch, roll 1d6 and consult the Scud Missile Launch Attempt Table [14.0.1]. The results are applied immediately. Any missiles that actually launch successfully will impact later in the Scud Impact Phase. The intended targets of Scud missile attacks need not be declared until the Scud Impact Phase.
[14.0.1] Scud Missile Launch Attempt Table
| 1d6 | Results |
|---|---|
| 1 | Didn't go off for some reason - no launch |
| 2-3 | Seemed to launch okay |
| 4 | Missile explodes on launch pad, destroying Scud unit, all units in the same hex, and all units in the six adjacent hexes |
| 5 | Enemy commandos have apparently replaced the firing electronics with parts from a video game machine - Scud crew is distracted for rest of the turn - no launch |
| 6 | Missile launches successfully but the crew forgot to install the blast shields - Scud unit is destroyed |
[15.0] Regular Combat
Regular combat takes place between units in adjacent hexes. Terrain has no effect on regular combat. Units may only attack once during the Regular Combat Phase, but may be attacked any number of times. No attacks may take place on The Bahamas.
To resolve regular combat, roll 1d6 and consult the Regular Combat Results Table [15.0.1]. Compare the attacking unit's combat factor to the defending unit's combat factor and find the closest odds ratio column on the table, rounding off in favour of the defending unit. Odds worse than 1:3 (attacker's combat factor to defender's combat factor) are considered to be 1:3, odds better than 6:1 are considered to be 6:1. Apply the results of the combat immediately.
A unit may choose to attack all enemy units stacked in a single hex, or may attack only one specific enemy unit in a hex. Several units may combine their combat factors in a single attack against a specific enemy unit or a stack of enemy units. Such attacks are resolved with a single dice roll on the Regular Combat Results Table.
[15.1] Units disrupted or bummed out as a result of combat are flipped over to their Disrupted (reduced strength) side. Only Infantry, Armour, Cavalry, Guard/Grenadier, and Para/Commando units can be disrupted; Artillery, Scud, and Air units are destroyed if they receive a disruption result. Units that are already disrupted (already on their reduced strength side) and receive a second disruption result are destroyed.
[15.0.1] Regular Combat Results Table
| 1d6 | 1:3 | 1:2 | 1:1 | 2:1 | 3:1 | 4:1 | 5:1 | 6:1 |
|---|---|---|---|---|---|---|---|---|
| 1 | A | A | A | D | B | B | B | M |
| 2 | A | M | M | D | D | B | D | M |
| 3 | M | M | D | M |
Combat Odds: attacker's combat ratio to defender's combat ratio.
Modifier to the Regular Combat Results Table: One column shift to the right if the attacking unit is being inspired by a Leader (example: a unit that would normall attack at 2:1 odds would be able to roll on the 3:1 column if it were inspired by a Leader - see Rule [15.3.1]).
Explanation of Regular Combat Results:
- A - Attacking unit destroyed
- D - Defending unit destroyed
- B - Defending unit is bummed out (see Rule [15.1]). If the defending unit is a Scud, Artillery, or Air, it is destroyed. If it is an Infantry, Armour, Cavalry, Guard/Grenadier, or Paratroop/Commando unit, it is flipped over to its disrupted (reduced strength) side, unless it was already disrupted, in which case it's now dead.
- M - Attacking unit mutinies - unit goes to The Bahamas and stays there for the rest of the game
- C - Defending unit gets confused - wanders aimlessly - roll on Para LZ Chart [12.7.1] for final location
- P - Both attacking and defending units all become pacifists and refuse to fight - all go to The Bahamas for rest of the game
- N - No effect
[15.2] OMCL Attacks. The OMCL units do not attack enemy formations directly; rather, OMCLs affect combat by controlling the minds of an enemy unit and forcing them to act against their will. Once during each Regular Combat Phase, an OMCL unit may exert its influence on a single enemy unit on the surface of the planet the OMCL is orbiting. The influenced unit is moved up to 3 hexes in a direction chosen by the player owning the OMCL. This attack is automatically successful and is not affected by terrain or the target's MP.
[15.3] Leaders. Leaders do not attack in regular combat, nor can they be attacked by regular combat. However, they can have an effect on their unit's combat performance (see rule 12.6).
Errata, Rule 15.3.2 (addition): A Leader cannot be attacked in Regular Combat. Leaders who participate in an attack that suffers a B, M, or P result on the Regular Combat Results Table must suffer those results along with the attacking combat units. Leaders who are in a hex that suffers an Artillery or Scud impact, or otherwise roll an ill effect on the Event Table, suffer the same results as the combat units in that hex.
[15.3.1] A Leader may inspire extra heroic combat performance for a number of friendly units equal to his L rating. The inspired units must be within a number of hexes equal to the Leader's L rating. Each inspired unit gets to shift its combat ratio one column to the right (in the attacker's favour). Combined attacks from multiple units may only receive one favourable column shift from leadership. Terrain has no effect on a Leader's inspiration range.
Example: Arch-Duke Robert, an L-3 Leader, may inspire up to 3 friendly units. Those 3 units must be within 3 hexes of the Arch-Duke's counter. Each of those units receive a favourable column shift on the Regular Combat Results Table, unless they were combining to attack a single enemy unit or stack of units, in which case only one column shift would be given for the entire attack. Polk, with only an L-1 rating, can only inspire 1 friendly unit, which must be no more than 1 hex away.
[16.0] Artillery Attacks
Artillery units have a choice of attacking with regular combat during the Regular Combat Phase, or using Long Range Bombardment during the Artillery Attack Phase. Long Range Bombardment works just like regular combat, except it happens earlier in the turn sequence, and Artillery units can strike enemy units up to 2 hexes away. Terrain has no effect on artillery fire missions.
Artillery units attacking via regular combat may only attack enemy units in adjacent hexes. Artillery units may not use both regular combat and Long Range Bombardment during the same turn.
To resolve Long Range Bombardment, roll 1d6 and consult the Artillery Enthusiasm Table [16.0.1]. The results are applied immediately.
[16.0.1] Artillery Enthusiasm Table
| 1d6 | Results |
|---|---|
| 1 | Fire mission conflicts with football game on TV - no artillery attack from this unit this turn |
| 2 | Gun crews busy watching army training film - no artillery attack from this unit this turn |
| 3 | Gun crews partied too hard last night - roll on Para LZ Chart [12.7.1] for actual barrage impact hex |
| 4 | Gun crews in pretty good mood - all units in target hex destroyed |
| 5 | Gun crews really psyched up from army training film - all units in target hex and all six adjacent hexes destroyed |
| 6 | Gun crews are in a bad mood due to their favourite team losing football game on TV - entire unit leaves for The Bahamas |
[17.0] Strategic Level Hand-to-Hand Combat
All surface units (Infantry, Air, Guard/Grenadier, Cavalry, Armour, Paratroop/Commando, Artillery, Scud) may participate in Strategic Hand-to-Hand Combat regardless of what else they did in the turn, unless they are on the Bahamas. Units may only attack adjacent enemy units.
Roll 1d6 and consult the Strategic Level Hand-to-Hand Combat Results Table [17.0.1]. Apply the results immediately.
[17.0.1] Strategic Level Hand-to-Hand Combat Results Table
| 1d6 | Results |
|---|---|
| 1 | Attacking unit eliminated |
| 2 | Defending unit eliminated |
| 3 | Both sides become pacifists and leave for The Bahamas |
| 4 | Both sides roll 1d6, highest roller gets 1 VP |
| 5 | Both sides break for lunch - no effect |
| 6 | Scud missile passing through interrupts the fight - attacking and defending units both become confused and wander aimlessly in a daze - roll on Para LZ Chart [12.7.1] for final locations |
[18.0] Scud Impacts
For every Scud missile that successfully launched during the Scud Launch Attempt Phase, declare the target hex. Roll 1d6 and consult the Scud Impact Table [18.0.1]. Apply the results immediately.
[18.0.1] Scud Impact Table
| 1d6 | Results |
|---|---|
| 1-2 | Scud missile lands on target - all units in target hex destroyed |
| 4-6 | Oooops - consult the Scud Malfunction Matrix [18.0.2] |
Source note: the printed Scud Impact Table has no entry for a roll of 3. It is transcribed as printed; no result is supplied for that roll in the source.
[18.0.2] Scud Malfunction Matrix
| 1d6 | Results |
|---|---|
| 1 | Scud's guidance system is jammed by enemy countermeasures, lands in the hex from which is was launched, destroying all units in that hex |
| 2 | Scud zooms into space and hits a Spaceship in orbit - determine randomly from all ships in orbit around the planet and in the Solar System area - resolve attack on the Spaceship Combat Matrix [11.1.1] with the Scud attacking as it were a Class A Spaceship |
| 3 | Scud missile hits passing albatross in midflight and explodes harmlessly - albatross loses 5 VP |
| 4 | Scud missile lands in The Bahamas - all units on the surface and in orbit around The Bahamas are destroyed and go to their respective Afterlife Staging Areas as New Arrivals |
| 5 | Scud missile lands in Chattanooga, destroying all units in the city |
| 6 | Scud missile flies out of control into Outer Space into the next tactical spaceship game you play, attacking one of the ships in that game. Determine randomly which ship is attacked, resolving the attack as the most powerful weapon available in that game system, through the target ship's most vulnerable area. |
[19.0] Alien Activity
The French and Austrian players each roll 1d6 and consult the Alien Activity Matrix [19.0.1]. Apply the results immediately.
[19.0.1] Alien Activity Matrix
| 1d6 | Results |
|---|---|
| 1 | Aliens land in the same hex as your Commander-in-Chief (L-3) causing chaos and confusion. All units in that hex and all six adjacent hexes wander aimlessly - roll on the Para LZ Chart [12.7.1] for each unit's final location |
| 2 | Aliens laugh hysterically at your infantry's uniforms - you lose 1d6 VP |
| 3 | Aliens fall in love with one of your L-1 leaders (determine randomly) and kidnap him - he is considered dead and moved to the Afterlife Staging Area |
| 4 | Aliens drink some of your deisel fuel and think it's pretty good stuff - you gain 1d6 VP |
| 5 | Aliens infiltrate one of your Spaceships (determine randomly) and force the crew to take the ship to The Bahamas |
| 6 | Aliens infiltrate one of your Spaceship (determine randomly) and decide to redecorate - you maintain control of the ship, but it's class changes - draw a new Ship Class counter for the ship |
[20.0] The Victory Point Assessment Phase
Consult the Victory Point Chalk Up Table [20.0.1] to determine the number of VP accrued at the end of the turn. The first player to accrue 80 VP at the end of the Victory Point Assessment Phase is declared the winner, or the player with the highest score at the end of 20 turns is declared the winner.
A player's VP total can never be less than zero. Any score below 0 is treated as 0, but the opposing player gains the difference. Example: If a player's score is 4, and he loses 10 points, his VP is reduced to 0 and his opponent gains 6 VP.
[20.0.1] Victory Point Chalk Up Table
| Event | VP |
|---|---|
| For each of your Spaceships destroyed this turn | lose 5 VP |
| For each of your non-Spaceship units destroyed this turn | lose 2 VP |
| For every Spaceship you have in orbit around The Bahamas | lose 3 VP |
| For every unit you have on the surface of The Bahamas | lose 1 VP |
| For every city you control (no enemy units in the city) | gain 5 VP |
| For every planet you control (no enemy units on the surface of the planet) | gain 10 VP |
[21.0] Miscellaneous Excuses
Certain areas on the maps and track sheets bear further explanation.
[21.1] The Bahamas
The Bahamas are a wonderful vacation place. Once you go there, you don't want to leave. Any Spaceship that enters orbit around The Bahamas never leaves, and is considered out of the game for VP purposes. Any unit that ends up on the surface of The Bahamas may move around the hexgrid normally, but may never leave, and is considered out of the game for VP purposes. No combat ever takes place on The Bahamas, aside from arguing over who is going to pay for lunch.
[21.2] Mobility Pools
These are simply holding boxes where you put your counters that have not entered the game yet.
[21.3] Afterlife Staging Areas
These are simply holding boxes where you put your counters that have been destroyed in combat, to help you keep track of VP during the game. As units are destroyed for whatever reason, they are placed in the New Arrivals box inside the Afterlife Staging Area, to be counted up during the Victory Point Assessment Phase. Once they have been counted and the VPs racked up, the units are moved from the New Arrivals box into the main portion of the Afterlife Staging Area for the rest of the game.
[22.0] Commonly Asked Questions about Napoleon at Chattanooga
Q. What are the Alien counters used for? A. Uh... nothing really.
Q. Shouldn't there be an index or table of contents or something in the rules? A. Uh... yeah, probably.
Q. How come it takes the same amount of time to launch a Scud as it does to build a spaceship? Are the Scuds really slow or are the spaceship builders really fast? A. Get your hand off my knee.
Q. Aw, c'mon. Why won't you go out with me? A. Leave me alone! I'm calling the police!
Q. Hey? What's the matter? Where are you going? A. Help! Please, somebody help!
[23.0] Designer's Notes
This is a game I've been wanting to write for about five years. Readers of the now-defunct ArmourSoft newsletter, Die Haus Orgel, may remember the on-going drama that unfolded in the "projects in the pipeline" portion of the DIPCo section surrounding what has now become Napoleon at Chattanooga. In the original edition, we were planning to cover the entire battle around Chattanooga at one squad per infantry unit. This unfortunately meant that there would be something like 60,000 counters in the game, and the only way we could have afforded to produce something like that would be if we reduced the map to about 4 inches long and 3 inches wide. That had serious implications in itself, and we had to introduce a stacking limit of about 5 feet just for safety reasons. The inevitable happened and a stack of Bavarian Hussars fell over. Contrary to all the vicious rumours, nobody was killed in the accident. Most of the playtesters were out of the hospital within a week and several of them are walking again.
Later, just as we were starting to convince people that playtesting was a safe and enjoyable endeavor, a typo in an early draft of the rules somehow sucked half our surviving playtesters into a freak rift in the time-space continuum, further delaying the project. In mid-December 1996, members of the Consim-L mailing list on the Internet decided to have a game design contest. The criteria was to come up with a design with 280 counters and 8 pages of rules, and had to be done by the end of the month. The topic was to be the exploraiton and conquest of the Solar System.
Immediately we decided we wanted to participate in this contest, and thought of our non-existent design, Napoleon at Chattanooga. Since the topic of the entry into the contest was supposed to be science fiction, we knew some changes would have to be made. Unfortunately, all this was going on at exactly the same time that the designer's house was being renovated and all his research materials were packed away, so off we went to the best source we knew of for collecting reliable information: Big Al's Discount Scholarly Research Emporium.
At first we were concerned with the information Big Al gave us; he assured us that, indeed, he had provided us with all the quality information he had to offer concerning Napoleon's famous expedition in the Tennessee Valley. We hadn't actually found any other references to this campaign in any of our other sources, but Big Al gave us his word, and that's good enough for us. We weren't even sure when this battle took place, but it must have been after Valmy and before Waterloo, which would place it sometime in 1863. We even asked Big Al if Interstate-24 really did go right through Jupiter. He said yes, he thought so, but probably not during the time covered by the game. Since this is supposed to be a science fiction game, we thought that this little anomaly would be okay.
Credits (section 24.0) omitted: attribution only.
Charts (Chart Booklet)
The Chart Booklet is transcribed here as the game's chart section. Charts already given in the rules text above are: [9.0.1] Event Table, [12.7.1] Para LZ Chart, [14.0.1] Scud Missile Launch Attempt Table, [15.0.1] Regular Combat Results Table, [16.0.1] Artillery Enthusiasm Table, [17.0.1] Strategic Level Hand-to-Hand Combat Results Table, [18.0.1] Scud Impact Table, [18.0.2] Scud Malfunction Matrix, [19.0.1] Alien Activity Matrix, and [20.0.1] Victory Point Chalk Up Table.
[3.0.1] Turn Sequence
Transcribed in full under Section [3.0] above.
[4.3.1] Game Setup Counter Listing Chart
French & Austrians each start with:
| Unit Type | Quantity |
|---|---|
| Infantry | 5 |
| Guard/Grenadier | 1 |
| Cavalry | 4 |
| Armour | 5 |
| Leader | 5 |
Errata: add to the Game Setup Counter Listing Chart: each side also starts with one spaceship. These spaceships start on The Solar System (Outer Space) area of the Other Map.
[5.0.1] Diplomacy Table
| 2d6 | Result |
|---|---|
| 2-7 | All types of attack are allowed |
| 8-9 | No Scud or OMCL attacks are allowed, all other types are allowed |
| 10 | No Spaceship combat is allowed, all other types are allowed |
| 11 | Only Spaceship combat allowed, no other types are allowed |
| 12 | Only Scud attacks allowed, no other types are allowed |
[6.0.1] Economy Table
| 2d6 | Result |
|---|---|
| 2-7 | Serious Recession |
| 8-9 | Runaway Inflation |
| 10-12 | The Economy Is In the Dumpster |
[7.0.1] Supply Table
| 2d6 | Result |
|---|---|
| 2-7 | In Full Supply |
| 8-9 | Out of Supply |
| 10-11 | Really Out of Supply |
| 12 | In Deep Doo-Doo |
[2.7.9] Gratuitous Sex and Violence Table
| 1d6 | Sex | Violence |
|---|---|---|
| 1-3 | Yes | Yes |
| 4-6 | No | Yes |
Source note: this table is printed in the Chart Booklet under the number [2.7.9]; the rules text has no rule with that number. Transcribed as printed.
[8.0.1] Production Table
Read across the Current Supply Condition columns: In Full Supply, Out of Supply, Really Out of Supply, In Deep Doo-Doo. Cross-index the Economic Condition with the 1d6 result.
Serious Recession
| 1d6 | In Full Supply | Out of Supply | Really Out of Supply | In Deep Doo-Doo |
|---|---|---|---|---|
| 1 | 3 Infantry, 2 Cavalry, 1 Artillery, 3 Spaceships | 2 Infantry, 2 Armour, 2 Spaceships | 2 Infantry, 1 Cavalry, 1 Spaceship | 1 Artillery, 1 Scud |
| 2 | 4 Armour, 1 Guard/Grenadier, 1 Air, 2 Spaceships | 2 Infantry, 1 Guard/Grenadier, 1 Artillery, 1 Spaceship | 2 Armour, 1 Guard/Grenadier, 1 Spaceship | 1 Cavalry, 1 Scud |
| 3 | 3 Infantry, 2 Para/Commando, 1 OMCL, 2 Spaceships | 2 Armour, 1 Cavalry, 1 OMCL, 1 Spaceship | 3 Infantry, 1 OMCL | 1 Air, 1 Scud |
| 4 | 2 Armour, 1 Guard/Grenadier, 2 Para/Commando, 1 Spaceship | 2 Armour, 1 Para/Commando, 1 Air, 1 Spaceship | 2 Infantry, 1 Armour, 1 Artillery | 1 Armour, 2 Scuds |
Runaway Inflation
| 1d6 | In Full Supply | Out of Supply | Really Out of Supply | In Deep Doo-Doo |
|---|---|---|---|---|
| 1 | 3 Infantry, 2 Cavalry, 2 Spaceships | 2 Infantry, 2 Cavalry, 1 Spaceship | 2 Infantry, 1 Cavalry | 1 Cavalry, 1 Scud |
| 2 | 3 Armour, 1 Guard/Grenadier, 1 Spaceship | 2 Infantry, 1 Guard/Grenadier, 1 Spaceship | 2 Armour, 1 Guard/Grenadier | 1 Air, 1 Scud |
| 3 | 3 Infantry, 1 Para/Commando, 1 Spaceship | 2 Armour, 1 Cavalry, 1 Spaceship | 3 Infantry | 1 Infantry, 2 Scuds |
| 4 | 2 Armour, 2 Para/Commando, 1 Spaceship | 2 Armour, 1 Para/Commando, 1 Air | 2 Infantry, 1 Armour | 1 Armour, 2 Scuds |
| 5 |
In the Dumpster
| 1d6 | In Full Supply | Out of Supply | Really Out of Supply | In Deep Doo-Doo |
|---|---|---|---|---|
| 1 | 3 Infantry, 1 Cavalry | 2 Infantry, 1 Cavalry | 2 Infantry | 1 Infantry |
| 2 | 3 Armour, 1 Guard/Grenadier | 2 Infantry, 1 Guard/Grenadier | 1 Infantry, 1 Guard/Grenadier | 1 Cavalry |
| 3 | 3 Armour, 1 Para/Commando | 2 Armour, 1 Cavalry | 2 Armour | 1 Air |
| 4 | 4 Cavalry | 3 Infantry | 2 Cavalry | 2 Scuds |
| 5 | 3 Infantry, 1 Air | 2 Infantry, 1 Artillery |
[11.1.1] Spaceship Combat Matrix
Find the defending ship's class along the top row. Find the attacking ship's class and the 1d6 roll down the left-hand column. Results are explained under Rule [11.1].
| Attacking Class | 1d6 | Def. A | Def. B | Def. C | Def. D | Def. E |
|---|---|---|---|---|---|---|
| A | 1 | A | A | D | D | M |
| A | 2 | D | D | D | D | M |
| A | 3 | M | D | D | D | P |
| A | 4 | C | M |
Explanation of Spaceship Combat Results:
- A - Attacking ship destroyed - all passenger units are Disrupted and land on nearby Planet Surface
- D - Defending ship destroyed - all passenger units are Disrupted and land on nearby Planet Surface
- M - Crew of attacking ship mutinies - ship goes to The Bahamas and stays in orbit there for rest of the game
- C - Crew of defending ship gets confused - wanders aimlessly - roll on Wandering Spaceship Chart [11.1.4.1]
- P - Crews of both ships become pacifists and refuse to fight - both ships go to The Bahamas for rest of the game
- N - No effect
[11.1.4.1] Wandering Spaceship Chart
Current Space Area across the top; 1d6 down the side.
| 1d6 | Solar System | Mars Orbit | Jupiter Orbit | Saturn Orbit | Pluto Orbit |
|---|---|---|---|---|---|
| 1 | Mars | Solar System | Mars | Mars | Mars |
| 2 | Jupiter | Jupiter | Solar System | Jupiter | Mars |
| 3 | Jupiter | Saturn | Saturn | Solar System | Jupiter |
| 4 | Saturn | Saturn | The Bahamas | Pluto | Saturn |
[12.7.2] Scatter Diagram (1d6)
See Rule [12.7.2] above.
[12.8.1] River Crossing Attempt Table
| 1d6 | Results |
|---|---|
| 1-2 | Unit crosses as planned |
| 3-4 | Unit drifts 1d6 hexes downstream |
| 5 | Unit drifts 1d6 hexes upstream |
| 6 | Unit becomes disoriented underwater and emerges in the same hex it started in - must end movement there |
Track Sheets
Track Sheet #1
- [3.1.1] Turn Sequence Track: the fourteen phases, numbered 1 to 14, with the Phase 9 and Phase 10 subphases labelled 9a to 9f (French) and 10a to 10f (Austrian). The printed boxes read: 1. Diplomacy Phase; 2. Economy Phase; 3. Supply Phase; 4. Production Phase; 5. Event Phase; 6. French Spaceship Movement Phase; 7. Austrian Spaceship Movement Phase; 8. Spaceship Combat Phase; 9a. French Planetary Surface Movement; 9b. French Air Attacks; 9c. French Scud Launch Attempts; 9d. French Regular Combat; 9e. French Artillery Attacks; 9f. French Strategic Hand-to-Hand Combat; 10a. Austrian Planetary Surface Movement; 10b. Austrian Air Attacks; 10c. Austrian Scud Launch Attempts; 10d. Austrian Regular Combat; 10e. Austrian Artillery Attacks; 10f. Austrian Strategic Hand-to-Hand Combat; 11. Scud Impacts; 12. Alien Activity; 13. Victory Point Assessment; 14. Advance the Game Turn Counter.
- [3.3.1] Victory Point and Game Turn Track: a row of boxes marked 0 to 9 (ones digit) and a row marked 0 to 90 in steps of 10 (tens digit).
- [5.0.2] Diplomacy Track: All Attacks Allowed; No Scud or OMCL Attacks Allowed; No Spaceship Combat Allowed; Only Spaceship Combat Allowed; Only Scud Combat Allowed.
- [6.0.2] Economy Track: Serious Recession; Runaway Inflation; In the Dumpster.
- [7.0.2] Supply Track: In Full Supply; Out of Supply; Really Out of Supply; In Deep Doo-Doo.
Track Sheet #2
Holding boxes for the French and Austrian Mobility Pools and the French and Austrian Afterlife Staging Areas. Each Afterlife Staging Area has a New Arrivals box and a Killed This Turn box (see Rules [21.2] and [21.3] and Rule [11.2]).
Errata Questions and Answers (as of April 15, 1998)
Q. When do spaceships load ground units? A. Spaceships load ground units at the beginning of the owning player's Spaceship Movement Phase.
Q. Can you drop off troops on the same turn that they loaded onto a spaceship? A. No, ground units cannot be unloaded from a transporting spaceship until the turn after they are loaded, or later.
Q. Why? A. Because they have to go through Customs.
Q. What planets can you put newly produced units on? A. New ground units are placed on the Earth map. Exception: if a player controls any hex of the city on Jupiter (even if other hexes of the city are controlled by the other player), new ground units may be placed on Jupiter.
Q. If I line up a bunch of my ground units along my opponent's edge of a planet, does that block him from landing any more ground units on that planet? A. No. If all of the hexes on a player's edge of a planet map are blocked by enemy units, ground units that are off-loaded from spaceships land in the nearest full hex not occupied by enemy units.
Q. Can spaceships attack Orbital Mind Control Lasers? A. No, spaceships cannot attack Orbital Mind Control Lasers. It's not polite.
Q. When do Orbital Mind Control Laser attacks take place? A. Orbital Mind Control Laser attacks take place during the owning player's Regular Combat Subphase.
Q. When "wrapping around" a planet due to Para Drop drift or Artillery scatter or whatever, do you stop counting once you've wrapped around to the opposite side, or do you keep counting hexes until you're reached the total? A. You keep counting.
Q. You sound... slightly hesitant. Are you sure about that? A. Yes, I'm sure.
Q. You have very beautiful eyes, you know. What are you doing tonight? A. Stop it! Leave me alone! Help, police, Q's violating the restraining order again!