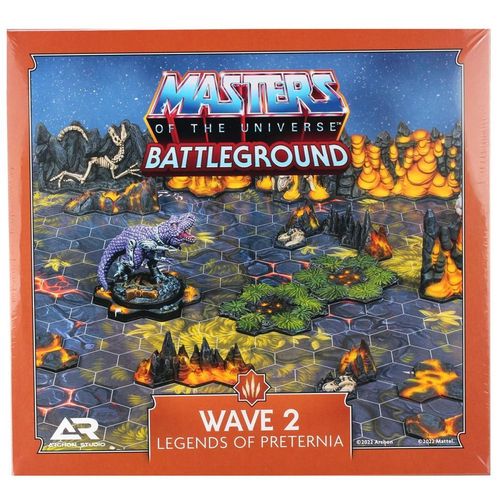
Masters of the Universe: Battleground – Wave 2: Legends of Preternia
Masters of the Universe: Battleground – Wave 2: Legends of Preternia Rulebook
Table of Contents
Table of Contents
Component List
Model
- 1 Tyrantisaurus Miniature
Cards
- 1 Character Card
- 1 Item card
- 2 Weapon Cards
- 10 Behaviour Cards
Terrain
- 4 Low Obstacles (2-hex piece)
- 4 Low Obstacles (3-hex piece)
- 4 High Obstacles (4-hex piece)
- 4 High Obstacles (3-hex piece)
- 2 Smoke Terrain (3-hex piece)
Other
- 2 Swamp Terrain (7-hex piece)
- 2 Lava pit Terrain (3-hex piece)
- 2 Lava pit Terrain (4-hex piece)
- 1 Hexagonal Base
- 1 Debuff-Token
- 1 Battleground (The Desolation)
- 1 Rulebook
- 1 Manual
Preternia Battleground
The combined powers of the Cosmic Key and the Central Tower allows heroes to travel back in time to Preternia! Praternia offers players a new battleground—The Desolation—as well multiple new terrain pieces, such as swamps and lava pits, that can affect characters during their epic battles.
(The source prints "Praternia" in this paragraph; it is kept as printed.)
The Desolation
The new battleground represents one of the most treacherous landscapes in the whole Preternia!
Terrain
This section contains the rules for this expansion's terrain pieces.
Swamp
A swamps is a 7-hex piece of difficult terrain. If the character begins a movement action while occupying a hex that contains difficult terrain, that character's speed value (and focused speed value) is reduced by two for the remainder of that action.
Lava Pit
A lava pit is a 3- or 4-hex piece. If the character enters a hex occupied by a lava pit, their movement immediately ends—this effect is triggered by any type of movement, except jumping and teleporting. If the character ends any type movement (including jumping and teleporting) on a hex occupied by a lava pit, that character receives one wound. If the character ends their activation on a hex occupied by a lava pit, they also receive one wound.
Massive Models are unaffected by lava pits.
Smoke
Smoke is a 3-hex piece that blocks line of sight and provides cover. A character cannot end their movement on a hex occupied by smoke. However, during a move action, the character can spend two movement points to move from any hex adjacent to a portion of a smoke to any other hex that is adjacent to the same portion of that smoke.
Tyrantisaurus
Tyrantisaurus, the main opponent of the hunt game mode (described later), is a massive model and does not belong to the forces of any player. He is also classified as a monster, which contains some unique rules that are described in the following sections.
Monster Basics
Monsters have their own character card and always enter the battleground with all of their basic equipment.
(Tyrantisaurs's character card and basic equipment — image in the source.)
Behaviour Deck
The behaviour deck consists of 10 behaviour cards that are used to control a monster's actions. Each behaviour card has its own initiative, list of the actions performed, and optional bonus.
Monster's Activation
During an activation phase, after each player reveals their selected fate or glory cards, they draw and reveal a single card from the monster's behaviour deck. Behaviour cards are drawn during every activation phase until both players have either passed or are unable to play any more cards.
Monster's First Activation
Until the monster is activated for the first time, all attacks against it are treated as frontal attacks.
Similar to the standard rules, both the players and the monster become active in the order of the initiative values of the revealed cards, from the highest to lowest. Ties between players are broken in favour of the first player. Ties between the player and the monster are broken in favour of the player.
When the monster becomes active, first resolve the bonus section on its revealed behaviour card. If the bonus section is empty, this step is skipped.
After the bonus is resolved, the monster performs all actions listed on the chosen behaviour card, from the top to bottom.
There is no limit to the number of times a monster can activate each round.
IMPORTANT! If the behaviour deck is ever depleted of cards, create a new behaviour deck by reshuffling all the used cards.
Monster Actions
This section describes all the actions a monster can perform as well as the rules for targeting.
Targets
Some actions performed by the monster require a target. By default, the monster's target is the last character activated during the current round. If for any reason the monster cannot perform an action against the default target (or there is no such character), it chooses the closest enemy instead (excluding characters outside the line of sight). If there is no such enemy, the monster skips its action. If there is more than one enemy at the same distance, the monster prioritises those enemies as follows:
- If those enemies belong to different forces, a character from the first player's force is chosen.
- If those enemies belong to the same force, a player who controls this force selects a target from within their force.
Example: Tyrantisaurus performs an attack action. Skeletor is the last activated character so he should be the target. However, Skeletor is outside the Tyrantisaurus' line of sight. The monster is unable to attack its default target, so it attacks the closest enemy instead.
Move
The move action allows the monster to change their position. The monster's movement follows the rules of massive models' movement with the following exceptions:
- This action requires a target.
- Monster always moves toward the target, even if the target is not within line of sight.
- The monster stops moving when it is adjacent to its target. If the monster can position itself in the rear arc of the target, it will do so.
- If the monster cannot reach the target, it moves as close to the target as possible. If one or more positions fulfil the criteria, the player controlling the target chooses which of those positions the monster moves to.
- The monster avoids engaging characters other than the target, even if they do not have enough movement points to reach the target.
- The monster cannot move over high obstacles.
- The monster ignores effects of difficult terrains and lava pits.
- The monster cannot use a focus token to boost its movement action.
A monster's move action ends after the monster uses all of its movement points or it enters a hex adjacent to an enemy.
Example: Tyrantisaurus tries to perform a move action and Skeletor is the target since he was the last activated character. If Tyrantisaurus chooses the shortest path to the target, it ends its move engaged with He-Man.
Fortunately, there is an optional route. Using a longer path Tyrantisaurus managed to reach Skeletor and avoid He-Man.
Tyrantisaurus tries to perform a move action and Skeletor is the target. The monster performs their action even if they are going to suffer attacks of opportunity as a consequence.
Tyrantisaurus starts its movement engaged with He-Man and receives an attack of opportunity. After the attack Tyrantisaurus continues its movement.
Attack
This action allows the monster to attack its target. Attack actions obey the following rules:
- This action requires a target.
- A monster always tries to perform a melee attack against its target. Melee attacks performed by the monster follow the standard rules.
- If the monster cannot perform a melee attack against the target, they perform a ranged attack instead. Ranged attacks performed by the monster follow the standard rules.
- If the monster cannot perform a melee or ranged attack against the target, the monster chooses a different target. The process of choosing a target is described in detail in the "Target" section above.
If there are no available targets, this action ends.
Example: Tyrantisaurus tries to perform move and attack actions. Skeletor is the target.
Tyrantisaurus tries to perform a move and an attack action. Skeletor is the target. Tyrantisaurus uses the shortest possible path and approaches Skeletor; its move action ends as soon as it enters a hex adjacent to Skeletor. Now the monster performs an attack action. It is engaged with the target so it performs a melee attack against Skeletor.
Tyrantisaurus uses the shortest possible path and approaches Skeletor, but it cannot reach him. The monster performs an attack action. Tyrantisaurus is not engaged with the target, but the target is within its line of sight and range of its weapon so it can perform a ranged attack against him.
Focus
By performing this action the monster gains a focus. Place a focus token next to the monster. If the monster has a focus token, it is focused. While the monster is focused, it cannot gain another focus token.
When the focused monster is resolving a test, it must spend its focus token to increase the test's scope by one. The focus token must be spent, even if a game effect prevents it from affecting the scope of a test. After the monster spends a focus token, remove this token from the battleground and place it back in the supply. The monster is no longer focused.
Use an Active Skill
The monster uses one of its skills. If the skill requires a target and its description does not specify what character should be targeted, use a default target.
If a behaviour card orders the monster to use a skill 1, it refers to the upper skill on the character card. If a behaviour card orders the monster to use a skill 2, it refers to the bottom skill on the character card.
The Hunt
The hunt is a new game mode that provides an unique opportunity to challenge a mighty Tyrantisaurus in either a solo, co-op, or semi co-op scenario.
Setup
The hunt mode follows the standard set-up process with few notable exceptions:
- Before players choose their deployment zones, place a character card and basic equipment of the chosen monster between players' play areas. Place the behaviour deck next to it.
- After players choose their deployment zones, place a model of the chosen monster on the spot indicated by the battleground's description and shuffle a behaviour deck.
Scenarios
The hunt mode can be played as three different scenarios each with its own unique mechanics and victory conditions.
Solo
One player gathers their force to hunt down the king of the ancient jungle – Tyrantisaurus. Unlike other scenarios this one was designed only for a single player.
Victory Condition
The player does not collect VPs, to win they must knock out the monster before the end of the fourth round. If this wasn't achieved or all of the player's characters were knocked out, the player loses.
Co-op
Two players combine their force against the beast. During this scenario characters belonging to the force of the other player are treated as allies, not enemies.
Victory Condition
Players do not collect VPs, to win they must knock out the monster before the end of the fourth round. For the purpose of this scenario the monster's health is doubled!
If players don't manage to reach their goals in a given time or at least one of them loses all characters, they both lose the game.
Semi Co-op
Two forces are preparing for the epic combat but they have no idea that the third party is lurking around.
Victory Condition
In this scenario, players can only gain VPs for completing missions on their Glory cards and by dealing wounds to a monster. Players don't receive any VPs for defeating enemy characters or claiming objective tokens. For the purpose of this scenario, the monster's health is doubled!
If one of the players loses all characters, their opponent wins the game. If this does not occur until the end of the fourth round, the player who gathers more VPs, wins the game.
Wounding the Monster
In the semi co-op scenario tokens representing wounds done to the monster must be placed in separate piles (each representing a force participating in the game). At the end of the game each player receives 10 VPs for every wound dealt by their force.
Curse
If the monster takes a wound from a curse, this wound is treated as dealt by the force that has put that curse on the monster.
The Hunt - Battlegrounds
The following battlegrounds are used with The Hunt. Each prints a hex map with deployment zones (not reproduced here) and one setup line.
Welcome to the Jungle
Setup: Place the monster on hex M15.
Brave New World
Setup: Place the monster on a hex C15.
Standard Battlegrounds
Each standard battleground prints a hex map with deployment zones (not reproduced here) and one setup line.
Shallow Water
Setup: Place two initial objective tokens on hexes: E15 and U15.
Inner Sanctum
Setup: Place two initial objective tokens on hexes: K15 and S15.
Lava Pit
Setup: Place two initial objective tokens on hexes: L12 and N19.
Advanced Battlegrounds
Call to Arms
Setup
All forces prepared for this scenario must include exactly four characters without any equipment. The total cost of the chosen characters cannot exceed 75.
Divide items, melee weapons, ranged weapons, and spell weapons into four decks, and place them next to the battleground.
Place six initial objective tokens on hexes: D16, L16, L19, N15, N12 and V15. Those tokens are item tokens.
Place 10 mana tokens on hexes: D11, E20, F15, L12, M7, M23, N19, T16, U10 and V20. Those tokens are weapon tokens. Do not place any additional tokens on the battleground.
Claiming Tokens
Item and weapon tokens can be claimed by following the rules of claiming objective tokens.
During the clean-up phase characters claim one token at the time, starting with the first player and alternating between characters of both players.
Players do not receive any VPs for claiming item or weapon tokens.
After claiming an item token, players draw three cards from an item deck. Characters who claimed the token equips one of those cards, discarding the others.
After claiming a weapon token, players draw three cards from a single category (melee weapons, ranged weapons, or spell weapons). Characters who claimed the token equips one of those cards, discarding the others.
Other Rules
There are no limits to how many and what type of equipment characters can have (characters can even use iconic weapons of other characters).
After knocking out an enemy, a character can take and equip one equipment piece from the knocked out enemy.
Players do not receive any VPs for knocking out enemies.
At the end of the game, each player receives 10 VPs for each item or weapon equipped by their characters (including knocked out characters).
If the description of the iconic weapon refers to the specific character, assume it is referring to its current owner instead.
Trap Jaw does not start with his "Hook Attachment," but he can use a "Grappling Hook" skill without it.
The Defender
Setup
All forces prepared for this scenario must include exactly four characters equipped only with their basic equipment. The total cost of the chosen characters and their equipment cannot exceed 80.
Players do not prepare their own fate and glory decks. During this scenario, they use a shared deck of 60 randomly chosen fate cards.
During setup, players draw 8 fate cards, instead of 5 fate and 2 glory cards.
Divide items, melee weapons, ranged weapons, and spell weapons into four decks, and place them next to the battleground.
Place six initial objective tokens on the battleground on hexes: E14, E22, M19, O12, R24 and T16. Do not place any additional tokens on the battleground.
Players do not choose their deployment zones (those are assigned to them, as depicted on the map above).
Special Rules
Players do not receive any VPs during this scenario.
Players can have up to 10 fate cards (instead of 5). However, they don't draw them during the preparation phase.
At the end of the preparation phase, players can discard up to 3 fate cards. For each card they discard, they draw a random item, melee weapon, ranged weapon, or spell weapon and equip it to any of their characters. Players alternately discard cards one at a time, starting with the first player.
Special Rules for the First Player
At the beginning of the preparation phase (except the first one), draw 2 fate cards for each objective tokens removed from the battleground.
The first player wins the game if their force claims at least five objective tokens or knocks out all enemies.
Special Rules for the Second Player
Characters of the second player cannot claim objectives.
Every character of the second player that is on a hex adjacent to the objective can spend 1 AP to draw 2 fate cards. This action can only be performed once for each objective token per round.
The second player wins the game if at the end of the fourth round the first player has not secured a victory.