Libertadores 1810-1824
Libertadores 1810-1824 Rulebook
Table of Contents
Table of Contents
- 0. Introduction
- 1. Game Components
- 2. Sequence of Play
- 3. Stacking
- 4. Facing
- 5. Zones of Control (ZoC)
- 6. Shock Combat
- 7. Leaders
- 8. Square
- 9. Ambush
- 10. Counterattack
- 11. Activations
- 12. Skirmish
- 13. How to Win
- 14. Scenarios
- General
- Scenario 1 • Ayacucho, Perú, 9th December 1824
- Scenario 2 • Boyacá, Colombia, 7 August 1819
- Scenario 3 • Carabobo, Colombia, 24th June 1821
- Scenario 4 • Viluma (also known as Sipe Sipe), Upper Perú, 29 November 1815
- Scenario 5 • Puente Calderón, México, 11th January 1811
- Scenario 6 • Maipo, Chile, 4th April 1818
- Scenario 7 • Vicalpugio, Upper Peru, 30th September 1813
- Scenario 8 • Chacabuco, Chile, 12th February 1817
- 15. Tables
- Aid Sheet
0. Introduction
Game Scales
- Units: battalions for the infantry, two squadrons for cavalry, and a variable number of pieces for artillery.
- Terrain: each hex is about 150 meters across.
- Time: each turn represents approximately one hour of real time. Each sub phase of the sequence of play is 10 minutes.
Abbreviations Used
- 1D6, 2D6: 1 or 2 six sided die.
- Hex, hexes: hexagon(s).
- Un, Uns: Units.
- ZoC: Zone of Control.
1. Game Components
A complete copy of Libertadores includes eight maps representing the terrain where each battle was fought. The maps have a hexagonal grid superimposed to aid in the positioning and movement of combat units and game markers. There are some Tables and Game Aids used to govern the game's mechanisms, along with 200 cut and paste counters representing the combat units and markers needed to play the game (see figs. 1 and 2).
Note: figs. 1 and 2 are not present in the source document.
2. Sequence of Play
In General
Each scenario or battle of Libertadores is divided in a determined number of turns. Each of these turns is further subdivided in a series of phases or steps during which players perform several game functions.
Sequence of Play
-
Pick Activation Markers. Each player has available 2 gunnery activation markers, 2 movement activation markers and 1 artillery activation marker at the beginning of each turn. During this phase each player chooses 3 markers and puts them in a cup or opaque container.
-
Activations Phase. The 6 markers are selected at random from the container one by one and put in that order on the spaces provided in the activations track (see aid sheet). Every time a marker is taken it must be played accordingly to the rules. When an activation phase is finished, the Activation marker is placed in the activation track. After the last activation marker is played, the Activations Phase ends and play proceeds to the Mutual Phase.
-
Mutual Phase or End of Turn. When the 6 activation markers have been played, the joint End of Phase begins. During this phase, the DS, skirmish (guerrilla) and limbered markers are retired from the map, reinforcements are deployed (see scenarios) and a new turn begins. If it's the last turn, determine if there is a winner of the scenario.
3. Stacking
Placing more than one unit in the same hex is called stacking. In Libertadores it is not possible to put more than one (1) unit per hex, but this limitation is only in effect at the end of the movement sub phase. During movement, the units of the same side can move over/through other units, with the exception of artillery units (see 11.1 Movement Activation).
4. Facing
The 3 top hexes of a unit are the front of that unit, and the 3 bottom hexes are the flank of that unit (see fig. 3 and shock modifiers). The facing of a unit must be determined at the end of the movement sub phase, but it can be modified at the beginning of other movement activations.
Note: fig. 3 is not present in the source document. The Shock Modifiers Table it refers to is also not present (see section 6).
5. Zones of Control (ZoC)
The 6 hexes surrounding a unit are called its Zone of Control or ZoC (see fig. 4). Artillery units cannot voluntarily enter an enemy ZoC. When a unit enters the ZoC of an enemy unit it must stop moving and conduct shock combat (see 6. Shock Combat). After solving shock combat, the unit cannot continue its movement until the next activation marker is drawn.
Shock combat is resolved individually, unit against unit. Although multiple units enter the ZoC of the same enemy unit, the shock combats are solved separately, the results being added at the end of all combats.
Any one unit can receive a disorganized (DS) or decimated (DZ) result only once per turn. If it receives additional DS or DZ results, nothing happens.
Note: fig. 4 is not present in the source document.
6. Shock Combat
In General
The shock combat is part of the movement activation and takes place when a unit finishes its movement whenever it enters an enemy unit's ZoC (see 5. ZoC, and 11. Activations).
Shock Procedure
To solve a shock combat, each player adds 1d6 die roll to the shock factor of his unit, modified by any applicable shock factor modifier (see the Shock Modifiers Table). The 1d6 die roll can be modified as well (see "DS or Ambushed Units Shock Roll Table" and "Assaulting Units Shock Roll Table").
When both players have calculated their unit's shock combat total, it is cross-referenced with the enemy unit's morale factor in the Shock Table. The players compare their respective results and the one with a higher result is the winner. In case of a draw, the attacker is the winner. After that, the winner rolls 1d6 and crosses the result with the difference obtained in the previous step to determine the final result of the shock combat.
Missing from source: the Shock Modifiers Table, the Shock Table, the "DS or Ambushed Units Shock Roll Table" and the "Assaulting Units Shock Roll Table" are referenced in this section but are not included in the source document (they belong to the Tables section, 15, which is absent). The shock combat procedure above is complete as printed; the table values needed to resolve it are not available here.
7. Leaders
Depending on its Activation Factor, Leader units can move and fight once, twice or up to three times per turn. Each time a marker of a side is activated the leader units can use the activation to move and/or fight, provided that its number of activations allows it.
If a leader enters the ZoC of a friendly disorganized unit, the DS marker is removed automatically without waiting for the Mutual End of Phase of the turn. This function can't be used if during the same movement the officer has entered an enemy ZoC.
Leader units can transform a DS result against them into a R+1 result.
8. Square
Infantry units with R or V morale can use a movement activation to form a square. A square marker is placed over that unit.
Effects
Units forming square double their shock factor if shock attacked by enemy cavalry units. If the unit makes any movement the square marker is retired.
9. Ambush
One M (Militia) morale unit located in a wood or mountain hex can launch an ambush attack against R or V morale enemy units entering its ZoC.
Procedure
To perform an ambush, the player rolls 1d6 and must obtain a result of 4, 5 or 6. If it fails the enemy player will use the normal Shock Table, but if the ambush is successful the ambushed player must use the DS or Ambushed Units Shock Combat Roll Table.
Missing from source: the Shock Table and the DS or Ambushed Units Shock Combat Roll Table are not included in the source document (see section 6).
10. Counterattack
If a unit enters the ZoC of multiple enemy units, and these units are not attacked by friendly units other than the one entering the ZoC, after solving the first shock combat the enemy units can make a counterattack with a +2 modifier for each unit. This is the only modifier that can be applied in the counterattack.
If a player decides to not counterattack, his units must retire one hex away from the enemy ZoC.
11. Activations
11.1 Movement Activation
During one movement activation, a player can move one, all or none of his units with the following costs:
- 1 movement point for the artillery
- 2 movement points for the infantry
- 3 movement points for the cavalry and officers
During one movement activation, a unit can't pass through hexes occupied by friendly artillery units.
Each terrain type has a certain Movement Point cost to enter/pass it (see Terrain Effects Chart in the aid sheet, below).
Assault
Once per turn, players can turn one of their movement activations into one assault activation.
Effects: The player has 1 extra movement point for all his infantry, cavalry and officers units, but all the moving units during this activation must end its movement in an enemy ZoC. If during an assault sub-phase a moving unit can't finish its movement in an enemy ZoC, it can not move at all during the activation. Assaulting units must use the Assaulting Units Shock Roll Table (see Play Aid Sheet).
Missing from source: the Assaulting Units Shock Roll Table is not included in the source document (see section 6).
11.2 Musketry Activations
When a gunnery activation marker is drawn, the player can fire with all, some or none of his units with fire factor. Combat units with the "X" symbol can't fire.
Range
The firing range of artillery units is from 2 to 4 hexes. The space between the firing unit and the objective must be free from obstacles; mountains, buildings, and/or friendly/enemy units. Units may fire into, but not through, woods hexes.
Musketry Procedure
The fire factor printed in the unit represents the number that must be obtained with the roll of 2d6 (after applying all applicable modifiers, see the Gunnery Modifiers Table). So, if a unit's fire factor is "9", that unit will hit the enemy if the player obtains a modified final result of 9 or higher with 2d6. If the roll is successful a second die roll with 1d6 is needed to obtain the final result of the artillery fire (see Gunnery Table).
Any firing unit with a DZ (decimated) marker applies a -1 penalty in the Gunnery Results Table.
Missing from source: the Gunnery Modifiers Table, the Gunnery Table and the Gunnery Results Table are not included in the source document (see section 6 note on the Tables section). Musketry fire cannot be resolved from this transcription alone.
11.3 Artillery Activation
During this marker activation the player can fire with all, some, or none of his artillery units.
Procedure
The same as for the gunnery, but with specific modifiers and tables for this unit type (see Artillery Modifiers and Artillery Results Table after the scenarios). The artillery range is from 2 up to 10 hexes.
Each time an artillery unit moves a limbered marker must be stacked with it (with negative consequences, see Artillery Modifiers after the scenarios).
Any unit stacked with a DZ marker applies a -1 penalty in the Artillery Results Table.
Missing from source: the Artillery Modifiers and the Artillery Results Table, which the source places "after the scenarios", are not included in the source document. The source's scenarios section does not contain them.
12. Skirmish
Units with V morale factor can be deployed in skirmish mode during its movement activation.
Conditions: At least one activation marker must be available for the player, and one musketry box must be empty in the activations track.
Procedure: A skirmish marker is placed over the unit as a reminder that the unit can't make more activations the rest of the turn. The unit can now move and make musketry fire in this same activation phase.
13. How to Win
Demoralization Level
Each scenario details the minimum level for each side to achieve demoralized status on the Morale Table (see aid sheet). When the Demoralization Level is reached all the units of this side must retreat 2 hexes at the end of the current activation, although these retreats don't mean further advances in the Morale Track.
All units with V morale are excluded from this mandated retreat if the player decides not to retreat them.
From the moment of demoralization until the end of the scenario all the units of the demoralized side have negative modifiers to the shock combat (see Tables).
Missing from source: the negative shock combat modifiers for demoralized sides are given in the Tables section (15), which is absent from the source document; the values are not reproduced here.
Rout Level
Each scenario details the minimum level for each side to achieve this condition. When a side routs the enemy side wins the scenario being played. If neither side reaches "rout" state after the last activation of the last turn, the game is considered a draw.
14. Scenarios
General
Each scenario simulates one of the battles from the American Wars of Emancipation. The rules for each scenario detail the initial deployment of the units in the map (with the unit's name and a number/letter indicating its location), the Length in turns, reinforcements (if any) with turn of arrival, the Demoralization and Rout levels for both sides, as well as any special rules.
Transcription notes: "Bía." is the printed abbreviation for a battery (artillery) unit. Obvious typographical errors in the source ("Lenght", "Concepciónn", "leaded", "had been" in the Ayacucho introduction) are corrected here. Set-up lists are transcribed as printed.
Scenario 1 • Ayacucho, Perú, 9th December 1824
If fortune is on our side, we will make use of everything, including the devil. If fortune abandons us there will not be another solution but to confront it at the last moment with the knowledge that "destiny awaits". --General Sucre
Historical Introduction. Despite having numerical superiority, the chosen battlefield could not have been worse for the Royalist armies. While their units descended from the Condorcunca heights, they were decimated with ease by the enemy's fire, and it seemed as if their own fire had no effect on the Patriots. Thus, when the Patriots launched their assault, the only thing the Viceroy La Serna could do was to charge at the head of his men. The Spanish fate in America was cast.
Special Rules
- When the Royalist player activates an artillery marker each unit must roll one die. The unit can be activated on a die roll of 4, 5 or 6. On a die roll of 1, 2 or 3 the unit cannot be activated.
- Every time the Royalist player selects one Activation Marker he must choose at least one artillery marker and one movement marker.
- Every time the Royalist player selects one Movement Activation Marker he must advance each unit at least one hex towards Quinzia.
Set Up
Patriots.- Leader Sucre at: 2, Leg. Peruana: 3, 1 Bon.: 4, 2 Bon: 5, 3 Bon.: 6, Vencedor: 8, Fus. Británicos: 7, Bogotá: 14, Pichincha: 10, Voltigueros: 9, Colombia: 11, Granaderos: 13, Junín: 12, Bía.6: 1.
Royalists.- Leader La Serna at A, IM. Alex: B, Castro: C, Cantabria: P, Guías: D, Victoria: O, Infante: E, Gerona: F, Bía. 2: G, Bía. 4: H, Bía. 3: I, Bía. 1: J, Fernando VII: K, Guardia: L, Unión: M, Perú: N.
Scenario Length: 5 turns.
Demoralization and Rout Levels
- Patriots.- Demoralization: 20. Rout: 30.
- Royalists.- Demoralization: 16. Rout: 24.
Scenario 2 • Boyacá, Colombia, 7 August 1819
I swear before the God of my parents, I swear before my honour, and I swear before the fatherland, that I will not give rest to my arm, nor my soul, until I've broken the Spanish chains that oppress us! --Simón Bolívar
Historical Introduction. After the epic crossing of the Andes, Bolívar arrived in Colombia with his reduced army. Many enthusiastic Patriots joined him in front of a surprised enemy, cunningly divided by Bolívar's march. So, when the young Royalist General Barreiro tried to rejoin his main army at Bogotá, the Libertador fell upon him at the bridge of Boyacá. Less than a hundred Royalists managed to escape. Three days later, Bolívar entered in triumph in Colombia's capital, while the brave and inexperienced Barreiro, was executed.
Set Up
Patriots: Leader Bolívar: 4, 1 Bon.: 5, Cazadores: 6, Apure: 1, Fus. Británicos: 7, Leg. Británica: 8, Barcelona: 9, Bravos de Paez: 12, Tunja: 10, Socorro: 11, Llano de Arriba: 2, Carabineros: 3.
Royalists: Leader Barreiro: A, Numancia 1: E, Numancia 2: F, Dragones: B, Rey 1: G, Rey 2: H, Granaderos: C, Bía 1: D, Tambo: I.
Scenario Length: 8 turns.
Demoralization and Rout Levels
- Patriots.- Demoralization: 18. Rout: 24.
- Royalists.- Demoralization: 16. Rout: 22.
Scenario 3 • Carabobo, Colombia, 24th June 1821
With difficulty there will be seen again a braver, faster and steadiest attack; and never had been seen a stronger, firmer and tougher defence. --General San Martín
Historical Introduction. The bravery and spirit of sacrifice among the British troops fighting on the Patriot's side, who would lose almost all of their officers in the war, was eclipsed by one of the most epic feats of the Spanish infantry in all its history. When the Patriot victory was evident, the Valencey battalion covered the Royalist retreat by forming square. Fending off repeated attacks by the enemy's cavalry, infantry, and artillery, its march lasted for 12 kilometres of solid fighting along each step of the way.
Set Up
Patriots.- Leader Bolívar: 4, Apure: 15, Caz. Británicos: 7, Fus. Británicos: 6, Leg. Británica: 5, Venganza: 8, Muerte: 9, Honor: 10, Vargas: 14, Boyacá: 13, Tiradores: 2, Anzoategui: 1, Vencedor: 11, Sagrado: 3.
Royalist.- Leader La Torre: I, Infante: B, Valencey: A, Barbastro: C, Hostalrich: D, Guías: F, Burgos: E, Fco. de Paula: J, L Rey: G, Príncipe: K, Bía. 5: H.
Scenario Length: 10 turns.
Demoralization and Rout Levels
- Patriots.- Demoralization: 27. Rout: 38.
- Royalists.- Demoralization: 30. Rout: 35.
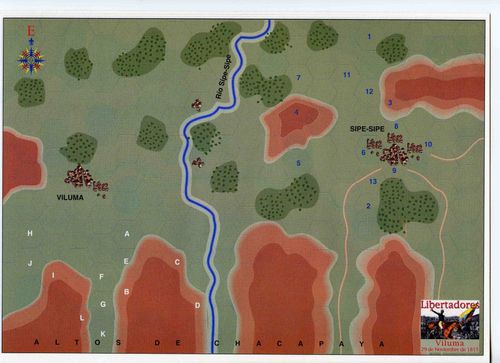
Scenario 4 • Viluma (also known as Sipe Sipe), Upper Perú, 29 November 1815
Historical Introduction. The Patriot general Rondeau's plan to catch the experienced Royalist General Pezuela was too evident, and Pezuela easily evaded the trap, redeploying his troops without much trouble. After some skirmishing, a general assault was initiated, in which the cannons were moved by hand across the river. Brave Patriot counter-attacks could do little against the Royalist human waves. Soon a second front was established, supported by the village and the immediate heights from which a desperate Patriot counterattack was launched, and which ultimately failed. The Royalist victory was total and, for the moment, the vast Peruvian territory was pacified.
Special Rules
- Royalist units start the game facing east. The Patriot forces can face in any direction they want.
- Artillery units can move across river hex sides at the cost of 1 MP (movement point) but if they do so, they will only be able to move during one of the movement activations of their side.
- Artillery units located in mountain hexes can fire to any unit excepting from the ones located immediately behind the woods, buildings or another unit.
Deployment
Patriots.- Leader Rondeau: 8, Balcarce: 2, 1 Bon.: 11, 6 Bon.: 12, 7 Bon: 13, 9 Bon: 14, Cazadores: 7, 12 Bon.1: 9, 12 Bon.2: 10, Gr. a cab.: 1, Bía. 1: 5, Bía. 5: 4, Bía. 6: 6.
Royalist.- Leader Pezuela K, S. Carlos: C, Cochamba: D, Fernando VII: J, Inf. Granaderos: A, Partidarios: B, Bía. 5: E, General: F, Bía 7: G, 2 Línea: H, Cazadores: I.
Scenario Length: 8 turns.
Demoralization and Rout Levels
- Patriots.- Demoralization: 20. Rout: 30.
- Royalists.- Demoralization: 24. Rout: 35.
Scenario 5 • Puente Calderón, México, 11th January 1811
Historical Introduction. In 1937, during the Spanish Civil War, an arrogant Italian general said, "Tomorrow Guadalajara, the next Alcalá, and then we will enter Madrid." The fact was that fate was about to inflict upon him a disaster. More than a century before, in another Guadalajara on the other side of the Atlantic, the insurgent cleric Hidalgo anticipated the Italian. "I'll take breakfast at Calderón, have lunch in Querétaro, and supper in Mexico." He, too, was about to suffer a humiliating defeat.
The Royalist General Calleja, without waiting for the veteran reinforcements under General Cruz, assaulted the Rebels entrenched behind the Lerma river. Only his left flank, led by elite squadrons, seemed to progress well at the battle's start. When its tiny artillery destroyed the gigantic Mexican battery, the Patriot's battle plan began to unravel. The Patriot leaders sought haven in the USA, but were arrested on the way. Hidalgo, deposed from his post in the Catholic Church, was executed on the 30th of June.
Deployment
Patriots.- Leader Hidalgo: 5, Allende: 6, Guadalapuna: 7, Atotonilco: 8, Chamacuro: 9, Irapuato: 10, Alhondiga: 16, Michoacán: 11, Caracuaro: 12, Guanajuato: 13, Tacamboro: 14, Querétaro: 15, Bía.1: 1, Bía.2: 2, Bía.3: 3, Bía 4: 4.
Royalist.- Leader Calleja: A, Carmen: I, España: B, México: C, Frontera: D, Corona: J, Puebla: F, Nueva España: G, Veracruz: H, Bía.6: E.
Scenario Length: 6 turns.
Demoralization and Rout Levels
- Patriots.- Demoralization: 18. Rout: 28.
- Royalists.- Demoralization: 25. Rout: 32.
Scenario 6 • Maipo, Chile, 4th April 1818
Historical Introduction. Exiled and embittered, General San Martín was visited in Paris by his old friend from the battle of Bailén and many others, the Spanish Alejandro Aguado. The General soon learned that his friend was now a famous and wealthy banker. After being asked about this, Aguado said, "Well, when one can't be the Liberator of half of the world, one must content oneself with something!"
The 4th April 1818, the battle was a draw, to the point that the first side that could re-deploy its reserves would carry the day. The Royalist infantry, alone in the open, formed in square, founded on the Burgos, Arequipa, Don Carlos and Concepción battalions. They started a bloody retreat towards Lo Espejo. As San Martín put it after the battle, "They marched leaving behind them a trail of blood and dead, but their ranks never broke".
Deployment
Patriot: Leader San Martín: 3, 11 Bon.: 5, Coquimba: 4, La Patria: 6, Gr. a Caballo 1: 1, Bía.6: 2, 2 Bon.: 8, Los Andes: 9, 8 Bon.: 13, Bía.5: 7, 1 Bon.: 11, 3 Bon: 12, Bía.4: 10.
Royalist.- Leader Osorio: J, Concepción: F, D. Carlos: G, Bía.5: B, Arequipa: D, Burgos: E, Chillan: C, Frontera: A, Bía.3: H, Mixto: I.
Scenario Length: 9 turns.
Demoralization and Rout Levels
- Patriots.- Demoralization: 22. Rout: 32.
- Royalists.- Demoralization: 25. Rout: 28.
Scenario 7 • Vicalpugio, Upper Peru, 30th September 1813
Historical Introduction. General Pezuela, alerted by a loyal Indian chief, that an Argentinean army under General Belgrano was located in the Vicalpugio spring, decided to seek battle, although his situation was not good, with few supplies, and a potentially hostile rearguard.
The continued bombardment against the left and centre of the Royalist forces weakened them so much that the follow-on charges only needed to kill the few fleeing soldiers. But in the middle of the chaos, some Royalist units (Picoaga, Olañeta battalions) stood and died in their positions. It seemed as if their sacrifices would not prevent the victory of General Belgrano, but then something strange happened, something more likely to happen in a movie than in real life. Colonel Castro's Royalist cavalry, until then away from the battlefield on a reconnaissance mission, came to the sound of the guns, and without a clear idea of what was going on, charged furiously into the Patriot's right flank, killing mercilessly and deciding the outcome of the battle. Their deed was not only one of the most brilliant in the history of the Spanish cavalry, but it saved many of their comrades from certain death.
Special Rules
- Starting in the common phase of turn 3, the Royalist player, whenever he wants, can put the Castro unit in any red marked hex and move it freely when a movement marker of his side is activated.
Set Up
Patriot.- Leader Belgrano: 4, Bía.1: 5, Bía.5: 6, Bía.6: 7, Cz. Belgrano 1: 1, Cz. Belgrano 2: 2, Cz. Belgrano 3: 3, 6 Bon.: 9, Forest: 8, Pardos y Morenos: 10, 8 Bon.: 11, Alvarez: 12, 2 Bon.: 13, Roldan: 14, Pedriel: 15.
Royalist.- Leader Pezuela L, Bía.1: D, Bía.5: C, Lima Folañeta: B, Cuzco: G, Picoaga: H, Lombrera: I, Azangaro: J, Desmontado: M, Partidarios: E, Pardos y Morenos: K, La Paz: A, (Castro TURN 3).
Scenario Length: 6 turns.
Demoralization and Rout Levels
- Patriots.- Demoralization: 20. Rout: 30.
- Royalists.- Demoralization: 22. Rout: 34.
Scenario 8 • Chacabuco, Chile, 12th February 1817
Historical Introduction. With San Martín's army concentrated in the Aconcagua valley, the march to Santiago de Chile started. As usual, and perhaps due to an excess of self confidence or perhaps suicidal arrogance, the Royalist general Maroto tried to stop him with clearly inferior forces. San Martín knew about the Royalist's weakness, so hastened his attack by forming his army into 2 columns. One was charged with fixing the enemy in place, while the second would outflank the Spanish. Plans rarely survive contact with the enemy, however. While the first column was clearly defeated, the second one, led by General Soler, didn't appear as planned.
San Martín, leading his own escort and the few reserves, charged against his old comrades from the "French war" in a desperate attempt to salvage something from the looming defeat. Soon after Soler's column finally appeared. The pressure was too much for the Spanish, who slowly retreated towards Chacabuco. There, the Patriot artillery fire and a final charge sealed the Spaniards' fate. The Royalist army lost its opportunity to finish off the Patriot army that the following year would free Chile.
Set Up
Patriot.- Leader San Martín: 1, 11 Bon: 2, Cazadores: 3, Mixto: 4, Gr. a caballo 1: 5, Bía. 6: 9, 7 Bon.: 10, 8 Bon.: 11, Gr. a caballo 2: 6, Bía. 5: 8, Gr. a caballo 3: 7.
Royalists.- Leader Maroto: E, Valdivia: B, Talavera: H, Chiloe: D, Abascal: A, Concordia: I, Concepción: F, Bía. 6: C, Penco: G.
Scenario Length: 7 turns.
Demoralization and Rout Levels
- Patriots.- Demoralization: 24. Rout: 32.
- Royalists.- Demoralization: 20. Rout: 29.
15. Tables
The source document lists this section in its index but does not contain it. The Shock Modifiers Table, Shock Table, DS or Ambushed Units Shock Roll Table, Assaulting Units Shock Roll Table, Gunnery Modifiers Table, Gunnery Table, Gunnery Results Table, Artillery Modifiers, Artillery Results Table and the demoralized-side shock modifiers are all absent from this transcription. They are not reproduced or reconstructed here. A community revision of the rules (BGG item 20550, file 178297) is reported to include the missing tables; it has not been used.
Aid Sheet
Transcribed from a photograph of the printed aid sheet (Ludopress, 2003). The rules above refer to it for the Terrain Effects Chart, the Activation Track and the Morale Chart.
Terrain Effects Chart
MP cost to enter the hex:
| Terrain | Infantry | Cavalry | Artillery | Notes |
|---|---|---|---|---|
| Clear | 1 | 1 | 1 | |
| Wood | 2 | 2 | Forbidden | |
| Buildings | 1 | 1 | When entering a building, a unit must leave it in its next movement activation. | |
| River | 2 | 2 | Only across bridge hexside | |
| Roads | 1 | 1 | 1 | 1 MP for all unit types; ignore any other terrain cost. |
Notes on the chart as printed: the Gorge row's artillery cell reads "Only moving across road hexes, without additional cost". The Bridges row's "12" entries are printed in the deployment-hex key; the photograph does not make clear whether these are hex numbers or key values, so they are transcribed as printed.
Activation Track
Patriots
| Activation | Marker slots 1 | Marker slots 2 |
|---|---|---|
| Movement activation | 1 | 2 |
| Musketry activation | 1 | 2 |
| Artillery activation | 1 |
Royalists
| Activation | Marker slots 1 | Marker slots 2 |
|---|---|---|
| Movement activation | 1 | 2 |
| Musketry activation | 1 | 2 |
| Artillery activation | 1 |
Turn Record Track
Turns 1 through 10 are printed on the track.
Morale Chart
The printed chart lists Morale Track values 1 to 38 (values 1 and 2 in the top-right cells, values 3 to 38 in the grid below). The morale level labels that correspond to these values (the R, V and M levels used in the rules) and the cell-to-level mapping are not legible in the aid sheet photograph and are not reproduced here. The Morale Track values are not stated as a complete table in the source.