InterSpace
InterSpace Rulebook
Table of Contents
Table of Contents
BASIC RULES
Introduction
This is the simplest form of InterSpace. Use the Basic rules if you are a new player just learning the game or if you are an experienced player looking for a lighter game. When you are ready for something meatier try the Standard rules. And once you are comfortable with the Standard Rules, try adding any or all of the optional Advanced rules.
InterSpace is a game of interstellar exploration and conquest for 2 to 4 players. Each player assumes the role of a civilization that has grown beyond its home world and is expanding into space.
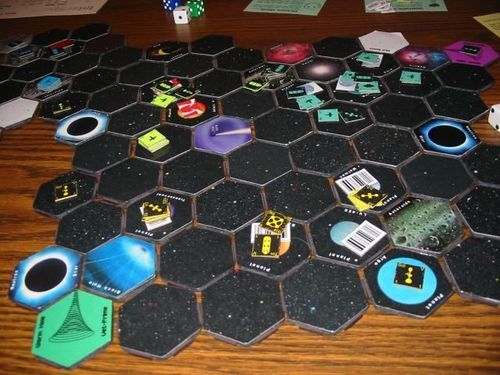
The game is played on a map of hexagon-shaped tiles called hexes. Each hex represents either empty space or an area that contains something interesting such as a planet, nebula, or wormhole.
Each player starts in his or her own separate region of space which consists of 7 hexes. Each region is surrounded by unexplored space. Players expand their regions by exploring and adding new hexes. Eventually players discover each other and their regions become connected in unexpected ways.
Definitions
Industrial Output Units (IOUs): These represent the energy and material cost to build new units. You will not use the IOU counters in the Basic game.
Industrial Level: The industrial level of a home world or colony represents its population and economic base. A planet's industrial and tech levels determine how many and what type of units it can build.
Tech Level: The tech level of a home world or colony represents the technical expertise of its industry. A planet's industrial and tech levels determine how many and what type of units it can build.
Civilization Level: This represents the technical knowledge of your civilization as a whole. Your civilization level is equal to the highest tech level ever achieved by any planet you control. Your civilization level can never decrease, even if you lose control of a planet with a high tech level.
Unit: There are 2 types of units: ships and stations.
Ship: There are 2 classes of ships: warships and civilian ships. Civilian ships are scouts (Sct), transports (Trn), and colony ships (Col). Civilian ship and station counters have a colored silhouette on a black background.
Warship: There are 5 warships: patrol boats (PB), assault boats (AB), destroyers (DD), cruisers (CA), and battleships (BB). Only warships may use their combat rating to attack other units. Only assault boats may conquer another player's planet. Warship counters have a black silhouette on a colored background.
Stations: These are large, space-borne defense and support installations. There are 3 classes of stations: system stations (SS), region stations (RS), and galaxy stations (GS).
Scout (Sct): A spaceship equipped with the sensors and telescopes it needs to explore space. Scouts are the only units that can explore an unknown hex.
Transport (Trn): A large spaceship capable of mining asteroids and trading with your colonies and alien home worlds.
Colony Ship (Col): A spaceship designed to carry resources and sentients to an uninhabited planet to start a new colony. The ship itself is cannibalized when you establish a colony.
Home World: The birthplace of your species.
Colony: A planet populated by immigrants from another planet.
Uninhabited Planet: Any planet drawn from the exploration box is initially uninhabited. You may use a colony ship to colonize an uninhabited planet.
Region: An area of space composed of contiguous hexes completely surrounded by unknown hexes. Each player begins the game in a separate region of space.
Unknown Hex: Any hexagon-shaped area just off the edge of a region is an unknown hex.
Equipment
Hexes
There are 90 hexes in the game: 4 another region, 6 asteroids, 3 black holes, 3 dust clouds, 40 empty space, 4 home worlds, 3 nebulas, 3 neutron stars, 3 null space, 12 planets, 3 pulsars, and 6 wormholes. Each hex type is described in the Terrain section.
Exploration Box
Use an opaque container for the exploration box. The box must be large enough to hold all the hexes.
Unit Counters
Each unit counter represents an individual ship or station. There are 11 types of units in InterSpace. Each type is described in the Unit Table on your Tables Card.
Limit: The number of units you may have in play at any given time is limited by the number of unit counters.
Values: Each counter has its silhouette in the center, its unit type in the upper left-hand corner, its movement rate in the upper right-hand corner, its tech level in the lower left-hand corner, and its combat rating is in the lower right-hand corner. If the unit has shields, its shield rating is shown in parentheses following its combat rating.
V & V/2: A V movement rate means the unit uses your variable movement rate. A V/2 movement rate means the unit's movement rate is 1/2, rounded up, of your variable movement rate. See the Variable Movement rules.
Other Counters
Shield: Use shield counters during a battle to keep track of the number of shields each unit has. See the Combat section.
Ind. Level & Tech Level: Use these counters to track a planet's industrial and tech levels by placing 1 of each type in the numbered track on the planet's data card.
Resource Counters: You will not use the IOU, Ore, or Trade Good counters in the Basic game.
Dice
You will need several 6-sided dice to play InterSpace.
Cards
Tables Cards: Give each player a Tables Card. These cards have the Unit Table, Terrain Effects Table, Transport Bonus Table, and Variable Movement Rate Table printed on one side. These are the only tables you will need in the Basic game.
Planet Data Cards: There are 16 planet data cards; 1 for each planet. Place Ind. Level and Tech Level counters on a card's number track to keep track of your planet's industrial and tech levels. You will not use the box labeled "Resources & New Units" in the Basic game.
Getting Started
Player Setup
Hexes: Each player begins with 7 hexes: 1 home world, 1 planet, 1 asteroids, and 4 empty space. Set your home world hex in front of you and place each of the other hexes next to it. It does not matter how you arrange the hexes as long as you end up with your home world in the center surrounded by the other 6 hexes.
Planet Data Cards: Take the planet data cards for your home world and the planet. Also take 2 Ind. Level and 2 Tech Level counters.
Home World: Your home world begins with an industrial level of 8 and a tech level of 3. Place an Ind. Level counter in the box labeled "8" on your home world's data card and place a Tech Level counter in the box labeled "3".
Initial Colony: The planet is your first colony. It begins with industrial and tech levels equal to 2. Place an Ind. and Tech level counter in the "2" box on the planet's data card.
Units: You start with 3 scouts, 2 transports, and 1 system station. You may place these units anywhere in your 7 hex region.
Exploration Box Setup
Set aside the wormhole hexes Aleph-Null, Bet-Null and Vet-Null. Place all remaining hexes in the exploration box. If there are fewer than 4 players place the extra home world hexes in the box as well.
Game Play
Game Turn
InterSpace is played in a series of game turns. Each game turn is divided into several player turns.
Turn Order
First Player: At the beginning of each game turn, place a unit counter from every player into an opaque container. Then draw 1 counter from the container to determine who takes the first player turn.
Next Player: At the end of each player turn, draw another counter from the container to determine who moves next. If there are no more counters in the container it is time for the next game turn.
Player Turn
Each player turn is divided into 5 steps:
- Economic Step
- Movement Step
- Combat Step
- Exploration Step
- Colonization Step
Step Order: During your player turn you may execute all, some, or none of these steps, but you must execute them in order. For example, you cannot move a scout into an unknown hex, explore the hex, and then move more units into that hex. You must complete the Movement Step before you start the Exploration Step.
Winning the Game
Victory Points: You must earn 50 victory points (VPs) to win the game. You earn 2 VPs for each industrial level you control. For example, at the beginning of the game you control planets with industrial levels totaling 10 (8 for your home world and 2 for your initial colony), so you already start with 20 VPs.
End Game: When you have 50 or more VPs at the end of a game turn, the game is over and you are victorious! If 2 or more players have 50 or more VPs the game ends in a tie.
Economic Step
During your Economic Step, each of your planets may do one (1) of the following:
- Increase its Industrial Level
- Increase its Tech Level
- Build New Units
Increase Industrial Level
You may increase a planet's industrial level if its industrial level is equal to or less than its tech level. Move the Ind. Level marker up 1 step on the planet's data card. A planet's industrial level cannot exceed 8.
Increase Tech Level
You can increase a planet's tech level if its tech level is equal to or less than its industrial level. Move the Tech Level marker up 1 step on the planet's data card. A planet's tech level cannot exceed 8.
Civilization Level: Your civilization level automatically increases to your highest planetary tech level. Your civilization level can never decrease, even if you lose control of a planet with a high tech level.
Civilization Growth Penalty: If increasing a planet's tech level increases your civilization level that planet incurs a penalty. The planet may not increase its industrial or tech level or build any new units on your next turn. To indicate this, flip the planet's Tech Level marker to the Civ Level Penalty side. Flip the marker back to its Tech Level side at the end of the next economic step.
Build New Units
Your planets may build new units. Place new units on the map in the building planet's hex.
Counter Limit: The number of units you may have in play is limited by the number of counters that come with the game. For example, you cannot have more than 2 galaxy stations on the map at any given time.
Tech Level: A planet may build only those units that are rated at, or below, the planet's tech level. For example, a planet with a tech level of 5 cannot build a cruiser because cruisers are tech level 6 units.
IOU Cost: Each unit has an IOU cost. The total cost of the units you build on a planet must be less than, or equal to, the planet's industrial level. (However, see the Transport Bonus rules below.) For example, a planet with an industrial level of 5 and no transport bonus cannot build a scout because a scout costs 6 IOUs. Unspent IOUs are lost.
Unit Tech Levels and Costs
| Unit | Tech Level | IOU Cost |
|---|---|---|
| Scout (Sct) | 1 | 6 |
| Transport (Trn) | 1 | 4 |
| Colony Ship (Col) | 2 | 8 |
| Patrol Boat (PB) | 2 | 2 |
| System Station (SS) | 3 | 6 |
| Assault Boat (AB) | 4 | 6 |
| Destroyer (DD) | 5 | 10 |
| Region Station (RS) | 5 | 12 |
| Cruiser (CA) |
Transport Bonus
You can augment your home world's economy by placing transports in asteroids, colony, and alien home world hexes.
Your Home World: You must have at least 1 transport in your home world's hex to receive any bonuses.
Bonuses: You receive an 8 IOU bonus for each unconquered alien home world where you have a transport, 4 IOUs for each asteroids hex, and 2 IOUs for each colony or conquered planet.
Example: You have a transport in your home world's hex, your first colony's hex, and an asteroids hex. Your home world receives a 6 IOU transport bonus and may build up to 14 IOUs worth of new units each turn.
Extra Transports: Only 1 transport is required to gain a bonus. Additional transports provide no extra benefit.
Trade: You may refuse to trade with another player (and vice versa.) If you refuse to trade with someone he or she cannot count a transport in your home world hex in his or her transport bonus.
Lost Home World: If you lose your home world you may designate one of your colonies or conquered planets to be your home world for the purpose of giving and receiving a transport bonus.
Transport Bonus
| Transport Location | IOU Bonus |
|---|---|
| Your Home World | No bonus, but required |
| Alien Home World | 8 IOUs |
| Asteroids | 4 IOUs |
| Inhabited Planet | 2 IOUs |
Movement Step
During your Movement Step you may move all, some or none of your units. A unit expends 0, 1, or 2 movement points for each hex it enters. The number of movement points a unit expends during your turn may not exceed the its movement rate.
Movement Cost: The movement point cost of each hex is given here and on your Tables Card.
Stop: A unit must stop after it enters an asteroids, black hole, nebula, null space, or unknown hex. A unit must stop in the first hex it enters when it leaves a black hole or nebula hex.
Movement Point Costs
| Hex Type | Movement Point Cost |
|---|---|
| Asteroids | 1 (stop) |
| Black Hole | 0 (stop on entry, roll to exit) |
| Dust Cloud | 2 |
| Empty Space | 1 |
| Nebula | 1 (stop on entry & exit) |
| Neutron Star | 0 |
| Null Space | 1 (stop) |
| Planet | 1 |
| Pulsar | 1 |
| Unknown | 1 (stop) |
| Worm-Hole | 1 |
Movement Rate
The movement rate of each unit is given on the Unit Table on your Tables Card and in the upper, right-hand corner of the unit counter. A unit's movement rate is the number of movement points it may expend during each Movement Step. A unit may expend all, some or none of its movement points each Movement Step. Unused movement points are lost.
Variable Movement Rate: Most of your units have a variable movement rate, V, based on your civilization level. The movement rate of your patrol boats, V+1, is 1 higher than your variable movement rate. The movement rate or your stations and colony ships, V/2, is 1/2, rounded up, of your variable movement rate.
Variable Movement Rates
| Civ Level | V | V+1 | V/2 |
|---|---|---|---|
| 1, 2 | 1 | 2 | 1 |
| 3, 4 | 2 | 3 | 1 |
| 5, 6 | 3 | 4 | 2 |
| 7, 8 | 4 | 5 | 2 |
Wormhole
Movement Cost: A unit must expend 1 movement point to enter a wormhole hex from an adjacent hex. A unit may expend 1 movement point to move from a wormhole hex to its partner. Moving to the partner wormhole is optional; a unit may move normally out of a wormhole hex and into an adjacent hex.
Partners Only: A unit may move from a wormhole to the wormhole's partner and vice versa. Non-partner wormholes are not connected. For example, a unit can move from Aleph-Prime to Aleph-Null or from Bet-Null to Bet-Prime, but it cannot move from Aleph-Prime to Bet-Null.
Black Hole
A black hole hex costs no movement points to enter but you must stop. On subsequent turns, you may roll a die for each unit that wants to leave. If the result is less than, or equal to, the unit's movement rate you may move the unit into an adjacent hex where it then must stop. If the result is greater than the unit's movement rate the unit remains trapped in the black hole. The unit may roll once each Movement Step until it rolls a number low enough to escape.
Dust Cloud
A unit must expend 2 movement points to enter a dust cloud hex. However, it is legal for a scout to enter an unknown hex that turns out to be a dust cloud even if the scout had only 1 movement point left. Also, a unit with a movement rate of 1 may expend its entire movement to enter a dust cloud hex.
Unknown Hex
Only scouts, and units stacked with them, may enter an unknown hex.
Shared Hex-Sides: If possible the unknown hex must share at least 2 hex-sides with "known" hexes. Note that an unknown hex does not become "known" until the Exploration Step. This restriction does not apply if the unknown hex is within 2 hexes of your home world.
Civilization Level: The number of unknown hexes your units may enter each Movement Step may not exceed your civilization level.
No Hexes: If there are no hexes left in the exploration box no unit may enter an unknown hex.
Examine Box: Before moving into an unknown hex you may examine the contents of the exploration box to see if there is anything left worth discovering.
Additional Movement Rules
Stacking: There is no limit to the number of units that may occupy a single hex. Your units may stack and unstack freely during your Movement Step.
Landing: No unit may ever land on a planet.
Patrol Boat Movement
A patrol boat that begins the Movement Step in a hex that contains your home world, colony, or station may move freely. However, a patrol boat that did not begin the Movement Step in a hex with one of your planets or stations must end the Movement Step in a hex that contains one of your planets or stations. Any patrol boat that cannot do so is removed from play.
Movement Example
In this example, your civilization level is 5 so your variable movement rate is 3.
- You must move the patrol boat from the empty space hex to either your home world or to your colony on Zorven.
- Last turn your scout discovered a black hole; this turn you would like to use the scout to explore an adjacent unknown hex. You must roll a die to determine if the scout can leave the black hole. You roll a "3" and move the scout into the unknown hex.
- You want to move a large stack of ships through wormhole Aleph-Prime. However, your opponent has blocked Aleph-Prime with a system station and 2 patrol boats. You decide to leave 2 patrol boats and an assault boat in the hex to counter the blocking units. You then move the remainder of your stack through the wormhole to Aleph-Null.
Blocked Movement
Blocking Units: Opposing warships block the movement of your units. In addition, an opposing station in a wormhole hex blocks your move if you enter the hex from its wormhole partner or if you intend to leave the hex and move to its partner. All other units are non-blocking and you my ignore them for movement purposes.
Moving In: You may freely move your units into a hex that contains another player's units.
Moving Out: You may move your units out of a hex that contains another player's blocking units only if you leave behind at least 1 warship for each blocking unit. For example, if the other player has a cruiser in the hex you may leave a patrol boat and move your remaining units out of the hex.
Combat Step
When your warships occupy a hex that contains opposing warships or stations you must attack all units in that hex. If the hex contains only opposing colony ships, scouts, and/or transports you have the option of attacking or ignoring those units.
Overview
The moving player is the attacker and the other player is the defender.
Resolve combat in a series of rounds. Each round the attacker rolls a die for each attacking warship and the defender rolls a die for each defending unit. If the attacker's die result is less than, or equal to, his or her warship's combat rating the defender must take a number of hits equal to the die result. Likewise, if the defender's die result is less than, or equal to, his or her unit's combat rating the attacker must take a number of hits equal to the die result.
Rounds continue until all units from one side or the other are eliminated or have retreated. Combat also ends if neither side rolls a hit during 3 consecutive rounds.
When the battle is over, if attacking assault boats remain in an opposing player's home world or colony hex the attacker may be able to conquer the planet.
Shields Up! All attacking and defending units begin the battle with all of their shields. Place a number of shield counters equal to each unit's shield rating behind that unit's counter. Shields are not regenerated between combat rounds. You can find the shield rating, if any, of each unit in parentheses in the lower right-hand corner of its counter and in the Unit Table on your Tables Card.
Combat Round
Each combat round is divided into 3 segments:
- Fire
- Resolve Hits
- Retreat
Fire
Attacker: The attacker rolls 1 die for each attacking warship. If the result is less than, or equal to, the warship's combat rating the defender receives a number of hits equal to the die result. For example, your attacking cruiser rolls a "3", so the defender must take 3 hits. If the cruiser had rolled "5" or "6" it would have missed.
Defender: The defender rolls 1 die for each defending unit. If the result is less than, or equal to, the unit's combat rating the attacker receives a number of hits equal to the die result. For example, a defending system station fires and rolls a "2" so the attacker must take 2 hits.
Resolve Hits
Remove Shields & Units: First the attacker removes shields and units from the defender's fleet. Then the defender removes shields and units from the attacker's fleet. Remove 1 shield or 1 unit for each hit you caused to your opponent's fleet. You may remove an opposing unit only after all its shields are gone.
Retreat
First the attacker, and then the defender, may move some of their units out of the shared hex and into a single, adjacent hex.
Screening Units: If you choose to retreat you must leave at least 1 warship behind for each opposing warship in the hex. If you cannot leave the required number of warships behind you cannot retreat.
End of Battle
One Side Gone: Combat rounds continue until all units from one side or the other are eliminated or have retreated.
Stalemate: Combat also ends if neither side rolls a hit during 3 consecutive combat rounds. At this point the attacking player must retreat all his or her units. In this case the attacker is not required to leave any warships behind.
No Warships: If the attacker runs out of warships he or she must retreat all his or her units. In this case the attacker is not required to leave any units behind.
Conquest
Assault Boats: During your Combat Step, if your units are in a hex with an opposing home world or colony, and no opposing units remain in the hex, your assault boats may conquer the planet. Assault boats are the only units that may conquer a planet.
Number: To conquer a planet, you must have a number of assault boats equal to, or greater than, 1/2 of the planet's industrial level. For example, if the planet's industrial level is 5 you must have at least 3 assault boats to conquer it.
Spoils: Take the conquered planet's data card from your opponent. The planet retains its industrial and tech levels.
Combat Example
You moved 2 patrol boats and an assault boat to attack Kevin's system station and 2 patrol boats.
Round 1
Fire: You roll a "2" for your assault boat and a "2" and a "5" for your patrol boats. This causes 2 hits to Kevin's units. Kevin rolls a "1" for his system station, and a "1" and a "5" for his patrol boats causing 2 hits to you.
Resolve Hits: You resolve 2 hits against Kevin by removing both his patrol boats. Kevin resolves his 2 hits against you by removing your assault boat and its shield.
Round 2
Your patrol boats both roll "1"s causing 2 hits while Kevin's system station rolls "4" and misses. You eliminate both of the system station's shields.
Round 3
Your patrol boats roll "1" and "5" causing 1 hit and Kevin's station rolls "1" causing 1 hit. You eliminate Kevin's station and Kevin eliminates 1 of your patrol boats. You have vanquished your foe and have 1 patrol boat remaining in the hex.
Exploration Step
Draw a Hex: A scout that entered an unknown hex during the Movement Step may now explore that hex. For each unknown hex you explore, randomly draw 1 hex from the exploration box.
Another Region: If the hex you draw is a home world or an Another Region hex return it to the exploration box and place an empty space hex under your scout. Then follow the Another Region instructions in the Terrain section.
Other Hexes: If the hex is not a home world or an Another Region hex place it under your scout. If the hex is a wormhole follow the Wormhole instructions in the Terrain section. You can find a detailed description of each hex type in the Terrain section.
Civilization level: During the Movement Phase, the number of unknown hexes your units may enter may not exceed your civilization level.
No Hexes: If there are no hexes left in the exploration box no further exploration is permitted and no unit may enter an unknown hex.
Colonization Step
Establish Colony: If you have a colony ship in an uninhabited planet hex you may establish a new colony. Remove the colony ship and take the planet's data card. Your colony begins with an industrial level of 1 and a tech level of 1.
One Per Planet: Only a single colony may be established per planet. Moving additional colony ships to a colony or home world has no effect.
Terrain
Another Region
All players start the game in their own separate regions of the galaxy. The physical relationship of one region to another becomes known when you draw an Another Region hex from the exploration box. To find out which other region you discovered, and how it will be joined with yours, follow this procedure:
1. Return the Another Region Hex. Do not connect the Another Region hex to your region. Return it to the exploration box instead.
2. Take an Empty Space Hex. Take an empty space hex from the box and place it under your scout.
3. Determine Region. Left or Right: The region you discover will contain the home world of the player to your left or right. Roll a die to determine which one: "1", "2" or "3" for left; "4", "5", or "6" for right.
Example: You move a scout into an unknown hex and draw an Another Region hex. Your region is not yet connected to either the player on your left or on your right so you roll a die to determine which player's region to connect to. The result is "2" so your region will connect to the player on your left.
Already Connected: If your region is already connected to the player on your left your region will automatically connect to the player on your right, and vice versa. If your region is already connected to both of these players' regions you cannot complete this procedure. Continue the game as if you had discovered only an empty space hex.
4. Determine Scout Facing. Away from your Home World: Position your scout in the empty space hex so that it faces away from your home world. If facing your scout away from your home world causes it to point directly between 2 hex sides, roll a die to determine which hex side it will face: "1", "2" or "3" for left; and "4", "5", or "6" for right.
Example: You return the Another Region hex to the exploration box and get out an empty space hex. You place your scout in the empty space hex so that it is facing away from your home world. Since this causes it to face between 2 hex sides you roll a die to determine which hex side it should face. You roll a "4" so your scout will face the hex side to its right.
No Explored Hexes: Your scout must not be facing toward any other hex that is part of your region. If your scout faces an explored hex in your region, at any distance, you cannot complete this procedure. Continue the game as if you had discovered only an empty space hex.
5. Determine Other Home World Hex Side. Roll a Die: Determine which hex side of the other player's home world your scout should be facing. Roll a die to determine which hex side: "1" for the hex side labeled "1", "2" for the hex side labeled "2", and so on. Then move the 2 regions together and join them in such a way that your scout is facing the selected hex side of the other player's home world.
Example: You roll a die and the result is "5". You move your region and the other player's region together so that your scout is facing the other player's home world's hex side number "5".
Overlap: If the two regions cannot be joined because hexes will overlap you cannot complete this procedure. Continue the game as if you had discovered only empty space.
Single Region: The end result of these 5 steps is the 2 regions become a single region shared by both players. All hexes in the joint region are now part of your region.
Asteroids
Asteroids are the stony remnants of a shattered planet. They contain easily accessible mineral resources.
Movement: A unit must expend 1 movement point to enter an asteroids hex where it then must stop.
Mining: If you have a transport in an asteroids hex and a transport in your home world hex your home world receives a 4 IOU transport bonus. See the Transport Bonus rules.
Black Hole
Black holes are collapsed giant stars that exert a powerful gravitational field that is difficult to escape.
Movement: A black hole hex costs no movement points to enter but you must stop after you enter the hex. Roll a die for each unit that attempts to leave a black hole. If the result is less than, or equal to, the unit's movement rate you may move the unit into an adjacent hex where it then must stop. If the result is greater than the unit's movement rate the unit remains trapped in the black hole hex. The unit may roll once during each Movement Step until it rolls a number low enough to escape the black hole.
Dust Cloud
Dust Clouds are regions of space with abnormally high densities of dust and gases.
Movement: A unit must expend 2 movement points to enter a dust cloud hex. However, it is okay for a scout to enter an unknown hex that turns out to be a dust cloud even if the scout had only 1 movement point left. A unit with a movement rate of 1 may expend its entire movement to enter a dust cloud hex.
Empty Space
Empty Space contains nothing useful or interesting.
Movement: A unit must expend 1 movement point to enter an empty space hex.
Home World
Treat a home world hex drawn from the exploration box as an Another Region hex; do not treat it as an uninhabited planet. Follow the Another Region hex rules.
Nebula
Nebulae are clouds of ionized gas that make navigation difficult and combat impossible.
Movement: A unit must expend 1 movement point to enter a nebula hex where it then must stop. A unit may move only 1 hex when it leaves a nebula hex.
Combat: A warship in a nebula hex may not attack any other unit.
Neutron Star
Neutron Stars are collapsed medium-size stars. You may use the strong (but not overpowering) gravitational pull of a neutron star to produce a slingshot effect.
Movement: There is no movement point cost to enter a neutron star hex and no penalty for leaving.
Null Space
Null Space is an inversion of the space-time continuum that precludes the existence of normal matter.
Movement: A unit must expend 1 movement point to enter a null space hex.
Destruction: Any unit that finds itself in a null space hex is immediately eliminated.
Planet
Any planet (other than a home world) you draw from the exploration box is an uninhabited planet.
Movement: A unit must expend 1 movement point to enter a planet hex.
Colonization: You can colonize an uninhabited planet by moving one of your colony ships to the planet's hex. Follow the Colonization Step rules.
Pulsar
Pulsars emit powerful and unpredictable bursts of energy that may destroy unshielded units.
Movement: A unit must expend 1 movement point to enter a pulsar hex.
Destruction: Roll 1 die for each unshielded unit that enters or begins the Movement Step in a pulsar hex. An even result indicates that the unit is destroyed. Unshielded units are scouts, transports, colony ships, and patrol boats.
Wormhole
A wormhole is a trans-dimensional portals to another region of the galaxy. Wormholes always come in pairs: the "Prime" wormhole and its "Null" partner.
Movement
One Movement Point: A unit must expend 1 movement point to enter a wormhole hex from an adjacent hex. A unit may expend 1 movement point to move from a wormhole hex to its partner. Moving to the partner wormhole is optional; a unit may move normally out of a wormhole hex and into an adjacent hex.
Partners Only: A unit may move only between a specific wormhole and the wormhole's partner. Other wormholes are not connected. For example, a unit can move from Aleph-Prime to Aleph-Null or from Bet-Null to Bet-Prime, but not from Aleph-Prime to Bet-Null.
Place Null Wormhole: When you discover a wormhole, place the "Prime" wormhole hex from the exploration box under the discovering scout. Then determine the location of its "Null" partner as follows:
- Select Another Player's Home World. Roll a die to randomly pick another player's home world. The player may be to your left, right, or across from you.
- Select a Home World Hex Side. Roll a second die to pick a hex side from the selected home world.
- Place the "Null" Wormhole. Moving directly away from the selected hex side, place the "Null" wormhole in the first unknown hex you come to.
Example: You move a scout into an unknown hex and draw the wormhole labeled "Aleph-Prime". First, you count off the other players and roll a die to the select one of them. The result is the player on your right. Next, you roll another die to select one of her home world's hex sides and roll "6". Moving directly away from this hex side, you place "Aleph-Null" in the first unknown hex you come to.
Units
Each unit's values are given in the Unit Table on the Basic Tables Card (Tech Level, Attack, Defend, Shields, Movement, IOU Cost).
Scout (Sct) - Tech Level 1, IOU Cost 6, Attack 0, Defend 1, Shields 0, Movement V. A scout is equipped with the sensors and telescopes it needs to explore space. Scouts are the only units that can explore an unknown hex. See the Unknown Hex rules and the Exploration Step rules.
Transport (Trn) - Tech Level 1, IOU Cost 4, Attack 0, Defend 1, Shields 0, Movement V. This is a large spaceship capable of mining asteroids and trading with alien cultures. See the Transport Bonus rules.
Colony Ship (Col) - Tech Level 2, IOU Cost 8, Attack 0, Defend 0, Shields 0, Movement V/2. A colony ship is designed to carry resources and sentients to an uninhabited planet in order to start a new colony. See the Colonization Step.
Patrol Boat (PB) - Tech Level 2, IOU Cost 2, Attack 1, Defend 1, Shields 0, Movement V+1. A patrol boat is a small, fast warship. It can carry only a limited amount of life support so it must return to one of your planets or stations every other turn. See the Patrol Boat Movement rules.
System Station (SS) - Tech Level 3, IOU Cost 6, Attack 0, Defend 2, Shields 2, Movement V/2. A system station is the smallest class of station. You start the game with 1 system station.
Assault Boat (AB) - Tech Level 4, IOU Cost 6, Attack 2, Defend 2, Shields 1, Movement V. An assault boat is a warship capable of atmospheric flight. It is the only unit that can conquer another player's home world or colonies. See the Conquest rules.
Destroyer (DD) - Tech Level 5, IOU Cost 10, Attack 3, Defend 3, Shields 2, Movement V. A destroyer is the third largest class of warship.
Region Station (RS) - Tech Level 5, IOU Cost 12, Attack 0, Defend 4, Shields 4, Movement V/2. A region station is the middle sized class of station.
Cruiser (CA) - Tech Level 6, IOU Cost 14, Attack 4, Defend 4, Shields 3, Movement V. A cruiser is the second largest class of warship.
Battleship (BB) - Tech Level 7, IOU Cost 18, Attack 5, Defend 5, Shields 4, Movement V. A battleship is the largest class of warship.
Galaxy Station (GS) - Tech Level 8, IOU Cost 24, Attack 0, Defend 6, Shields 6, Movement V/2. A galaxy station is the largest class of station.
Basic Tables
Terrain Effects Table
| Terrain | Move Cost | Additional Effects |
|---|---|---|
| Another Region | n/a | Replace with an empty space hex and follow the Another Region procedure. |
| Asteroids | 1-Stop | Transports receive a 4 IOU bonus in Basic game, or may mine for ore in Standard game. |
| Black Hole | 0-Stop | Roll a die when attempting to leave. If the result is less than, or equal to, the unit's movement rate, it may move into the next hex and stop. |
| Dust Cloud | 2 | None |
| Empty Space | 1 | None |
| Nebula | 1-Stop | Combat is not permitted. A unit may move only 1 hex when leaving. A station in a nebula cannot provide support (Standard rules.) |
| Neutron Star | 0 | There is no movement point cost to enter the hex and no penalty for leaving. |
STANDARD RULES
Standard Rules Introduction
Use the these rules once you have mastered the Basic rules or if you are an experienced player and want to jump into a meatier game. Once you are comfortable with the Standard Rules, try adding any or all of the optional Advanced rules.
The Standard rules are complete; you do not need to refer back to the Basic rules.
Here are the differences between the Basic and Standard rules:
Economic Phase: Each turn begins with a joint economic phase in which all players simultaneously conduct the "business" of their civilizations. Planets have more options during this phase than in the Economic Step of the Basic game. Now a planet can save IOUs from one turn to the next and your colonies may produce ore which you can convert into IOUs. A planet may build units and invest in both industrial and tech levels on the same turn. However, you cannot place new units on the map until the turn after you build them. See the Economic Phase rules.
Combat: The combat rules are somewhat different in the Standard rules. Attacker and defender divide their fleets into 3 different battle intensity zones. Higher tech units may receive a first fire advantage each combat round. See the Combat section.
Planetary Conquest: Planets have an opportunity to defend themselves against invading assault boats. See the Conquest rules.
Transports: There is no Transport Bonus in the Standard rules. Now transports mine asteroids for ore and must move the ore to a planet to be refined into IOUs. You may also use your transports to move ore and IOUs between planets. And you may build trade goods to transport to alien trading partners. See the description of transports.
Warships: Destroyers now have the option of attacking protected units, but at the cost of a shield. Cruisers may explore unknown hexes like scouts and they ignore support. And battleships may bombard planets. See the Unit descriptions.
Resource Counters: You will use the IOU, Ore, and Trade Goods counters.
Civilization Growth Penalty: There is no civilization growth penalty in the Standard rules.
Support: Your ships may not move beyond the support range of your planets and stations. In a Standard game you face the challenge of building and defending an infrastructure of colonies and stations in order for your civilization to expand into space. See the support rules.
Contact: Your warships are no longer required to attack alien warships in the same hex. You may choose to coexist peacefully with another player and even defend a shared hex against a third player. See the Contact Step rules.
Standard Definitions
Industrial Output Units (IOUs): These represent the energy and material you need to build units, refine ore, and grow your economy.
Ore: Ore is rich in high-grade metals and may be mined from asteroids and colonies. Ore has no value of its own, but you may refine it into IOUs.
Trade Goods: Trade goods represent miscellaneous consumer or industrial products. Trade goods are inexpensive for you to build but may be quite valuable to an alien empire.
Resource: IOUs, ore, and trade goods are resources and may be carried by transports.
Industrial Level: The industrial level of a home world or colony represents its population and economic base. A planet's industrial level determines how many IOUs (and ore, in the case of a colony) it produces each turn.
Tech Level: The tech level of a home world or colony represents the technical expertise of its industry. A planet's tech level determines the kind of units it can build.
Civilization Level: This represents the technical knowledge of your civilization as a whole. Your civilization level is equal to the highest tech level ever achieved by any planet you control. Your civilization level can never decrease, even if you lose control of a planet with a high tech level.
Home World: This is the birthplace of your species. Your home world produces IOUs but not ore.
Colony: This is a planet populated by immigrants from another planet. A colony has easily accessible mineral resources and produces both IOUs and ore.
Uninhabited Planet: Any planet drawn from the exploration box is initially uninhabited. You may use a colony ship to colonize an uninhabited planet.
Region: This is an area of space that is composed of contiguous hexes completely surrounded by unknown hexes. Each player begins the game in a separate region of space.
Unknown Hex: Any hexagon-shaped area just off the edge of a region is an unknown hex.
Unit: There are 2 types of units: ships and stations.
Ship: There are 2 types of ships: warships and civilian ships. Civilian ships are scouts (Sct), transports (Trn), and colony ships (Col). Civilian ship and station counters have a colored silhouette and a black background.
Warship: There are 5 warships: patrol boats (PB), assault boats (AB), destroyers (DD), cruisers (CA), and battleships (BB). Only warships may use their combat rating to attack other units. Warship counters have a black silhouette on a colored background.
Stations: These are huge, space-borne defense and support installations. A station can provide support to all friendly ships within its support range. There are 3 classes of stations: system stations (SS), region stations (RS), and galaxy stations (GS).
Support Range: The ability of a home world, colony, or station to provide logistical support to your far-flung ships is represented by the planet's or station's support range.
Scout (Sct): This is a spaceship equipped with the sensors and telescopes it needs to explore space. Scouts and cruisers are the only units that can explore an unknown hex.
Transport (Trn): This is a large spaceship capable of moving resources. A transport can hold up to 6 resources in any combination. A transport may also mine asteroids for ore.
Colony Ship (Col): This is a spaceship designed to carry resources and sentients to an uninhabited planet in order to start a new colony. The ship itself is cannibalized when you establish a colony.
Patrol Boat (PB): This is a small, fast warship that is cheap to build but quick to die. A patrol boat can carry only a limited amount of life support, so it must return to a friendly home world, colony, or station every other turn.
Assault Boat (AB): Capable of atmospheric flight, this warship is the only unit that can conquer another player's home world or colonies.
Destroyer (DD): Built for aggressive fighting, this warship may charge into combat and engage protected targets. However, it must give up 1 shield each time it does so.
Cruiser (CA): This warship is designed for long range combat and exploration missions. It is the only ship that can ignore support range and the only ship other than a scout that can explore unknown hexes.
Battleship (BB): The heavy weapons on this warship allow it to bombard a planet. A successful bombardment reduces a planet's industrial level and eliminates all units from the planet's Resources & New Units box.
Standard Equipment
Hexes
There are 90 hexes in the game: 4 another region, 6 asteroids, 3 black holes, 3 dust clouds, 40 empty space, 4 home worlds, 3 nebulas, 3 neutron stars, 3 null space, 12 planets, 3 pulsars, and 6 wormholes. Each hex type is described in the Terrain section.
Exploration Box
Use an opaque container for the exploration box. The box must be large enough to hold all the hexes.
Unit Counters
Each unit counter represents an individual ship or station. There are 11 types of units in InterSpace. Each type is described in the Unit Table on your Tables Card.
Limit: The number of units you may have in play at any given time is limited by the number of counters.
Values: Each counter has its silhouette in the center, its unit type in the upper left-hand corner, its movement rate in the upper right-hand corner, its tech level in the lower left-hand corner, and its combat rating is in the lower right-hand corner. If the unit has shields, its shield rating is shown in parentheses following its combat rating.
V & V/2: A V movement rate means the unit uses your variable movement rate. A V/2 movement rate means the unit's movement rate is 1/2, rounded up, of your variable movement rate. See the Movement Rate rules.
Other Counters
IOU: These counters come in 3 denominations: 1, 5, and 10 IOUs.
Trade Good: Each of these counters represents either 1 or 4 trade goods.
Ore: Each of these counters represents 1 or 4 ore.
Shield: Use shield counters during a battle to keep track of the number of shields each unit has. See the Combat section.
Ind. Level & Tech Level: Use these counters to track a planet's industrial and tech levels by placing 1 of each type in the numbered track on the planet's data card.
Dice
You will need several 6-sided dice to play InterSpace.
Cards
Tables Cards: Give each player a Tables card. These cards have the Unit Table, Terrain Effects Table, Transport Bonus Table, and Variable Movement Rate Table printed on one side, and the Game Play Summary, Tech Level Investment Table, Industrial Level Investment Table, and Asteroid Mining Table on the other. You will not use the Transport Bonus Table in the Standard game.
Planet Data Cards: There are 16 planet data cards, 1 for each planet. Place Ind. Level and Tech Level counters on a card's number track to keep track of the planet's industrial and tech levels. Place resources and newly built units on the card in the box labeled "Resources & New Units".
Standard Getting Started
Player Setup
Hexes: Each player begins with 7 hexes: 1 home world, 1 planet, 1 asteroids, and 4 empty space. Set your home world hex in front of you and place each of the other hexes next to it. It does not matter how you arrange the hexes as long as you end up with your home world in the center surrounded by the other 6 hexes.
Planet Data Cards: Take the planet data cards for your home world and the planet. Also take 2 Ind. Level and 2 Tech Level counters.
Home World: Your home world begins with an industrial level of 8 and a tech level of 3. Place an Ind. Level counter in the box labeled "8" on your home world's data card and place a Tech Level counter in the box labeled "3".
Initial Colony: The planet is your first colony. It begins with industrial and tech levels equal to 2. Place an Ind. and Tech level counter in the "2" box on the planet's data card.
Units: You start with 3 scouts, 2 transports, and 1 system station. You may place these units anywhere in your 7 hex region.
Exploration Box Setup
Set aside the wormhole hexes Aleph-Null, Bet-Null and Vet-Null. Place all remaining hexes in the exploration box. If there are fewer than 4 players place the extra home world hexes in the box as well.
Standard Game Play
Game Turn
InterSpace is played in a series of game turns. Each game turn is divided into 2 phases:
- Economic Phase
- Action Phase
Economic Phase
All players simultaneously conduct the business of their civilization during the Economic Phase. This phase is divided into 5 steps:
- Placement Step
- Production Step
- Purchase Step
- Investment Step
- Conversion Step
Independent Economies: Each of your planets has an entirely independent economy so you may execute all of these steps on a single planet before moving on to the next planet.
Step Order: You may execute all, some, or none of the economic steps for each planet but you must execute them in order. For example, you cannot do the Conversion Step on a planet and later do the Purchase Step on the same planet; you must do the Purchase Step before the Conversion Step.
Rules: See the detailed Economic Phase rules below.
Action Phase
Players take turns moving their units, exploring space, and making contact during the Action Phase. This phase is broken into 5 steps:
- Determine Active Player Step
- Movement Step
- Contact Step
- Exploration Step
- Colonization Step
Step Order: You may execute all, some, or none of the action steps during your turn, but you must execute them in order. For example, you cannot move a scout into an unknown hex, explore the hex, and then move more units into that hex. You must complete the Movement Step before you start the Exploration Step.
Rules: See the detailed Action Phase rules below.
Winning the Game
Victory Points: You must earn 50 victory points (VPs) to win the game. You earn 2 VPs for each industrial level you control. For example, at the beginning of the game you control planets with industrial levels totaling 10 (8 for your home world and 2 for your initial colony), so you already start with 20 VPs.
End Game: When you have 50 or more VPs at the end of a game turn, the game is over and you are victorious! If 2 or more players have 50 or more VPs the game ends in a tie.
Standard Economic Phase
Placement Step
During this step, your home world and colonies may place units they built during previous turns onto the map. In other words, you may move units from a planet's data card to that planet's hex on the map. This is strictly optional; you may leave units on a planet's card for as long as you wish. Opposing units in the planet's hex have no affect on placement.
Production Step
During this step, your home world and colonies produce IOUs. In addition, your colonies and any asteroids you are mining produce ore.
Planets
Home World: Your home world produces the number of IOUs equal to its industrial level. Place these IOU counters in the box labeled "Resources & New Units" on your home world's data card.
Colony: Each of your colonies also produces the number of IOUs equal to its industrial level. In addition, an eligible colony has the option of producing the number of ore up to 1/2 its industrial level, rounded up. Place these IOU and ore counters in the box labeled "Resources & New Units" on the colony's data card.
Ore Depletion: After a colony produces ore roll 2 dice. If the result is less than, or equal to, the amount of ore produced the colony may no longer produce ore.
Asteroid Mining
Mining: Once each Economic Phase, your transports may mine ore from each asteroids hex they occupy. Any ore produced must be loaded onto a transport immediately or it is lost.
Mining Table: Roll 1 die and add the result to the number of transports you have in the hex. Find the corresponding number in the left-hand column of the Asteroids Mining Table. Then look up the amount of ore in the right-hand column. For example, if you have 2 transports mining an asteroids hex and you roll a "3", the total is 5 so 2 ore are produced.
Alien Transports: Subtract 2 from the die roll for each alien player who has 1 or more transports in the asteroids hex. For example, if you have 3 transports in the hex and Roger has 4 you would add only 1 to your mining die roll (+3 for your transports, -2 for Roger.)
Accidents: If the modified mining die result is 2 or less one (1) of your transports is destroyed. You choose which transport to remove. Any resources onboard are lost.
Asteroids Mining Table
| Modified Die Roll | Result |
|---|---|
| 2 or less | Lose 1 transport |
| 3 | No ore produced |
| 4, 5, or 6 | 2 ore produced |
| 7 or more | 4 ore produced |
Purchase Step
During this step, your home world and colonies may spend IOUs to purchase new units and trade goods.
New Units: Place new units in the Resources & New Units box on the data card of the planet that purchased the units. A planet may purchase only those units that are rated at, or below, the planet's tech level. For example, a tech level 3 planet cannot purchase a destroyer because destroyers are tech level 4 units. The tech level and IOU cost of each unit is given here and on your Tables card.
Unit Tech Levels and Costs
| Unit | Tech Level | IOU Cost |
|---|---|---|
| Scout (Sct) | 1 | 6 |
| Transport (Trn) | 1 | 4 |
| Colony Ship (Col) | 2 | 8 |
| Patrol Boat (PB) | 2 | 2 |
| System Station (SS) | 3 | 6 |
| Assault Boat (AB) | 4 | 6 |
| Destroyer (DD) | 5 | 10 |
| Region Station (RS) | 5 | 12 |
| Cruiser (CA) |
Trade Goods: You may purchase trade goods for 1 IOU each on any of your planets. Unlike units, you may place trade goods on the map the same turn you purchase them; you do not have to wait until the Placement Step of a later turn. Trade goods are tech level 1.
Build Limit: The total number of units and trade goods a planet purchases in a single turn may not exceed its industrial level.
Local Economy: A planet may spend IOUs only from its own Resources & New Units box; it may not spend IOUs from another planet.
Counter Limit: The number of units you may have in play is limited by the number of counters that come with the game. For example, you cannot have more than 2 galaxy stations on the map at any given time.
Rebuild: If a unit is destroyed or a trade good refined, you may rebuild that unit or trade good on the next turn. For example, if you built 2 galaxy stations and 1 was destroyed last turn you may build a third galaxy station.
Recall Trade Goods: If you want to build more trade goods than you have available you may recall trade goods of your color that are held by another player. Simply take the trade goods you need from the other player and place them on the planet that is building them. The purpose of this rule is to prevent another player from holding your trade goods indefinitely. You may not recall your trade goods if you could build them from the counters you already hold.
Investment Step
During this step, each planet you control may increase or decrease its industrial level, tech level, or both by one (1) step. You may increase or decrease levels in any order.
Increase Levels
Industrial Level: The cost of increasing a planet's industrial level is given here and on your Tables card. The cost depends on the planet's current industrial and tech levels. Find the planet's current industrial level in the table and then find its tech level next to it. The cost of increasing the planet's industrial level will be to the right of its tech level in the IOU Cost column. For example, if you want to increase your planet's industrial level from 4 to 5, and its tech level is 3, you must pay 6 IOUs.
Industrial Level Investment Costs
| Ind. Level Change | Planet Tech Level | IOU Cost |
|---|---|---|
| 1 to 2 | 1 | 4 |
| 2 | 2 | |
| 3+ | 1 | |
| 2 to 3 | 1 | 9 |
| 2 | 4 | |
| 3 | 2 | |
| 4+ | 1 | |
| 3 to 4 | 1 | 16 |
| 2 |
Tech Level: The cost of increasing a planet's tech level is given here and on your Tables card. This cost depends on the planet's current tech level and your civilization level. To determine the cost, find the planet's current tech level in the table and then find your civilization level next to it. The cost of increasing the planet's tech level will be to the right of your civilization level in the IOU Cost column. For example, if you want to increase your planet's tech level from 2 to 3, and your civilization level is 4, you must pay 2 IOUs.
Tech Level Investment Costs
| Tech Level Change | Civ. Level | IOU Cost |
|---|---|---|
| 1 to 2 | 1 | 4 |
| 2 | 2 | |
| 3+ | 1 | |
| 2 to 3 | 2 | 9 |
| 3 | 4 | |
| 4 | 2 | |
| 5+ | 1 | |
| 3 to 4 | 3 | 16 |
| 4 |
Immediate Result: Tech level changes go into effect immediately. You may increase a planet's tech level and then use the new, higher level to determine the cost of an industrial level increase on the same turn. Likewise, if you increase your civilization level by increasing a planet's tech level you may use the new, higher civilization level to determine the cost of a tech level increase on another planet.
Limit: The maximum industrial or tech level a planet can attain is 8.
Local Economy: A planet may spend IOUs only from its own Resources & New Units box; it may not spend IOUs from another planet.
Civilization Level: Your civilization level automatically increases to your highest planetary tech level. Your civilization level can never decrease, even if you lose control of a planet with a high tech level.
Decrease Levels
No Cost: There is no cost to decrease a planet's industrial or tech level, but you may decrease each level by only one (1) step per turn. You do not receive any IOUs for decreasing a level. You may not decrease a planet's tech level to 0 except by reducing its industrial level to 0.
Industrial Level Zero: If you reduce a planet's industrial level to 0 its tech level automatically falls to 0 and the planet becomes uninhabited. You or another player may recolonize the uninhabited planet.
Conversion Step
Your planets may convert ore, trade goods, and units into IOUs.
Ore
A home world or colony may refine ore into IOUs by first paying 2 IOUs for each ore. Then roll a die for each ore you paid to refine. The total of the die results is the number of IOUs you receive. Remove the spent IOUs and the refined ore counters from the planet's Resources & New Units box and replace them with a number of IOUs equal to the die result total.
Trade Goods
A home world or colony may convert trade goods into IOUs at no cost. Remove the converted trade goods counters from the planet's Resources & New Units box and replace them with the correct number of IOU counters. The number of IOUs you receive depends on whether the trade goods are alien or local.
Local Trade Goods: Local trade goods are those trade goods purchased by a planet you control. The trade good counters will be your color. You receive one (1) IOU for each local trade good you convert.
Alien Trade Goods: Alien trade goods are those trade goods purchased by a planet another player controls. The trade good counters will be a color different than your own. Roll a die for each alien trade good you convert. The resulting total is the number of IOUs you receive.
Units
A home world or colony may decommission your units that are located in the planet's hex. Remove the unit from the map. In the planet's Resources & New Units box, place IOUs equal to 1/2 of the unit's original cost.
Economic Phase Example
The following is an example of what you might do during the Economic Phase of the first turn of InterSpace. In this example, you will conduct economics on your home world first and then on your colony.
Home World
Production Step: Since there are no units in your home world's Resources & New Units box you skip the Placement Step. Your home world has an industrial level of 8, so it produces 8 IOUs during the Production Step. Place 1 "5 IOU" counter and 3 "1 IOU" counters in the Resources & New Units box on your home world's data card.
Purchase Step: Next, you decide to buy a scout during the Purchase Step. According to the Unit Table, a scout is tech level 1 and costs 6 IOUs. So you remove 1 "5 IOU" and 1 "1 IOU" counter and place a scout counter in your home world's Resources & New Units box. You may move the scout into your home world's hex during a later turn's Placement Step.
Completion: Finally, you decide to save the remaining 2 IOUs and skip the Investment and Conversion Steps, completing the economic steps for your home world.
Colony
Production Step: Again there are no units in your colony's Resources & New Units box so you skip the Placement Step and go straight to the Production Step. Your colony has an industrial level of 2 so it produces 2 IOUs and 1 ore.
Conversion Step: You decide to skip the Purchase and Investment Steps and use your IOUs for the Conversion Step. You spend 2 IOUs to convert 1 ore. You roll a die and the result is a "5" so your colony ends the Economic Phase with 5 IOUs and no ore in its Resources & New Units box.
Phase Completion
While you are doing the economic steps on your planets all other players will be doing the economic steps on their planets. When everyone has completed the economic steps for all their planets the Economic Phase is over and it is time to begin the Action Phase.
Standard Action Phase
Players take turns moving their units, exploring space, and making contact during the Action Phase. This phase is broken into 5 steps:
- Determine Active Player Step
- Movement Step
- Contact Step
- Exploration Step
- Colonization Step
Determine Active Player Step
When the Action Phase begins, each player must place 1 of his or her unit counters into a cup. Then draw 1 counter from the cup to see who moves first. When the first player is done moving, draw another counter to see who moves second, and so on until everyone has had a turn.
Movement Step
During your Movement Step you may move all, some or none of your units. A unit expends 0, 1, or 2 movement points for each hex it enters. The number of movement points a unit expends during your turn may not exceed the its movement rate.
Movement Cost: The movement point cost of each hex is given here and on your Tables Card.
Movement Point Costs
| Hex Type | Movement Point Cost |
|---|---|
| Asteroids | 1 (stop) |
| Black Hole | 0 (stop on entry, roll to exit) |
| Dust Cloud | 2 |
| Empty Space | 1 |
| Nebula | 1 (stop on entry & exit) |
| Neutron Star | 0 |
| Null Space | 1 (stop) |
| Planet | 1 |
| Pulsar | 1 |
| Unknown | 1 (stop) |
| Worm-Hole | 1 |
Stop: A unit must stop after it enters an asteroids, black hole, nebula, null space, or unknown hex. A unit must stop in the first hex it enters when it leaves a black hole or nebula hex.
Movement Rate
The movement rate of each unit is given on the Unit Table on your Tables Card and in the upper, right-hand corner of the unit counter. A unit's movement rate is the number of movement points it may expend during each Movement Step. A unit may expend all, some or none of its movement points each Movement Step. Unused movement points are lost.
Variable Movement Rate: Most of your units have a variable movement rate, V, based on your civilization level. The movement rate of your patrol boats, V+1, is 1 higher than your variable movement rate. The movement rate or your stations and colony ships, V/2, is 1/2, rounded up, of your variable movement rate.
Variable Movement Rates
| Civ Level | V | V+1 | V/2 |
|---|---|---|---|
| 1, 2 | 1 | 2 | 1 |
| 3, 4 | 2 | 3 | 1 |
| 5, 6 | 3 | 4 | 2 |
| 7, 8 | 4 | 5 | 2 |
Black Hole
A black hole hex costs no movement points to enter but you must stop. On subsequent turns, you may roll a die for each unit that wants to leave. If the result is less than, or equal to, the unit's movement rate you may move the unit into an adjacent hex where it then must stop. If the result is greater than the unit's movement rate the unit remains trapped in the black hole. A unit may make only 1 attempt to leave the black hole each turn.
Dust Cloud
A unit must expend 2 movement points to enter a dust cloud. However, it is legal for a scout or cruiser to enter an unknown hex that turns out to be a dust cloud even if the scout had only 1 movement point left. Also, a unit with a movement rate of 1 may expend its entire movement to enter a dust cloud hex.
Wormhole
Movement Cost: A unit must expend 1 movement point to enter a wormhole hex from an adjacent hex. A unit may expend 1 movement point to move from a wormhole hex to its partner. Moving to the partner wormhole is optional; a unit may move normally out of a wormhole hex and into an adjacent hex.
Partners Only: A unit may move from a wormhole to the wormhole's partner and vice versa. Non-partner wormholes are not connected. For example, a unit can move from Aleph-Prime to Aleph-Null or from Bet-Null to Bet-Prime, but it cannot move from Aleph-Prime to Bet-Null.
Unknown Hex
Only scouts and cruisers, and units stacked with them, may enter an unknown hex.
Shared Hex-Sides: If possible the unknown hex must share at least 2 hex-sides with "known" hexes. Note that an unknown hex does not become "known" until the Exploration Step. This restriction does not apply if the unknown hex is within 2 hexes of your home world.
Civilization Level: The number of unknown hexes your units may enter each Movement Step may not exceed your civilization level.
No Hexes: If there are no hexes left in the exploration box no unit may enter an unknown hex.
Examine Box: Before moving into an unknown hex you may examine the contents of the exploration box to see if there is anything left worth discovering.
Patrol Boat Movement
A patrol boat that begins the Movement Step in the same hex as a friendly home world, colony, or station may move freely. However, a patrol boat that did not begin the Movement Step in a hex with a friendly planet or station must end the Movement Step in a hex with a friendly planet or station. Any patrol boat that cannot do so is removed from play.
Friendly Planet or Station: Any planet or station you control is friendly to your patrol boats. In addition, another player may declare 1 or more of his or her planets or stations friendly to your patrol boats. This declaration must be made by the other player at the beginning of your Movement Step every game turn.
Transport Movement
Stop on Unload: A transport may load and/or unload resources at any point during its movement. However, once a transport unloads any resource, it must stop and may not move farther for the rest of the turn.
Resources Stop: Resources may be transferred between consenting transports and/or planets. Once you have transferred a resource it cannot be moved again during your Movement Step.
Blocked Movement
Blocking Units: Opposing warships may block the movement of your units. In addition, an opposing station in a wormhole hex may block your move if you enter the hex from its wormhole partner or if you intend to leave the hex and move to its partner. All other units are non-blocking and you may ignore them for movement purposes.
Moving In: You may freely move your units into a hex that contains another player's units.
Moving Out: You may move your units out of a hex that contains another player's blocking units if at least 1 of the following conditions is met:
- the unit you intend to move started the Movement Step in the hex
or
- the other player gives you permission to leave
or
- you leave at least 1 warship in the occupied hex for each blocking unit the other player has there. For example, if the other player has 2 cruisers in the hex you may leave 2 patrol boats and move your remaining units out of the hex.
Permission: If the other player gives you permission to move out of a hex any of your units may move out of the hex for the remainder of your Movement Step. The other player cannot pick and choose which of your units can leave and which ones cannot.
Additional Movement Rules
Stacking: There is no limit to the number of units you may stack in a single hex. Your units may stack and unstack freely during your Movement Step.
Landing: No unit may ever land on a planet. Only newly built units may be held on a planet's data card.
Support Range: You may not move a ship into a hex if the hex is not inside the support range of at least 1 friendly planet or station. You may not move a station if the move would cause a ship to no longer be inside the support range of at least 1 friendly planet or station. See the Support Range rules.
Movement Example
In this example, your civilization level is 5, so your variable movement rate is 3.
- The transport in the asteroids hex mined ore during the Economic Phase and now you want to move the ore to your home world. You move the transport, and the ore counters stacked under it, to your home world's hex and transfer the ore counters to the Resources & New Units box on your home world's data card. Although the transport used only 1 of its 3 movement points it must stop moving when it unloads.
- You must move the patrol boat from the empty space hex to either your home world or to your colony on Zorven.
- Last turn your scout discovered a black hole; this turn you would like to use the scout to explore an adjacent unknown hex. You must roll a die to determine if the scout can leave the black hole. You roll a "3" and move the scout into the unknown hex.
- You want to move a large stack of ships through wormhole Aleph-Prime. However, your opponent has blocked Aleph-Prime with a system station and 2 patrol boats. You decide to leave 2 patrol boats and an assault boat in the hex to counter the blocking units. You then move the remainder of your stack through the wormhole to Aleph-Null.
Contact Step
Shared Hexes
Contact is made in every hex your units share with units that belong to one or more other players. During your Contact Step, you must either join forces with or attack the other units in every hex you share. You may attack only if you have warships. You determine the order in which these shared hexes are resolved.
Join Forces
Permission Granted / Mutual Defense: If all other players who have units in the shared hex give you permission to join forces with them your units may remain in that hex without attacking. If the hex is attacked later by another player all units in that hex must defend it.
Not an Alliance: Sharing a hex does not mean you have a permanent alliance. You may share one hex with someone while attacking his or her units in another. In addition, a player who allows you to share a hex may attack your units in that hex on his or her next or any subsequent Contact Step.
Example: You wish to help your neighbor, Lisa, defend her home world against an imminent attack by the mutually-feared Dean. During your Movement Step you move several ships to Lisa's home world. During your Contact Step, Lisa gives your ships permission to join forces with her units in that hex. When Dean attacks Lisa's home world both your units and Lisa's units defend the shared hex.
Permission Denied: You can deny permission for another player to remain in a shared hex during that player's Contact Step, forcing that player to attack your units in the hex. If that player has no warships follow the Counter Attack rule.
Example Continued: After defeating Dean, Lisa moves most of her units away from her home world hex which she still shares with your units. During Lisa's Contact Step, you deny permission for her units to remain in the shared hex. Lisa is forced to attack your units and loses, leaving you in a position to easily conquer her home world on your next turn. It is not very nice, but perfectly legal.
Attack
If you choose to attack follow the Combat rules.
Exploration Step
Draw a Hex: A scout or cruiser that entered an unknown hex during the Movement Step may now explore that hex. For each unknown hex you explore, randomly draw 1 hex from the exploration box.
Another Region: If the hex you draw is a home world or an Another Region hex return it to the exploration box and place an empty space hex under your scout. Then follow the Another Region instructions in the Terrain section.
Other Hexes: If the hex is not a home world or an Another Region hex place it under your scout. If the hex is a wormhole follow the Wormhole instructions in the Terrain section. You can find a detailed description of each hex type in the Terrain section.
Civilization level: During the Movement Phase, the number of unknown hexes your units may enter may not exceed your civilization level.
No Hexes: If there are no hexes left in the exploration box no further exploration is permitted and no unit may enter an unknown hex.
Colonization Step
Establish Colony: If you have a colony ship in an uninhabited planet hex you may establish a new colony. Remove the colony ship and take the planet's data card. Your colony begins with industrial and tech levels of 1 and 6 IOUs.
One Per Planet: Only a single colony may be established per planet. Moving additional colony ships to a colony or home world has no effect.
Standard Combat
Overview
The active player is the attacker and all other players in the hex are the defenders. Combat is resolved in a series of rounds. Each round, both players separate their units into battle intensity zones. Then the attacker rolls a die for each attacking warship and the defender rolls a die for each defending unit. If the attacker's die result is less than, or equal to, his or her warship's combat rating the defender must take a number of hits equal to the die result. Likewise, if the defender's die result is less than, or equal to, his or her unit's combat rating the attacker must take a number of hits equal to the die result.
Each round has 2 fire segments; first fire and second fire. During first fire, only those units with a tech level advantage may fire. Units eliminated by first fire do not get to fire back.
During second fire, all remaining units may fire except those that fired during first fire. Damage from second fire is resolved simultaneously, units eliminated by second fire get to fire back.
Rounds continue until all units from one side or the other are eliminated, retreated, or join forces. Combat also ends if neither side rolls a hit during 3 consecutive rounds.
After the battle is over, if attacking warships remain in an opposing player's home world or colony hex the attacker's battleships may bombard the planet and the attacker's assault boats may attempt to conquer the planet.
Shields Up!
All attacking and defending units begin the battle with all of their shields. Place a number of shield counters equal to each unit's shield rating behind that unit's counter. Shields are not regenerated between combat rounds. You can find the shield rating, if any, of each unit in parentheses in the lower right-hand corner of its counter and in the Unit Table on your Tables Card.
Combat Round
Each combat round is divided into 6 segments:
- Organize Fleets
- First Fire
- Resolve Hits
- Second Fire
- Resolve Hits
- Retreat
Organize Fleets
At the beginning of each combat round, separate units into battle intensity zones; 3 zones for the attacker and 3 zones for the defender.
Zones: First the defender must allocate his or her units to 3 zones numbered 0, 1, and 2. Then the attacker must allocate his or her units into 3 zones also numbered 0, 1, and 2.
Placement: Take your units from the map and place them a clear space on the table. Then arrange your units into a front row, a middle row, and back row. The front row is your zone 0, the middle row is your zone 1, and the back row is your zone 2.
Empty: You are not required to place units into each zone. For example, you may place all your units in your zone 0.
Fewer Units: There must be fewer units in your zone 2 than in your zone 1 and there must be fewer units in your zone 1 than in your zone 0.
Civilian Attacker: If you are the attacker you must place your civilian units in your zone 2. This is an exception to the Fewer Units rule above.
First Fire
Only technologically superior units, if any, may fire during this step. Immediately remove units destroyed by first fire. They do not get to return fire.
Tech Advantage: Determine if either player has a tech advantage. Compare the tech level of the attacker's highest tech warship with the tech level of the defender's highest tech unit. You can find the tech level of each unit in the lower left-hand corner of its counter and in the Unit Table on your Tables Card.
Eligible Units: If you have a tech advantage your technically superior units will fire during first fire. Only those units whose tech level is higher than your opponent's highest tech level get fire first.
Example: Your fleet is composed of an assault boat and 2 patrol boats and Kevin's fleet is composed of a system station and 2 patrol boats. Your highest tech unit, the assault boat, is tech level 4. Kevin's highest tech unit, the system station, is tech level 3. So only your assault boat gets first fire.
Reevaluate: A fleet's tech advantage may change as units are lost on both sides. Each combat round you must redetermine what units, if any, get first fire.
No Advantage: If neither player has a tech advantage there is no first fire--proceed to the second fire step.
Second Fire
Simultaneous: After you resolve first fire, if any, the surviving units may fire during second fire. However, units that fired during first fire may not fire again. Units eliminated by second fire get to fire back.
Fire Procedure
Follow this procedure for both first and second fire. However, only one side gets first fire.
Penetration Fire: Destroyers may conduct penetration fire against units in the opposing zone 1. First the defender, and then the attacker, designate which destroyers are conducting penetration fire. See the Special Units rules for a description of penetration fire.
Attacker: The attacker rolls 1 die for each attacking warship. If the result is less than, or equal to, the warship's combat rating the defender receives a number of hits equal to the die result. For example, an attacking cruiser fires and rolls a "3", so the defender will take 3 hits. If the cruiser had rolled "5" or "6" it would have missed.
Defender: The defender rolls 1 die for each defending unit. If the result is less than, or equal to, the unit's combat rating the attacker receives a number of hits equal to the die result. For example, a defending galaxy station fires and rolls a "2", so the attacker will take a 2 hits. Galaxy stations never miss, they just do varying amounts of damage.
Zone Modifier: The combat rating of units in zone 2 is reduced by 2. The combat rating of units in zone 1 is reduced by 1. Units in zone 0 are not affected. For example, a destroyer in zone 1 will cause 1 hit on a die result of "1" and 2 hits on a die result of "2". Any other die result is a miss.
Resolve Hits
Remove Shields & Units: First the defender removes shields and units from the attacker's fleet. Then the attacker removes shields and units from the defender's fleet. Remove 1 shield or 1 unit for each hit you caused to your opponent's fleet. You may remove an opposing unit only after all its shields are gone.
Zones: You may apply damage as you see fit to any of your opponents units in zone 0. You may not apply damage to units in a higher numbered zone until all units in all lower numbered zone are eliminated.
Penetration Fire: You may apply hits from penetration fire to units in either zone 0 or zone 1 or both.
Retreat
First the defender, and then the attacker, may move some of his or her units out of the shared hex and into a single adjacent hex.
Screening Units: If you choose to retreat you must leave at least 1 warship in the shared hex for each opposing warship. If you cannot leave the required number of warships behind you cannot retreat.
Negotiation: The combatants may negotiate a retreat that does not require the retreating player to leave screening warships behind. Or, both players may simply agree to end combat and join forces in the shared hex with no retreat at all.
Opposing Warships: You may not retreat your units into a hex that contains opposing warships.
Closer to Home: If possible you must retreat your units into a hex that is closer to your home world. Count distance through wormhole pairs if that is the shortest route.
Support Range: You may not retreat into a hex that is not within the support range of at least 1 friendly planet or station. However, cruisers and stations do not require support and may retreat out of support range. See the Support Range rules.
End of Battle
One Side Gone: Combat rounds continue until all units from one side or the other are eliminated or retreated.
Join Forces: Combatants may end a battle by agreeing to join forces in the hex. See Join Forces.
Stalemate: Combat ends automatically if neither side rolls a hit during 3 consecutive combat rounds. At this point, the attacking player must retreat all his or her units and may not leave screening warships behind.
Counter Attack: If the attacker runs out of warships and the defender has 1 or more warships the defender may either allow the attacker's civilian units to retreat or the defender may attack those units. If the defender chooses to attack continue the battle but now the defender becomes the attacker and the active player becomes the defender. Shields are not regenerated before a counter attack.
No Warships: If the attacker runs out of warships and the defender has no warships or chooses not to counter attack the attacker must retreat. In this case the attacker does not leave screening units behind.
Special Units
Assault Boats
Planetary Conquest: Assault boats are the only units capable of conquering a planet. See the Planet Attack rules.
Destroyers
Special Tactics: Your attacking or defending destroyers may fire in 1 of 2 ways: normal fire or penetration fire. If you choose penetration fire your destroyer first must give up 1 of its shields.
Normal Fire: Your destroyer fires normally rolling 1 die against its combat rating of 3.
Penetration Fire: Your destroyer may choose to fire on units in your opponent's zone 1. Before rolling any dice, first the defender, and then the attacker, must announce which destroyers are conducting penetration fire. Then roll 1 die for each destroyer and apply the damage, if any, to units in your opponent's zone 1 or zone 0.
Shields Down: A destroyer cannot conduct penetration fire if it does not have at least 1 shield.
Battleships
Bombardment: Your battleships may bombard a planet to reduce the planet's industrial level and eliminate units from the planet's Resources & New Units box. See the Planet Attack rules.
Planet Attack
During your Contact Step, if your units are in a hex that contains an opposing home world or colony and no opposing units remain in the hex, your battleships may bombard the planet and your assault boats may attempt to conquer it. Planet attacks take place after any battle in the hex is resolved.
Bombardment
You battleships may bombard a planet once during your Contact Step. If you successfully bombard a planet, you will reduce its industrial level by 1 or more steps and remove all units from its Resources & New Units box.
Fire: Roll 1 die for each bombarding battleships. Find the total damage inflicted in the left-hand column of the Bombardment Table below. Reduce the planet's industrial level by the number of steps shown in the right-hand column.
Bombardment Table
| Total Damage | Reduce Ind. Level |
|---|---|
| 0-2 | no reduction |
| 3-5 | 1 step |
| 6-9 | 2 steps |
| 10+ | 3 steps |
Remove Units: If you reduce the planet's industrial level by 1 or more steps, remove all units from the planet's Resources & New Units box.
Industrial Level Zero: If you reduce a planet's industrial level to 0 its tech level also drops to 0 and the planet becomes uninhabited. Any player may recolonize the planet during his or her Colonization Step.
Conquest
After bombardment, if any, your assault boats may attempt to conquer the planet. You may only attempt to conquer a planet once during your Contact Step. You cannot conquer an uninhabited planet.
Commit Assault Boats: Announce how many assault boats you are committing to the attempt. No uncommitted assault boats, or any other unit, can be harmed during a conquest attempt.
Planet Combat Rating: A planet's combat rating is equal to 1/2 its tech level, rounded up.
Planet Fire: The planet fires at the committed assault boats. Roll a number of dice equal to the planet's industrial level and total the number of hits.
Example: Your defending colony has an industrial level of 4 and a tech level of 5. You roll "1", "2", "3", and "4" for a total of 6 hits which is enough to destroy 3 assault boats.
Surviving Assault Boats: If 1 or more of your assault boats survive you conquer the planet. Assault boats do not fire during planetary conquest.
Spoils: Take the conquered planet's data card from your opponent. The planet retains its industrial and tech levels. All IOUs, ore, and trade goods in the planet's Resources & New Builds box remain on the planet and become yours. However, any units in the Resources & New Builds box are automatically destroyed.
Civilization Level: If you conquer a planet with a tech level higher than your civilization level your civilization level increases to the planet's tech level.
Standard Combat Example
You moved 2 patrol boats and an assault boat to attack Kevin's system station and 2 patrol boats. You are not interested in joining forces with Kevin and proceed straight to the first combat round.
Round 1
Organize Fleets: Kevin places all of his units in his zone 0. You place your patrol boats in your zone 0. You want to protect your assault boat so you place it in your zone 1.
First Fire: Your assault boat is tech level 4 while Kevin's highest tech unit, his system station, is only tech level 3. So your assault boat gets first fire and rolls a "2". Normally this would cause 2 hits to Kevin's units, but since your assault boat is in zone 1 its combat rating is reduced to 1. Therefore a die result of "2" is a miss.
Second Fire: During second fire, you roll "1"s for both your patrol boats and inflict 2 hits on Kevin's units. Kevin rolls a "2" for his system station and a "1" and a "6" for his patrol boats inflicting 3 hits total on your units.
Resolve Hits: Kevin removes both your patrol boats from your zone 0. Since you have no more units left in zone 0 he applies the 3rd hit to your assault boat's shield. You choose to remove both of Kevin's system station's shields. Kevin is left with 2 patrol boats and a unshielded system station and you are left with a unshielded assault boat.
Round 2
Organize Fleets: Kevin leaves his units in his zone 0. Since you have only 1 unit left you must place it in your zone 0.
First Fire: Your assault boat is still the highest tech unit in the battle, so it fires and rolls a "1", causing 1 hit. You choose to eliminate Kevin's system station.
Second Fire: Kevin's patrol boats roll "1" and "3", inflicting 1 hit and eliminating your assault boat. Your units have been completely wiped out while both of Kevin's patrol boats remain in the hex.
Standard Additional Rules
Support Range
The ability of a home world, colony, or station to provide logistical support to your far-flung ships is represented by the planet or station's support range. A ship that is not inside the support range of at least 1 friendly planet or station may not attack, colonize, or explore. A ship may never voluntarily leave support range.
Exceptions: Stations and cruisers may leave support range and operate normally.
Determine Support
Count Hexes: Count the number of hexes from the planet or station to the ship. Do not count the hex the planet or station is in, but do count the hex the ship is in. If the number of hexes is less than or equal to the planet's or station's support range the ship is inside support range. See the table below for the support range of planets and each station type.
Considerations: Count each hex as 1; do not worry about the movement point cost of the hex. You may count through any type of hex except unknown hexes and null space. You may count through a wormhole hex to its partner; each hex counting as 1. You may count through hexes that contain opposing units.
Support Range Table
| Planet or Station | Support Range |
|---|---|
| Home World | 2 |
| Colony | 2 |
| System Station | 4 |
| Region Station | 6 |
| Galaxy Station | 8 |
Ships Outside of Support Range: If a ship finds itself outside the support range of all friendly planets and stations the ship suffers the following effects:
- Shields are reduced to 0
- Attack rating (if any) is reduced to 0
- Defense rating (if any) is reduced to 1
- Movement rating is reduced to 1
- An assault boat cannot attack a planet
- A battleship cannot bombard a planet
- A colony ship cannot colonize
- A scout cannot explore
- A transport cannot mine asteroids
Returning to Support Range: The effects of being outside of support are lifted the moment a ship enters a hex inside of support range. For example, if the first hex a ship enters is inside support range the ship may continue to move its full movement rate.
Friendly Planet or Station: All planets and stations you control are friendly to your ships. In addition, another player may declare 1 or more of his or her planets or stations friendly to you in order to support your ships. This declaration must be made by the other player at the beginning of your Movement Step every game turn.
Nebulae: A station in a nebula hex does not provide support.
Secrecy
No Secrets: In a Standard game of InterSpace there are no secrets; players are free to examine one another's counter stacks and Planet Data cards. However, if all players agree you may keep some or all of this information secret.
Example: All players may agree to disallow players from examining any but the top unit in an opposing counter stack.
Trade
Resources: You may give another player IOUs, ore, or trade goods. These resources may be moved by transports from one hex to another. You may transfer resources from a planet you control to another player's transport in the same hex, you may transfer resources from one of your transports to another player's planet in the same hex, and you may transfer resources from one transport to another in the same hex.
Enforcement: There are no rules covering the terms of these transactions. You may wish to give another player IOUs, ore, or trade goods as a bribe, in exchange for other resources, or on a whim. Enforcement of trade agreements is left solely to your warships.
Restrictions: You may not give another player any of your units. You may not give another player your home world or any of your colonies. Your planets must defend themselves normally during a conquest attempt.
Standard Terrain
Another Region
All players start the game in their own separate regions of the galaxy. The physical relationship of one region to another becomes known when you draw an Another Region hex from the exploration box. To find out which other region you discovered, and how it will be joined with yours, follow this procedure:
1. Return the Another Region Hex. Do not connect the Another Region hex to your region. Return it to the exploration box instead.
2. Take an Empty Space Hex. Take an empty space hex from the box and place it under your scout or cruiser.
3. Determine Region. Left or Right: The region you discover will contain the home world of the player to your left or right. Roll a die to determine which one: "1", "2" or "3" for left; "4", "5", or "6" for right.
Example: You move a scout into an unknown hex and draw an Another Region hex. Your region is not yet connected to either the player on your left or on your right so you roll a die to determine which player's region to connect to. The result is "2" so your region will connect to the player on your left.
Already Connected: If your region is already connected to the player on your left your region will automatically connect to the player on your right, and vice versa. If your region is already connected to both of these players' regions you cannot complete this procedure. Continue the game as if you had discovered only an empty space hex.
4. Determine Ship Facing. Away from your Home World: Position your scout or cruiser in the empty space hex so that it faces away from your home world. If facing your ship away from your home world causes it to point directly between 2 hex sides, roll a die to determine which hex side it will face: "1", "2" or "3" for left; and "4", "5", or "6" for right.
Example: You return the Another Region hex to the exploration box and get out an empty space hex. You place your scout in the empty space hex so that it is facing away from your home world. Since this causes it to face between 2 hex sides you roll a die to determine which hex side it should face. You roll a "4" so your scout will face the hex side to its right.
No Explored Hexes: Your scout or cruiser must not be facing toward any other hex that is part of your region. If your ship faces an explored hex in your region, at any distance, you cannot complete this procedure. Continue the game as if you had discovered only an empty space hex.
5. Determine Other Home World Hex Side. Roll a Die: Determine which hex side of the other player's home world your scout or cruiser should be facing. Roll a die to determine which hex side: "1" for the hex side labeled "1", "2" for the hex side labeled "2", and so on. Then move the 2 regions together and join them in such a way that your ship is facing the selected hex side of the other player's home world.
Example: You roll a die and the result is "5". You move your region and the other player's region together so that your scout is facing the other player's home world's hex side number "5".
Overlap: If the two regions cannot be joined because hexes will overlap you cannot complete this procedure. Continue the game as if you had discovered only empty space.
Single Region: The end result of these 5 steps is the 2 regions become a single region shared by both players. All hexes in the joint region are now part of your region.
Asteroids
Asteroids are the stony remnants of a shattered planet. They contain easily accessible mineral resources.
Movement: A unit must expend 1 movement point to enter an asteroids hex where it then must stop.
Mining: Your transports may mine asteroids for ore. See the Asteroid Mining rules.
Black Hole
Black holes are collapsed giant stars that exert a powerful gravitational field that is difficult to escape.
Movement: A black hole hex costs no movement points to enter but you must stop after you enter the hex. Roll a die for each unit that attempts to leave a black hole. If the result is less than, or equal to, the unit's movement rate you may move the unit into an adjacent hex where it then must stop. If the result is greater than the unit's movement rate the unit remains trapped in the black hole hex. The unit may roll once during each Movement Step until it rolls a number low enough to escape the black hole.
Dust Cloud
Dust Clouds are regions of space with abnormally high densities of dust and gases.
Movement: A unit must expend 2 movement points to enter a dust cloud hex. However, it is okay for a scout or cruiser to enter an unknown hex that turns out to be a dust cloud even if the ship had only 1 movement point left. A unit with a movement rate of 1 may expend its entire movement to enter a dust cloud hex.
Empty Space
Empty Space contains nothing useful or interesting.
Movement: A unit must expend 1 movement point to enter an empty space hex.
Home World
Treat a home world hex drawn from the exploration box as an Another Region hex; do not treat it as an uninhabited planet. Follow the Another Region hex rules.
Nebula
Nebulae are clouds of ionized gas that make navigation difficult and combat impossible.
Movement: A unit must expend 1 movement point to enter a nebula hex where it then must stop. A unit may move only 1 hex when it leaves a nebula hex.
Stations: A station in a nebula does not provide support.
Warships: A warship in a nebula may not attack any other unit.
Neutron Star
Neutron Stars are collapsed medium-size stars. You may use the strong (but not overpowering) gravitational pull of a neutron star to produce a slingshot effect.
Movement: There is no movement point cost to enter a neutron star hex and no penalty for leaving.
Null Space
Null Space is an inversion of the space-time continuum that precludes the existence of normal matter.
Movement: A unit must expend 1 movement point to enter a null space hex.
Destruction: Any unit that finds itself in a null space hex is immediately eliminated.
Planet
Any planet (other than a home world) you draw from the exploration box is an uninhabited planet.
Movement: A unit must expend 1 movement point to enter a planet hex.
Colonization: You can colonize an uninhabited planet by moving one of your colony ships to the planet's hex. Follow the Colonization Step rules.
Pulsar
Pulsars emit powerful and unpredictable bursts of energy that may destroy unshielded units.
Movement: A unit must expend 1 movement point to enter a pulsar hex.
Destruction: Roll 1 die for each unshielded unit that enters or begins the Movement Step in a pulsar hex. An even result indicates that the unit is destroyed. Unshielded units are scouts, transports, colony ships, and patrol boats.
Wormhole
A wormhole is a trans-dimensional portals to another region of the galaxy. Wormholes always come in pairs: the "Prime" wormhole and its "Null" partner.
Place Null Wormhole: When you discover a wormhole, place the "Prime" wormhole hex from the exploration box under the discovering scout or cruiser. Then determine the location of its "Null" partner as follows:
- Select Another Player's Home World. Roll a die to randomly pick another player's home world. The player may be to your left, right, or across from you.
- Select a Home World Hex Side. Roll a second die to pick a hex side from the selected home world.
- Place the "Null" Wormhole. Moving directly away from the selected hex side, place the "Null" wormhole in the first unknown hex you come to.
Example: You move a scout into an unknown hex and draw the wormhole labeled "Aleph-Prime". First, you count off the other players and roll a die to the select one of them. The result is the player on your right. Next, you roll another die to select one of her home world's hex sides and roll "6". Moving directly away from this hex side, you place "Aleph-Null" in the first unknown hex you come to.
Movement
One Movement Point: A unit must expend 1 movement point to enter a wormhole hex from an adjacent hex. A unit may expend 1 movement point to move from a wormhole hex to its partner. Moving to the partner wormhole is optional; a unit may move normally out of a wormhole hex and into an adjacent hex.
Partners Only: A unit may move only between a specific wormhole and the wormhole's partner. Other wormholes are not connected. For example, a unit can move from Aleph-Prime to Aleph-Null or from Bet-Null to Bet-Prime, but not from Aleph-Prime to Bet-Null.
Standard Units
Unit values are as in the Basic Unit Table; the descriptions below are from the Standard rules. Where the printed layout of this page is ambiguous the values given are those of the Unit Table.
Assault Boat (AB) - Tech Level 4, IOU Cost 6, Attack 2, Defend 2, Shields 1, Movement V. An assault boat is a warship capable of atmospheric flight. It is the only unit that can conquer another player's home world or colonies. See the Conquest rules.
Battleship (BB) - Tech Level 7, IOU Cost 18, Attack 5, Defend 5, Shields 4, Movement V. The heavy weapons on this warship allow it to bombard planets. See the Bombardment rules.
Colony Ship (Col) - Tech Level 2, IOU Cost 8, Attack 0, Defend 0, Shields 0, Movement V/2. A colony ship is designed to carry resources and sentients to an uninhabited planet in order to start a new colony. See the Colonization Step.
Cruiser (CA) - Tech Level 6, IOU Cost 14, Attack 4, Defend 4, Shields 3, Movement V. A cruiser is a warship designed for long range combat and exploration missions. It is the only ship that can ignore support range and the only ship other than a scout that can explore unknown hexes.
Destroyer (DD) - Tech Level 5, IOU Cost 10, Attack 3, Defend 3, Shields 2, Movement V. A destroyer is a warship built for aggressive fighting. It may charge into combat and make penetration fire against protected zone 1 units. See the Destroyer rules.
Galaxy Station (GS) - Tech Level 8, IOU Cost 24, Attack 0, Defend 6, Shields 6, Movement V/2. A galaxy station provides support for your ships up to 8 hexes away.
Patrol Boat (PB) - Tech Level 2, IOU Cost 2, Attack 1, Defend 1, Shields 0, Movement V+1. A patrol boat is a small, fast warship. It can carry only a limited amount of life support so it must return to one of your planets or stations every other turn. See the Patrol Boat Movement rules.
Region Station (RS) - Tech Level 5, IOU Cost 12, Attack 0, Defend 4, Shields 4, Movement V/2. A region station provides support for your ships up to 6 hexes away.
Scout (Sct) - Tech Level 1, IOU Cost 6, Attack 0, Defend 1, Shields 0, Movement V. A scout is equipped with the sensors and telescopes it needs to explore space. Scouts and cruisers are the only units that can explore an unknown hex. See the Unknown Hex rules and the Exploration Step rules.
System Station (SS) - Tech Level 3, IOU Cost 6, Attack 0, Defend 2, Shields 2, Movement V/2. A system station provides support for your ships up to 4 hexes away. (The printed text on this page reads "A region station provides support for your ships up to 4 hexes away"; the Support Range Table gives system stations a range of 4.)
Transport (Trn) - Tech Level 1, IOU Cost 4, Attack 0, Defend 1, Shields 0, Movement V. A transport is a large spaceship capable of moving resources. Resources are IOUs, ore, and trade goods. A transport can carry up to 6 resources in any combination. A transport may also mine asteroids for ore. See the Asteroid Mining rules, the Transport Movement rules, and the Trade rules.
ADVANCED RULES
Advanced Rules Introduction
These rules are optional--you may use all, some, or none as you see fit.
- Breakthrough Cards: Use these cards to pursue different lines of technological development. You gain a Breakthrough each time you increase your civilization level.
- Colonization Cards: Your colonists may find a surprise or two when they establish a new colony.
- Encounter Cards: Empty space may not be so empty. When you draw an empty space hex, you may be required to draw an Encounter card to see what you found (or what found you.)
- Experimental Unit Cards: These cards add a dozen new units to InterSpace. Each unit is unique--once you select a particular type you become the only player who can build those units.
- Non-Random Exploration: Use this rule to reduce the effects of luck.
- Alien Expertise: This is a challenging rule for experienced players. Each alien species is naturally more gifted in one endeavor than in others. To simulate this, each player excels at building one type of unit.
Breakthrough Cards
Breakthrough cards allow players to pursue different lines of technological development. You gain a Breakthrough card each time you increase your civilization level.
How They Work
Civilization Level: Each Breakthrough card has in its upper, right-hand corner, the civilization level required to take that card. An (A) indicates the card may be taken at any civilization level.
Choose a Card: When you increase your civilization level you may choose one Breakthrough card whose level is equal to, or less than, your new civilization level. For example, if you increase your civilization level from 3 to 4 you may take a (2), (3), (4), or (A) card.
Only One: Except for drive improvement, you may not choose a breakthrough that you already have.
Only Two: There are only 2 copies of each card (except drive improvement.) So once both Nav Computers are gone no one else may have them.
Multiple Players: If 2 or more players improve their civilization levels during the same Economic Phase randomly determine who chooses first, second, and so on.
Variable Movement Rate
You will no longer use the Variable Movement Rate table. Instead, your variable movement rate will be 1 plus the number of Drive Improvement cards you hold.
Getting Started
Two Cards: You should begin the game holding 2 Breakthrough cards. Players choose the cards they want in 2 rounds. During the first round, you may take a (2) or an (A) card. During the second round, you may take a (2), (3), or (A) card. However, you cannot take a second Drive Improvement card during the second round.
Round Order: To determine the order players choose cards, each player must place 1 of his or her unit counters in a cup. Then draw counters 1 at a time to determine who chooses first, second, third, and fourth during the first round. Reverse this order for the second round.
Additional Rules
Asterisk: An asterisk on a Breakthrough card indicates that there are additional rules that would not fit on the card. These additional rules are given here.
Drive Improvement
Variable Movement Rate: Your variable movement rate is equal to 1 plus the number of Drive Improvement cards you hold.
Limit: You may take a Drive Improvement card only if half the Breakthrough cards in your hand or fewer are already Drive Improvements.
Example: You hold 1 Drive Improvement and 2 other Breakthrough cards, so your fourth draw may be a Drive Improvement. If you held 2 Drive Improvements and only 1 other Breakthrough card your fourth draw could not be a Drive Improvement.
Grapple Beams and Repair Robots
Following a battle, if you have the Grapple Beams and/or the Repair Robots card, and no opposing units remain in the hex, you may be able to bring some destroyed units back into play. If you have both the Grapple Beams and Repair Robots cards you must use the Grapple Beams first.
Assault Boats & Battleships: An assault boat or battleship may attack a planet on the turn it is repaired or captured. And you may attempt to repair assault boats after successfully conquering a planet.
Artifacts: You cannot repair artifacts.
Jamming
If you have 1 or more scouts in your fleet, you may jam enemy fire control. Additional scouts have no effect.
Reduce Hits: After each combat round, roll a number of dice equal to your civilization level. However, you may not roll more dice than the number of hits you received. Eliminate 1 hit for each even numbered result.
Second Fire Only: You may jam only second fire; you cannot jam first fire.
Zone 0 or 1: The attacker may place his or her scouts in zone 0 or 1. This is an exception to the Civilian Attacker rule of the Standard Rules. A scout may jam only if it is in its zone 0 or 1.
Destroyers: If your opponent uses destroyers against zone 1 units you may choose which types of hits to reduce. You may make this decision after you opponent rolls damage.
Defending: Your scouts defend normally.
LRMs: Your scouts may jam LRMs.
Retreat: Remember, if neither fleet takes a hit for 3 combat rounds the attacker must retreat. Treat a jammed hit just like a miss.
Example: Dean's cruiser attacks your fleet which contains a cruiser and a scout. Your civilization level is 6. Dean's cruiser rolls a "2" scoring 2 hits. Your scout rolls 2 dice and the results are "2" and "6" so Dean's hits are completely negated. On the second round, Dean's cruiser rolls a "4". You scout rolls 4 dice and the results are "1", "3", "3", and "4". You reduce the number of hits from 4 to 3 and Dean eliminates all of your cruiser's shields.
Modular Units
Economic Phase: During the economic phase you may replace units with units of equal or lesser IOU value. For example, you may replace a patrol boat (2 IOUs) and a destroyer (10 IOUs) with a region station (12 IOUs) or vice versa.
Tech Level: The tech level of a newly created unit must be at or below your civilization level.
Colony Ship: You may never assemble or disassemble a colony ship.
Colonization Cards
Your scouts and cruisers may locate an uninhabited planet suitable for colonization, but they cannot determine exactly what your colonists will find when the settle down there. Each time you establish a new colony, draw a Colonization card and follow the instructions. Do not draw a card for your original colony.
Additional Rules
Asterisk: The asterisk on the Rebels card indicates that there are additional rules that would not fit on the card. These additional rules are given here.
Rebels
This colony immediately declares its independence from your home world. All of your units currently in the planet's hex join the rebels.
Defend Only: Rebel units never leave the planet's hex. From now on, if any player moves units into the hex the rebels will block movement and defend the hex. Any player may attempt to conquer the planet with assault boats.
No Resources: Do not keep track of IOUs or ore for the rebel planet.
Parasites: If an infested colony rebels the colony is no longer infested.
Breakthroughs: Rebels do not receive the benefit of any Breakthrough Cards.
Economy: Each turn, the rebels will grow their economy or build a unit. Roll 1 die at the beginning of each Economic Phase and consult the table below:
| Die Roll | Rebel Action |
|---|---|
| 1-2 | Increase Level |
| 3-4 | Build a Station |
| 5-6 | Build a Warship |
Rebel Actions
Increase Level: Increase the lower of the rebel's tech or industrial levels by 1 step. If both levels are the same increase their tech level by 1 step.
Build a Station: The rebels build the largest station their tech level allows. However, if their tech level is only 1 or 2 increase it by 1 step instead.
Build a Warship: The rebels build the largest warship their tech level allows. However, if their tech level is only 1 increase it to 2 instead.
Place Units: Place a new station or warship onto the map immediately.
Encounter Cards
Empty space may not be as empty as you think. Each time you explore an unknown hex and draw an empty space hex, roll 2 dice. If both die results are even numbers you must draw an Encounter card.
Counters: An Encounter card may require the placement of a counter on the map. These counters are provided.
Scouts: Many of the Encounter cards refer to your scout. If you are exploring an unknown hex with a cruiser then the cruiser is your "scout". If you are exploring with additional units stacked with a scout or cruiser, and a card states that it affects your scout, all of your units in the hex are affected the same way.
Artifacts
Some encounters result in the discovery of ancient artifacts. Each artifact has its own counter. Any unit may carry any number of artifacts. You may transfer artifacts between units and between a unit and a planet the same way a transport transfers resources. An artifact does not take up any space on a transport. If the unit carrying an artifact is destroyed so is the artifact. It cannot be repaired even if the unit is.
Free Agents
Some encounters result in the discovery of free agents. During the Action Phase, agents move after all players have finished their turns. They move in alphabetical order:
- Berserker
- Ion Storm
- Madness
- Pirates
- Plague Units
- Raiders
- Rogue Miners
- Space Amoeba
- Trader
Interaction
Free agents will interact with each other. The Berserker will attack the Pirates, the Pirates will attack the Trader, the Ion Storm may destroy the Rogue Miners, etc...
Random Movement
The Berserker, Ion Storm, Plague units, and Space Amoeba move randomly. Use the numbered hex sides of a nearby home world and roll a die to determine a direction. Then move the agent 1 hex in that direction. If this would take the agent off of the map it stops at the edge instead.
Black Hole: Black Holes have no affect on random agents.
Dust Cloud: Dust clouds have no affect on random agents.
Null Space: If a random move takes an agent into a Null Space hex the agent is eliminated.
Pulsar and Ion Storm: Pulsars and the Ion Storm have no affect on the Berserker, Ion Storm, or Space Amoeba. A Pulsar or Ion Storm may destroy an unshielded plague unit normally.
Worm Hole: If a randomly moving agent starts its turn in a worm hole hex, roll a die. If the result is "1", the agent will move to the worm hole partner. On any other result, ignore the worm hole and roll again to determine a direction of movement.
Combat
When you allocate hits caused by an agent, you must attempt the eliminate the highest number of warships.
Additional Rules
Asterisk: An asterisk on an Encounter card indicates that there are additional rules that would not fit on the card. These additional rules are given here.
Madness
Contemplation of the Universe's deepest secrets causes your scout's crew to go insane. Your scout becomes a free agent.
Movement: Each turn your scout must move at its maximum speed toward the nearest unit, friendly or alien. If two or more units are equally distant you choose which one. Ignore support range.
Suicide Pact: When your scout enters a hex that contains another unit, or another unit enters a hex that contains your scout, your scout convinces the other unit's crew to self-destruct. If there is more than 1 unit in the hex randomly determine which one is destroyed. Your scout is also destroyed.
Pirates
Place the Pirate cruiser in the new, empty space hex. The pirates are a free agent. Your scout is unharmed.
Movement: Each turn the pirates expend up to 3 movement points to move toward the nearest transport. If two or more transports are equally distant the player who drew the Pirates decides which one.
Blocking: You may block the pirates movement normally. See the Blocked Movement rules of the Standard rules. Pirates never block movement.
Combat: Pirates attack only if you refuse to share a hex with them. They defend normally if you attack them.
Steal Resources: Once the pirates reach a hex that contains a transport, they take all its cargo. Remove the resources from beneath the transport and place them with the other unused counters.
No Resources: If the transport has no cargo roll a die. If the result is even the transport is destroyed. Otherwise the transport is unharmed.
Multiple Transports: If there are 2 or more transports in the hex randomly determine which one is plundered. The pirates ignore the others transports.
Moving On: The pirates do not dawdle. On their next turn, they leave the hex and move toward the next nearest transport, ignoring any transports in the hex they started the turn in. The pirates never plunder in the same hex 2 turns in a row.
Finished: If there are no more transports the pirates can reach (including those reachable via a wormhole) the pirates leave the game by moving into the nearest unknown hex. Remember, pirates ignore transports already in their hex.
Plague
Your scout's crew becomes infected with a hideous, space borne disease. Place a plague marker on the scout. Plague units are free agents.
Movement: Plague units move randomly.
Blocking: You may block a plague unit's movement normally. See the Blocked Movement rules of the Standard rules. Plague units never block movement.
Contamination: When a plague unit enters a hex that contains other units, or other units enter a hex that contains a plague unit, the other units may become infected. Roll 2 dice for each uninfected unit. If both die results are even that unit becomes a plague unit--place a plague marker on it. If a unit catches the plague it must stop immediately, otherwise it may continue moving normally.
Combat: Infection takes place after LRM fire but before any other combat. Plague units attack only if you refuse to share a hex with them. They defend normally if you attack them.
Breakthroughs: Plague units have all of the same breakthroughs as their original owner, including breakthroughs acquired after the unit caught the plague.
Support: Plague units do not need support.
Patrol Boats: Plagued PBs are not required to return to a planet or station each turn.
Planet: If a plague unit occupies a planet's hex during the Economic Phase reduce the planet's industrial level by 1 step. If a planet's industrial level is reduced to 0 its tech level also drops to 0 and it becomes uninhabited. Any player may re-colonize the planet.
Raiders
Place the Raider's cruiser in the new empty space hex. The raiders are a free agent. Your scout is unharmed.
Movement: Each turn, the raiders expend up 3 movement points to move toward the nearest home world or colony. If two or more inhabited planets are equally distant, the player who drew the card decides which one.
Blocking: You may block the raiders movement normally. See the Blocked Movement rules of the Standard rules. Raiders never block movement.
Combat: Raiders attack only if you refuse to share a hex with them. They defend normally if you attack them.
Steal IOUs: Once they reach a planet hex, they take all IOUs from the planet's Resources & New Builds box. Remove the IOUs from the planet's data card and place them with the other unused counters.
No IOUs: If the planet has no IOUs, roll a die. If the result is even, reduce the planet's industrial level by 1 step. If the level is already 1, there is no effect.
Moving On: The raiders do not dawdle. On the turn after raiding a planet, they again move toward the next nearest planet. However, they never visit the same planet twice. Keep a list of visited planets and exclude them when choosing which planet to move to next.
Finished: The raiders will continue to travel from planet to planet until they have visited all the inhabited worlds they can reach (including those reachable via wormhole.) Then they leave the game by moving into the nearest unknown hex.
Rogue Miners
Place the Miner's transport into the new, empty space hex. The miners are a free agent. Your scout is unharmed.
Movement: Each turn, the miners expend up to 3 movement points to move toward the nearest asteroids hex. If two or more asteroids are equally distant the player who drew the card decides which one. However, the miners will not move toward an asteroids hex if the hex contains a warship.
Blocking: You may not block the miners movement. The miners never block movement.
Combat: The miners never attack and you cannot attack them.
Mining: While the miners are in an asteroids hex, players mining the hex must subtract two from their mining die roll. This is in addition to any other die roll penalty.
Stay: The miners will remain in the asteroids hex until a warship moves into the hex.
Leave: The miners will leave an asteroids hex after a warship moves in. On their next turn, the miners move toward the next nearest asteroids hex. However, they will not move toward an asteroids hex if it already contains a warship. If all asteroids hexes the miners can reach (including those reachable via a wormhole) contain warships the miners leave the game by moving into the nearest unknown hex.
Space Amoeba
Place the Amoeba counter into the new, empty space hex. The amoeba is a free agent. Your scout is unharmed.
Blocking: The amoeba never blocks movement, even for a colony ship.
Colony Ships: If there are 1 or more colony ships in the amoeba's hex the amoeba eats 1 of them and does not move. Otherwise, if there is a colony ship within 2 hexes the amoeba moves 1 hex toward it. If there are 2 or more colony ships equally distant choose 1 randomly. If the amoeba enters a hex containing 1 or more colony ships the amoeba eats only 1. You may build a colony ship on a planet even if the amoeba is in that planet's hex.
Movement: If there are no colony ships within 2 hexes the amoeba moves 1 hex in a random direction each turn. However, the amoeba stops when it reaches the edge of the map.
Limit: The amoeba will eat only 1 colony ship per turn and the amoeba eats only during its own turn. If your colony ship enters the amoeba's hex on your turn the amoeba will not eat it until the amoeba's turn.
Planet: If the amoeba occupies a planet's hex during the Economic Phase reduce the planet's industrial level by 1 step. If a planet's industrial level is reduced to 0 its tech level also drops to 0 and it becomes uninhabited. Any player may re-colonize the planet.
Trader
Place the Trader's transport with the 6 purple trade goods into the new, empty space hex. The trader is a free agent. Your scout is unharmed.
Movement: Each turn the trader expends up to 3 movement points to move toward the nearest home world or colony. If two or more are equally distant the player who drew the card decides which one.
Blocking: You may block the traders movement normally. See the Blocked Movement rules of the Standard rules. The trader never blocks movement.
Combat: The trader never attacks, but she does defend normally if you attack her.
Trade: At any point during your or the trader's movement step, the trader will exchange up to 6 trade goods for the same number of trade goods of any other color. She never exchanges trade goods for trade goods of the same color. The trader exchanges trade goods only at a planet.
Moving On: The trader does not dawdle. On her next turn, whether a trade has been made or not, she again moves toward the nearest home world or colony. However, she never visits the same planet twice. Keep a list of visited planets and exclude them when choosing where to move next.
Finished: The trader will continue to travel from planet to planet until she has visited all the home worlds and colonies she can reach (including those reachable via wormhole). Then she leaves the game by moving into the nearest unknown hex. The trader will also leave if she loses all of her trade goods to the Pirates.
Colonial InterSpace: Treat the trader's purple trade goods as alien trade goods. They may be converted to IOUs on any planet.
Experimental Unit Cards
This section adds a dozen new units to InterSpace. Each one is unique--once you select a particular type you become the only player who can build those units.
How They Work
Purchase: You may purchase one Experimental Unit card per turn during the Purchase Step. The cost of a card is 12 IOUs and must be paid by a single planet with a tech level of 4 or higher.
Card: An Experimental Unit card allows you to build the units described on the card. Additional rules are included here.
Prototype: When you buy a card you receive 1 new ship, or 6 new robots, of that type. Place the unit in the planet's hex. Robots may be placed in orbit only if there is a transport to hold them. Prototypes do not count against the planet's build limit.
Additional Units: Each experimental ship cost 6 IOUs and each robot cost 1 IOU. All experimental units have a tech level of 4.
Robots
Robots are neither ships nor stations but are instead a third class of unit. Robots are indicated by a movement rating of "R".
Production: Robots cost 1 IOU each. Like trade goods, you may place robots on the map as soon as you purchase them. However, a robot must be placed either on a ship (transport or express ship) or left in the purchasing planet's Resources and New Builds box.
Movement: A robot cannot move on its own, not even into orbit around the purchasing planet. Transports and express ships may carry robots just like a resource.
Combat: Robotic defenders, fighters, and interceptors may be deployed from transports and express ships at the beginning of the missile round or any combat round.
Retrieval: Robots have limited power and armament and burn out quickly. After a battle, your transports and express ships may attempt to retrieve your surviving robots. Roll a die for each robot. On an even result you may return the robot to your ship. On an odd result the robot is lost. Bombers and probes may never be retrieved.
Breakthroughs: Your robots never gain the benefit of your Breakthrough cards.
Grapple Beam: You may not capture an opposing robot with your grapple beam; it would self-destruct immediately.
Bombardment
In addition to battleships, robotic bombers and mass drivers may also bombard a planet. You may make only a single bombardment attack each turn. Combine the damage done by your battleships, bombers, and mass drivers into a single total and consult the Bombardment table of the Standard Rules.
Jamming
If you jam an opponent who has destroyers (damage zone 1 units), escorts (damage small units), lances (damage ignores shields), and/or neutralizers (damage only shields) you decide which types of hits to reduce. You may make this decision after you opponent rolls damage.
Non-Random Exploration
Planets: Each player is allowed to discover a fixed number of uninhabited planets. You can colonize and conquer as many planets as you can get away with. The only limit is on discovery.
Discovery Limit: The number of planets each player may discover is given in the table below. For example, in a 5 player game you may discover only 2 uninhabited planets. When you draw your 3rd planet from the exploration box, you must put it back in and continue drawing until you get something other than a planet.
Fulfillment: After every player has discovered all of the planets they are entitled to, each player is allowed to discover one additional planet. For example, once everyone in a 5 player game has discovered 2 uninhabited planets each, all players are eligible to discover the single remaining planet.
Asteroids: Follow the same system to regulate the discovery of asteroids using the table below.
Forfeit: If you do not explore for 3 turns in a row you give up the planets or asteroids reserved for you. Proceed using the discovery limits given for a game with 1 less player.
Discovery Limits
| Number of Players | Planet Discovery Limit | Asteroids Discovery Limit |
|---|---|---|
| 2 | 5 | 2 |
| 3 | 3 | 1 |
| 4 | 2 | 1 |
| 5 | 2 | 1 |
| 6 | 1 | 1 |
| 7 | 1 | 1 |
| 8 | 1 | 1 |
Alien Expertise
Suggested by Roger Allen
Each alien species is naturally more gifted in one endeavor than in others. For example, one species may produce great explorers while another great warriors. To simulate this, each player excels at building one type of unit.
How it Works
Types: There are 6 types of units players may have expertise in building:
- Scouts
- Transports
- Colony Ships
- Stations
- Warships
- Experimental Units
Cost: You pay the normal cost for those units you have expertise in. You pay triple the cost for units you do not have expertise in. An Experimental Unit card costs 36 IOUs if you do not have the expertise.
Grapple Beam: The Grapple Beam card refers to IOU costs. Use only the normal unit costs when you determine if a unit can be captured or not.
Rebels: Rebels build units normally.
Getting Started
Cards: There are 36 Alien Expertise cards; 6 of each of the 6 types.
Number of Players: Use only cards from the list that correspond to the number of players. For example, in a 4 player game you will use only the scouts, transports, colony ships, and stations.
Unused Types: All players have expertise in the unused types. So in a 4 player game all players have expertise in warships and experimental units.
Determine Expertise: Create a deck of cards with 1 of each unit type in use. Then deal 1 card to each player at random. The card you receive is your area of expertise.
Option for 2 or 3: If 3 are playing each player receives 2 cards. First randomly assign scouts, transports, and colony ships then randomly assign stations, warships, and experimental units. If 2 are playing each player receives 3 cards. First assign scouts and transports, then colony ships and stations, and finally warships and experimental units.
Remaining Cards: Leave the remaining cards faceup on the table. You will take these cards when you gain additional expertise.
Units: You do not receive the usual units at setup. Instead, you may spend up to 36 IOUs for your initial units. Unspent IOUs are lost. However, if you are playing Colonial InterSpace or a game with 5 or more players you do not receive any IOUs or units at setup.
Gaining Expertise
Decommission: You can gain expertise by decommissioning an alien unit at one of your planets. See the Conversion Step of the Standard rules. If the player whose unit you decommission has expertise in that type of unit you gain that expertise.
Example: Roger has expertise in scouts and allows you to decommission one. This gives you scout expertise. You also receive IOUs equal to 1/2 the unit's normal cost. Later, John captures one of your scouts with a grapple beam. If John decommissions this scout he will gain scout expertise from you.
Acquiring Alien Units
You can acquire an alien unit in 3 ways:
- Gift
- Capture
- Destroy
Gift: An alien player may move a unit to one of your planets and allow you to decommission it. This will generally be part of a larger deal such as a swap or paying a fee. Enforcement of such agreements is left solely to your warships.
Capture: You may use grapple beams to capture an alien unit then move it to one of your planets for decommissioning.
Destroy: If you have a transport in a hex where you won a battle you may be able to gather enough alien debris for study. Choose the unit type you are searching for and roll a die. If the result is less than, or equal to, the number of alien units of that type destroyed you have gathered enough debris. Place an alien unit under one of your transports; this uses the transports entire capacity. You may decommission the unit normally at one of your planets. However, you may not use the unit for any other purpose.
Breakthrough Cards (Card Text)
The civilization level required to take each card is shown in parentheses; (A) means any level. There are 10 Drive Improvement cards; the other cards each have 2 copies.
Heavy Transports (2)
- Nine Resources: Your transports may carry up to 9 resources instead of the usual 6.
- Mining: Add 1 to your mining die rolls.
Nav Computers (2)
- Asteroids: Your units are not required to stop when they enter an asteroids hex.
- Black Holes: Your units treat black holes as if they were neutron stars.
- Pulsars: Your units are immune to pulsars.
Jamming* (3)
- Reduce Hits: If you have 1 or more scouts in your fleet you may reduce hits rolled against you. Roll a number of dice equal to the number of hits or your civilization level, whichever is lower. Eliminate 1 hit for each even result.
- Zone 0 or 1: A scout may jam only if it is in your zone 0 or 1. The attacker may place scouts in these zones.
- See Rules: See rules for more info.
Multiplex Sensors (3)
- Exploration: Once per turn, you may return a hex drawn from the exploration box and draw again. You must make this decision immediately before you draw any more hexes.
- Colonization: Once per game, you may discard a Colonization Result card and draw again.
- Encounter: Once per game, you may discard an Encounter card and draw again.
Advanced PBs (4)
- First Fire: When you determine which units get first fire treat your patrol boats as if their tech level were equal to your civilization level. For all other purposes treat your patrol boats as tech level 2 units.
Repair Robots* (4)
- Repair: After winning a battle, roll 1 die for each of your "destroyed" units. If the result is even return that unit to the hex where the battle took place.
- VPs: Repaired units still count as destroyed when counting VPs.
- See Rules: See the Advanced rules for more information.
LRMs (5)
- Missile Round: Before the first combat round, your attacking warships or defending warships and stations may fire once. Unless your opponent also has LRMs, destroyed units may not return fire.
- No Zones: Do not divide units into zones for the missile round. Your opponent must apply LRM hits to his or her own units as he or she sees fit.
Grapple Beams* (5)
- Capture: After winning a battle roll 1 die for each of your remaining warships and stations. If the result is even that unit may capture 1 "destroyed" enemy unit of equal or lower IOU value than itself. Replace the enemy unit with one of your own. Captured units still count as destroyed for VPs. A captured transport retains its cargo.
- See Rules: See rules for more info.
Stealth Tech (6)
- No Block: Your movement cannot be blocked by opposing units except at wormhole entrances.
- Retreat: You are not required to leave screening units behind when you retreat.
- First Fire: Your opponent never receives first fire.
- LRMs: Roll a die for each LRM hit on your units. Ignore the hit if the result is even.
Modular Units* (6)
- Economic Phase: During the economic phase, you may replace units with other units of an equal or lesser IOU value.
- Combat: During the retreat step of each combat round, you may break larger units into PBs or assemble PBs into larger units.
- See Rules: See the Advanced rules for more information.
Plasma Cannons (7)
- Multiple Fire: Each combat round, your defending stations may fire a number of times equal to their combat rating. In other words, each system station rolls 2 dice, each region station 4, and each galaxy station 6.
- LRMs: Your stations do not get multiple fire during the missile round.
Star Gates (7)
- Jump: Your units may jump from 1 station directly to another station at a cost of 1 movement point. The stations must each be within the other's support range. Units may continue to move after jumping and even jump multiple times.
- Resources: You cannot move resources independently; they must be loaded on a transport.
Nova Bombs (8)
- Colony Ships: You may no longer build colony ships. These counters now represent nova bombs (NB). An NB has the same cost, movement, combat, and shield ratings as a colony ship, but it is a tech level 8 unit.
- Detonate: You may detonate an NB after combat is resolved. Your other units automatically retreat from the hex prior to detonation. Remove the hex from the game and treat the remaining, empty hex as null space.
Planetary Grid (8)
- Impervious: Your tech level 8 planets may not be conquered or attacked by anything, including nova bombs and space amoebas.
- Units: You may announce that all, some, or none of your units are inside the grid. Units inside the grid cannot attack or be attacked. Units outside the grid attack or defend normally but may retreat into the grid without leaving screening units behind.
Drive Improvement (A)
- Variable Movement Rate: Your variable movement rate is equal to 1 plus the number of Drive Improvement cards you hold.
- Card Limit: You may not draw a Drive Improvement card if more than half the Breakthrough cards you already hold are Drive Improvement cards.
Colonization Cards (Card Text)
Ancient Ruins: The discovery of ancient ruins on this planet leads to rapid technological advances. If your colony's tech level is 4 or less, calculate the cost of tech level investment for this colony as if your civilization level were 1 higher than it actually is.
Pleasure World: Psycho-active chemicals in the local plant life keep your colonists happy but stupid. Calculate the cost of tech level investment for this colony as if your civilization level were 1 lower than it actually is. There is no effect if your civilization level is 1.
Lost Treasure: Your colonists discover the fabled lost treasure of space pirate Mack M'Ahn. This colony starts with an additional 12 IOUs, for a total of 18.
Paradise: The idyllic conditions on this planet lead your colonists to defend it fiercely. As long as you control this colony, your patrol boats have a combat rating of 2 while in this colony's hex.
Nice World: The ideal climate of this planet enhances the growth and development of your colony. Calculate the cost of industrial level investment for this colony as if the colony's tech level were 1 higher than it actually is.
Ice World: The adverse climate of this planet inhibits the growth and development of your colony. Calculate the cost of industrial level investment for this colony as if the colony's tech level were 1 lower than it actually is. There is no effect if the colony's tech level is already 1.
Mineral World: The abundant mineral resources on this planet insure your colony will always produce ore. Do not check for ore depletion for this colony.
Vegetable World: The lack of mineral resources on this planet prohibits mining. This colony does not produce ore.
Doh!: Your colonists packed the wrong gear for this planet's environment. This colony starts with 0 IOUs, industrial level 1, and tech level 1.
Frontier Spirit: Your colonists turn out to be hard working and resourceful. This colony starts with 6 IOUs, industrial level 2, and tech level 2.
Hostile Natives: This colony may increase its industrial or tech levels only if you have an assault boat, battleship, or mass driver in the colony's hex.
Rebels*: This colony immediately declares its independence from your home world. All of your units currently in the hex join the rebels. See the Advanced Rules for more information.
Normal World (4 cards): There is nothing particularly interesting about this colony. It begins with an industrial level of 1, a tech level of 1, and 6 IOUs in its Resources & New Units box.
Encounter Cards (Card Text)
Ancients Return: Your scout awakens the ancients and they are not pleased with how you have used their technology. Lose all artifacts you control, if any. The artifacts are Crystal, Fabrication, Drive, Shield, and Weapon. This card has no effect on artifacts you draw later in the game. If you have no artifacts discard this card and draw again.
Berserker: Place the Berserker counter in the hex. Your scout is destroyed. The Berserker moves randomly each turn. Roll a die to determine a direction and move it 1 hex. However, it stops when it reaches the edge of the map. After moving, the Berserker attacks any units in its hex and will bombard a planet in its hex. The Berserker defends normally during player turns.
Crystal Artifact: Your scout salvages a crystalline object of rare beauty and unknown purpose from an ancient derelict. Place the Crystal Artifact under your scout. You may take the crystal to any home world or colony and convert it to 12 IOUs during the Conversion Step of the Economic Phase. Discard the crystal after you convert it.
Doom Station: Place the Doom Station and its 6 PBs into the hex. Your scout is destroyed. The Doom units never leave the hex. The PBs block movement and all Doom units defend normally. As long as the station remains, replace any destroyed Doom PBs during the Economic Phase.
Dread: Fear of the unknown causes your scout's crew to panic. Move your scout toward your home world a number of hexes equal to its movement rating. The crew regains its composure on your next turn and the scout may move normally.
Drive Artifact: Your scout salvages the drive from an ancient derelict. Place the Drive Artifact under your scout. Any unit with the Drive Artifact has a movement rating of 5.
Fabrication Artifact: Your scout salvages a fabrication unit from an ancient derelict. Place the Fabrication Artifact under your scout. When placed in the Resources & New Builds box of a home world or colony, the artifact produces 1 to 6 IOUs during the Production Step of each Economic Phase. Roll a die to determine how many IOUs are produced. However, the artifact will not produce on a turn it is moved.
Gamblers: A space borne gambling cartel makes an offer you can't refuse: double or nothing. You must roll 1 die. If the result is 1, 2, or 3, place an additional scout in the hex. If the result is 4, 5, or 6, your scout is lost permanently. If you used a cruiser to explore the hex and you roll 1, 2, or 3, you gain an additional cruiser. If you roll 4, 5, or 6, your cruiser is lost.
Insight: Contemplation of the Universe gives your people a deeper understanding of the alien cultures you encounter. You may look at all players' Alien Objective cards. However, you may not show one player's objective to another. If you are not using the Alien Objective cards, Insight has no effect. Discard this card and draw another Encounter card.
Ion Storm: Place the Ion Storm counter in the hex. The storm moves randomly each turn. Roll a die to determine a direction and move it 1 hex. However, it stops when it reaches the edge of the map. Before and after it moves, roll 1 die for each unshielded unit in the storm's hex. The unit is destroyed on an even result. The storm does not block movement.
Knowledge: Your study of hyper-spatial anomalies in this area leads to a technological breakthrough. You may immediately take 1 new Breakthrough card of your choice. However, the card must be at or below your current civilization level. If you are not using Breakthrough cards, Knowledge has no effect. Discard this card and draw another Encounter card.
Lost & Found (2 cards): If this is the first Lost and Found card drawn place it to one side and place your scout on top of the card. If this is the second Lost and Found card drawn place into the hex the scout that was lost earlier.
Lost Colonists: You discover a long lost colony ship. Place a colony ship of your color into the hex.
Lost Probe: You discover an automated exploration probe and download its database. Immediately draw additional hexes to fill all unknown hexes adjacent to the empty space hex you just explored. You may not use Multiplex Sensors when adding the hexes. The new hexes never result in an encounter or Another Region. If you draw Another Region put it back and draw again.
Madness*: Contemplation of the Universe's deepest secrets causes your scout's crew to go insane. Each turn your scout must move at its maximum speed toward the nearest unit, friendly or alien. When your scout is in a hex that contains another unit your scout convinces the other unit's crew to self-destruct. You scout is also destroyed. See the rules for more information.
Merchants: Space borne merchants offer to trade your scout for any other type of unit except a colony chip. You have the option of removing your scout and replacing it with a new unit. However, the tech level of the new unit must be equal to, or less than, your civilization level.
Meteor Storm: Your scout is destroyed in an unlucky accident. These things happen.
Pirates*: Place the Pirate cruiser in the hex. Each turn the pirates move at speed 3 toward the nearest transport. If 2 or more transports are equally distant you choose which one. Once the pirates reach a transport, they take all its cargo. If the transport is empty roll a die. If the result is even the transport is destroyed. See the rules for more information.
Plague*: Your scout's crew becomes infected with a hideous, space borne disease. You lose control of your scout and it becomes a plague unit. Plague units move 1 hex in a random direction each turn. When a plague unit enters a hex, roll 2 dice for each uninfected unit in the hex. If both die results are even, that unit also becomes a plague unit. See the rules for more information.
Upgrade: A space borne robotic culture decides your scout needs an upgrade. Replace your scout with the Sct+ counter (movement V+1, tech level 6, combat rating 4, shields 3 -- counter printed "Sct+ / 6 / V+1 / 4(3)"). Your scout's movement rating is now equal to your variable movement rate plus 1. It has a tech level of 6, a defensive combat rating of 4, and 3 shields. If you are exploring with a cruiser, this card has no effect. However, do not draw a new Encounter card.
Raiders*: Place the Raiders cruiser in the hex. Each turn the raiders move at speed 3 toward the nearest inhabited planet. If 2 or more planets are equally distant, you choose which one. Once the raiders reach a planet, they take all of its IOUs. If the planet has no IOUs roll a die. If the result is even reduce the planet's industrial level by 1 step, but never to 0. See the rules for more information.
Rejection: Higher beings determine your people are not yet worthy of unlocking the secrets of the Universe. Move your scout directly to your home world. Do not pass Go, do not collect $200.
Rogue Miners*: Place the miner's transport in the hex. Each turn the miners move at speed 3 toward the nearest asteroids hex. If 2 or more asteroids hexes are equally distant, you choose which one. While the miners are in the asteroids hex, players mining the hex must subtract 2 from their mining die roll. See the rules for more information.
Shield Artifact: Your scout salvages a shield generator from an ancient derelict. Place the Shield Artifact under your scout. Any unit with the Shield Artifact receives 1 extra shield before combat, even if it had none before. In addition, the unit regenerates 1 lost shield after each round of combat.
Space Amoeba*: Place the Amoeba counter in the hex. Your scout is unharmed. If there is a colony ship in the amoeba's hex, it eats the ship and does not move. If there is a colony ship within 2 hexes, the amoeba moves 1 hex toward it. If there are no nearby colony ships, the amoeba moves 1 hex in a random direction. See the rules for more information.
Dimensional Portal: Your scout activates a ancient portal. The portal is destroyed and your scout is sent to another location. Randomly select a home world. Then roll a die to select a direction from that home world. Then roll once more and place your scout that many hexes from the home world in the direction chosen. If this would place your scout off the map stop when you reach the edge of the map.
Stasis: Your scout is trapped in a time anomaly. It must remain in the hex until released by another unit. Any unit entering the hex has the option of releasing the scout. There is no affect on the releasing unit and no further affect on your scout. If you release your own scout it may move immediately up to its full movement rating.
Telepaths: A star faring race of busy bodies exposes your secrets. You must reveal your Alien Objective card and leave it faceup for the rest of the game. If you are not using the Alien Objective cards Telepaths has no effect. Discard this card and draw another Encounter card.
Temporal Shift: A time travel experiment in your civilization's future strands an advanced unit in your era. Place 1 new unit of your choice into the hex. The new unit's tech level may be up to 2 levels higher than your current civilization level.
Trader*: Place the Trader's transport, loaded with 6 trade goods, into the hex. Each turn the trader moves at speed 3 toward the nearest inhabited planet. If 2 or more planets are equally distant you decide which one. Once there, the trader will exchange up to 6 trade goods for the same number of trade goods of a different color. See the rules for more information.
Unstable Wormhole: Roll a die and move your scout to the corresponding wormhole hex: 1 Aleph Prime, 2 Aleph Null, 3 Bet Prime, 4 Bet Null, 5 Vet Prime, 6 Vet Null. If the worm-hole hex has not yet been placed remove your scout. When that wormhole is discovered, place your scout into that hex.
Weapon Artifact: Your scout salvages a weapon from an ancient derelict. Place the Weapon Artifact under your scout. Any unit with the Weapon Artifact has combat rating of 5. Any unit may use the weapon to defend. However, only a warship may use the weapon to attack.
Wisdom: Your discovery of the fundamental nature of the Universe leads your society to completely reassess its values. Discard your Alien Objective card and draw a new one at random. If you are not using the Alien Objective cards Wisdom has no effect. Discard this card and draw another Encounter card.
Wonder: Your scout's crew stares in amazement at the fantastic alignment of stars in this area of space. You may not move your scout on your next turn.
Vanished: Your scout's crew mysteriously disappears but the ship itself is unharmed. The next player to move a unit into the hex may capture the scout and replace it with one of his or her own color.
Experimental Unit Cards (Card Text)
All experimental units have tech level 4. Robots (movement "R") cost 1 IOU each; experimental ships cost 6 IOUs each.
Robotic Bomber (bom) - Movement R, Tech Level 4, counter combat rating 0. You may deploy bombers during planetary conquest (Standard Rules, Planet Attack). Roll a number of dice equal to the number deployed. Add 1 to the bombardment total for each even numbered result. Battleships and mass drivers may also contribute to the bombardment total. All deployed bombers are destroyed.
Robotic Defender (def) - Tech Level 4, Cost 1, Attack 0, Defend 2, Shields 0, Move R. These slow moving, automated weapon pods may be deployed by your transports and express ships to help defend a planet or fleet. They cannot attack, but they defend with a combat strength of 2.
Escort (DE) - Tech Level 4, Cost 6, Attack 3*, Defend 3*, Shields 1, Move V. An escort is a warship with a combat rating of 3. However, damage from an escort may be applied only to patrol boats (PBs) and robots. (* Damage may be applied only to PBs and robots.)
Express (Exp) - Tech Level 4, Cost 6, Attack 0, Defend 0, Shields 0, Move CL. These fast moving transports may carry up to 4 resources. Your express ships always have a movement rating equal to your current civilization level (CL.) They cannot mine asteroids.
Robotic Fighter (ftr) - Tech Level 4, Cost 1, Attack 1, Defend 1, Shields 0, Move R. These unmanned fighters may be deployed by your transports and express ships to aid in battle.
Robotic Interceptor (int) - Tech Level 4, Cost 1, Attack 0, Defend 0, Shields 0, Move R. An interceptor will interpose itself between enemy fire and the unit it is assigned to protect. At the beginning of each combat round, you may assign your interceptors to your units, 1 interceptor per unit. When resolving damage, your opponent must remove the interceptor before removing the protected unit's shields and then the unit itself.
PB Tender (APB) - Tech Level 4, Cost 6, Attack 1, Defend 1, Shields 1, Move V. A PB that starts with a tender may move freely. A PB that did not start with a planet, station, or tender must end its move with a planet, station, or tender. However, a tender may accommodate only up to 6 PBs.
Lance (LA) - Tech Level 4, Cost 6, Attack 1*, Defend 1*, Shields 1, Move V. A lance is a warship with a combat rating of 1. However, damage from a lance ignores shields (but not interceptors.) (* Damage ignores shields.)
Mass Driver (MD) - Tech Level 4, Cost 6, Attack 3*, Defend 0, Shields 1, Move V. A mass driver may use its combat strength only for bombardment. Otherwise it's attack strength is 0. Battleships and bombers may also contribute to bombardment. (* Bombardment only.)
Neutralizer (NU) - Tech Level 4, Cost 6, Attack 3*, Defend 3*, Shields 1, Move V. Neutralizers are warships with a combat strength of 3. However, damage from a neutralizer may be applied only to shields. (* Damage may be applied only to Shields.)
Robotic Probe (pro) - Movement R, Tech Level 4, counter combat rating 0. At the end of your Movement Step, transports and express ships may deploy probes to explore adjacent, unknown hexes. The probes are eliminated. If using Encounter cards ignore effects on scouts. Probes must adhere to the Two Hex Side and Civilization Level restrictions of the Standard Rules. Probes may explore hexes outside of Support Range.
Ion Ram (IR) - Tech Level 4, Cost 6, Attack *, Defend , Shields 1, Move V. The ion ram starts each battle with a combat strength of 0. At the end of each combat round that the ram is not fired, add 2 to its combat strength to a maximum of 6. ( Combat Strength = 0, 2, 4, or 6.)
Alien Expertise Cards
There are 36 Alien Expertise cards; 6 of each of the 6 types (1. Scouts, 2. Transports, 3. Colony Ships, 4. Stations, 5. Warships, 6. Experimental Units). The cards carry only the type name.
SCENARIOS
Here are a few new ways to play InterSpace.
- Alien Objectives: Each player has his or her own, unique victory conditions.
- Colonial InterSpace: Each player represents a separate nation state venturing into space from a common home system.
- Five+ Players: These rules allow up to 16 to play InterSpace.
- Imperial InterSpace: You win by conquering all other players. Each time you conquer a player you gain all of his or her technology breakthroughs. Technologies may combine to create unique synergies.
- Two Players: These optional rules work best for a 2 player game.
- Other Victories: A few more, simple ideas.
Alien Objectives
Not all species think alike. During your explorations you will encounter alien civilizations whose goals are totally unlike your own.
Cards
Draw a Card: There are 8 Alien Objective cards. Each player must draw 1 card at random before the game begins. Keep the card you draw secret for now.
Victory Points: The card you draw will explain how you earn victory points (VPs) during the game. You can earn VPs only in the manners described on your objective card. To win the game, you must earn 50 victory points (VPs).
End Game: When you have 50 or more VPs at the end of a game turn, the game is over, and you are victorious! If 2 or more players have 50 or more VPs the game ends in a tie.
Grapple Beams & Repair Robots: For the purpose of counting victory points units that are repaired or captured are still considered "destroyed".
Secret: In the early part of the game, you must keep your Alien Objective card hidden. However, you may be forced to reveal your card in some situations. For example, if you are the Conquerors and you build assault boats at a tech level 3 planet and someone points this out you must reveal your Alien Objective card.
One Region: All players must reveal their Alien Objective cards when all of the home worlds have been joined into a single region.
Examples
Researchers
You drew the Researchers card when the game began. This card states:
"For each of the following hex types you study, you earn 7 VPs: black hole, dust cloud, neutron star, nebula, pulsar, and wormhole. To earn VPs for a hex type, you must currently have 1 or more stations in 1 or more hexes of that type. If you no longer have a station in a particular hex type you no longer earn VPs for that type.
You also earn 1 VP for each industrial level you control."
Later in the game, you still control your home world with an industrial level of 8, and you have improved the industrial level of your original colony to 6. You do not control any other planets. You have system stations in a black hole hex, a nebula hex, and in the Aleph-Prime and Aleph-Null wormhole hexes. So right now you have 35 VPs: 14 for the industrial levels of your planets plus 21 for stations in 3 of the different types of hexes that interest you.
Techies
You drew the Techies card before the game began. This card states:
"You earn 4 VPs for each civilization level you attain. For example, if your civilization level is 6, you have earned 24 VPs.
You also earn 1 VP for each industrial level you control."
Later in the game, you control planets with industrial levels that total 21 and your civilization level is 5. You have 41 VPs and are only 9 VPs short of winning the game.
Additional Rules
Asterisk: An asterisk on an Alien Objective card indicates that there are additional rules that would not fit on the card. These additional rules are given here.
Parasites
Each member of the Parasite species inhabits the body and controls the mind of a host life form. The Parasites can multiply quickly and take over the population of an entire planet in a short period of time. When this occurs, the planet is infested.
Victory Points: The Parasites receive 5 VPs for each home world and colony they infest. The Parasite home world and original colony are already infested at the beginning of the game.
Control Does Not Matter: The Parasites receive 5 VPs for an infested planet even if another player controls it. It is possible for the parasites and the controlling player to earn VPs for the same planet. However, the parasites do not receive VPs for the industrial level of a planet they do not control.
Infestation: The Parasites have the special ability to infest another player's home world or colony by using a colony ship built at an infested planet. The Parasites must move the colony ship into the opposing planet's hex. Then, at the end of the Contact Step, the Parasites may remove the colony ship from play. This causes the opposing planet to become infested.
Not Colonization: By eliminating the colony ship, the Parasites are seeding the planet with pods and taking over the minds and bodies of the population. The planet remains under the control of its original owner and it retains its industrial and tech levels. The planet does not receive 6 additional IOUs when the colony ship is removed.
Colonization: An uninhabited planet becomes infested if it is colonized by a colony ship that was built on an infested planet, even if another player controls the planet that built the colony ship.
Conquered Planets: A planet is not infested merely by being conquered by the Parasites. The Parasites must still move a colony ship to the planet's hex and remove it as described above.
Eradication: The only way to remove an infestation is to reduce the planet's industrial level to 0. If you control the planet, you can reduce its industrial level by 1 each turn during the Investment Step. If you do not control the planet you may reduce its industrial level by bombarding it during your Contact Step. You cannot bombard a planet you control.
Rebels: If an infested colony rebels the colony is no longer infested.
Alien Objective Cards (Card Text)
Parasites*: Members of your species inhabit the bodies and control the minds of host life forms. You can multiply quickly to infest an entire planet. You earn 5 VPs for each planet you infest. You also earn 1 VP for each industrial level you control. See the Scenarios for more information.
Builders: Your people believe a strong and growing economy is the key to greatness. You earn 2 VPs for each industrial level you control.
Conquerors: You earn VPs each time you conquer a planet that you have not controlled before. The number of VPs you earn is equal to the planet's industrial level plus its tech level at the time of conquest. You also earn 1 VP for each industrial level you control. You may build assault boats at a cost of 4 IOUs. For all purposes, treat your assault boats as tech level 3.
Xenophobes: Your species is driven by a paranoid fear and loathing of all things alien. You earn VPs for destroying alien units. You earn 1 VP for each alien warship, 2 VPs for each scout, 4 VPs for each station, and 8 VPs for each colony ship you destroy. And you earn 1 VP for each alien industrial level you destroy by bombardment. You also earn 1 VP for each industrial level you control.
Warriors: Your people live to die in battle - there is no greater glory! You earn 1 VP for each of your own warships destroyed during your Contact Step. You do not earn VPs for destroying alien units and you do not earn VPs when your warships are destroyed defending themselves. You also earn 1 VP for each industrial level you control.
Techies: Nothing excites your species more than owning the latest gadget. You earn 4 VPs for each civilization level you attain. For example, if your civilization level is 6 you have earned 24 VPs. You also earn 1 VP for each industrial level you control.
Researchers: For each of the following hex types you study, you earn 7 VPs: black hole, dust cloud, neutron star, nebula, pulsar, and wormhole. To earn VPs for a hex type you must currently have 1 or more stations in 1 or more hexes of that type. If you no longer have a station in a particular hex type you no longer earn VPs for that type. You also earn 1 VP for each industrial level you control.
Royalists: Your people love to lavish extravagant gifts on their royal family. You also earn 1 VP for each industrial level you control. During the Purchase Step, your home world may buy VPs in pairs. The first 2 VPs you buy during the game cost 2 IOUs, the second 2 cost 4, the third 2 costs 6, and so on. Each VP you purchase counts against your home world's purchase limit.
Colonial InterSpace
Suggested by Roger Allen
In this scenario each player represents a nation state competing for dominance of outer space. All nations start in a single home system and expand outward.
Set-Up
Another Region: Remove the Another Region markers from the exploration box.
Home System: All players start in the same hex. Place a single home world hex in the center of the table and remove the remaining 3 home worlds from the game. Do not place any other hexes at this time.
Planet Card: Use a home world planet card to represent your nation in the home system. You nation starts with an industrial level of 8 and a tech level of 1.
No Units or Breakthrough Cards: You do not receive any units or Breakthrough Cards at setup.
Home System
Combat: Attacks and nova bomb detonation are prohibited in the home system hex. However, you may still defend normally against free agents such as berserkers.
Trade Goods: Trade goods may not be produced in the home system. Trade goods may be converted to IOUs only in the home system. You may convert your own trade goods as if they were alien trade goods.
Ore: The home system does not produce ore.
Worm-Holes
When you discover a worm-hole place its partner on the table so it is not connected to any other hex. Treat this hex as a separate region.
Another Region: Place 1 another region marker into the exploration box each time you discover a worm-hole. When you draw an another region marker from the exploration box randomly choose 1 unconnected worm-hole region and connect it with the home region following normal rules.
Multiple Colonies
You may establish more than one colony on a single planet. In addition, two or more players may establish colonies on the same planet.
Colonization Result: Draw a new card for each colony. For example, one colony may be in the planet's "Nice" hemisphere while the other is in the "Ice" hemisphere.
Industrial Levels: The total of the colonies' industrial levels may not exceed 8. During the Economic Phase, randomly determine who goes first on each shared planet.
Ore Depletion: At the end of the Economic Phase, one player should roll 2 dice for the entire planet. If the total is less than, or equal to, the sum of the colonies' ore production, the planet (and all colonies on it) may no longer produce ore. However, a "Mineral World" colony still produces ore.
Ground Transport: During your Contact Step, your colony may give unlimited IOUs, ore, and/or trade goods to other colonies on the same planet.
Conquest: You may conquer a colony normally using the Planetary Conquest rules of the Standard rules. However, you may conquer only 1 colony per planet per turn. After conquest, continue to treat each colony on the planet as a separate entity.
Ground Combat: During your Contact Step, your colony may initiate ground combat against one opposing colony on the same planet.
Colony Combat Rating: A colony's combat rating is equal to 1/2 of its tech level, rounded up.
Colonies Fire: Each colony rolls a number dice equal to its industrial level. Total the number of hits and consult the Bombardment Table of the Standard rules.
Example: Your colony attacks John's colony located on the same planet. Both colonies' industrial levels are 4. Your colony's tech level is 5, so you hit on 3 or less. You roll "1", "2", "3", and "4" totaling 6 on the bombardment table and reducing John's industrial level from 4 to 2. John's colony's tech level is 3, so he will hit on 2 or less. John also rolls "1", "2", "3", and "4" totaling 3 on the bombardment table and reduces your industrial level from 4 to 3.
Additional Rules
Victory: Use the victory conditions described in the Standard Rules.
Optional Rules: Use whatever optional rules you like. However, do not use Non-Random Exploration.
Encounter Cards: Do not roll for an encounter if the newly discovered empty space hex is adjacent to the home system.
Five+ Players
If 5 or more are playing InterSpace do not use the Getting Started rules to set up the game. Instead, each player begins the game with only 1 hex; his or her home world.
Home World Hexes: Since there are only 4 home world hexes in the game some players must use planet hexes to represent their home worlds. Treat these planet hexes exactly as if they were home world hexes.
Levels: Each player's home world starts with an industrial level of 8 but a tech level of only 1. So all players start the game with a civilization level of 1.
No Units: You do not receive any units at the beginning of the game.
Breakthrough Cards: You do not receive Breakthrough cards at the beginning of the game. When you improve your civilization level do not take and hold a Breakthrough card. Instead, set the card you want faceup in a common area on the table and place one of your unit counters on the card. If you want the same breakthrough another player has already chosen place one of your unit counters on that card.
Encounter Cards: Do not roll for an encounter if the newly discovered, empty space hex is adjacent to a home world.
Imperial InterSpace
Not yet playtested--feedback welcome!
You win by conquering all other players' home worlds.
Conquest
Home World: When you conquer an opponent's home world that player is eliminated from the game. You gain control of all of his or her remaining colonies and units.
Counters: You also take control of the conquered player's unbuilt counters. You may build these units and treat them as your own.
Breakthroughs: Take all of your opponent's Breakthrough cards except Drive Improvements.
Experimental Units: Take all of your opponent's Experimental Unit cards.
Synergy Card: You may acquire 1 new Synergy card each time you conquer an opponent. See Synergy Cards below.
Hyper Tech
You may purchase additional Breakthrough cards beginning the turn after you reach civilization level 8. You may purchase 1 card per turn during the Investment Step of the Economic Phase.
Cost: The cost of each card is equal to the square of its tech level. However, the cost of each drive improvement is equal to the cube of your current variable movement rate.
Duplicates Allowed: You may purchase a Breakthrough card you already have. You may ignore the limit on acquiring a new Drive Improvement card.
Restrictions: All IOUs spent to purchase a card must come from a single planet and that planet must have at least the tech level of the card you are buying. If several players purchase cards on the same turn randomly determine who gets to pick first.
Synergy Card: You may acquire 1 new Synergy card each time you purchase a new Breakthrough card after reaching civilization level 8. See below.
Synergy Cards
Some combinations of breakthroughs allow you to take a Synergy card. See each card for its requirements.
Choose One: You may take one Synergy card, if eligible, each time you a) conquer an opponent or b) purchase a new Breakthrough card after reaching civilization level 8.
Example: You are at civilization level 8 and you have Heavy Transports and Nav Computers. You purchase the 2nd Heavy Transport card for 4 IOUs so you may take either the Space Train or Quick Drop Synergy card.
Synergy Card Text
Asteroid Grapplers (S) - Requires: Grapple Beams + Heavy Transports. Double Ore: When you mine an asteroids hex, double the amount of ore you produce. For example, if your modified die result on the Asteroid Mining Table is 5, you produce 4 ore instead of just 2.
Efficient Navigation (S) - Requires: Both Nav Computers. Variable Movement Rate: Your variable movement rate is equal to two plus the number of Drive Improvement cards you hold.
Double Grappler (S) - Requires: Both Grapple Beams. Two Dice: Roll 2 dice for each unit instead of 1. The unit is captured if either result is even.
Regeneration (S) - Requires: Both Repair Robots. Two Dice: Roll 2 dice for each unit instead of 1. The unit is repaired if either result is an even number.
Space Train (S) - Requires: Both Heavy Transports. Unlimited Cargo: Your transports may carry any number of resources. However, a transport's movement rating is reduced by 1 for every 10 resources it holds. For example, if your transport has 19 resources, its movement rating is reduced by 1. If it had 20 resources, its movement rating would be reduced by 2.
Invisibility (S) - Requires: Both Stealth Techs. Secrecy: No one may inspect your counter stacks. Blocked Movement: Your movement cannot be blocked. Missles: Your units are immune to LRMs and VLRMs.
Quick Drop (S) - Requires: Heavy Transports + Nav Computers. Continue Moving: Your transports are not required to stop when they unload resources; they may continue to move normally. There is no movement point cost to unload resources.
VLRMs (S) - Requires: LRMs + Multiplex Sensors. Fire: At the end of your turn, your warships and stations may fire LRMs once into an adjacent hex. Units that were involved in a battle cannot fire. Units in different hexes cannot combine attacks against a single hex, but may make separate attacks on the same hex. Defending units regenerate shields after each attack.
Recon (S) - Requires: Both Multiplex Sensors. Two Hexes: Every time you explore an unknown hex, draw 2 hexes. Keep the hex you want and return the other to the exploration box. Two Cards: Every time you draw an Encounter or Colonization Result card, draw 2 cards. Keep the card you want and place the other with the discards.
Suppression (S) - Requires: Both Jamming. Suppression: For each scout in your fleet, you may designate one opposing unit that may not fire. You may change designations each combat round. A scout may suppress only if it is in its zone 0 or 1. A suppressing scout may not be used for Jamming.
Collective Units (S) - Requires: Grapple Beams + Modular Units + Repair Robots. Combat: During combat, your units may freely combine their combat strengths. Total the combat strengths of the units you wish to group and roll 1 die per group. Treat groups with a combat strength greater than 6 as 6. Ignore groups when you take damage. You cannot combine LRM or VLRM attacks.
Rapid PBs (S) - Requires: Both Advanced PBs. Movement Rating: The movement rating of your patrol boats is equal to your civilization level.
Teleport (S) - Requires: Multiplex Sensors + Star Gates. Jump: Your units may jump from a station directly to any hex within that station's support range. The movement point cost to jump is 1. Your units may continue to move and jump.
Transmat (S) - Requires: Both Star Gates. Unified Economy: During the Economic Phase, you may freely move resources between your planets. For example, you may spend IOUs on one planet to build units on another, you may refine ore on one planet to generate IOUs on another, and so on.
Reality Engineering (S) - Requires: Nova Bombs (NB) + Planetary Grid + Teleport. Swap Hexes: During your Colonization Step, you may replace hexes with other hexes on the map. Each hex must contain one of your NBs. The NBs are eliminated but other units are unaffected and remain with the hex as it is moved. For example, you have NBs in a Nebula and a Worm Hole. You may eliminate the NBs and swap the two hexes.
Omnipotence (S) - Requires: Invisibility + Reality Engineering + Transmat. Effect: You win!
Additional Rules
Nova Bombs & Planetary Grids: You may deactivate an opponent's planetary grid by eliminating 1 of your nova bombs from the planet's hex. This does not destroy any units or remove the hex from the game. It does allow you to bombard and attempt to conquer the planet. The grid becomes active again during the next Economic Phase.
Nova Bombs & Player Elimination: If your home world is destroyed by a nova bomb you are eliminated from the game. Remove all of your units from the map and treat all of your planets as uninhabited. No one receives your colonies, units, counters, or cards.
Optional Rules: Use the Breakthrough, Colonization Result, and Encounter card optional rules. Also use Non-Random Exploration and Experimental Units.
Two Players
Suggested by Michael & Sarah Van Devender
Fewer Hexes: Remove from the game 2 asteroids, 1 black hole, 1 dust cloud, 14 empty space, 2 home worlds, 1 nebula, 1 neutron star, 1 null space, 4 planets, 1 pulsar, and 1 wormhole pair. Keep all of the another region hexes.
Hidden Regions: At the beginning of the game, place a divider on the table so you cannot see each other's regions. Remove the divider when someone discovers another region or wormhole.
Secret Tech: At the beginning of the game, give each player his or her own deck of Breakthrough cards. Each deck must contain 1 of each type of breakthrough plus several drive improvements. When you increase your civilization level, take a card from your own deck. Reveal breakthroughs only when you use them.
When drawing hexes, discard unneeded Another Region and Home World hexes.
Other Victories
First Conquest: The first player to conquer an opponent's home world wins the game.
Greatest Civilization: The first player to reach civilization level 8 is declared the winner. If 2 or more players reach level 8 during the same economic phase the game ends in a tie.
VP Goal: Fifty (50) victory points (VPs) are normally required to win. For a shorter game 35 VPs is a good goal. Or choose 65 VPs or higher for a longer game.
Time Limit: Before you start a game, decide what time you want to quit. The player with the most VPs when the time limit is reached is the winner.
Exploration Limit: The game ends the instant the last hex is drawn from the exploration box. The player with the most VPs wins.
Bonus VPs (suggested by Dean Henderson): Your base VP score is 1 for each industrial level you control. You gain 1 bonus VP each time you:
- Win a space battle against another player
- Conquer another player's planet
- Increase your civilization level
- Research a space phenomena
Space phenomena are black holes, dust clouds, neutron stars, nebulae, pulsars, and wormholes. You may research each type of phenomena only once per game by sending a scout, cruiser, or station into the hex.