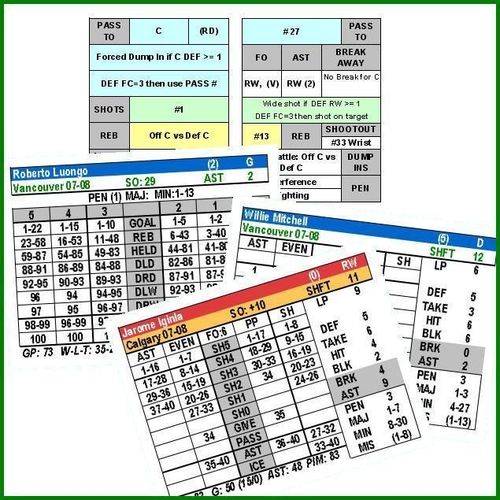
Inside the Crease Hockey
Inside the Crease Hockey Rulebook
Table of Contents
Table of Contents
- What You Need to Play
- Setup
- FAC Deck
- Face-offs
- PASS TO Section
- SHOT Section
- Rebound (REB) Section
- LOOSE PUCK Section
- DUMP IN Section
- BREAKAWAY Section
- ASSIST (AST) Section
- PENALTY (PEN) Section
- Power Play Killing Defense
- SHOOTOUT Section
- When Setting Up for After Penalty
- Playing Low Physical While Playing Without 5 on the Ice
- Final Two Minutes and Overtime
- Pass, Rebound or Loose Puck to an Empty Position
- Game Timing
- Line Changing (Optional)
- Strategies (Optional)
- Injuries (Optional)
- Pulling the Goalie (Optional; only within the last 80 seconds of the game)
- Offensive Zone Faceoff Shooting Chance (Optional)
- Intimidation Factor (IF) (Optional)
- Additional Penalty Ratings (untitled final page of the PDF)
What You Need to Play
- 2 Teams
- FAC Deck
- Timing-Scoreboard
- Score Sheet
- Tokens (used to mark score, time and return of penalty box players)
Setup
To begin each team must divide their players into lines. Each team will have 4 forward lines consisting of a LW, C and RW. Each team will also need 3 defense pairings divided into LD and RD. Each player is given a shift rating (SHFT) that shows how many shifts the player is rated to play per game. Each team must also choose a goalie to start the game. Stack each position with line 1 on top with 2 below and so on for each position. Now place each team on the table like this:
AWAY TEAM:   LW   LD   C   RD   RW   G
HOME TEAM:   LW   LD   C   RD   RW   G
You will use a game pawn to keep track of where the puck is at any time by placing the pawn on the controlling player.
FAC Deck
The FAC deck is used to move the play along in ITC. The deck has 200 cards, which are double-sided. Consider the side with the PASS TO section that has a position listed as the FRONT while the PASS TO with # number as the BACK. You will need to shuffle these well before beginning to play for the first time. Easiest way to shuffle is to break the deck into 4 manageable stacks and shuffle each one while inter-mixing the stacks as you go. Place one of the stacks next to the player cards to begin play with the front side showing.
When reading the FACs they are read as if they are one large card with both the front and back coming into play. Only one reading is taken off of each flip of the cards no matter which section is being referenced.
Face-offs
Face-offs are handled by comparing the face-off ratings of the centers in the game. If a team doesn't have a center then the highest FO rated player is used. You will be looking on the back portion of the FAC under FO to get the reading needed to resolve the face-off.
- The team with the highest rated player is considered the team with the advantage. If the FO reading lists just a position then the highest rated player wins the face-off and the player at the position listed is then in control of the puck.
- If the FAC has position with +# listed then that number is added to the lower players FO rating. If that makes his new FO rating higher than his opponents then his team now controls the puck.
- If both face-off players start with equal ratings but one team has a man or more advantage that team controls the puck with the player listed in control.
- If both face-off players start with equal ratings or after a +# result makes both face-off players equal then the puck is controlled by the team listed in parenthesis. H is the home team while V is the visitors.
Other outcomes in the FO section of the FAC cards:
KO HOME or VIS: The Home or Visiting player taking the face-off is kicked out of the circle. He needs to be replaced by the next highest player on the ice and another FAC needs to be flipped to resolve the face-off.
KO HIGH or LOW: The highest or lowest FO rated player is kicked out of the face-off circle to be replaced by the next highest player on the ice for that team. A new FAC needs to be flipped to resolve the face-off. ** if the player's ratings are equal then remove no player and flip again.
- If no player on the ice has a FO rating for a team then consider that player to be rated a 1.
PASS TO Section
The pass to section of the FAC is the most used and the only section that is used to time the game. The Pass To section is the complete blue section on both sides of the FAC. The front Pass To section mentions a player on the offensive team that has the puck. There is a 2nd position listed in parenthesis that is used on assisted passes so that an assisted pass reception doesn't use the same player that passed the puck. Below that, in the blue, are defensive results that may or may not stop the offensive player. If the defensive modifier fails to stop the offensive player then use the 1-40 number on the back of the FAC to complete the timed sequence of events.
Each player has 4 sections with ranges from 1-40 on their cards. The section used depends on the situation on the ice or is triggered by an event on the ice. These sections are:
- AST: This section is used on rebound shots or after an AST Pass.
- EVEN: This section is used when teams are at Even Strength
- PP: This section is used when a team is on the Power Play
- SH: This section is used when a team is Shorthanded
Outcomes from the offensive players card:
SH5-SH0: These are all shots at goal being attempted by a player with the higher numbers being a higher percentage shot than the lower numbers. When a SH# comes up flip another FAC and refer to the SHOT section.
GIVE: Giveaway by the offensive player possibly causing a breakaway (see Breakaway section)
PASS: The offensive player doesn't do anything with the puck except to attempt to pass it to a teammate. Flip another FAC and refer to the PASS TO section.
AST: The player has a made a great pass to a teammate to set up an automatic shot attempt. Flip another FAC and refer to the PASS TO section for the shooting player and use the 1-40 number in the shooting players AST range for the type of shot attempt. Disregard any defensive stops from this FAC.
- If the player shown receiving the assisted pass is the same player as the one who made the assisted pass then use the player at the position listed in parenthesis.
- If there is no player at the position listed then it is considered an empty position and the puck is tuned over to the opposing player who is listed opposite of the vacated position.
- If the 1-40 number is higher than the range shown on the card then the shooting player has shot wide of the net (refer to WIDE SHOTS IF in the SHOT section of the rules)
ICE: Only comes up when a team is shorthanded. The player has iced the puck to the other end in an attempt to kill time remaining on the Penalty. Begin play with the other team with the puck, flip another FAC and read from the PASS TO section.
Possible Defensive Stops
Defensive stops are the section in blue directly beneath the PASS TO on the front FAC. They refer to the defender(s) ratings to stop the advance of the offense. All failed defensive stops take you to the offensive players 1-40 ranged section to resolve the sequence. The possible stops are:
FORCED DUMP IN IF: If the defender listed has a DEF rating greater than or equal to the number mentioned on the FAC then a Dump In is forced. Check the back FAC in the DUMP IN section to resolve the play. (see Dump In)
Special PP rules:
[2nd edition] If the PP team has the puck and a DUMP IN is forced by the SH team just disregard the DUMP IN and play it as a forced PASS by the PP team. PP teams still controls puck but flip another FAC and move the clock.
[2nd edition] If the SH team has the puck and a DUMP IN is forced by the PP team just disregard the DUMP IN and play it as an ICE for the SH team.. This means no loose puck chase and you just flip a timed FAC with the PP team in control.
TAKEAWAY IF: If the defender listed has a TAKE rating greater than or equal to the number mentioned on the FAC the defender has taken the puck away. Flip another FAC and refer to the PASS TO section.
[2nd edition] During a power play if the PP team gets a TAKE from the SH team the PP team controls the puck and NO time is taken off the clock for the next PASS TO FAC.
LOOSE PUCK IF: If the defender listed has a HIT rating greater than or equal to the number mentioned on the FAC the defender has checked the offensive player off the puck causing a loose puck. Flip another FAC and refer to the LOOSE PUCK section. (see Loose Puck)
INTERCEPTION IF: If the combination of DEF ratings of the two defensive players listed is greater than or equal to the number mentioned on the FAC the defenders have forced an interception of the puck. Flip another FAC and refer to the PASS TO section. Use best discretion as to which defender made the interception.
PENALTY IF: If the defender listed has a PEN rating greater than or equal to the number mentioned on the FAC the defender has incurred a possible penalty. Flip another FAC and refer to the PENALTY section. (see Penalties)
- Exception: if a possible penalty has occurred but the 1-40 number from the back PASS TO section falls in a SH# or AST section the penalty is delayed. Play out the shot as you would normally with the exception that if the shot is not a goal, play is stopped to check on the penalty as above.
SHOT Section
The shot section in green on the FACs is used when any SH# is the result of the previous FAC. The shot section is broken into two parts with the front card SHOT section having a number from 1-100 while the back card in the SHOT section has possible defensive stops. If the defensive stops are successful then the 1-100 is not used.
Possible Defensive Stops On Shot Attempts
WIDE SHOT IF: If the defender listed has a DEF rating greater than or equal to the number mentioned on the FAC then the defender has forced the shooter to shoot wide of the net. Flip another FAC and refer to the LOOSE PUCK section. (see Loose Puck)
BLOCKED IF: If the defender listed has a BLK rating greater than or equal to the number mentioned on the FAC then the defender has blocked the attempted shot by the shooter. Flip another FAC and refer to the LOOSE PUCK section. (see Loose Puck)
* ALL rebound and AST shots can still be affected by these defensive stops in the shots section. Only breakaway shots cannot be affected by these stops.
Shots On Goal
Any shot that is not stopped by one of the above situations becomes a shot on goal. For these, use the 1-100 number from the front FAC card Shot section. This number is used to reference the Goalie card. Use the column that matches the type of shot taken. Goalies have columns from SH5-SH0 to match those types of shots that can come from an offensive player's columns.
Possible shot outcomes from the Goalie Cards:
GOAL: The shot beats the goalie and results in a goal scored for the shooter.
REB: The shot has been stopped by the goalie but is loose in front of the net. Flip another FAC and refer to the REB section. (see Rebounds)
HELD: The shot is stopped and held by the goalie. Begin play again with a face-off.
DLD, DRD, DLW, DRW and DC: The shot has been stopped by the goalie and he has diverted the puck to the player listed on his team. Flip another FAC and refer to the PASS TO section.
OOP: The shot has been deflected out-of-play by the goalie. Begin play again with a face-off.
Rebound (REB) Section
The rebound section of the FACs is triggered by shots that are stopped by the goalie that fall within the REB range of their cards. The rebound section, in yellow, has two parts. The front FAC REB section refers to a specific position that gets the rebound or a battle for the rebound between two players. The back FAC REB section has a number from 1-40. This number is only used when an OFFENSIVE player gets the rebound. If a defensive player gets the rebound disregard this number.
Possible outcomes from the REB section:
HOME/VIS POSITION: The home or visiting team player at this position gets the rebound.
OFF/DEF POSITION: The offensive or defensive player at this position gets the rebound.
POSITION vs. POSITION: A battle is occurring for the rebound between the players listed. Sometimes a + modifier is included for one of the players. To resolve the battle for the puck use the LP ratings of the players involved including any + modifiers as needed. The player that wins the battle gets the rebound.
- If the offensive player wins he gets a rebound shot. Use the 1-40 number from the back FAC REB section. This number is used on the rebounding players AST section to get the type of shot put back on net. From there, flip another FAC and refer to the SHOT section resolving as you normally would and all defensive stops are possible. If the 1-40 is higher then the player has in his AST range it is a WIDE shot. (see WIDE SHOTS IF in the SHOT section of the rules)
- If the defensive player wins then he gets the rebound. Flip another FAC and refer to the PASS TO section on his card.
[2nd edition] 3) If the battle ends in a tie give the puck to the HOME team. They are eligible to take a rebound shot explained above.
LOOSE PUCK Section
The loose puck section of the FACs come into play a lot during the game to resolve who controls the puck. Loose pucks can occur from rebounds, successful hits, some dump ins, and wide/blocked shots. Sometimes a specific position gets control of the puck, other times it is a puck battle. No matter which team (offensive or defensive) gets control of the puck after a loose puck, play continues with a flip of a FAC with the PASS TO section being referenced.
Possible outcomes from the LOOSE PUCK section:
HOME/VIS POSITION: The home or visiting team player at this position gets the control of the puck.
OFF/DEF POSITION: The offensive or defensive player at this position gets the control of the puck.
POSITION vs. POSITION: A battle is occurring for the loose puck between the players listed. Sometimes a + modifier is included for one of the players. To resolve the battle for the puck use the LP ratings of the players involved including any + modifiers as needed. The player that wins the battle gets the control of the puck.
[2nd edition] *If the battle ends in a tie give the puck to the HOME team.
FO: INJ? POSITION: The puck is tied up and a face-off results. There is a possible injury (see Injuries section) to the player listed. Resolve the injury and then begin play again with a face-off.
DUMP IN Section
This section is read right away from the DUMP IN section of the back FAC when a dump in is forced. The dump in section of the FAC is used when a defender makes a successful defensive stop. When a dump in happens a race for the puck can occur, a defensemen can chase down the puck, the goalie can drop the puck to a defensemen or the goalie can simply cover the puck.
Possible outcomes from the DUMP IN section:
GOALIE RECOVERS LEAVES FOR LD/RD: The goalie has retrieved the puck and has left it for the defensemen listed. Flip another FAC and refer to the PASS TO section.
DEF RD/LD CHASES DOWN PUCK: The defensemen listed has chased down the dump in and is now in control of the puck. Flip another FAC and refer to the PASS TO section.
GOALIE COVERS PUCK: The goalie is under pressure and has covered the puck to force a face-off.
PUCK BATTLE: A battle is occurring for the dump in between the players listed. Sometimes a + modifier is included for one of the players. To resolve the battle for the puck use the LP ratings of the players involved including any + modifiers as needed. The player that wins the battle gets the control of the puck.
[2nd edition] *If the battle ends in a tie give the puck to the HOME team.
BREAKAWAY Section
The breakaway section of the FAC is used whenever an offensive player makes a giveaway (GIVE) from his offensive ranges. After a giveaway, a mistake by an offensive player, the forwards on the other team can possibly be called upon to skate in alone on the goalie. To resolve a breakaway, flip another FAC and refer to the BREAKAWAY section. It will tell you that NO break is possible for a position or give you a qualifying rating that a position has to beat to get a break.
Possible outcomes from BREAKAWAY section:
NO BREAK FOR POSITION: A break away could not get started by this player. Flip another FAC and refer to the PASS TO section.
POSITION BREAK IF >= #: A breakaway is possible but the player listed must have a BRK rating greater than or equal to the number mentioned on the FAC.
- If the player fails the rating check then the break has failed but the player still retains possession of the puck. Flip another FAC and refer to the PASS TO section.
- If the player is successful on the rating check he has broken away for a one-on-one against the goalie. He gets an automatic SH5 shot with no possible defensive stops possible for the defense. Flip another FAC and refer to the SHOT section of the FAC, disregard all blocked or wide shot stops by the defense. Use the 1-100 number against the SH5 range of the defending goalie. Resolve as a normal shot with the exception that if the 1-100 number has a (BRK) next to the number the player has scored a goal as well.
NO BREAK FOR POSITION/ PENALTY SHOT?: No breakaway possible but the reason may be because a penalty shot is called. The player that failed to get the break is the player potentially fouled. Flip another FAC and refer to the AST section. If the defensive player (the team that gave the puck away in the first place) mentioned in the AST section of the FAC has a PEN rating greater than or equal to the number there a penalty shot has been called. (Note: any AST section FAC with a ranking mentioned (high, 2nd high, low etc) are considered to be no penalty shot)
Penalty shot resolution: Penalty shots are resolved in the same as a breakaway above with an additional bonus of adding the shooting players BRK rating to the GOAL range of the defending goalie. (Ex. If a player has a BRK rating of 5 and the goalie has a SH5 GOAL rating of 1-24, the new GOAL rating would be 1-29 (24+5). All (BRK) shot numbers (91-99) count as goals as well.
ASSIST (AST) Section
Before reading this section to get extra assists you need to "burn" a card. Meaning flip one extra FAC before getting the AST reading. The assist section of the FAC is used after a goal is scored and extra assists need to be assigned. A max of two assist checks are done per goal. Sometimes an assist or two have occurred during regular play by way of an AST pass coming from the offensive ranges that results in a goal or after a rebound shot that goes for a goal. No matter what the case, flip a FAC until and refer to the AST section until either you have checked it twice or two assists have already been credited.
Possible outcomes from the AST section:
HIGH/ LOWEST: Some refer to where the player ranks on the team as far as their AST rating goes. Give an assist to the player mentioned by rank on these. If a tie occurs based on the AST rank give it to the player with the most assists on the year.
POSITION (#): These refer a specific position with a number. If the player at that position has an AST rating greater than or equal to the number mentioned give him credit for an assist.
- If a player is referred to that has either scored the goal or already received an assist use only the number next to the position and check the other players on the ice to see if they can beat the number mentioned on the FAC, if any can then give them credit for an assist. If more than one player qualifies for an assist in this way then give the assist to the highest rated AST. If still a tie give the assist to the player with the most assists on the year.
PENALTY (PEN) Section
The penalty section of the FAC is used when a possible penalty has occurred from the defensive stops of the PASS TO section. When checking for a penalty a 1-38 number is usually given along with some other information sometimes on the front FAC penalty section. The back FAC penalty section is broken into a minor (top) and major (bottom) section that gives names for the penalty assessed if one happens. Depending upon the type of penalty, check the proper section to get the name of the penalty.
Possible outcomes from the PENALTY section:
##: The number is used to check against the possible players range in his MIN and MAJ sections on his card. If the number falls within the range of either type of penalty then that is what is assessed the player. If the number falls outside of the ranges then no penalty is incurred and play is restarted with a face-off.
## + MINOR IF MAJOR: If the number falls in the possible players MAJ range he is assessed a minor penalty as well as a major. If outside the MAJ range of the player it is just a MIN.
## DOUBLE MINOR: If the number falls in the possible players MIN range he is assessed two minor penalties. If the number is outside the MIN range then no penalty is assessed.
## + OPP PEN # OR HIGHER: If the number falls within either MIN or MAJ range then the player is assessed that type of penalty plus if the opponent (the player that had the puck when the PEN was called) has a PEN rating greater than or equal to the number mentioned then he also receives the same type penalty. If the number falls outside the original players ranges no penalty is assessed.
## + OPP: If the number falls within either MIN or MAJ range then the player is assessed that type of penalty plus the opponent (the player that had the puck when the PEN was called) also receives that same type penalty. If the number falls outside the original players ranges no penalty is assessed.
## + HIGHEST OPP: If the number falls within either MIN or MAJ range then the player is assessed that type of penalty plus the opponent with the highest PEN rating is also assessed that same type penalty. If the number falls outside the original players ranges no penalty is assessed.
GOALIE PENALTY ?: The goalie of the defending team is possibly assessed a penalty. Flip another FAC and check only the number in the PENALTY section. Check that number against the MIN and MAJ range of the goalie. If the number falls outside those ranges then no penalty is assessed.
Fighting Majors
When a fighting major happens you need to find the other participant in the fight so they can both be removed for a fighting major. To do this when the original penalty is a fighting major flip another FAC and refer to the AST section of the FAC. A position and number are given that you use to check the PEN rating of that player on the opposing team. If that player has a PEN rating greater or equal to the one in the AST section of the FAC then he is the fighting opponent. If the PEN rating for that player is lower than the fighting opponent is then use the highest PEN rated player on the ice. If there is a tie give it to the player with the most PIM on the season.
Misconducts
When looking for a penalty type there are some majors that say Fighting (#).
[2nd edition] This is a possible misconduct as well. Flip another FAC and refer to the PEN # area (1-40#).
If the number falls within the MIS range the player is given a Misconduct penalty rating as well.
(Transcriber's note: in the PDF the gray highlight on this passage covers the words "This is a possible misconduct as well. Flip another FAC and refer to the PEN # area (1-40#)." and stops there; the rest of the sentence is not highlighted.)
Penalties with a INJ?
Some penalties have a INJ? along with the penalty name (ex. Roughing INJ?, Boarding INJ?, etc). When these occur an injury check (see Injuries section) is needed to resolve whether a player was hurt during the penalty or not. The player to be checked for injury is the one that had the puck when a penalty check was being made.
- Home RD has the puck and a penalty is called on the Away LW. The penalty is a Roughing INJ?. You would need to check the Home RD for possible injury.
Power Play Killing Defense
Some players have a secondary DEF rating shown in ( ). These can be higher or lower than the regular DEF rate. These ratings are ONLY used when this player is on the ice in a short-handed situation because of a penalty.
SHOOTOUT Section
A shootout system came into effect in 05/06 to decide games in case the were tied after regulation and overtime. The shootout section of the FACs can have as many as two parts; a number which decides the outcome of the shootout shot and some commentary. To resolve a shootout, you need to determine a shooter and the goalie. Each player is assigned a SO rating which is a modifier number. Goalies have a number for their SO rating. The shooters SO rating is added to the goalies SO rating to get the SO number for this shot attempt. Flip a FAC and refer to the shootout section, if the number is less than or equal to the modified SO number the player has scored. Other outcomes that don't have numbers but only commentary on the shot are missed shots.
When Setting Up for After Penalty
When a team goes with less than 5 skaters due to a penalty some positions must be left blank for the missing players.
- With 4 skaters on the ice leave the C position empty.
- With 3 skaters on the ice leave the LW and RW positions empty.
Playing Low Physical While Playing Without 5 on the Ice
[2nd edition] Team plays LOW PHYSICAL during shorthanded or both team LOW with both 4 on 4
[2nd edition] There should be less one-on-one contact so less hits. The "disregard if playing LOW" affects the PEN if >1 FACS (5 of them) and the HIT if >1 or >2 FACs (10 of them).
Final Two Minutes and Overtime
[2nd edition] During the final 2 minutes of the game or overtime cut ALL PEN rates in half (rounding down). So a 5 becomes 2 and a 9 becomes a 4.
Pass, Rebound or Loose Puck to an Empty Position
[2nd edition] During the game in shorthanded situations some positions are left with no player manning it. If a PASS, REBOUND or LOOSE PUCK goes to an empty position give the puck to the opposing player at the same position. Flip another timed FAC and refer to the PASS TO section to continue play.
If during something like 4 on 4 situations, where both teams are missing a C, then flip another FAC and refer to Loose Puck to find the controlling player. If that doesn't resolve control of the puck, whistle the puck dead and begin play with a new Face-off.
Game Timing
The game is timed in 20-second increments. The only time the clock advances is when you are getting a result from the PASS TO section. The exception to this is that the clock DOES NOT advance when getting the player and 1-40 number after an AST pass.
Line Changing (Optional)
Players have a number under SHFT that give the amount of 2 minute shifts that player may play in a game.
- Teams MUST change lines in and out at every 2-minute increment. (18,16,14, etc).
- On power plays or shorthanded opportunities you have the option of instantly switch out lines but they count as a shift even if the other line only got 20 seconds on the ice. (Ex. A power play begins at 11:20 left in the period. The players that played from 12:00 to 11:40 are credited with a shift. A power play team is brought on from 11:40 to 10:00 they are also credited with a shift. You can complete a 2 minute power play with the same players and change shifts when the PP situation ends even if one of the 2 minute increments happen
- No player is allowed to play shifts back-to-back unless one is a special teams shift.
Basic shifting: What I do is place 4 forward lines in a stack at each position and 3 defensive pairings at their 2 spots. Then I just rotate the players every 2 minutes. When a power play comes up I shift the offensive team's line to the better line if it is within the top 2 in the stack.
Strategies (Optional)
Cards are included to set optional forecheck and physical play settings. The number of forecheckers used directly affects your offense and defense. The PASS TO, SHOT and BREAK AWAY sections sometimes have instructions that override the normal action despite rating checks on the players. The effects of the different strategies are shown on the cards. Here is how the Forechecking settings can change the game:
- FC 3 = better chance that if you get a PASS that it changes to an AST pass; less chance that a dump in is forced; less chance to force a wide shot or block a shot; better chance for a takeaway; better chance to get a breakaway shot after a giveaway
- FC 1 or 0 = some AST passes become just a PASS; better chance to force a dump in; better chance to force a wide shot or block a shot; less chance for a takeaway; less chance to get a breakaway shot after a giveaway
- PHY HIGH = better chance to make a successful HIT on a player; better chance that a penalty will be called
- PHY LOW = less chance to make a successful HIT on a player; less chance for a penalty to be called
The PHY LOW setting should be used be a team playing shorthanded to show their attempt to not lose another player to penalty while already being down a player.
Injuries (Optional)
All players have an injury rating. When an injury occurs, flip a FAC and refer to ONLY the number in the Penalty section (1-38). Compare this number to the players INJ rating. If the number is less than the INJ rate use the right column of the INJURY CHART found on the scoreboard chart. If the Penalty number is greater than or equal to the INJ number use the column to the right.
If a Goalie Penalty? comes up in the Penalty section of the FAC the injury could be to the goalie of the same team as the player that was originally being checked. Flip another FAC until you get a number in the Penalty section of the FAC and compare that to the goalies INJ rate. Resolve as above.
Pulling the Goalie (Optional; only within the last 80 seconds of the game)
- This puts the team with the 6th skater in a "power play" situation. Treat this as such with any pass that goes to the same player on back-to-back FAC cards now going to the extra skater.
- Use the PP section of the player cards for the team with a 6th attacker. If this team was shorthanded before the goalie is pulled then use the EVEN section.
- The team without the 6th attacker must use their SH section. However, any SHOT that would require a goalie save on shots towards the empty net would be considered a goal.
- The team with the extra skater is considered in the FC=0 for blocks, wide shots and dump ins while they are considered in a FC=3 for takeaways.
Offensive Zone Faceoff Shooting Chance (Optional)
[2nd edition] First of all this should only be used in two situations and only AFTER a HELD puck by the defending zones teams. It should only be used during the last 20 seconds (last FAC) of a period or the last 20 seconds of a power play by the PP team. Most of the time an offense can take their time and play out the series of FACs but in these two situations I would think their offense takes on an up tempo approach.
[2nd edition] How it would work is when checking for a shot off of the face off you first have to win the FO. Then if the FO tie breaker in the FO check, the (V) or (H), must be for the team that could shoot. If these happen then you read what player controls the puck and give him a SHOT # based on where a #20 SHOT would fall on his AST shot column. Play the shot as a normal shot with all defensive stops possible.
Intimidation Factor (IF) (Optional)
[2nd edition]
- Whenever a team gets a successful HIT on the other team the IF for that team goes to a +1.
- These become cumulative so the IF can go back and forth as you play.
- The IF number is added to that teams LP rate.
- The IF resets to 0 for both teams after one of the following: 1) Any goal 2) Any penalty 3) Any new start of a period
Additional Penalty Ratings (untitled final page of the PDF)
The sample player card below (Nick Kypreos) shows the new rating layout. The annotations at the right of the card are printed in the PDF:
Nick Kypreos                                   (4)    LW W
Hartford 92-93                       11/0/1   SHFT    6
  AST   EVEN        PP     SH        LP       5
  1-24  1-3   SH5   1-10
 25-40  4-5   SH4  11-16             DEF      3
        6     SH3          1         TAKE     3
        7     SH2                    HIT      7
        8     SH1                    BLK      3
              SH0                    BRK      6
        9-15  GIVE 17-23   2-7       AST      2
       16-37  PASS 24-37   8-12      PEN 11 (23)
       38-40  AST  38-40             MAJ  8 (9)
              ICE        13-40       MIN 36 (2)
GP: 75  G: 17 (0/0)  AST: 10  PIM: 325   MIS 37 (13)
- The (23) is the new FIGHT rate
- The (9) is the new Misconduct off a MAJ rate
- The (2) is the new Misconduct off a MIN rate
- The (13) is the new Match off a MIS rate
Everything works the same as the other penalty system with the exception of possible additional penalties being called on the same play. After getting the initial 1-38 number that falls into whichever type penalty (MAJ, MIN, MIS) you would check to see if there is a possability of an additional penalty being assessed on the whistle. If the player does not have a (##) rate next to the type of penalty called your done. If the player does have additional ratings (##) next to the penalty type (I picked Kypreos because he has them all) then you would flip another FAC and check the 1-40 PASS TO number to see if more minutes gets added on.
If a misconduct comes off the additional minutes check you would once again flip and check to see if the player could get a Match penalty. One more FAC flip to check the 1-40 number under PASS TO would be used to check the players Match rate against the number. Obviously if the player does not have a Match rate there would be no need to check.
The numbers no longer have a range for MAJ, MIN and MIS. The 1-38 number for penalty type check are read from top to bottom. If the 1-38# is less than or equal to the type penalty then that is the call.
Ex. Kypreos has ranges from MAJ: 1-8, MIN: 9-36, MIS: 37. A 38 would be no penalty, faceoff
Fighting majors
You still use the same process as before getting a reading from the AST section of the FAC but instead using the PEN rate you would use the FIGHT rate. If it refers to a position that doesn't qualify then make the fighter the highest on the ice.
Ex. We have a team that has a lineup with FIGHT ratings of:
| LW | LD | C | RD | RW |
|---|---|---|---|---|
| 2 | 10 | 1 | 5 | blank |
FAC AST section reads:
- LD (1): LD has a rate that is >=1 (10) so he is the other fighter
- RW (2): RW has no FIGHT rate so he is not the fighter, instead go with high on ice LD
- C (5): C rate 1 is < 5 needed so no fight for him, instead go with high on ice LD
- 2ND HIGH: Figure the 2nd highest in ice which is RD
Opposing players
You would also check for additional penalty minutes even if the player was not the instigator of the original PEN check. So coincidental minors and fights could have you check for additional minutes for all players involved.
The (**) reading is an automatic additional assessment with no need for a 1-40 number check. It would be considered a (40).