Inside Pitch Baseball
Inside Pitch Baseball Rulebook
Table of Contents
Table of Contents
- Sample Cards
- 1 Basic Procedure
- 2 Pitcher Card
- 3 Batter Card
- 4 Ballpark Card
- 5 Errors
- 6 Range Plays
- 7 Runner Advancement on Hits
- 8. Setting the depth of infielders
- 9 Ground outs
- 9.1 No runners on or 2 outs
- 9.2 Runner on 1st, less than 2 outs
- 9.3 Runner on 2nd, less than 2 outs
- 9.4 Runner on 3rd, less than 2 outs
- 9.5 Runners on 1st and 2nd, less than 2 outs
- 9.6 Runners on 1st and 3rd, less than 2 outs
- 9.7 Runners on 2nd and 3rd, less than 2 out
- 9.8 Bases loaded, less than 2 out
- 10 Line outs
- 11 Fly outs
- 12 Strategy Roll
- 13 Pitching Changes
- 14 Injuries
- 15 Options
- FAQ
- Rare Play Charts
- Symbol Key
Sample Cards
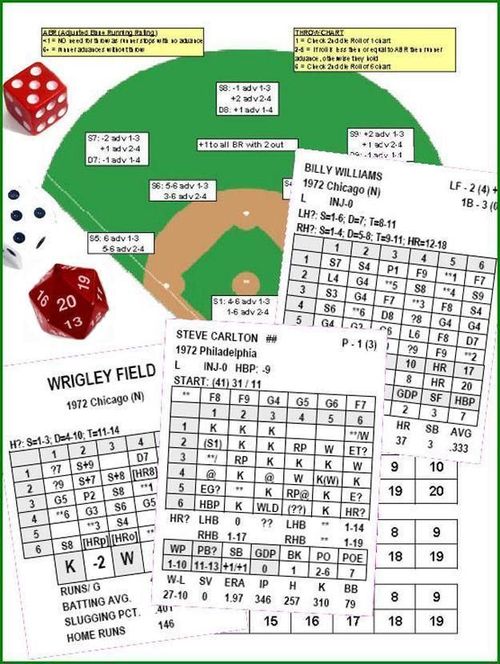
Sample Ballpark Card (San Diego Stadium, 1970 San Diego)
Parts of the card: ballpark name; team's park and year; "H?" outcomes (example: H?: S=1-7; T=8-12; [HR]=13-14); ballpark matrix (6x6, columns 1-6 by the RED die and rows 1-6 by the WHITE die); ballpark adjustments for K, W and HR (HR changes are rare; example K +2, W -1, HR 0); ballpark stats (runs per game, batting average, slugging percentage, home runs).
Sample matrix:
| 1 | 2 | 3 | 4 | 5 | 6 | |
|---|---|---|---|---|---|---|
| 1 | S7 | S+7 | **2 | S5 | D7 | D8 |
| 2 | **6 | [HRp] | (blank) | G1 | **3 | D9 |
| 3 | **5 | G6 | S6 | S8 | S4 | (blank) |
| 4 | (blank) | ?9 | S8 |
Sample Hitter's Card (Johnny Bench, 1970 Cincinnati)
Parts of the card: name; team and year; hitting side (R); injury rating (INJ-0); positions with range (error #) arm/pivot (for catchers: range/PB rate (error #) arm); "?" outcomes versus lefties and righties (LH?: S=1-5; D=6-8; T=9-11; HR=12-16 / RH?: S=1-3; D=4-8; T=9); batting matrix; K/W/HR ratings versus LHP and RHP; ratings line (BR base running, BNT bunting, ATT jump, SB steal, GDP double play, SF sac fly, HBP hit by pitch); stat line.
Sample: positions C - 5/2 (19) -2, LF - 2 (12) 0, RF - 2 (18) 0, 1B - 2 (11).
| 1 | 2 | 3 | 4 | 5 | 6 | |
|---|---|---|---|---|---|---|
| 1 | S6 | ?8 | F8 | **4 | **3 | **6 |
| 2 | ?7 | H/F9 | **5 | G/S5 | F7 | ?7 |
| 3 | S8 | G4 | F9 | G5 | **2 | H/F9 |
| 4 | S5 | D/F7 | G6 |
LHP: K 10, W 5, HR 20. RHP: K 9, W 10, HR 20. Ratings line: BR 3, BNT 2, ATT 1, SB 14, GDP 2, SF 3, HBP 0. Stat line: G 158, AB 605, R 97, RBI 148, HR 45, SB 5, AVG .293.
Sample Pitcher's Card (Tom Seaver, 1970 New York (N))
Parts of the card: name (## if the pitcher has his own hitting card); team and year; pitching side (R); injury rating (INJ-0); hit-by-pitch rate (HBP: -3); positions, range (error #) (P - 4 (3)); potential Special K rating; start/relief (games pitched) with tired/pull rate (START: (36) 33 / 13, RELIEF: (1) 1 / 0); actual HR given up (21); the ** section (used for automatic outs and for ball location on hitter's and ballpark cards); pitching matrix; ?? ranges for LHB and RHB; HR? ranges versus LHB and RHB; WP and PB? ranges; SB hold/steal rate; GDP; BK; PO pickoff/balk; POE pickoff error ranges; stat line.
** line: 1 F8, 2 G4, 3 G5, 4 G6, 5 F7, 6 F9.
| 1 | 2 | 3 | 4 | 5 | 6 | |
|---|---|---|---|---|---|---|
| 1 | K | K | K | W+/ | W | @ |
| 2 | E? | K | K(W) | @ | K | /K+ |
| 3 | /HR | RP | W | RP@ | /W | K |
| 4 | HBP | WLD | W |
HR? LHB 1-12, RHB 1-8. ?? LHB ** 1-12, RHB S1 1-3. WP 1-9, PB? 10-12, SB 0/0, GDP 0, PO 1-3, POE 4-5. Stat line: W-L 18-12, SV 0, ERA 2.82, IP 290, H 230, K 283, BB 75.
1 Basic Procedure
Inside Pitch uses three six-sided dice (3d6) of different colors (traditionally RED and WHITE and BLUE) and one twenty-sided die (1d20). The BLUE 1d6 and the 1d20 will only come into play occasionally.
An at bat begins by rolling 2d6 (RED and WHITE) against the pitcher's card. Dice are read column first (RED die), then row (WHITE die). The 1d20, which can be rolled at the same time, is used for ratings checks either on the pitcher's card or the batter's card depending on the result. Use the BLUE 1d6 when a simple 1d6 is required.
If the rolled result from the pitcher's card is inconclusive, an additional roll of the 2d6 is necessary. Depending on the type of result from the pitcher's card, this roll is read from either the batter's card or the ballpark card in the same fashion, column first then row.
2 Pitcher Card
Pitchers who have faced a minimum of batters from both sides of the plate during the carded season will have split results. Read to the left of the / when the batter is batting left-handed and read to the right when the batter is batting right-handed. Switch hitters are assumed to be batting from the opposite side from which the pitcher is throwing (batting right-handed against a left-handed pitcher). Results such as K/ or /W+ have a blank on the right and left respectively.
2.1 Blank
No result. Roll 2d6 against the batter's card.
2.2 S1
This is a single past the pitcher into the outfield.
2.3 (S1)
If the pitcher is tired (13.1), this is a single past the pitcher into the outfield, otherwise it is a blank.
The parentheses are a reminder of the exhausted pitcher rule discussed later. (13.3)
2.4 **
On the pitcher's card, this is an automatic out. This is where the blue 1d6 can be used and read the type of out from the ** line on the pitcher's card.
Note that the results from the batter's card or ballpark card that reference the pitchers ** line are not automatic outs and are subject to any pending range or error checks.
2.5 **(S1)
If the pitcher is tired (13.1), play like S1 from 2.2 otherwise it is played like the ** from 2.4.
The parentheses are a reminder of the exhausted pitcher rule discussed later. (13.3)
These results are not in every season. However, the cards for the season they are in should be played as printed just like cards without these readings should only be played the way those cards read.
2.6 WLD
This is a possible wild pitch or passed ball. If no runners are on base, disregard and roll on the batter's card.
When runners are on base, roll 1d20 against the pitcher's WP and PB? ranges. If the roll is in the WP range, it's a wild pitch and all runners advance one base.
If the 1d20 roll is in the PB? range, roll an additional 1d6 against the catcher's passed ball rating (the number after the / in his defensive ratings). If the roll is less than or equal to the rating, the catcher blocks the ball. If the roll is greater than the passed ball rating, it is a passed ball.
If neither a wild pitch nor a passed ball is rolled, go ahead and roll on the batter's card.
After resolving these checks, continue the at bat by rolling again (2d6) on the batter's card.
2.7 (??)
Roll 1d20 against the ?? split rating on the pitcher's card, either the LHB rating against left-handed batters or the RHB rating for right-handers. If the roll is in range, it is either a ** or S1 result as listed on the card. If the 1d20 roll is outside the range or there is no range, it is a blank with no result. Proceed to roll 2d6 against the batter's card.
This result applies whether or not the pitcher is tired. The parentheses are a reminder of the exhausted pitcher rule discussed later. (13.3)
2.8 @
Roll 2d6 against the ballpark card to resolve the play.
2.9 E?
Most likely a possible error. Roll 2d6 against the batter's card to resolve the play. On all results, check for the error by rolling 1d20 against the fielder's error rating.
2.10 ET?
Possible throwing error. Roll 2d6 against the batter's card to resolve the play. Check for an error only on plays involving throws. Do this by rolling 1d20 against the fielder's error rating. Check for a throwing error on all hits where runner advancement requires a throw from an outfielder or a hit to an infielder that is considered knocked down but possibly thrown away.
2.11 EG?
Most likely a possible error on balls hit on the ground. Roll 2d6 against the batter's card to resolve the play. On ground ball results, check for an error by rolling 1d20 against the fielder's error rating. Do not check for errors on fly outs, popups, or line drives.
2.12 HBP
Possible hit-by-pitch. Roll 1d20 against the sum of the batter's and pitcher's HBP ratings. If the sum is less than one, then no HBP can occur. If the roll is less than or equal to the combined rating, the batter is hit by the pitch and is awarded first base. If the roll is greater than the combined rating, proceed to roll 2d6 against the batter's card.
2.13 K and K+
Possible strikeout. Roll 1d20 against the sum of the batter's K rating and any ballpark K adjustment. If K+, add ten to the sum. If the roll is less than or equal to the adjusted rating, the batter strikes out. Otherwise, proceed to roll 2d6 against the batter's card.
2.14 W and W+
Possible walk. Roll 1d20 against the sum of the batter's W rating and any ballpark W adjustment. If W+, add ten to the sum. If the roll is less than or equal to the adjusted rating, the batter walks. Otherwise, proceed to roll 2d6 against the batter's card.
2.15 K(W)
When the pitcher is not tired, proceed with a K possible strikeout result. If the pitcher is tired (13.1), proceed with a W possible walk result.
The parentheses are a reminder of the exhausted pitcher rule discussed later. (13.3)
This can be optionally as a K(HR) check shown in options
2.16 HR
Possible homerun. Roll 1d20 against the batter's HR rating. In rare instances, the ballpark card has an adjustment for HR. If so, apply that to the batter's rating. If the roll is less than or equal to the adjusted rating, it's a homerun, otherwise it is a blank with no result (proceed to roll 2d6 against the batter's card).
2.17 HR?
Possible homerun. Roll 1d20 against the HR? ranges on the pitcher's card using the batter's handedness (LHB or RHB). If the roll is within the range, treat the result as an HR result (follow directions above). If the roll is outside the range, it is a blank with no result (proceed to roll 2d6 against the batter's card).
The ballpark card HR rating is not used to adjust the pitchers HR? range only the batters HR rate.
2.18 RP
Range play. Roll 2d6 against the batter's card to resolve the play. Use the blue 1d6 against the fielder's range rating. If the roll is less than or equal to the fielder's range rating, the fielder makes the play.
2.19 RP@
Range play. Roll 2d6 against the ballpark card to resolve the play. Use the blue 1d6 against the fielder's range rating. If the roll is less than or equal to the fielder's range rating, the fielder makes the play.
2.20 Special K LHB or Special K RHB
Some pitchers need additional chances for strikeouts beyond those that the 36 cells on a pitcher's card allow. These pitchers have Special K ratings. For pitchers with these additional ratings, all regular outs from the batter's card or ballpark card can become strikeouts if a 1d20 roll is within the Special K range.
Often the pitchers with Special K ratings are found in eras of high strikeout rates. But the pitchers that require extra strikeout chances are not always those with the highest strikeout rates. Excessive walks or, more likely, an extremely low rate of balls in play might necessitate Special K ratings.
Range or error checks that have been activated by the pitcher's card take precedence and no Special K check is made, regardless of the result. Any rare play also cancels out the Special K check.
Results directly from the pitcher's card of ** are not subject to special K checks.
The special K rate is not adjusted by the ballpark K rate.
Results from the batter's card or ballpark card that reference the pitcher's card ** line (**1 through **6) are included in checks for special K's. These are just regular outs influenced by the pitcher.
Example: Pitcher's card is a K, batter's K rating is a 10 (ballpark K=-2) and the 1d20 is a 9. The batter narrowly avoids the strikeout. Rolling 2d6 on the batter's card results in a G4. The pitcher's Special K rating is 1-6 (not altered by the ballpark K rating). Roll a 1d20 to see if the ground out is swapped for a strikeout, rolls of 1-6.
Example: Pitcher's card is @, ballpark card is ?9, and a 1d20 check against the H? range yields an HR result. Roll another 1d20 against the batter's HR rating. If the roll is less than or equal to that rating, it's a homerun. If the roll is greater than that rating, the normal result would be an F9 and because it's not a hit, the Special K rating is used. If another 1d20 roll is inside the Special K rating, the fly out is swapped for a strikeout.
Example: Pitcher's card is an RP, batter's card is a G6. Since a range check is necessary, there is no Special K check, regardless of result. Simply roll the 1d6 against the shortstop's range rating and resolve as a normal range play.
Example: Pitcher's card is an E?, batter's card is a F8. Since an error check is necessary, any Special K rating a pitcher may have is irrelevant. Roll 1d20 against the centerfielder's error rating and resolve as a normal error check play.
3 Batter Card
Batters who have faced a minimum of pitchers from both sides of the plate during the carded season will have / split results in the grid as well as split K, W, and HR ratings. Read to the left of the / when the pitcher is pitching left-handed and read to the right when the pitcher is pitching right-handed.
When checking K, W, or HR ratings, read the LHP line against left-handed pitchers and the RHP line against right-handed pitchers. In both cases, remember to apply any adjustments to these ratings from the ballpark card.
3.1 **1, **2, **3, **4, **5, and **6
Read the number from the corresponding pitcher's card ** line to determine the type of out. Apply any range or error checks to the fielder if applicable.
3.2 ?7, ?8, and ?9
Possible hit to the outfield (7=LF, 8=CF, 9=RF). Roll 1d20 against the LH? or RH? splits on the batter's card depending on the handedness of the pitcher. Batters without splits will have a range of H? results. Ranges may be given for singles, doubles, triples, and home runs. Rolls outside all the ranges are fly outs. Resolve any range or error checks after first determining the batted ball type. Home run results are automatic, they are not influenced by range plays, error checks, or the batter's HR rating.
Example: RH?: S=1-8; D=9-16; T=17-18 where 19-20 is a fly out.
3.3 Hits: S, D, T, H
Single, double, triple, and home run, respectively. Singles to infield positions are considered singles through the infield past that player to the outfield. Any H results are automatic homeruns without the need for a 1d20 roll against the batter's HR rating.
3.4 Outs: G, P, F, L
Ground out, popup, fly out, and lineout respectively.
Example: S/G6 single past the shortstop against a left-handed pitcher, ground out to shortstop against a right-handed pitcher.
Example: D/F9 fly out to the right fielder against a right-handed pitcher, double to right field against a left-handed pitcher.
3.5 W or K
This is a straight walk or strikeout result. Walks and strikeouts in the batter's grid are rare and appear only on player's cards with extreme hitting stats, mostly pitchers. These results disregard any range or error checks.
4 Ballpark Card
Results of @ or RP@ on the pitcher's card require rolls of 2d6 against the ballpark card, rather than the batter's card.
4.1 Blank
Go to the rare play charts and roll 2d6. There are four charts: two for bases empty situations and two for when runners are on base. Those are also broken down by how you got to the ballpark card, @ or RP@. Use the appropriate chart as the game situation and how you got there dictates.
The rare play chart result overrides any range or error check from the pitcher's card. Play the at bat on what the rare play chart says.
If play rolled doesn't match the situation (rare) roll again on the same chart.
4.2 Typical Hits (S, D, T) and Outs (G, P, F, L)
Read these results just as you would from the batter's card.
4.3 **1, **2, **3, **4, **5, and **6
Read the number from the corresponding pitcher's card ** line to determine the type of out. Apply any range or error checks to the fielder if applicable.
4.4 ?7, ?8, and ?9
Possible hit to the outfield (7=LF, 8=CF, 9=RF). Roll 1d20 against the H? splits on the ballpark card. Ranges may be given for singles, doubles, triples, and home runs. Rolls outside all the ranges are fly outs. [HR] results remind that a 1d20 roll against the batter's card is necessary. A failed HR check results in a fly out. Range play checks on fielders are made only after the home run check fails. A failed range check on this type play is considered a double.
Examples: Pitcher's card is an RP@, ballpark card yields a ?7. First, roll 1d20 to determine batted ball type.
If the roll lands in the [HR] range for a homerun possibility roll 1d20 against the batter's HR rating. If less than or equal to the rating, it's a home run and no range check takes place. If greater, it's an F7 that requires a 1d6 range check on the left fielder. If he fails to make the play, assume a double off the wall.
If the original 1d20 roll is within the ranges for a single, double, or triple, roll 1d6 against the left fielder's range rating. If the fielder makes the play, it's an F7. If not, the type of hit stands.
If the original 1d20 roll is outside the hit ranges, it's an F7. Roll 1d6 against the left fielder's range rating.
If he fails to make the play, roll one final 1d20 to determine single (1-4) or double (5-20).
4.5 [HR8], [HRo], [HRp]
Possible home runs to center field, opposite field, and pull-side field, respectively. Roll 1d20 against the batter's HR rating (adjusted by ballpark HR rating if any). Rolls less than or equal to the rating are home runs. If the roll is greater than the rating, play it as a fly out.
Range play checks on fielders are made only after the home run check fails. A right-handed batters pull-side field is to left field, with the opposite field being right field and vice versa for left-hand hitters.
If the fielder fails the range check, the result is a double, runners advance 2 bases. If the play is made, runners on 2nd and 3rd, advance automatically.
Example: A right-handed batter with a 13 HR rating against left-handers gets an RP@ result off a left-handed pitcher's card. The ballpark yields an [HRp] result and comes with an HR ballpark rating of 0. Roll 1d20 against the total HR rating of 13, with 1-13 being a homerun to left field. On rolls of 14-20, the range play is triggered. If the left fielder has a range rating of 4, 1d6 rolls of 1-4 yield an F7 and rolls of 5-6 are a D7.
4.6 S+7, S+8, S+9
This is a single with the possibility of stretching for a double. Roll 2d6 against the combination of the batter's BR rating and the outfielder's ARM rating (ABR 7.2.1). If the roll is less than or equal to this sum, the runner is safe at 2nd with a double. Rolls of 6 (on the RED die) mean the hitter is potentially thrown out at 2nd trying to stretch the single. Use the 2nd (WHITE) 1d6 to check on the OF ARM chart (7.2.3). If the roll is in range of the outfielder's ARM rate the hitter is thrown out, otherwise, he retreats to 1st.
Rolls above the ABR of the runner but less than 6 the hitter holds with a single. All other runners advance two bases, regardless of the hitter's outcome.
With two outs and runners going on contact, a runner on 2nd scores before any possible out at 2nd.
If this result arrives by way of an RP@ result from the pitcher's card, remember to resolve the range play first and see if the outfielder can make the play. If the range check fails, roll 1d6 to see if the batter can take the extra base.
Example: The result from the pitcher's card is RP@ and the result from the batter's card is S+7. First, roll 1d6 against the range rating of the left fielder to see if he makes the play. For a range rating of 4, rolls of 1-4 would be an F7 result and rolls of 5-6 would mean the S+7 prevails. Assuming the batter's BR rating is 3 and the outfielder's ARM rating is -1, roll 1d6 against the ABR of 2. Rolls of 1-2 the batter legs out a double. Rolls 3-5 and he holds at 1st. A roll of 6 means he is possibly thrown out at 2nd by the left fielder.
Example: Batter with a BR rating of 4 hits an S+9 to a right fielder with an ARM rating of +2. Since the ABR is 6, all rolls of the 1d6 put the batter safely on 2nd with a double and no throw from the outfielder.
5 Errors
After an error possibility (E?, EG?, ET?) result from the pitcher's card, the result from the hitter or ballpark card may be subject to an error check. To check for an error, roll 1d20 against the appropriate position player's error rating. If the roll is less than or equal to the rating, an error occurs. If the roll is greater, no error occurs, and the play should be completed as usual. The charts that follow denote the type and number of bases for each type of error. If the table shows a blank for a particular scenario, then no error can occur, so play the result from the batter's card normally.
Hits with errors are just that, a hit with additional advancement due to an error. Outs with errors are considered an error with the runner reaching base.
Exception is error type #4 on a E? or EG? which require no error check but are instead infield hit chances that require a roll versus the hitters BR rate.
#1 Boots ball (1): Grounder booted, all runners advance one base only
#2 Drop Pop up "odd" ($): Pop fly dropped if error check fails and the 1d20 is odd. 1 base if less than 2 outs otherwise 2 base error. If C fails then the foul ball dropped, repitch.
Example: You roll a P6 where the shortstop has an error rate of 7. He would drop the popup on rolls of 1,3,5 and 7 while 2,4 and 6 are not errors (popout).
#3 Drops fly "odd" (+): Fly ball dropped if error check fails and that 1d20 roll is odd.
- Less than 2 out, roll 1d6 versus BR of runner, if roll is higher than the BR runner/hitter advance 1 base only, otherwise 2 bases.
- With 2 out, roll 1d6 versus BR of runners on, if roll is higher than the BR runner(s) advances 2 base only, otherwise 3 bases. If higher than BR of batter 1 base, otherwise 2 bases.
Example: You roll a F7, with 1 out, where the left fielder has an error rate of 4. He would drop the fly ball on rolls of 1 and 3 while 2 and 4 are not errors (flyout). With the error and there is a runner on 2nd (BR=2) and the batter has a BR=4. Roll 1d6 versus the BRs of the runners/batter, roll of 1-2 the runner on 2nd scores, batter gets to 2nd. Roll of 3-4 runner goes to 3rd and the batter gets to 2nd. Roll of 5-6 runner gets to 3rd and runner holds at 1st.
#4 Infield S? BR: NO error chance, Roll 1d6 versus hitters BR. If roll is higher hitter is out otherwise single. All runners advance 1 base.
Example: Runner on 1st, batter BR=3. Roll 1d6 versus the BR of the batter. Roll of 1-3 batter safe with single, 4-6 batter out at 1st. In either case runner gets to 2nd.
#5 HIT/Boots ball(+): Roll 1d6 versus ABR of runner/hitter (one roll for all), if higher than ABR than the runner/hitter advances 1 extra base, otherwise advance 2 extra bases than normal advancement of hit type.
Example: Runner on 1st (BR=2), batter BR=3. A S8 is hit where the center fielder (ARM=+1) boots the ball. The runner gets 3rd on the error with the batter taking 2nd. Roll 1d6 versus the BRs of the runner/batter. Roll of 1-2 the original runner from 2nd scores and the batter gets to 3rd. Roll of 3-6 they hold at 3rd and 2nd respectfully. The batter can't get a base more on roll of 3 since the runner in front holds.
#6 Throwing (2?): Throwing error with potential for advancing another base on bad throw; go through steps below.
&: if possible DP chance check for throwing errors on the fielder first then the pivot man.
The range checks by the throws receiver are not subject to range modifications based on players infield depth (8.5).
- Roll 1d6: Check against the range of the errant throw receiver; if higher than his range step 2, otherwise he kept the poor throw from getting by him thus making it only a 1 base error.
- Roll 1d6: Check against all runners (including hitter) BR rate; if higher than runner/hitter BR they hold, otherwise they get an extra base. There must be a base available to move up or they hold as well.
Example: Runner on 1st (BR=3), batter BR=2, DP chance. G6 with error on shortstop. Roll 1d6 versus the range of second baseman (throws receiver) if higher the runner/batter have a chance to advance an extra base, otherwise they end at 2nd and 1st. Roll 1d6 versus the BRs of the runner/batter. Roll of 1-2 the runner gets to 3rd and the batter gets to 2nd. Roll of 3 the runner gets to 3rd, batter holds at 1st. 4-6 all stop at 2nd and 1st.
Example: Runner on 1st, batter BR=2, DP chance. G6 with NO error on shortstop, runner out at 2nd. Roll 1d20 versus the error rate of the second baseman. If error, roll 1d6 versus the range of the first baseman, if higher throw allows batter to potentially get to 2nd, roll 1d6: 1-2 batter gets to 2nd, 3-6 batter holds at 1st. Within range of first baseman poor throw corralled by first baseman holding batter at 1st.
Example: Runner at 2nd (BR=4), 1 out, batter BR=2. G4 with throwing error on the second baseman. Roll 1d6 versus the range of the first baseman if higher throw allows batter to potentially get to 2nd, roll 1d6: 1-2 runner who moved to 3rd on the grounder scores batter gets to 2nd, rolls 3-4 runner scores batter holds at 1st, rolls 5-6 runner stops at 3rd batter holds at 1st. Within range of first baseman poor throw corralled by first baseman holding runner at 3rd and batter at 1st.
#7 Throw(1) or DP#: Ball caught, roll on LD chart. NO ERROR chance if no runners on, 2 out or no one at base LD chart says is being doubled up, otherwise 1 base error attempting to double who the chart says.
#8 Throw <>: If the ABR of the lead runner is 1-5 a throw is made to the advanced base for possible error otherwise no check. If error, proceed to play out as normal. (11.2 or 11.3) These can only happen on a fly ball where a runner is on 2nd or 3rd.
- A holding runner and any trailing runners get the advance base on throwing error. An advancing runner gets the advance base plus 1 for the throwing error, any trailing runners advance 1 base as well.
- The lead runner cannot be thrown out on throwing error. Instead of playing it like the above, an advancing runner gets the advance base plus 1.
Example: Batter hits a F9. Runner on 2nd (BR=5) RF ARM =0, MOD=-1 using Runner on 2nd fly ball chart so ABR =4 (5+0-1), there will be a throw. Roll 3d6 because that is what you do with advancement with fly ball and runner on 2nd. With the first (RED) die roll of 1-4 the runner gets to 3rd ahead of the throw but scores on the throwing error. Rolls of 5-6 the runner was going to hold but drawing a throw allows for a throwing error allowing the runner to get to 3rd.
Example: Same as above except runner also on 1st. With first die roll of 1-4 the runner from 2nd gets to 3rd ahead of the throw but scores on the throwing error, runner on 1st goes to 2nd. Rolls of 5-6 the runner was going to hold but drawing a throw allows for a throwing error allowing the runner to get to 3rd runner on 1st goes to 2nd on the error.
#9 Infield S/throw (1): Infield single with 1 extra base advancement on bad throw, otherwise everyone only gets 1 base total.
#10 Throwing (1): If error, the runner gets an extra base on the error. Overrides anyone being thrown out instead runner safe and gets an extra base.
6 Range Plays
After a range play result (RP or RP@) from the pitcher's card, all outcomes from the hitter's card or ballpark card are subject to a range check. Roll 1d6 against the listed position's range rating. If the roll is less than or equal to the rating, the fielder makes the play, otherwise he fails the check. Out results can become hits and hit results can become outs as a result of the range check.
The following adjustments are to be made depending on the positioning of the infielder making the play (8.5):
- Infielder Back: No changes
- Infielder DP depth: Range - 1
- Infielder In: Range - 2
- P and C never have depth adjustments
Some failed range plays on hits to the corner infielders and the outfielders may need a 1d6 roll to determine of it is a single or double.
On all singles play as single past that position with advancement as normal.
On doubles past infielders other runners advance 2 bases only.
On failed range plays on pop ups allow for 1 base advance for everyone with less than 2 out and 2 base advances with 2 outs.
Example: Pitcher's card yields an RP result; batter's card is a D8. The range check puts this potential double to center field in question. The range rating of the center fielder is 3. Roll 1d6. Rolls 1-3 and the play is made (successful range check): F8. Rolls 4-6 and the fielder fails the range check, resulting in the original D8 double to center.
Example: Pitcher's card yields an RP result, batter's card is an L3. Will the first baseman make the play? The first baseman's range rating is a 2. Roll 1d6. Rolls 1-2 and the play is made: L3. Rolls 3-6 and the out result becomes a hit. Roll a 1d20 to determine if it's an D9 (1-4) or S9 (5-20).
Example: Pitcher's card yields an RP@ result, ballpark card is an S+9. This is potentially a single to right field with the the chance for an extra base. The range rating of the right fielder is a 2. Roll 1d6. Rolls 1-2 and the play is made: F9. Rolls 3-6 and the original result S+9 stands. Roll another 2d6 to see if the batter can stretch the single into a double. If the right fielder's ARM rating is a -1 and the batter's ABR= 4. Using 1st (RED) 1d6 rolls 1-3 and it's a double, rolls = 4 or 5 and it's a single, and on a 6, the batter is potentially thrown out at 2nd. Checking the outfielders ARM rate (-1) against the OF ARM chart use the 2nd (WHITE) 1d6 roll to see if it falls in range of the -1 ARM thrown out check. 1-4 hitter out at 2nd, 5-6 holds at 1st.
Example: With the infield in, game on the line and the tying run at 3rd with one out, an RP result is followed by a G6. Will the shortstop (range of 4) make the play? Because he is playing in, the shortstop's range is reduced from 4 to 2. Roll 1d6. Rolls 3-6 and it's a single past the shortstop and the run scores. On rolls 1-2, he makes the play and the decision of whether to send the runner home must be made. Two possibilities emerge: (1) The runner holds (shortstop looks the runner back) and throws to 1st for the G6 or (2) the runner goes, and the shortstop attempts to throw him out. In the latter case, the shortstop's positioning reduces the runner from 3rd BR rating by 2. Roll 1d6. A BR 3 runner becomes a 1 and he's out on rolls 2-6, safe only on a 1.
7 Runner Advancement on Hits
On hits, the batter and all base runners automatically advance at least as far as the hit would indicate (one base for a single, two for a double, etc.) What follows are the rules that govern whether any of the runners (batter included) advance further than that.
7.1 Singles through the Infield
The simplest scenarios are singles through the infield (S1-S6) past that infielder to the outfield. In these cases, only the BR rating of each runner is used to determine advancement. The batter always holds at 1st. Use the following chart and work backwards from the lead runner. If a runner's BR rating is in the range shown, he takes the extra base. When there are two outs and runners are going on contact, increase each runner's BR rating by one.
S2 results only advance runners one base, with no opportunity for additional advancement.
(The chart referred to here is the Runner Advance MOD / singles-through-the-infield chart on the publisher's separate V4 game chart sheet, transcribed in the companion file "Inside Pitch Baseball V4 Game Chart"; the rules PDF itself does not reprint it.)
Example: With a runner on 2nd (BR = 3) and one out, the batter singles past the first baseman (S3). Since his BR rating of 3 is below the 4-6 range required to score, the runner from 2nd holds at 3rd. Had that same single come with two outs, his BR rating would have increased to 4 and been within the required range to score from 2nd on an S3.
Example: With runners on 1st (BR = 5) and 2nd (BR = 2) and one out, the batter singles past the shortstop (S6). Working backwards, the runner from 2nd must hold at 3rd with only a one base advance. His BR is under the 3 needed to take the extra base and score. As a result, the runner from 1st is held up by the lead runner and must stop at 2nd. This is even though his BR of 5 allows for a two-base advance. Had there been two outs, both runners would be going on contact and have their ratings increased. The lead runner would then be inside the 3-6 range required to score and the runner from 1st could advance to 3rd.
7.2 Singles and Doubles to the Outfielders
As an option if a games run difference is 6+ there are no rolls on the throw chart as runners go station to station, (one base for a single, two for a double, etc.), for both teams.
Singles and doubles to the outfield (S7, S8, S9, D7, D8, D9) can be a bit more complicated due to the possibility of an outfield assist. In addition to taking the extra base, runners behind the play may move up when throws are made to the base. Triples (T7, T8, T9) are easy to resolve because all runners score and the batter holds at 3rd.
The "lead runner" is the most advanced base runner on which a play can be made. All other runners, including the batter, are considered "trailing runners."
A runner on 3rd when the batter singles is, for the purposes of determining extra bases, not considered to be the "lead runner." This is because he will always score and never draw a throw home. The same goes for runners on 2nd and 3rd when a double is hit. The lead runner in that scenario would have to be on 1st (the batter is never the lead runner). In many cases, the batter can be the only trailing runner.
7.2.1 (ABR) Adjusted base running rating
The first step is to use the following formula to adjust the lead runner's BR rating:
ABR = BR + OF ARM + MOD + (1 if 2 out)
MOD= modified by chart as to type and where the ball is hit
ABRs of less than 1 or greater than 5 require no throw (so no roll) as runners stop or advance without one.
This roll of 3d6 is used for all runners. Another roll (1d6) is required only if a rundown ensues.
On a single with runners on 1st and 2nd (or bases loaded), if the lead runner from 2nd scores without a throw (ABR >= 6), the runner from 1st becomes the "lead runner." Repeat the adjustment of this new runner's BR rating. The batter is never the "lead runner."
7.2.2 Runner Advancement 1st Die roll number
Roll of 1 (RED die) requires a check of the OTC ROLL 2.1 chart. All runners advance and the hitter has a chance to advance on a throw. Roll of 2-5 is checked against all the runners on base. If this roll is higher, they hold otherwise they advance. End process.
- Note: 2-5 result, this check applies to the lead runner and all trailing runners except the batter. Work backwards, checking each runner individually for an advance. The batter can only advance on rolls of 1 or 6.
Roll of 6 requires a check of the OTC ROLL 2.6 chart. As a runner has potential to be thrown out.
7.2.3 Runner Advancement 2nd Die roll number
After 1st (RED) 1d6 roll of 1 check the 2nd (WHITE) 1d6 roll against the hitters and any trailing BR (no adjustment) if higher they hold otherwise they advance 1 base.
After 1st (RED) 1d6 roll of 6 check the 2nd (WHITE) 1d6 using the fielding outfielders ARM rate on the chart. Rolls in the All Runners Hold range requires all runners to hold, end process. If roll is in the Check 3rd die OTC ROLL 3 range continue to the OTC ROLL 3 chart.
7.2.4 Runner Advancement 3rd Die roll number
Use the 3rd (BLUE) 1d6 on this chart to see who gets thrown out.
Examples: Bases loaded, one out. The runner on 2nd (BR = 4), runner on 1st (BR = 3), batter (BR = 2). S8 result, center fielder's ARM is -1, 2-H on single is +2. On the single, everyone advances one base, scoring the runner from 3rd. The lead runner is the runner that started on 2nd, his ABR is 4 + 2 - 1 = 5. A throw is possible, so roll 3d6.
Rolls are 3 (RED), 6 (WHITE), 2 (BLUE). The 3 is checked against the lead runner's Adjusted BR first. His rating beats the roll (5 >= 3) and he scores. The runner on 2nd's ABR is 3 - 1 - 1 = 1. His rating does not beat the roll of 3, so he holds at 2nd. The batter can go no further than 1st. The other dice are not needed.
Roll is 1 (RED), 3 (WHITE), 5 (BLUE). The roll of 1 sends us to the OTC ROLL 2.1 chart where the runner on 2nd scores, drawing a throw and the runner on 1st's BR rating is compared with the second die roll of 3. His BR rating, unadjusted, is 3, which is equal to the roll. He takes the extra base and reaches 3rd. The batter's BR rating of 2 is lower than the 3 which means the batter holds at first. The other die not needed.
Roll is 6 (RED), 4 (WHITE), 3 (BLUE). A roll of 6 means that someone may get thrown out. Checking the OTC 2.6 chart we see the roll of 4 falls in the 1-4 range of a -1 ARM on the chart, advance to OTC ROLL 3 chart. Using the 3 (BLUE) roll result we find that the lead runner is thrown out at the plate. The runner on 1st (BR=3) advances to 3rd on the throw (BR tied the 3 roll) but the batter (BR=2) must hold at 1st since the 3 is higher than his BR.
7.2.5 Rundown
If rundown roll 1d6 and check the roll versus the runners BR that is in the rundown. Consider the better BR the longer he stays in rundown to allow others to advance.
8. Setting the depth of infielders
8.1 Infielder Back
In this situation, it's likely that any runner on 3rd will break for the plate. The assumption is that the defense is conceding the run. If instead the defense chooses to make a play on the runner going home, that runner's BR rating gets a +2. For this reason, it's not a good decision to throw home when playing back. Use the runner on 3rd procedure.
8.2 Infielder In
If the infield is playing IN, they are doing so to prevent the runner on 3rd from scoring. If the runner decides to hold, the defense's only play is at 1st. If he goes, the defense can try for the play at the plate with a BR -2 adjustment on the runner (9.4) or simply take the out at 1st. If the pivot player is IN no double play is possible.
*Remember that all infielders can be positioned independently. For instance, if the corner infielders (1B/3B) are IN and the middle infielders (2B/SS) are playing BACK, the defense has more options. Since the pivot at 2nd is manned by fielders who are not playing IN, a 2nd to 1st double play is possible.
8.3 Adjustments for Infield Depth (Non-Bunts)
With the bases empty, an infield's regular positioning is BACK. This optimizes each infielder's range but makes it harder to make a play at the plate.
With a runner on 1st base, a manager may want to guard against a bunt. In this case, corner infielders may be positioned IN, with middle infielders BACK.
Bringing the infield IN is a common tactic to prevent a runner on 3rd from scoring. Playing closer to the batter allows infielders to more quickly get the ball to the plate with the tradeoff of reduced range.
Optional: a new INFIELD IN chart (15.1) has been added that automates the entire process of determining the final play result when playing IN with a runner on 3rd and less than 2 out. The player can choose to use the manual methods as outlined in sections (9.4, 9.6, 9.7 and 9.8) or use this new chart.
Pitchers and catchers cannot change positioning; thus their range is the same in all situations. All other infielders may be positioned at either of the two depths. Apply the following adjustments depending on the fielding player's positioning in non-bunting situations:
Range = -2 BR of runner on 3rd = -2
9 Ground outs
9.1 No runners on or 2 outs
Simple ground out.
9.2 Runner on 1st, less than 2 outs
Straight rolls of 6 (slow roller), no DP, runner out at 1st only, others advance 1 base.
Compare 1d6 roll against the Combined GDP rating, a sum of the following:
- Pitcher GDP
- Batter GDP
- Pivot Rating (See table for which fielder's rating to use given location and handedness of the batter.)
- The depth of the initial fielder may adjust the GDP as well. Check the depth of the fielding player for adjustments.
If the roll is less than or equal to the Combined GDP, the double play is successfully turned. Otherwise, no double play.
If no double play, compare that same roll to the BR rating of the runner on 1st (reduced by 1 if the fielder involved is at DP depth). If the roll is less than or equal to the BR rating the runner is safe at 2nd and the only play is at 1st.
If the roll is greater than the BR rating of the runner on 1st but not equal to 6, the runner is out on the force play.
Example: Result is G6. Batter's GDP = 1, Pitcher's GDP = 0, Pivot of 2B is +1, SS is DP depth (+1) Combined GDP = 3. Roll 1d6. Rolls 1-3 are 643 double play results. Runner on 1B BR = 3, which becomes 2 with SS at DP depth. Rolls 4-5 are 64 force outs at 2nd. Roll of 6 is a 63 ground out, with the runner advancing to 2nd.
Example: Same as above except runner on 1B BR = 5, which becomes a 4 since the SS is DP depth. On rolls of 4 the runner is safe at 2nd, 63 ground out. Roll of 5 and the runner is forced at 2nd, batter safe at 1st. Roll of 6 is a 63 ground out, with the runner advancing to 2nd.
Example: Result is G4. Batter's GDP = 4, Pitcher's GDP = 0, Pivot of SS is +1, 2B is DP depth (+1). Combined GDP = 6. Only a roll of 6 is NOT a DP.
Example: Pitcher's card is a range play (RP), batter's card result is G3. Resolve the range play first and reduce the first baseman's range rating by 1 if he's playing at DP depth. If he makes the play, follow the typical double play procedure.
9.3 Runner on 2nd, less than 2 outs
Straight rolls of 6 (slow roller), runner out at 1st only, others advance 1 base. NO other play.
G2, G3, G4: Runner on 2nd advances to 3rd.
G1, G6: Roll 1d6. Runner advances if roll is less than or equal to runner's BR rating, otherwise hold. G5: Roll 1d6. Runner advances only on a roll of 6.
9.4 Runner on 3rd, less than 2 outs
Straight rolls of 6 (slow roller), runner out at 1st only, others advance 1 base. NO other play.
Decide if the runner on 3rd heads for home. If a play is to be made on the runner, roll 1d6 against his BR rating (adjusted based on fielders depth). If the roll is less than or equal to the rating, the runner scores, otherwise he is out at the plate.
Note that with the infield IN, the only plays for an infielder are home or 1st with the only double play chance of home to 1st (catchers have no pivot rating to include). The pitcher is always considered to be IN but can make the play at any base.
9.5 Runners on 1st and 2nd, less than 2 outs
Straight rolls of 6 (slow roller), no DP, runner out at 1st only, others advance 1 base.
G1, G2, G3, G4, G6: Play as "runner on 1st" (9.2) and try for a double play. Runner on 2nd advances to 3rd.
G5: Roll 1d6 to determine where the third baseman fields the ball.
- 1-2: The ball is hit towards the third base foul line. Try for the 53 double play as you would in the "runner on 1st" scenario (9.2). Note that there is no pivot in this instance and the BR rating of the runner on 2nd is used. The runner on 1st advances to 2nd.
- 3-4: The ball is hit right at the third baseman. There are two choices. Choose, then roll 1d6.
- Go for only the force play at 3rd. On rolls of 1-5, the runner from 2nd is forced at 3rd. 6 only play at 1st.
- Try for the 543 double play and allow the runner at 2nd to advance to 3rd. To try for the double play, proceed as you would in the "runner on 1st" scenario (9.2).
- 5-6: The ball is hit deep in the hole between 3rd and short. No play at 3rd. Must try for the 543 double play as you would in the "runner on 1st" scenario. The runner on 2nd advances to 3rd.
9.6 Runners on 1st and 3rd, less than 2 outs
Straight rolls of 6 (slow roller), no DP, runner out at 1st only, others advance 1 base.
Since there is no force play at the plate, the first task is to decide whether the runner on 3rd will try to score. This decision should be heavily influenced by the infielder's depth.
The pitcher and catcher get all the advantages of playing in but have all the choices of playing DP depth and back. They can go for the double play at any time and have the BR-2 advantage when attempting a play on a runner going home.
If the defense chooses to go for the double play then the runner on 3rd scores. If the defense holds the runner on 3rd the only play is to first.
9.7 Runners on 2nd and 3rd, less than 2 out
Straight rolls of 6 (slow roller), no DP, runner out at 1st only, others advance 1 base.
Defense chooses to play it like runner on 3rd scenario or out at 1st. Runner on 2nd only moves to 3rd if runner on 3rd goes home and rule of runner on 2nd apply.
9.8 Bases loaded, less than 2 out
Straight rolls of 6 (slow roller), no DP, runner out at 1st only, others advance 1 base.
With infielder IN defense has a option of going for a home to 1st DP or making play on batter at 1st only. Play DP attempt like that of runner on 1st (Catcher PIVOT rating 0).
In these situations, decisions are going to be based on how the defense sets up. If playing BACK remove the runner at 3rd (going home) in the equation which only leaves normal DPs or plays at 1st. If playing IN DPs other than home to 1st are out and you would play it like the lead runner is on 3rd.
10 Line outs
To check for a double play, roll 1d20. If there is a runner on the base of the range rolled, the runner is doubled off.
Example: Runners on 1st and 2nd, result is an L4. Roll 1d20: rolls of 1-6 doubles off the runner at 1st. Rolls of 7-12 doubles off the runner at 2nd. Rolls of 13-20 have no effect. If there is no runner at the base designated with the roll then no line out double play.
11 Fly outs
11.1 No runners on
This is simply a fly out.
11.2 Runner on 2nd, less than 2 outs or runners on 2nd and 3rd, less than 2 out but runner on 3rd scores on batters SF roll.
Use the MOD (modifiers) from this chart using the field fly is hit to.
Roll 3d6: If the roll of the 1st (RED) 1d6 die is higher than the ABR of the runner on 2nd the runner holds otherwise the runner advances from 2nd to 3rd.
If a 6 6 (RED and WHITE) is rolled check the 3rd (BLUE) 1d6 against the outfielders ARM rate on the OTC ROLL 2.6 chart. The runner is out if rolled in range of "runner out", otherwise they hold.
11.3 Runner on 3rd, less than 2 outs
Roll 1d6. If the roll is less than or equal to the batter's SF rating, the runner on 3rd scores without a throw to the plate. If the runner on 3rd scores on that roll, any runner on 2nd may try to tag up and advance like any runner on 2nd with less than 2 out. (10.2)
If the roll exceeds the SF rating, however, a throw home may occur. In that case, handle all runner advancements by rolling 3d6 and using the OTC ROLL charts if the ABR = BR + OF ARM is between 1-5). (7.2.1)
The sacrifice fly attempt is first dependent on the depth of the ball hit by the batter (SF rating). Think of fly balls that fail that check as average depth fly balls where the runner determines if he can beat the outfielder's throw-that's when the ARM and BR are used.
Example: Runners on 2nd and 3rd with 1 out. F9 means the batter is out and there is a possible sacrifice fly. Batter's SF = 2. 1d6 rolls of 1-2 and the run scores without a throw home, check for runner on 2nd. The runner on 2nd BR = 3, right fielder's ARM = +1 and the MOD for 2nd to 3rd on a fly is MOD of -1 for an ABR = 3(3+1-1) so a throw to 3rd is possible. Roll 3d6 to determine advancement. If the initial (RED) 1d6 roll is 1-3 the runner from 2nd gets to 3rd, 4-6 they hold. If a 6 6 is rolled check the 3rd 1d6 against the outfielders ARM rate on the OTC ROLL 2.6 chart. The range for a +1 ARM from the chart 1-2 so if the 3rd 1d6 is 1-2 runner is out at 3rd, 3-6 they hold at 2nd.
Example: Same situation as above but the SF roll for the hitter failed. The runner on 3rd (BR=1), right fielder's ARM (+1) for an ABR = 2. Consulting the OTC Roll 1 chart, a throw is possible (ABR between 1-5) so a 3d6 roll is necessary. Roll of 1 with the first die the runner scores and you use the 2nd (WHITE) 1d6 die to check the OTC ROLL 2.1 chart to see if the runner on 2nd advances to 3rd. Rolls of 1-3 (runner on 2nd BR=3) he gets to 3rd on the throw, 4-6 he stays at 2nd. Roll of 2 the runner on 3rd scores on a sac fly. Runner on 2nd holds. Rolls 3-5 the runner on 3rd holds, so does the runner on 2nd. Roll of 6 you then use the 2nd (WHITE) 1d6 die to check the OTC ROLL 2.6 chart. Using the right fielders ARM of +1 on that chart we find rolls 1-2 sends us to OTC Roll 3 chart (7.2.4) while 3-6 all runners hold.
12 Strategy Roll
The strategy roll is a simple engine to drive managerial decisions in an automated fashion. When runners are on base, roll the 1d20 once per plate appearance. These rolls can be played either as suggestions or hard and fast rules and should always be applied with the game situation in mind.
The strategy roll is not used when the score differential plus the inning number is greater than 10.
Example: Score is 5-2 in the 8th ... 5 - 2 + 8 = 11. No strategy rolls.
The 20 sides of the die are divided into ranges that trigger steal attempts, hit and runs, sacrifice bunts, and pickoff attempts. The ranges are calculated based on the runner's ATT rating, the pitcher's HLD rating, batter's K and BNT ratings.
On the rare instance of an overlap between stealing/hit and run and bunt attempts, give priority to the stealing/hit and run range.
Ignore sacrifice bunt and hit and run attempts with two outs.
Hit and runs are only called when there is a runner on first base.
One very popular house rule for strategy rolls is to roll each time the on-base situation changes. After a steal or a wild pitch or passed ball, many people choose to roll again during the same plate appearance.
12.1 Stealing
12.1.1 Getting the Jump
Steal attempts are triggered by rolling 1d20 against a combination of the runner's ATT rating and the pitcher's HLD rating. Rolls less than or equal to this Adjusted ATT mean that the runner has "gotten the jump" and will attempt to steal.
HLD is the rating to the left of the / on a pitcher's card SB cell.
A batter's Adjusted ATT rating cannot be more than double his ATT rating. A runner with an ATT = 2 will only see an Adjusted ATT rate of 4, even if the pitcher's HLD is +4.
Special ATT ratings include N and H. N, which means that the runner neither attempts to steal nor is involved in hit and runs. H means that the runner is only involved in hit and runs and does not attempt to steal (ATT = 0).
With multiple runners on base, there are no additional rolls required. A single strategy roll per plate appearance is used to check each runner's individual possibility of a stolen base attempt. With runners on 1st and 2nd, the -lead runner might be the only one who steals or it could be a double steal. It just depends on each of their Adjusted ATT ratings.
Example: The pitcher's HLD rating is zero. Runner on 1st with an ATT of 1, runner on 2nd with an ATT of 6. A roll of 1 means a double steal, while a 2-3 (ATT of 6 is halved) would mean only the runner on 2nd is stealing.
12.1.2 Attempting to Steal
If a runner gets the jump and attempts to steal, roll 1d20 against his Adjusted SB rating. This is the sum of his raw SB rating, the pitcher's SB rating, and the catcher's ARM rating.
The pitcher's SB rating is to the right of the / on a pitcher's card SB cell.
On rolls less than or equal to this adjusted rating, the runner successfully steals the base. A roll greater than the Adjusted SB rating or equal to 20 (regardless of SB rating) means that the runner is caught stealing.
On unadjusted rolls of 1 and 2, a check is made for a throwing error by the catcher. Roll another 1d20 against the catcher's error rating. If the roll is less than or equal to the rating, an error occurs and it is an automatic one base advance for all runners.
An unadjusted roll of 20 is always thrown out.
When deciding who gets thrown out on a double steal, if both runners roll a caught stealing, default to the runner stealing 3rd.
12.2 Hit and Run
With a runner on 1st, strategy rolls greater than the Adjusted ATT rating based upon the H&R CHART trigger a hit and run attempt.
Example: If the adjusted ATT rate of runner on 1st is 5 and the batter has a K rate of 7 the Hit and Run range would be 6-8 (+3 from the chart above).
Use the K rate from the batters card without park adjustments.
Runners with H ratings always have an Adjusted ATT of 0, regardless of a pitcher's HLD rating for H&R purposes.
Players with a N ATT rating cannot be used in a hit and run so H&R has no range.
The at bat proceeds normally with the following adjustments:
12.3 Sacrifice Bunts
Some batters have good BNT ratings but would probably not be called on to bunt. Bunt ratings are usually based upon ability more than propensity. That is why these are suggestions and not auto bunts.
For everyday hitters with a runner on 1st and less than two outs, strategy rolls greater than 16 are potential sacrifice bunts. For pitchers with runner on 1st, 1st and 2nd or 2nd only with less than 2 out rolls 6+ could be a bunt. The bunting chart determines the rolls for which a bunt is attempted. These ranges are based on the BNT rating of the batter and differ for position players and pitchers.
On an attempted sacrifice or suicide bunt, roll 3d6 and a 1d20. The red and white 2d6 roll gets the result from the pitcher's card with modifications or disregarding based on the chart below. 1d20 die to get result of the bunt and the 1d6 gets who fields the bunt from the BUNT FIELDER chart.
12.3.1 Pitcher roll for a bunt
If a batter is going to bunt you still roll on the pitcher's card with a 2d6. All K/K+ and W/W+ rates with park adjustments are divided by 10 and rounded down for the bunt attempt and checked against the 1d20 like a normal at bat.
All HBP, WLD, range plays and errors proceed as normal.
All other outcomes from a pitcher's card are disregarded and go straight to the bunt attempt.
The 1d6 is used to get who fielded the ball.
12.3.2 Adjustments for Infield Depth
The depth of the fielder can influence the BUNT, BR, GDP and RANGE of players involved.
Note: Typical positioning for a likely bunt would be to play the "corners in", and any balls fielded by the first or third basemen would reduce the BNT rating.
Good Bunt: A successful sacrifice bunt means that the batter is out at 1st and all other runners advance one base.
Example: A batter (BNT=3) is going to sacrifice with the CORNERS IN. Using the 2d6 off the pitchers card you get a ** (disregard **) so you check the 1d20 and the blue 1d6. You get a 9 and a 5. The third basemen fields the ball (5 from the bunt fielder chart) and he is playing IN so he takes 1 off the BNT rate of the batter making him a BNT=2. The 9 falls in the Good Bunt range on the chart under a 2 BNT RATE so the batter has successfully bunted and is out at first with the runner(s) advancing 1 base.
Lead Runner: lead runner is thrown out, the batter is safe at 1st on a fielder's choice.
Example: Same scenario as first example except the 1d20 roll is a 14. This falls in the Lead runner range for a 2 BNT rate. This was a poor bunt that is fielded and cuts down the lead runner. Batter safe at first.
Safe: This is simply a great bunt where all runners advance 1 base and the batter is safe with a single.
G-DP: Ball bunted for potential DP, resolve the play as a normal ground ball double play chance. Resolve like any DP chance (9.2) using the GDP modifiers based on who fielded the bunt and their depth.
Example: Same scenario as first example except the 1d20 roll is a 18. This falls in the G-DP range for a 2 BNT rate. You use the normal GDP combination of (batter GDP rate + Pitcher GDP rate + Pivot Rate) plus since the third baseman fields the ball and he was playing IN you add 1 more to the GDP roll.
Popout DP?: The batter pops out. Roll 1d6 against the lead runner's BR rating. If roll is greater than his BR, the runner is out.
Example: Same scenario as first example except the 1d20 roll is a 20. This falls in the Popout DP? range for a 2 BNT rate. Popup, batter out, the runner on first (BR=3) could get caught off for a double play. Roll another 1d6, if the roll is greater (4-6) than the BR of the runner on 1st he is doubled up, otherwise he gets back.
12.4 Squeeze Bunts
Follow the sacrifice bunt procedure, but use the squeeze bunt chart below. If batter strikes out, the runner from 3rd attempts a steal of home using SB - 10.
Good bunt: same as sacrifice with runner scoring.
Foul: same as sacrifice.
Lead runner: same as sacrifice with runner out at home and batter safe with fielder's choice.
?? Bunt: The defense has a choice, (1) retire batter at 1st or (2) attempt play at the plate. If attempting the play at the plate, roll 1d6. A roll less than or equal to the BR rating of the runner from 3rd and he scores, otherwise he is thrown out at the plate. The runner BR is adjusted based on who fielded the bunt and his depth using chart for BUNT DEPTH.
Rundown: The bunt is too hard and the runner from 3rd is caught up in a rundown. Proceed to roll 1d6 and use the rundown chart. The batter and any other runner(s) could advance if runner from 3rd stays in the rundown long enough.
Popout DP: The batter and runner from 3rd are both out.
12.5 Bunting for a hit
When bunting for a hit, follow the sacrifice bunt procedure.
Good bunt: Roll another 1d20. If the roll is less than or equal to (batter's BNT +BR - fielder's range rating + Bunt for HIT adjustment who fielded the bunt and their depth) it is a single otherwise they are out at first.
Foul: same as sacrifice
Lead runner, G-DP and Popout DP?: All poor bunts with batter thrown out at first.
Safe: result on the bunt for hit is considered an automatic single.
Example: A batter (BNT=4, BR=5) is going to bunt for a hit with the infielders BACK. Roll the 2d6 off the pitcher's card and modify or disregard that outcome based on the reading. It is a blank so you check the 1d20 and the blue 1d6. You get a 6 and a 3. The 1st baseman (RNG=3) fields the ball (3 from the bunt fielder chart) so he adds 1 (playing BACK) to the BNT rate of the batter making him a BNT=5. The 6 falls in the Good Bunt range on the chart under a 5 BNT RATE so the batter has successfully bunted and has a chance beat it out for a single. Roll 1d20 and check against batters adjusted BNT (5) + batters adjusted BR (5-0 for 1st baseman playing BACK) - 1st baseman's RANGE (3). So a roll of 1-7 and the batter is safe with a bunt single otherwise they are out.
12.6 Range plays on bunts
If a RP chance is rolled on the pitcher's card before a bunt resolve the range play first and then follow the chart for procedure. Most fails will be singles while only the SAFE outcome can be changed to an out by a successful RANGE check.
12.7 Error plays on bunts
If an error chance is rolled on the pitcher's card before a bunt resolve the error check first and then follow the chart for procedure. The # is checked against the normal error numbers.
12.8 Pickoffs
A strategy roll of 20 leads to a pickoff attempt. Roll an additional 1d20 to compare with the pitcher's BLK (balk), PO (pickoff), and POE (pickoff error) ratings. Rolls in these ranges trigger the corresponding results. A POE is when the pitcher throws the ball away, resulting in all runners advancing one base. This is automatic, without regard to the pitcher's error rating. With multiple runners on base, apply the pickoff to a runner with a base open in front of them.
Example: Runner on 1st in a 1st and 3rd situation and the runner on 2nd in a 1st and 2nd situation. Otherwise, go for the runner on 3rd.
13 Pitching Changes
13.1 Fatigue
A pitcher is considered tired once they have reached the number of batters faced shown on their cards next to START or RELIEF. When a pitcher is tired, the (S1) and K(W) results become the result in parentheses. See (2.3 and 2.14), respectively.
The cards are designed with the idea that a pitcher will face approximately 5-10% of batters while tired.
13.2 Pull (Optional)
The number to the right of the / on a pitcher's START or RELIEF lines is the pull rating. Once the total number of runs, hits, and unintentional walks exceeds the pull rating, the pitcher should be removed from the game.
This is a simplified guideline to give an idea of when the pitcher normally leaves a game.
13.3 Exhausted (Optional)
When a tired pitcher gets a (??), (S1), or K(W) result, the pitcher becomes exhausted and must be replaced before facing another batter.
14 Injuries
When an injury check is triggered by a rare play result, roll 1d6 against the Injury Chart to determine the time (if any) the player misses.
Reroll: means to roll again on the chart number mentioned.
1d6 (BLUE): number of days missed 2d6: numbers added together for days missed 1d20: number of days missed
15 Options
15.1 Automating the runner on 3rd infield IN action
While there is no definitive data specific to infielder's playing in, this chart was made by utilizing 30 years of PBP data with fielders in base/game situations where playing IN was warranted. The chart requires the roll of a 1d20 and an adjustment to that roll using the BR rating of the runner on 3rd.
The situations considered where a team would be playing IN are the following:
- When the game-winning/tying run is at 3rd, with less than 2 out
- 1 run or less difference in score with less than 2 out
While the chart can be used at any time with less than 2 out and a runner on 3rd, it is suggested, based on the 30 years of pbp data, that the chart be used when the following applies:
- In a 1-run game (either behind or ahead)
- Less than 2 out
- 7th inning or greater
Suggested positioning of infielders:
- ALL IN: Runner 3rd or 2nd and 3rd
- ALL IN: 1st and 3rd or loaded, 1 out
- CORNERS IN: 1st and 3rd or loaded, 1 out
The BR of the runner on 3rd adjusts the 1d20 roll based on their BR. Check the game chart for adjustments. Faster runners add to the roll, slower runners subtract from the roll.
Adjusted rolls below 1 use 1, and above 20 use 20.
The results chart is broken down by OTHER (meaning any situation OTHER than bases loaded) situations (at the top) and BASES FULL (at the bottom). It also shows by row what happens to the runner on 3rd and the batter depending on the adjusted dice roll.
You simply find a row showing the player fielding the ball and find where the adjusted d20 roll falls in their ranges. The results for the runner on 3rd and the batter for OTHER are shown at the top and the results for the runner on 3rd and batter for BASES FULL are at the bottom.
Runner on 3rd outcomes: HOLD: runner on 3rd holds OUT: runner on 3rd out at home SAFE: runner on 3rd beats the throw home SCORE: runner on 3rd scores with no throw
Batter outcomes: FC: batter safe at 1st on fielder's choice FC-safe: batter safe at 1st as throw was to home OUT: batter out at 1st
There will be times that the winning run is coming home and the chart says the play is at first. Just consider that on those as the run scores as the throw would be probably be at least attempted to home.
Example: Runner at 3rd BR of 6. Runner only on 3rd. This means a +2 for the roll adjustment. Ball hit to 3B. With the +2 added to the roll it pushes the likelihood of scoring higher and less chance to hold as the adjusted roll numbers would fall to 3-22. Use 20 if above 20.
Note: The examples referenced below are the ADJUSTED rolls. For instance, if the 1d20 roll was a 7, this would be adjusted upwards to a 9 (because of the +2 due to the baserunner's BR).
- 1-8 Runner holds, batter out at 1st
- 9 Runner holds but 3B takes too long looking runner back and batter safe at 1st
- 10 Runner out at the plate, batter safe at 1st. (If bases loaded this would be a DP)
- 11-17 Runner out at the plate, batter safe at 1st.
- 18-19 Throw goes home but the runner is safe and the batter is safe at 1st.
- 20 Runner scores with no throw and the batter is out at 1st.
15.2 Calling your own strategies
While the game is set up to allow the solo gamer to let the dice decide some strategies for the game you can also call them yourself. The Hit & Run and sacrifice bunting can just be called at any time and use the EXE (for H&R) and BNT rate (for a SH).
For stealing I would suggest adding in a JUMP roll which would use the runner's ATT combined with the pitcher's HLD rate just as you would do normally (rule 12.11). Check this JUMP rating against a 1d20 roll.
- If the roll is less than or equal to the ATT+HLD number, then the runner gets a good jump and plays the SB out as normal.
- If the roll is higher than the ATT+HLD you can still choose to steal but subtract the difference from the roll and the ATT+HLD from the SB number of the runner.
Example: Runner on 1st has an ATT rate of 2 and a SB rate of 18 (why not steal? that is good!). The pitcher has a HLD rate of +1. We will say the catcher's ARM rate and pitchers SB rate come to 0 for this example though the actual rates would be used if the player does steal. Rolling a 1d20 you roll a 7. The adjusted ATT rate is 3 so the roll is 4 above that rate. You can still choose whether to have this player steal or not, but his SB rate is lowered by that 4 to 14.
15.3 Using the d20 on the table for strategy roll
To streamline play instead of rerolling a d20 for the strategy roll you can use the last d20 rolled from the prior bat even if you used it to complete the previous at bat.
15.4 Playing the K(W) as a K(HR)
When the pitcher is not tired, proceed with a K, a possible strikeout result. If the pitcher is tired (13.1), proceed with a HR check.
This could provide that extra penalty to leave a tired pitcher in. It matches some of the data where you see how many times a pitcher goes through the order and HRs are one of the biggest changes along with Ks. This still checks the hitters HR rate with the d20 but can be punishing.
The parentheses are a reminder of the exhausted pitcher rule discussed later. (13.3)
FAQ
Outfield Throw Chart (OTC):
Many of the questions first time IP players have been about the base running procedures, especially those on hits to the outfielders. The first thing you need to know is you will have these come up on average about 3/3.5 times a game so it may take a while to become second nature. I will break down how to progress with each dice roll outcome. On these plays you will always roll 3d6 (RED, WHITE and BLUE die). You may not always use all 3 but it is best to roll them together. A lot of things can happen from this one roll and can make it an exciting part of the game.
Example: Batter BR=2, runner on 1st BR=3, single to CF (S8), CF ARM=+1, 0 outs.
- First thing to check is the chart for hit type and where the runner is going on that hit. Checking the chart at S8 - 1/3 (1st to 3rd) we find a BR MOD (modification) of -1.
- So, the ABR for this advancement is BR=3 plus OF ARM=+1 plus MOD (-1). His ABR=3 (3+1-1) will require a roll on the advancement charts. If the ABR was less than 1 (runner stops) or above 5 (auto advance) there is no throw needed.
- You will now roll 3d6 (RED, WHITE and BLUE die) and use the Outfield Throw Charts. Using the red die result you check the OTC ROLL 1 chart. Here is how each RED die result would break down:
1. Runner on 1st advances to 3rd on a throw possibly allowing the batter to go to 2nd on the throw (we would use the 2nd (WHITE) die on the OTC ROLL 2.1 chart.
- The batter is the trailing runner in this case, so we use the batters BR=2 to see if he goes to 2nd on the throw. WHITE die results of 1-2 (BR=2) the batter gets to 2nd, rolls 3-6 he hold at 1st.
2-3. Rolls of 2-3 the runner on 1st gets to 3rd as his ABR=3 with no advancement for the batter.
4-5. Rolls of 4-5 are above the ABR of 3 so the runner holds at 2nd.
6. There is a chance someone is getting thrown out. Use the 2nd (WHITE) die on the OTC ROLL 2.6 chart using the OF ARM rate of +1.
- Rolls of 4-6 with the WHITE die means the runner holds at 2nd.
- Rolls of 1-2 with the WHITE die will send us to the OTC 3 chart and the 3rd 1d6 (BLUE) die according to the chart under +1 ARM.
- Using the 3rd (BLUE) die result we check what happens from the OTC ROLL 3 chart. Roll of 1 means the runner from 1st gets to 3rd as the ball is cut off and the batter is thrown out heading to 2nd.
- Roll of 2 means the runner from 1st is thrown out at 3rd but the batter BR=2 gets to 2nd on the throw.
- Rolls of 3-5 means the runner from 1st is thrown out at 3rd but the batter BR=2 holds at 1st.
- A roll of 6 means the runner at 1st gets to 3rd as the ball is cut off and has the batter in a rundown at which point you would roll 1d6 on the RUNDOWN chart.
Example: Batter BR=1, runner on 1st BR=4, runner on 2nd BR=2, single LF (S7), LF ARM -1, 1 out.
- First thing to check is the chart for hit type and where the lead runner is going on that hit. Checking the chart at S7 - 2/H (2nd to home) we find a BR MOD of +1.
- So the ABR for this advancement uses the lead runner, player on 2nd, who is BR=2 plus OF ARM=-1 plus MOD (+1). His ABR=2 (2-1+1) will require a roll on the advancement charts. If the ABR was less than 1 (runner stops) or above 5 (auto advance) there is no throw needed.
- You will now roll 3d6 (RED, WHITE and BLUE die) and use the Outfield Throw Charts. Using the red die result you check the OTC ROLL 1 chart. Here is how each RED die result would break down:
1. Runner on 2nd advances to home on a throw possibly allowing the runner on 1st and the batter to go to advance on the throw (we would use the 2nd (WHITE) die on the OTC ROLL 2.1 chart.
- The runner on 1st (BR=4) and the batter (BR=1) are the trailing runners in this case so we use those rates to see if they advance. WHITE die result of 1 allows the runner on 1st to get to 3rd and the batter to get to 2nd. WHITE die results of 2-4 the runner on 1st gets to 3rd but the batter holds at 1st, rolls 5-6 he hold at 2nd.
2. Roll of 2 the runner on 2nd scores as his ABR=2 but with no advancement for the other runners.
3-5. Rolls of 3-5 are above the ABR of 2 so the runner holds at 3rd.
6. There is a chance someone is getting thrown out. Use the 2nd (WHITE) die on the OTC ROLL 2.6 chart using the OF ARM rate of -1.
- Rolls of 5-6 with the WHITE die means the runner holds at 2nd.
- Rolls of 1-4 with the WHITE die will send us to the OTC 3 chart and the 3rd 1d6 (BLUE) die according to the chart under +1 ARM.
- Using the 3rd (BLUE) die result we check what happens from the OTC ROLL 3 chart. Roll of 1 means the runner from 2nd scores as the ball is cut off and the runner on 1st is thrown out heading to 3rd.
- Rolls of 2-4 means the runner going home is thrown out at the plate but the runner on 1st BR=4 gets to 3rd on the throw. These rolls are higher than the batters BR=1 so he holds at 1st.
- Roll of 5 means the runner from 2nd is thrown out at home but the runner on 1st BR=4 holds at 2nd.
- A roll of 6 means the runner at 2nd scores as the ball is cut off and has the batter in a rundown at which point you would roll 1d6 on the RUNDOWN chart
Rare Play Charts
Roll 2d6 (first die = first number, second die = second number) on the chart that matches the situation (see 4.1).
RARE PLAYS BASES EMPTY from @
- 1-1: Pitcher grabs shoulder after pitch; Check P for injury. Repitch
- 1-2: Foul tip off catcher: Check C for injury. Repitch.
- 1-3: Bad hop grounder to 1B check for G3 error. Check 1B for injury.
- 1-4: Bad hop grounder to 2B check for G4 error. Check 2B for injury.
- 1-5: Bad hop grounder to 3B check for G5 error. Check 3B for injury.
- 1-6: Bad hop grounder to SS check for G6 error. Check SS for injury.
- 2-1: Single into LF where fielder stumbles fielding the ball. Check LF for error. If error batter gets 2 extra bases as the ball skips by. Check LF for injury.
- 2-2: Single into CF where fielder stumbles fielding the ball. Check CF for error. If error batter gets 2 extra bases as the ball skips by. Check CF for injury.
- 2-3: Single into RF where fielder stumbles fielding the ball. Check RF for error. If error batter gets 2 extra bases as the ball skips by. Check RF for injury.
- 2-4: Hitter fouls one off his foot; Injury check for hitter
- 2-5: Inside pitch possibly hits batter in the elbow, resolve like a HBP and if the batter is hit check for injury to hitter otherwise just a ball, repitch
- 2-6: Batter chases 2 strike pitch in the dirt for a strikeout, resolve play by checking if the C allows a PB, if PB then score K and PB batter to first
RARE PLAYS BASES EMPTY from RP@
- 1-1: Stinging line drive to the P, resolve like a L1 range play. Check for injury to P.
- 1-2: Baltimore chop in front of plate catcher grabs arm after play, resolve play as a G2 range play. Check for injury to C.
- 1-3: 1B chases foul ball into stands, resolve as a P3 range play; Check for injury to 1B
- 1-4: 2B goes into hole to make the play and hurts arm on throw, resolve play as a G4 range play; Check for injury to 2B
- 1-5: 3B chases foul ball into stands, resolve as a P5 range play; Check for injury to 3B
- 1-6: SS goes into hole to make the play and hurts arm on throw, resolve play as a G6 range play; Check for injury to SS
- 2-1: Sharp grounder at P. Resolve as G1 range play. If P fails ball caroms to SS, resolve as G6 range play. Check for injury to P.
- 2-2: Tapper in front of plate. Batter doesn't move and catcher crashes into batter. Batter out on interference. Check for injury to C.
- 2-3: 1B goes into hole to make the play and hurts himself on the play, resolve play as a G3 range play; Check for injury to 1B
- 2-4: Shallow pop up to RF that the 2B chases but doesn't hear the RF call and they collide, resolve like a P4 range play; Check for injury to 2B
- 2-5: 3B goes into hole to make the play and hurts himself on the play, resolve play as a G5 range play; Check for injury to 3B
RARE PLAYS MEN ON from @
- 1-1: Pitcher develops possible blister on hand; Check for injury to P
- 1-2: Passed ball chance, roll 1d6 versus C PB rating. If passed ball it gets away to the backstop. All runners move up 1 base and head for another (if applicable) roll 1d6 and check against lead runners' BR rate. If roll is above runner is thrown out otherwise safe 2 bases ahead. Any other runner moves up 2 bases also. Check C for injury.
- 1-3: Slow roller to 3B who throws batter out at first but batter cleats 1B coming across the bag. All other runners advance. Check for injury to 1B.
- 1-4: Bad hop grounder to 2B check for G4 error. Check 2B for injury.
- 1-5: Bad hop grounder to 3B check for G5 error. Check 3B for injury.
- 1-6: Bad hop grounder to SS check for G6 error. Check SS for injury.
- 2-1: Single into LF where fielder stumbles. Check LF for error. If error batter gets 2 extra bases as the ball skips by. Check LF for injury.
- 2-2: Single into CF where fielder stumbles. Check CF for error. If error batter gets 2 extra bases as the ball skips by. Check CF for injury.
- 2-3: Single into RF where fielder stumbles. Check RF for error. If error batter gets 2 extra bases as the ball skips by. Check RF for injury.
- 2-4: Batter slides head first into first base (he is out) trying to beat out a slow grounder to SS. Runners advance one base. Check for injury to batter.
RARE PLAYS MEN ON from RP@
- 1-1: Grounder back to the mound resolve as G1. If successful range play lead runner caught too far off and P throws behind them for out. Fail and the throws late, Batter on with FC.
- 1-2: Grounder in front of plate resolve as G2. If successful range play lead runner caught too far off and C throws behind them for out. Fail and the throws late, Batter on with FC.
- 1-3: Trapped short hop grounder to 1B, resolve as G3 range play. If successful range play catches the lead runner in no mans land and throws them out. If lead at 1st tags runner out then touches 1st to get batter. If fail then S3.
- 1-4: Trapped short hop grounder to 2B, resolve as G4 range play. If successful range play catches the lead runner in no mans land and throws them out. If lead at 1st completes double play If fail then S4.
- 1-5: Trapped short hop grounder to 3B, resolve as G5 range play. If successful range play catches the lead runner in no mans land and throws them out. If lead at 1st completes double play If fail then S5.
- 1-6: Trapped short hop grounder to SS, resolve as G6 range play. If successful range play catches the lead runner in no mans land and throws them out. If lead at 1st completes double play If fail then S6.
- 2-1: Shallow fly to LF, resolve play as a F7 range play, if LF does not catch the ball the lead runner gets a late break attempting to advance to the next base, roll 1D6 versus BR + LF arm if higher runner out otherwise safe. If caught and not 3rd out roll 1d6 versus BR + LF as the lead runner is trying to retreat back to his original base.
- 2-2: Same as 21 except CF.
- 2-3: Same as 21 except RF.
Injury Chart
Injury rate is the player's INJ rating (0-7); roll 1d6 for the row. "1d6", "2d6" and "1d20" mean the numbers of days missed are determined by rolling that die (2d6 numbers added together). "Reroll on N" means roll again on the chart at the number mentioned.
| 1d6 | Rate 0 | Rate 1 | Rate 2 | Rate 3 | Rate 4 | Rate 5 | Rate 6 | Rate 7 |
|---|---|---|---|---|---|---|---|---|
| 1 | None | None | None | Game | Game | Game + 1d6 | Game + 2d6 | Game + 1d20 |
| 2 | None | None | Game | Game | Game + 1d6 | Game + 2d6 | Game + 1d20 | 15 day |
| 3 | None | Game | Game |
Symbol Key
Pitchers matrix (2d6): read one die as column and one die as row
- /: Split ratings versus lefty/righty show up in some cells; use the reading of the side of the hitter (left/right). The 1d20 here is used to resolve the split (??) hits.
- **(S1): Auto out produced by pitcher. If pitcher TIRED it becomes a single past the pitcher.
- (S1): Single past the pitcher only if pitcher is considered TIRED, otherwise consider it a blank. This can trigger the optional exhausted rule if tired.
- **: Auto out produced by the pitcher. Roll 1D6 and check the ** line of the pitchers card to resolve AB.
- (??): Split rating for **/S1; roll 1d20 on pitchers card versus side of hitter in the ?? Section. If 1d20 is in range then treat as the result shown otherwise treat as a blank space and move to the hitters card. This can trigger the optional exhausted rule if tired.
- @: Go to Ballpark card to resolve AB.
- E?: Possible E proceed to batters card and resolve play, then use 1d20 to check for error on fielding player on all plays.
- EG?: Possible E on a grounder (G) to the infield or a hit to the outfield. Proceed to batters card and resolve play then check for error ONLY in those situations, otherwise disregard.
- ET?: Possible throwing E. Proceed to batters card and resolve play then check for error only if a throw was involved on the play, this includes ground outs (G). Check for a throwing error on all hits where runner advancement requires a throw from an outfielder or a hit to an infielder that is considered knock down but possibly thrown away.
- ALL E?: All E? type chances (ET, E and EG) followed by a S1-S6 are considered infield single types. Follow the rules for each type from the Error chart.
If no direct outcome comes up go to the hitters card. Rolling 2d6 again with the dice read a column first then row for a box on the BATTERS MATRIX. The 1d20 here is used to resolve the split (?) hits and any error outcomes that need to be checked.
Batters matrix (2d6): read one die as column and one die as row
- **#: Check back to the pitchers ** section and use the number listed to show where the ball was hit to resolve AB.
- ?: Split hit number; roll 1d20 on hitters ? Range versus pitchers hand, if above the ratings it is a fly out.
- D: Double
- F: Fly out
- G: Ground out
- H: Home Run
- K: Strikeout
- L: Line Out
- P: Pop Out
- S: Single; S1-S6 are singles past those positions to the outfield except those proceeded by E's? from the pitchers card.
- T: Triple
- W: Walk
- #: Number of the position ball was hit to. Single to infielders are considered singles through the infield past the numbered position player.
- /: Split ratings versus lefty/righty show up in some cells; use the reading of the side of the pitcher (left/right).
Ballpark card matrix (2d6): read one die as column and one die as row
- (blank): These are rare plays and require you to go to the rare play chart based on whether there are base runners or not to resolve the play.
- **#: Check back to the pitchers ** section and use the number listed to show where the ball was hit to resolve AB.
- ?: Split hit number; roll 1d20 on H? Range, if above the ratings it is a fly out.
- [HR]: Possible HOMERUN to field shown in the ?; roll 1d20 versus batters HR rate, if no HR then play it like a fly out.
- [HR8]: Possible HOMERUN to CF; roll 1d20 versus batters HR rate, if no HR then play it like a fly out.
- [HRp]: Possible HOMERUN to batters pull field (RH=LF, LH=RF) roll 1d20 versus batters HR rate, if no HR then play it like a fly out.
- [HRo]: Possible HOMERUN to batters opposite field (RH=RF, LH=LF) roll 1d20 versus batters HR rate, if no HR then play it like a fly out.
- D: Double
- F: Fly out
- G: Ground out
- L: Line Out
- P: Pop Out
- S: Single; S1-S6 are singles past those positions to the outfield.