Imperial Settlers: Empires of the North – Solo Scenarios
Imperial Settlers: Empires of the North – Solo Scenarios Rulebook
Table of Contents
Table of Contents
Scenario 1: Giants at the Wall
You have only ever heard tales of Giants laying waste to our lands. But... our ancestors did not raise this giant wall for nothing, did they? Surely it was to protect the clan from something. Now a pair of our scouts reports that the Giants are real, and they are already close. The time has come to put this Wall to the test!
Victory Point threshold: 45
Wall: You lose immediately as soon as you remove the last stone from here.
Setup changes
- Assign 2 stones and 1 people from the general supply to the Wall.
Rule changes
- If at any point in the game the Giants have more people than the total number of Goods on the Wall, immediately remove all people from the Giants, then remove 1 stone and half of the people (rounding down) from the Wall.
- During the Scouting Phase, draw 2 numbered tokens (instead of 1) and resolve the events for both.
Scoring changes
- At the end of the game, each stone on the Wall is worth 3 Victory Points (star), and each people is worth 2 Victory Points (star).
Giants action
- Action: Spend 1 red apple or 1 blue fish to assign 1 people to the Wall. This action may be activated an unlimited number of times.
Doom of the Giants
- Action: Spend 1 axe to remove 2 people from the Giants.
Scenario events
- Breach the Wall: If possible, spend 1 stone, or remove 1 people from the Wall.
- Patched at the Last Moment: You may spend 2 stones and/or wooden planks, in any combination, to place 1 stone on the Wall. Assign 1 people from the general supply to the Giants.
- Send the Raven: You may spend 1 red apple or 1 blue fish to place 1 people on the Wall. Assign 1 people from the general supply to the Giants.
- Catapult: Spend 1 stone or 1 wooden plank, or assign 1 people from the general supply to the Giants.
- Open the Gates: You may spend 1 axe to gain 1 Victory Point (star) for each people at the Giants.
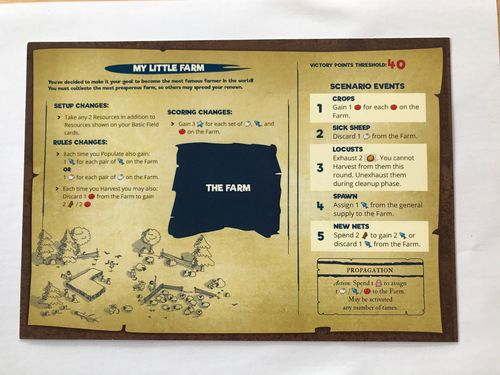
Scenario 2: My Little Farm
You have decided that no matter what, you will become the most famous farmer in the world! To do so, you must build the richest farm, one that will be the stuff of legend!
Victory Point threshold: 40
Setup changes
- Take 2 Resources of your choice, in addition to the Resources shown on your Basic Field cards.
Rule changes
- Each time you SETTLE, also gain:
- 1 blue fish for each pair of blue fish on the Farm, OR
- 1 sheep for each pair of sheep on the Farm.
- Each time you COLLECT, you may also discard 1 red apple from the Farm to gain 2 wooden planks or 2 red apples.
Scoring changes
- Gain 3 Victory Points (star) for each set of sheep, blue fish and red apple on the Farm.
Breeding action
- Action: Spend 1 people to assign 1 sheep, 1 blue fish or 1 red apple to the Farm. This action may be activated an unlimited number of times.
Scenario events
- Sowings: Gain 1 red apple for each red apple on the Farm.
- Sick Sheep: Discard 1 sheep from the Farm.
- Locusts: Turn 2 cards bearing the pumpkin icon sideways. You may not COLLECT with these cards this round. Turn them back upright during the Cleanup Phase.
- Caviar: Assign 1 blue fish from the general supply to the Farm.
- New Nets: Spend 2 wooden planks to gain 2 blue fish, or discard 1 blue fish from the Farm.
Scenario 3: Feudal Era
You have dropped anchor on the shores of the Samurai's homeland. You will soon learn that the political situation on the islands is very unstable: the feudal lords are fighting for control of the archipelago. You face a difficult choice between seizing islands and protecting resources.
The rules of the advanced scenario mode are highlighted in red.
Victory Point threshold: 45
The sheet shows a map of five islands: Hokkaido, Honshu, Okinawa, Kyushu and Shikoku. Hokkaido is marked with a sheep, Honshu with a blue fish, Okinawa with a wooden plank, Kyushu with a stone and Shikoku with a red apple. Green and red arrows connect neighbouring islands.
Setup changes
- Assign 1 or 2 people (from your reserve) to Honshu.
- Advanced mode (red): Instead, assign them to Hokkaido.
- Gain 1 blue fish for each people on Honshu.
- Advanced mode (red): Instead, gain 1 sheep for each people on Hokkaido.
Rule changes
- The term "Japanese islands" refers to the islands shown on this scenario sheet: Honshu, Kyushu, Okinawa, Hokkaido and Shikoku.
- You may COLLECT from Japanese islands as if they were cards bearing the pumpkin icon. Choose 1 Japanese island and gain 1 Resource (of the type shown on the chosen Japanese island) for each people on it.
- Japanese islands with people on them count as Conquered.
- Japanese islands connected by a green arrow or a red arrow count as neighbouring.
- Advanced mode (red): Do not use the red arrow.
Scoring changes
- Gain 3 Victory Points (star) for each Conquered Japanese island.
- Gain 1 Victory Point (star) for each people on Kyushu and on Okinawa.
Samurai Under Sails action
- Action: Spend 1 Clan Ship token (place it on this action) and 1 blue fish to assign 1 people from the general supply to any Japanese island next to a Conquered Japanese island. (During the Cleanup Phase, the Clan Ship token returns to your reserve.)
Other actions
- Action: Spend 1 red apple to assign 1 people to any Conquered Japanese island. This action may be activated an unlimited number of times.
- Action: Spend 1 blue fish to move any number of assigned people from 1 Japanese island to any neighbouring Conquered Japanese island. This action may be activated an unlimited number of times.
Scenario events
- Earthquakes in the North: This round you may COLLECT only from Japanese islands.
- Shogun's Naval Blockade: This round you may not move people from or to Shikoku.
- Shogun's Ninja: Place 1 blue fish on Okinawa and on Kyushu. For each blue fish there, you must spend an additional blue fish when you assign people to it by activating the Samurai Under Sails action.
- Tokugawa Shipyard: This round you may spend 2 wooden planks to gain 1 Clan Ship token (this may be used only once per activation of this event).
- Shogun's Revenge: Remove 1 people from Kyushu and 1 people from Honshu (you do not lose 2 Victory Points (star)).
Editor's Notes
- The source sheet carries three scenarios, not two as its metadata states: Giants at the Wall and My Little Farm (on the second printed page) and Feudal Era (on the third printed page, with the Japanese islands map). The cover page carries no rules. All three scenarios are transcribed.
- The Feudal Era scenario is printed on the same sheet and uses the Japanese islands map. It relies on the islands, Clan Ship tokens and the Samurai Under Sails action as printed there.
- The printed sheet shows several icons as pictures without naming them. They are described in brackets here: "axe" (the axe-shaped icon), "pumpkin icon" / "pumpkin card icon" (the pumpkin on a card), and "Clan Ship token" (the longship icon, named after the Japanese Islands components). Goods types are named as in the Japanese Islands rulebook (wooden plank, blue fish, red apple). The stone and sheep Goods and the people icon (pink figure) are named as they appear on the sheet.
- "Scouting Phase" and "Cleanup Phase" are the translator's English for the Russian "Фаза Разведки" and "Фаза Очистки". The base rulebook was not available to check these names.
- Where the sheet's text has a slash in an event ("с / на" in Shogun's Naval Blockade), it is read as "from or to", the usual meaning of the separator.
- The sheet's advanced-mode lines are printed in red. They are marked as advanced mode above.
- The map on the Feudal Era page is shown as a picture on the sheet; the only text of it is the island names, and the arrows are read as printed.