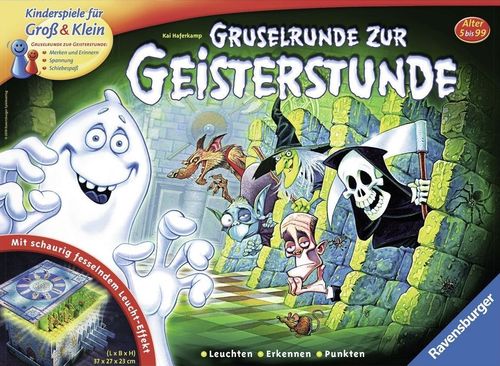
Gruselrunde zur Geisterstunde
Gruselrunde zur Geisterstunde Rulebook
Table of Contents
Table of Contents
Game Contents
- 1 Villa Schauerstein (4 walls, 1 floor, 1 roof, 1 peephole cover plus push button)
- 1 flickering light lamp
- 10 sliders with creepy creatures
- 10 wall projections
- 3 stone devils
- 1 ghost ring (puzzle circle)
- 37 scare chips
- 8 tip chips (4 × yes / 4 × no)
Setup
Let your parents or older siblings help you with the first assembly of Villa Schauerstein.
Before the first game: Carefully punch all cardboard parts out of their frames.
Before every game:
- Take the two side walls (1) first and insert them into the lower part of the box. Make sure the side walls have their green windows facing outward and their blue windows facing inward. Which wall goes on the right and which on the left can be recognised from the continued illustrations on the side parts of the box.
- Then take the ten sliders with the creepy creatures (2) and decide how many you want to play with. The more sliders you use, the more demanding the game becomes. For the introductory game we recommend eight sliders. Push the sliders from the inside, evenly distributed to both sides, through the lower slots in the side walls. The bases of the sliders then stand in the recesses of the box insert that are marked with an arrow.
- Next, insert the back wall (3) of the villa. Make sure that the two tabs at the top of the back wall slide into the slots of the side walls on the right and left.
- To be able to lay in the floor (4) comfortably, pull the sliders with the creepy creatures outward as far as possible. The jagged side of the floor lies between the creepy creatures.
- Now insert the wall projections (5) into their slots in the side walls. They are seated correctly as soon as they are also in the slots at the bottom of the box insert. There must be a wall projection in front of every creepy creature that is taking part!
- Now attach the peephole cover (6) with the push button to the front of the house (7) and insert the front like the back wall. Then push the flickering light lamp (8) from the inside through the front of the house so that the side with the button sticks out a little from the house. The lamp clicks into place at the front in a hole in the floor.
- Turn the villa so that its front faces you, and push all the creepy creatures on their sliders as far as possible into the villa. Then memorise well which creature hides where! Tip: Look closely at the outer sides of the side walls. At every slot where a slider's creature peeks out of the villa there is a small feature: sometimes a mouse scurries past, sometimes a beetle crawls there. It can be very helpful to remember which creepy creature goes with which feature! Once you have memorised the positions of the creepy creatures, place the roof (9) onto Villa Schauerstein. Then pull all the sliders outward again, so that the creepy creatures disappear behind their wall projections. So that the game is different every time, you should reassemble the villa before every game and change the arrangement of the sliders. Finally, puzzle the ghost ring (10) together on the roof of the house. All creatures whose sliders are in the villa are fitted into the ring with the colourful picture facing up. All creatures that are not part of this round are fitted in with their black back facing up. The order in which you fit the creatures together is arbitrary.
Introductory Game – Warm-Up Spooks!
Goal of the game: Memorise the hiding places of many creepy creatures and be the first to win three scare chips!
Start of the game: The youngest player begins. The player to the right of them places two of the stone devils on two coloured creepy creatures of the ghost ring. They determine which creatures the starting player should now push out of their hiding places into Villa Schauerstein.
The active player tries to remember where the two creepy creatures are, and pushes two of the eight sliders into the villa. Then they press the button of the lamp and keep it pressed. Flickering, eerie light lights up the villa. Now they slide the peephole cover to the side and look inside:
If they see ...
- ... the two sought-after creepy creatures? Then they say so out loud. All other players now also take a look into Villa Schauerstein. They check that the two sought-after creepy creatures are really visible, and memorise the positions of the creepy creatures once more. The active player receives one scare chip as a reward.
- ... only one or none of the sought-after creepy creatures? Then they say out loud the number of correct creepy creatures and memorise the positions of the visible creepy creatures for the coming rounds. The other players do not take a checking look into the villa.
If you cannot clearly recognise a creepy creature because it is hidden by the shadow of another creature, you may pull the front creature back a little.
Afterwards, all stone devils on the ghost ring are moved one space to the left; black spaces are skipped. Then all sliders are pulled back to their starting positions, and the next player takes their turn.
The next player moves one stone devil by one to three spaces in any direction; black spaces are skipped. Then the game continues as described above.
End of the game: As soon as the first player has won their third scare chip, the round is played through to the starting player. All players who now have three scare chips have won the spooky warm-up game!
Main Game – For the Fearless!
For the main game you need, in addition to the material of the introductory game, the third stone devil and the tip chips (right / wrong). Each player receives two tip chips, a green one for "right" and a red one for "wrong".
The game proceeds like the introductory game, with the following changes:
- You place three stone devils instead of two. This means three instead of two creepy creatures are sought per round.
- As soon as the active player has pushed the sliders in, you may guess whether they have found all the sought-after creepy creatures. To do so, take the corresponding tip chip in your hand. When everyone has decided, hold your fist with the tip chip inside it in the middle. On the call "Horrorschreck und Gruselgraus, so siehts aus im Geisterhaus!" (roughly: "Horror-scare and creepy-grey, this is how it looks in the ghost house!") you open your hands. Only then does the active player look into the villa.
- The active player looks into the villa and announces the result out loud.
If all are right: All other players look into the villa one after another and check the result. In doing so they memorise the locations of the creepy creatures once more. The active player receives two scare chips for the correct result. All players who guessed "right" each receive one scare chip. All players who guessed "wrong" go empty-handed. Afterwards all stone devils are moved one space to the left.
If not all are right: The active player unfortunately receives no scare chips. All players who guessed "wrong" each receive one scare chip. All players who guessed "right" go empty-handed. The next player moves one stone devil by one to three spaces in any direction. Then the game continues as described above. All sliders are pulled back again and the next player takes their turn.
End of the game: The game is won by the player who first collects the following number of scare chips:
- With 2 players: 8 scare chips
- With 3 players: 9 scare chips
- With 4 players: 10 scare chips
Adjusting the difficulty: How easy or hard your game is can be decided by yourselves!
- You can bring more or fewer sliders into the game, and so play with more or fewer creepy creatures. For this, take the desired number of sliders during setup and build them into the villa. The more sliders you use, the harder your game becomes.
- You can bring more or fewer stone devils into the game. The number of stone devils determines how many creepy creatures you have to summon.
- By deciding how many scare chips are to be collected, you can determine how long your game lasts.
Variant for Experts – Scare Cheating
(The manual prints an "8+" age marker beside this variant heading.)
At the start of the game each player receives 9 scare chips, which they place in front of themselves. The player who first has no scare chips left wins.
The game proceeds as in the main game: the active player moves one of the three stone devils, pushes three sliders into the villa and looks inside.
Warning, cheating alarm: When announcing the number of correct creepy creatures, cheating is allowed! All non-active players now give a tip on whether the active player is announcing the correct number.
- If everyone votes "right", the active player may hand over as many scare chips as the number of correct creepy creatures they announced. Their claim is not checked! The chips go back into the box and are out of the game.
- If at least one player votes "wrong", all players who voted "wrong" may take a checking look into Villa Schauerstein.
- If the active player did not cheat and announced the correct number, they must distribute their own scare chips to the doubters, in the amount of the correctly announced number. How they distribute them among their fellow players is up to them.
- If the active player cheated, all players who voted "wrong" may each hand one chip over to them.
Afterwards all stone devils are always moved one space to the left; black spaces are skipped. Then the next player takes their turn, and the game continues as described above.
End of the game: Whoever first has no chips left wins!
Safety and Battery Information for the Flickering Light Lamp
Changing the battery: Changing the battery must be carried out by an adult. On the underside of the lamp there is a battery compartment. Open the battery compartment with a cross-head screwdriver. Insert two button cells of type LR44 / A76 / KA76 / V13GA so that the plus and minus poles match the markings in the battery compartment. Screw the battery compartment cover back on.
Safety notes:
- Non-rechargeable batteries must under no circumstances be recharged!
- Rechargeable batteries may only be charged under adult supervision!
- Rechargeable batteries must be removed from the toy before they are charged!
- Different battery types, or new and used batteries, must not be used together!
- Insert batteries correctly according to the polarity signs "+" and "–"!
- When the batteries are discharged, or when the toy is not used for a longer time, the batteries must be removed!
- The connection terminals must not be short-circuited!
- We recommend the use of alkaline-manganese button cells (batteries).
- Use only batteries of the specified type or an equivalent type.
- Always replace all batteries at the same time, not just individual ones.