Golazo
Golazo Rulebook
Table of Contents
Table of Contents
The Basics
Aim of the Game
GOLAZO is a board game based on the rules of football. The objective is to score more goals than the other team. This is achieved through a combination of tactics, strategy and an element of luck!
Counters
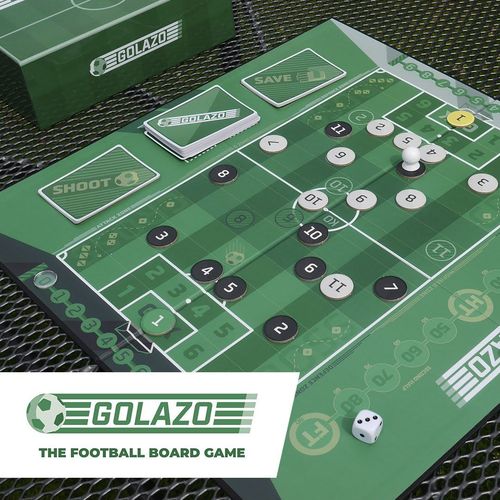
Each player on the GOLAZO pitch is represented by a numbered counter.
There are eleven players on each team. Each player has a designated starting position marked on the pitch. The goalkeepers are represented by the #1 counter and must stay in the GK space at all times. All other players (numbered #2 to #11) can move around the board as the game progresses.
Possession
Only one player can have possession of the ball at any one time - The ball is placed on top of the player counter to show that they are in possession. The team in possession is classed as the "attacking team".
More Than Two Playing?
Split into two teams rotating the dice roll and gameplay steps for each turn. Alternatively, why not design your own tournament? It could be a straight knockout, a league, or a full tournament with group stages and knockout rounds!
The Board
Board features: GK zone, Long Shot space, Ball / Kick Off space, numbered spaces, Cross zone, Penalty area, Time counter (timer track KO, 10, 20, 30, 40, HT, 50, 60, 70, 80, FT), Score counters (one scoreboard per team) and the Action Deck. Components: 6 x SAVE cards, 6 x SHOOT cards, the Action Deck, GOLAZO dice (one per player) and 4 classic dice.
Setup
- Place the player counters onto the designated numbered spaces.
- Take the POWERCARDS, shuffle them into the ACTION DECK and place on the board.
- Place the SHOOT & SAVE cards at the side of the pitch.
- Place the TIME COUNTER counter on the KO space on the timer.
- Put a SCORE COUNTER at "0" on each scoreboard.
- Each player takes one GOLAZO dice.
- The 4 classic dice can be placed to the side of the board.
- You are ready to play!
Gameplay
Start
At the start of the game, each team rolls 1 classic dice. The team that rolls the highest number takes the kick off.
Kick Off
The team kicking off should move a player counter, with the ball, onto the kick off space and then roll 1 classic dice. They can then take moves depending on the number rolled i.e. 4 rolled = 4 moves. See: Moves.
After kick off each subsequent turn is broken down into 3 steps.
Step 1 - The Dice Roll
Both teams roll the GOLAZO dice. Highest wins!
Tie? If both teams roll the same then roll again.
Move onto step 2.
Step 2 - Make Your Move
1-5 rolled: Both teams are given moves depending on the number they rolled in step 1, i.e. roll a 4 = 4 moves. The team that wins the dice roll completes all their moves first. See: Moves.
GOLAZO dice icon ("G") rolled: Team that rolls takes a card from the ACTION DECK and completes the action as described. No moves are given to either team when the icon is rolled. See: Action Deck.
+ Time: The TIME COUNTER should also be moved on by one space.
Once all moves are completed, move onto step 3.
Step 3 - Key Event
A number of key events may now be possible...
- Long Shot: If a player is in possession of the ball, on the LONG SHOT SPACE in their opponent's half, they may take a long shot. See: Long Shot.
- Cross: If the player in possession of the ball is in the CROSS ZONE, in their opponent's half, they may attempt a cross. See: Cross.
- Shot: If a player has possession of the ball in their opponent's PENALTY AREA they may take a shot. See: Shot.
Once all possible key events are completed, return to step 1.
Action Deck
Example cards: "Keeper off the Line" (attacking team: take a long shot now from your current position!) / "Brilliant Defensive Play" (defending team: take the ball and give it to any player on the pitch); "PITCH INVASION! There's a Streaker on the Pitch! The referee has stopped the game while the stewards get involved... Timer doesn't move."
If a GOLAZO dice icon is rolled no moves are given to either team. Instead, the team that rolled it draws a card from the ACTION DECK and performs the action.
When an attacking/defending split card is drawn, perform the action of the "attacking team" if your team is in possession of the ball. If not in possession, perform the action of the "defending team".
Note: Only the team that rolled the icon performs the actions on the card.
The TIME COUNTER is moved each time a card is taken from the ACTION DECK unless the card prevents this.
Powercards
Example cards: "Load the Box" - Place an additional 3 players in opposition penalty area before the cross is attempted. Play when your player has the ball in a cross zone. "Offside Trap" - Ball goes to your Goalkeeper. Complete a clearance. Play when the opposition has the ball in your half of the pitch.
If a POWERCARD is taken from the ACTION DECK, the team can decide to use it immediately or save it for later in the game.
Each POWERCARD has instructions confirming when it can be played.
After being used once the POWERCARD is returned to the bottom of the deck.
Moves
Both teams can make as many moves as they rolled in step 1, i.e. roll a 4 = 4 moves.
The team that wins the dice roll completes all their moves first.
Unsporting Behaviour...
It is ILLEGAL at any point in the game to:
- Form a wall of players to block the entire width of the pitch.
- Completely surround a player with the ball.
- Move an opposition player unless instructed by an ACTION CARD.
- Have 6 players in your own penalty area.
Types of Moves Available
Any combination of the below can be used until all moves are completed.
- Player: A move of a player without the ball by one space in any direction. (1 move)
- Dribble: A move of a player with the ball by one space in any direction. (1 move)
- Passing: A pass of the ball to another player. (1 move)
- Tackle: Use of two moves to take the ball from an opposition player. (2 moves)
NOTE: The team that lost the dice roll cannot make a tackle with their moves.
Player
A move of any player without the ball by one space in any direction.
The same player can complete multiple player moves during each turn.
E.g. #10 Player moves sideways by one space.
Dribble
A move of the player in possession of the ball by one space in any direction.
After completing a dribble move, the player in possession cannot move again during this turn until the ball is passed to another player.
E.g. 3 moves would allow the following: 1. #8 "Dribble" by one space forwards. 2. Pass to #10. 3. #10 "Dribble" by one space diagonally.
Passing
A pass must meet two criteria to be allowed:
- The path of the ball must follow along horizontal, vertical or diagonal spaces from one player to another.
- The path of the ball must be unobstructed by an opposition player.
Diagonal passes must follow the line of spaces between the 2 players (as the bishop would move in chess).
A pass uses only one move and there is no limit to how far the ball can travel between two unobstructed teammates.
Tackle (2 moves)
Only the team that won the dice roll can make a tackle to take possession of the ball.
Sequence:
The tackling player must be in a space next to the opponent in possession of the ball before making a tackle.
The tackling player uses two moves to take the ball.
Any moves left after a tackle has been made can be used to complete pass, player or dribble moves.
NOTE: The team that lost the dice roll cannot make a tackle with their moves.
Key Events
Shot
When a player, in possession of the ball, is in their opponent's penalty area they can take a SHOT on goal!
Sequence:
Attacking team: The attacker chooses one card from the "SHOOT" deck. Each "SHOOT" card shows where the shot is being aimed.
Defending team: The defender chooses 2 cards from the "SAVE" deck.
Goal
Once both teams are happy with their selection the cards are revealed simultaneously. If the defender has not selected the matching save card the attacking team have scored! GOLAZOOOOOO!
The players are reset to their starting positions and the team that conceded the goal takes a kick off.
Save/Clearance
If the defender has chosen a save card that matches the attacker's selection then the shot is saved and the goalkeeper takes possession of the ball!
All players must be taken out of the penalty area and moved into an available space in the same half of the pitch. The team that took the shot moves their players first. The goalkeeper now has two options:
- Play one pass according to the rules of passing to a player in the same half of the pitch.
- Perform a high clearance by rolling 2 classic dice. For a high clearance, the ball is given to the player with the total number that was rolled from the 2 dice, e.g. 3+5 = 8. The ball goes directly to the number 8 player.
If a 12 is rolled then the team can choose to give the ball to any available player.
If the player has been sent off, then the ball goes to the opposition player of the same number. If neither player is available, then re-roll the dice.
If possession is taken by a player and a key event is possible then this event can be completed before play continues.
Long Shot
If a player has possession of the ball in the long shot space in the opposition half then they can attempt a long shot!
N.B. The team in possession can take a long shot even if an opposition player is between the ball and the goal.
Sequence:
Attacking team: The attacker chooses one card from the "SHOOT" deck.
Defending team: The defender selects FOUR cards from the "SAVE" deck.
Result: GOAL/SAVE/CLEARANCE
Cross
When a team has possession of the ball in a cross zone in the opposition's half they may attempt a cross.
Sequence:
- 1, 2, 3 or 4 classic dice are taken depending on how many dice are shown on the space where the player has the ball.
- The dice are rolled... If any of the dice match the numbered space which an attacking player occupies in the penalty area then a goal is scored! GOLAZOOOOOO!
The more players you have in the penalty area, the higher your chances of scoring!
Example: The attacking team has two players on numbered spaces "3" and "6". The player in possession of the ball is in the "3 dice" space. Attacking team roll 3 dice = 2, 2 & 6. The player on the "6 space" matches the 6 dice so a goal is scored!
If a goal is not scored the ball goes to the goalkeeper. See: Clearance.
Game Over?
Half Time
When the time counter reaches the HT space and all actions/key events have been completed, the players are reset to their starting positions.
The team that did not kick off in the first half now restarts the game. See: Kick off.
Full Time & Stoppage Time
When the time counter reaches the FT space and all actions/key events have been completed the game enters stoppage time!
- One classic dice is rolled.
- The number rolled indicates how many turns are left before the game ends. For example, 4 is rolled = 4 turns left.
During stoppage time the GOLAZO dice are no longer used. Both teams now use the classic dice for each turn.
Once all possible key events after the final turn are completed the game is over!
Deadlock?
Golden Goal: If the game ends in a draw then you can continue playing until one team scores a goal. The game ends immediately once a goal is scored!
Penalties! If you prefer the highest level of drama! Each team takes it in turns to shoot and defend using standard shoot and save rules. Winner is the best of 5 penalties each.
Advanced Rules
Once you have mastered the GOLAZO basics why not try adding advanced rules? These are all optional but add a greater level of depth and strategy to the game!
Slide Tackle
After losing the dice roll, a team can opt to gamble all of their moves to attempt a slide tackle.
The player attempting the slide tackle must be in an adjacent space to the player with the ball.
Sequence
- Team that won the dice roll complete their moves.
- The team that lost can now attempt a slide tackle before making any moves.
- One classic dice is rolled by the defending team.
Outcome
- 1 rolled: Player attempting the tackle is sent off and removed from the pitch.
- 2-5 rolled: Defending team forfeit all moves in the turn.
- 6 rolled: The defending team's slide tackle is successful! They gain control of the ball and are given 6 moves this turn.
Tactical Golazo
You can play a more tactical version of GOLAZO by allowing the team who lost the dice roll in step 1 to take their moves first in the turn.
The team that lost the dice roll cannot tackle with these moves, but it will allow them to re-organise their players to create problems for the opposition or even retain possession with some smart tactical play.
These are just two of a whole host of advanced rules, but full details, along with diagrams and explainer videos, can be found at www.golazo-game.co.uk.
More Advanced Rules (from the publisher's Advanced Rules web page)
Other ideas to have a more tactical game...
Wall defence outlawed: Neither team can end the turn with more than 4 players in the same horizontal row on the pitch.
Pass distance: You can restrict the distance a normal pass can be played. The restriction means you need to use a move for every 4 spaces the ball travels. i.e. Distance between players: 1-4 spaces = 1 move; 5-8 spaces = 2 moves; 9-12 spaces = 3 moves. Alternatively, you can attempt a high pass with 1 move - see High pass.
Timed games: The Timed game is a great option if you prefer to set a specific length of the game, want to have a fast paced game or wish to play a tournament with multiple games. All the rules remain the same except for the timing.
Key adaptations:
- The board timer is not used. Set a timer for as long as you wish the game to go on for.
- Both teams have 20 seconds each to make all of their moves once the dice roll (Step 1) has occurred. If the moves are not complete in the 20 seconds then any moves not used are forfeited and the next dice roll occurs.
- If the dice are rolled before the timer ends the game then all available moves and possible key events are completed before the game ends!
- We would recommend an overall game length of 15-20 minutes as standard.
GK rush-out: When the attacking team is in the penalty area with the ball for a shot, the defending team can decide to make the Goalkeeper rush-out before the shot is taken. This does not use a move.
Sequence: Defending team roll 1 classic dice. If they roll the numbered space that the striker is on in the penalty area, the GK has won the ball > Clearance. If the correct number is not rolled, the attacking team takes a shot but the defending team can only choose 1 card to attempt a save.
GK moves: Player moves can be used to bring the Goalkeeper out of the GK Zone like any outfield player. However, if possession is lost whilst the Goalkeeper is out of the GK zone, the opposition can immediately take a shot from anywhere on the pitch. The number of cards the defending team will have to save the shot will depend on where the shot is being taken from.
- Inside Penalty area: 0 cards
- 1 space outside of penalty area: 1 card
- 2 spaces outside of penalty area: 2 cards
- 3 spaces outside of penalty area: 3 cards
- 4 spaces outside of penalty area: 4 cards
- 5 spaces outside of penalty area: 5 cards
Pass to GK: This allows passes to be made to the Goalkeeper during the turn. The pass must still follow the original laws of Passing. Once the Goalkeeper has the ball, the team can use 1 move to perform a High Clearance with two dice from the goalkeeper OR use moves to dribble/pass the ball as with any outfield player. Alternatively, the goalkeeper can keep the ball until the next turn, but be aware that if the opposition makes a tackle they can take a shot!
Wingers: This allows a player to use all the available moves in the turn to make dribble moves in the cross zone. A player may use a dribble move to enter the cross zone and then continue to use dribble moves to advance forwards during the same turn. A player is not allowed to dribble within the cross zone and then dribble out of the cross zone in the same turn.
Nutmegs: A nutmeg allows the player with the ball to move into the space directly beyond an opposition player. The opposition player must be in a space directly adjacent to the player with the ball. A nutmeg uses a player's one dribble move.
To attempt a Nutmeg: Roll two classic dice. If a DOUBLE is rolled the player with the ball can move into the space directly beyond the opposition player. If unsuccessful the ball goes to the opposition player and the team's turn is over immediately.
NOTE: A nutmeg cannot be attempted if the space directly beyond the opposition is occupied by another player.
High pass: A HIGH PASS can travel over opposition players without being blocked, but it must still follow a horizontal, vertical or diagonal line of spaces. 1 high pass uses 1 move.
To attempt a high pass: The attacking team states what direction the ball is to be passed. 1 or 2 classic dice can be rolled to decide how many spaces the ball will travel in that direction. The ball passes directly to that space.
Possible outcomes:
- Ball lands on a space a teammate is occupying: Attacking team can continue turn and complete any moves left.
- Ball lands on a space an opposition player is occupying: Attacking team's turn is over immediately.
- Ball lands on an empty space: Attacking team can use any moves left to move a player towards the ball. If they are unable to get to the ball, the opposition can take possession of the ball with their available moves in the turn. If neither team can get to the ball, the turn ends and the next dice roll occurs using the classic dice.
- Ball goes out of play on the goaline: Attacking team's turn is over. Opposition completes a clearance with their Goalkeeper. Any moves they have left in the turn are then completed.
- Ball goes out of play on the side touchline: Attacking team's turn is over. Opposition place one player with the ball in the space where the ball went out of play. They can decide to use the moves they already have in the turn or have an unopposed dice roll with 1 classic dice.
Extra Time! Expansion Pack
Do you want to add even greater depth to your game? The Golazo Managers Expansion can be purchased separately at www.golazo-game.co.uk/managers. Each of the Golazo Managers has 3 special abilities to give you an advantage over your opponent! Choose your manager at the start of the game. You can only use each card once, so use them wisely! (Example card: "Diver" - play and win an unopposed dice roll for the next turn. Play before the dice roll.)