Dungeon Lords: Minions Bearing Gifts
Dungeon Lords: Minions Bearing Gifts Rulebook
Table of Contents
Table of Contents
Item Tokens
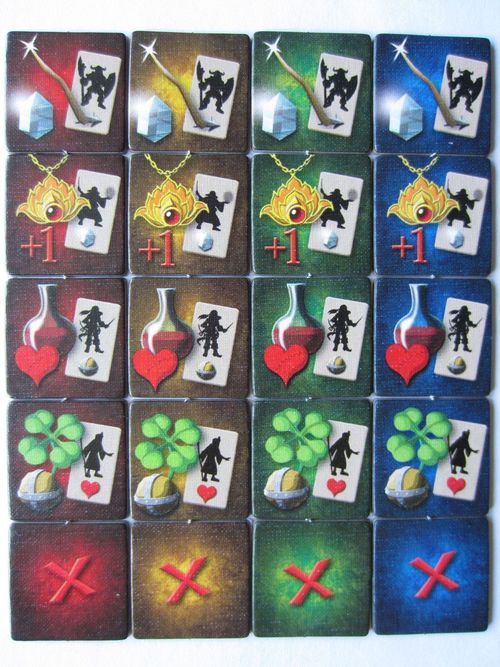
Each color has 5 Item Tokens: one is the Empty Token, and the other four are magic items, one for each type of adventurer.
Each Item Token shows an illustration of the magic item, its ability, and the type of adventurer that can use it. The adventurer type is shown by an icon.
Magic Items
Magic Wand Allows a warrior to add one magic point to the party. Scrolls and runes may confuse them, but even warriors know how to wave a stick.
Amulet of Fortitude Gives a wizard an extra hit point. Carrying this amulet will improve the physique of even the wimpiest wizard, partly because of its power and partly because of its weight.
Healing Potion Enables thieves to help heal the party. Upon receiving the potion, they must sign a license agreement stating that they will abide by the same rules as the priests. Yes, they keep their word. Thieves do not mind going against the law, but they know how dangerous it is to go against the lawyers.
Lucky Four-Leafed Clover Enables priests to help the party avoid trap wounds. To make it truly lucky, it must be gathered at midnight and dipped in unicorn blood – which is not so lucky for the unicorn.
Empty Token
Variants
There are two variants:
The Straightforward Variant is easier to explain and play. Try it if you like the theme of the game and want more player interaction.
Interaction is not-so direct in the Tricky Items Variant. If you guess wrong, you can actually thwart your own plans. This variant is for experienced players who enjoy manipulating the Evilometer, predicting game development, and exploiting the fine details of combat.
Straightforward Items Variant
This variant adds direct interaction to the game. We recommend this for the first game with magic items, as it is easier to explain and to play.
At the start of the last round of each Year, each player sends one Item Token to each party camping in front of the other players' dungeons.
Before Combat, the magic items are distributed within each party to the adventurers who can use them. During Combat, the items strengthen the adventurers, making their defeat more difficult.
On the other hand, eliminated adventurers yield their items to the Dungeon Lord who captures them, giving him or her one extra point for each item at the end of the game. So if you send an item to a party that cannot use it effectively, you will actually be helping your opponent.
Setup
At the start of the game, you get the 5 Item Tokens in your color (4 magic items and one Empty Token).
II In a two-player game, you also get the 4 magic items in the non-player color you are in charge of. You do not get the non-player Empty Token. (So you will have 8 magic items and 1 Empty Token.)
Items Phase
Each Year has an additional Items Phase in which your minions peddle magic items to the adventurers waiting at other players' dungeons.
The price is just enough to cover production expenses. Items are not sold at a profit. The satisfaction of thwarting a competitor's plans is rewarding enough.
The Items Phase occurs at the beginning of the last round of the Year, after rooms and monsters (or ghosts) are revealed and before the Orders Phase. When setting up the Progress Board for the Year, use an Imp Figure to mark that space of the Progress Board. His pointy ears will remind you to peddle items at that time.
If you want, you can use a Troll Token instead of that imp. It's easier to overlook, but at least there will be a good reason for having 4 Troll Tokens in a game with only 3 Trolls.
Peddling Items
When the Progress Marker reaches the marked space, you distribute Item Tokens to the other players' dungeons. Give one Item Token, face down, to each other player.
In a 4-player game, you must give the Empty Token to one player and magic items to the other two. In the First Year, you choose two magic items to send and two to keep for next Year. You choose which items to give to whom.
After all players have received one Item Token from each opponent, the Item Tokens are revealed. Empty Tokens are returned to their owners. The other Item Tokens (the actual magic items) are kept near the adventurers on the Dungeon Board of the player who received them. The items will be distributed to the party members at the beginning of Combat. (See below.)
Yeah, the items are sent to the dungeons before everyone gets their last adventurer, so you still have time to jockey on the Evilometer. That's dungeon lording: even the Straightforward Items Variant can be tricky.
After the First Year's Items Phase, you will have 3 Item Tokens (in your color) left, one of which will be the Empty Token. In the Second Year you will pass these 3 Item Tokens out. (You will not be able to choose which tokens to send in the Second Year, but you can still choose who receives what.) At the end of the Second Year's Items Phase, your Empty Token will be returned to you. It will be the only Item Token you have left.
III In a three-player game, you give away only two Item Tokens. One of them can be the Empty Token, but it does not have to be. Your Empty Token will not be returned to you. Instead it will be discarded to the Distant Lands Board. So if you pass one magic item and the Empty Token in the First Year, you will have only magic items available for the Second Year. You will give away two of these in the Items Phase and have one left at the end of the game. On the other hand, if you keep the Empty Token and send two magic items in the First Year, the Empty Token will be available to you in the Second Year. You can pass it to someone in the Items Phase, or you can give away both your remaining magic items and keep your Empty Token for the rest of the game.
II In a two-player game you have Item Tokens in two colors. You must give one Item Token in each color to your opponent and also to your opponent's non-player Dungeon Board. You receive one Item Token from each of your opponent's colors, as does your non-player Dungeon Board.
You may keep your Empty Token or send it. You can choose to send it to either your opponent or to the non-player. If you send it, it will not return to you. It will be discarded to the Distant Lands Board when Item Tokens are revealed. So you can only use one Empty Token once during the course of the game.
Only Item Tokens sent to your opponent matter. Item Tokens sent to non-players are discarded to the Distant Lands Board when they are revealed. (This limits your choices in the Second Year.) Discarded Item Tokens are face up, so your opponent can check to see what Item Tokens you have left for the Second Year.
The Second Year follows the same rules as the first. You will use 4 of your 5 remaining Item Tokens and keep one (which will be in your color).
Yeah, we know it doesn't matter what Item Tokens you give to the non-player in the Second Year. Do it anyway. The non-player gets bored if no one pays it any attention.
Summary (for 2, 3, or 4 players)
- You start with 5 Item Tokens in your color. (In a two-player game, you also have 4 non-player Item Tokens – all except the non-player Empty Token.)
- Each Year, you send one Item Token to each opponent. (In a two-player game, you send your opponent and his non-player board one of each of your colors.)
- In a four-player game, you send the Empty Token each Year and it returns to you. In a two- or three-player game, you can choose whether to send your Empty Token, and it is discarded after being revealed.
- You are always left with one Item Token in your color at the end of the game, regardless of how many players there are.
Combat
During the Items Phase, your adventurers received 0 to 3 magic items, which could be the same or of different types. Only the magic items you received from other players matter. Item Tokens in your color will play no role in Combat.
Item Distribution
During Setup, distribute the items among your adventurers. Each item can be used by only one type of adventurer. The others cannot use it.
For each type of magic item you have, do the following:
- If you have exactly one adventurer of the required type, give all such items to him. (Put them above his head.)
- If you have multiple adventurers of the required type, deal out all such items evenly, starting with the rearmost adventurer. If there is one item for each, then each will get one. If you have three items and two adventurers, the one farther behind will get two and the one more in front will get one.
- If you have no adventurers of the required type, the party will not use the items. Put them at the end of the row to indicate that the party has kept them in the party sack.
The paladin never receives any item.
Some say the paladin denies himself magic items because he is so pure. Others say his vows prevent him from taking them. But the truth is that the paladin is such a show-off that the other adventurers refuse to share with him.
The following examples illustrate correct item distribution:
[Example diagrams of correct item distribution are on the page and are not transcribed.]
Effect of Items in Battle
The magic items assigned to adventurers can affect Battle. The magic items in the party sack, however, have no effect. (You can turn them face down so they do not distract you.)
An item's effect is simple: it gives the bearer the extra ability depicted on the Item Token – one extra hit point (+1), or one anti-trap, magic or healing ability.
The extra hit point for a wizard works as though the red number on that Adventurer Tile were greater by one. Thus it will take one more Damage Counter to eliminate him. (Note, however, that the Poisoned Meal Trap will do one more damage if it affects that wizard.) This is cumulative, so two amulets will give a wizard 2 extra hit points.
The other abilities are simply added to the party's total anti-trap, magic, or healing abilities. They have exactly the same meaning as the abilities printed on the Adventurer Tiles. For example, all these parties will heal damage in the same way:
- A party with no priests and one thief with two healing potions.
- A party with no priests and two thieves, each with one healing potion.
- A party with one priest with one healing icon and one thief with one healing potion.
- A party with one priest with two healing icons and no healing potions.
Magic items can be used every time they apply. They do not get used up. (Think of the thief as giving someone a sip from the healing potion each round. No one drinks it all up.) The only way to get rid of a magic item is to eliminate the adventurer carrying it.
Rules referring to a type of adventurer (warrior, priest, etc.) only refer to the type as indicated on the Adventurer Tile. For example, a thief with a healing potion is still a thief and not a priest. She can still be attacked by vampires, and Anti-Magic Dart has no special effect if it hits her. However, if the Anti-Magic Dart hits a priest, it prevents the thief from healing, because the trap is designed to make the entire party skip the Healing Step. Similarly, a warrior with a magic wand is not a wizard. He can help the party cast Invisibility, but the spell will not apply to him. Anti-Magic Dart will prevent the magic wand from contributing to a spell only if it hits a regular wizard.
The text on Poisoned Dart needs to be corrected. The "two damage thieves cannot prevent" should be interpreted as "two damage that cannot be prevented by the anti-trap ability" so that it also applies to paladins and to priests with a lucky four-leafed clover. For more, read the official FAQs at www.czechgames.com.
Capturing Items
When you eliminate an adventurer with one or more magic items, put these items in your prison along with the adventurer. The captured items will play no further role in Combat.
If there are items in the party's sack (i.e., magic items that could not be used by any of the adventurers) you capture them if you eliminate all the adventurers (including the paladin if present).
If Combat ends before you eliminate all the adventurers, the items carried by the remaining adventurers, as well as those in the party's sack, are discarded to the Distant Lands Board.
Special case: if you defeat all the adventurers and then have to start Combat again because the paladin moved to your dungeon, you keep all captured items, including those in the party's sack, regardless of whether you eliminate the late-coming paladin.
Scoring
At the end of the game, when scoring points for captured adventurers, you also score one point for each captured magic item in your prison.
Use your Empty Token wisely, and be sure to choose magic items that will really mess with your opponents' plans. Otherwise, they just say, "Thanks for the bonus point!" and toss the captured item into their vaults.
Tricky Items Variant
If you like the tricky aspects of the game – maneuvering on the Evilometer, out-guessing your opponents, etc. – you can try this variant. The interaction is less direct, and the impact of your actions is more difficult to guess. The rules are also more difficult to explain. If you just want to add some interaction to the game, use the Straightforward Items Variant.
In this variant, Instead of sending magic items to the other players, you send them to the adventurers waiting on the Progress Board. You can't be completely sure which player will receive which adventurers, as you assign items before the orders for this round are revealed and evaluated. Because all players are doing this secretly and simultaneously, you can not even be sure that your item will be assigned.
Each adventurer can have only one item. You do not score points for capturing items. Instead, you watch to see if the item you sent is successfully used by the adventurer. If so, you score 2 points for mischief at the end of the game.
Setup
At the start of the game, take the five Item Tokens in your color (four magic items and one Empty Token).
(The rules are the same for any number of players.)
Orders Phase
In the rounds in which adventurers are assigned to dungeons (i.e., the second, third, and fourth rounds of each Year) players can send magic items to the adventurers.
When selecting orders during the Orders Phase (except in winter) you choose one of your Item Tokens and place it face down below the adventurers. Play order is important. The player with the Starting Player Token puts his or her Item Token below the first Adventurer Tile (the one farthest to the right). The next player places his or her token below the second Adventurer Tile, and so on.
Orders are not revealed until all players have chosen an Item Token. The Item Tokens are not revealed at this time. They are kept face down until the adventurers are assigned to players.
II III In a two- or three-player game, you will also be randomly choosing orders for the non-player color(s). The randomly chosen orders are revealed before you select your own orders and Item Token.
In the spring of the First Year, you will have 5 Item Tokens to choose from. In later rounds, you might have fewer, but the Empty Token will always be at your disposal (as explained below).
Adventurers Phase
Just before assigning the adventurers to the dungeons, the items are distributed.
Reveal the Item Tokens in order (starting with the one below the first adventurer). For each Item Token do the following:
- If it is an Empty Token, return the Item Token to the player of that color.
- Otherwise, put the magic item above the first adventurer of the appropriate type (the one farthest to the right) who has no item yet. For example, if there are two warriors, the first magic wand goes to the first warrior and the second magic wand goes to the second warrior.
- If there is no adventurer of the appropriate type this round, or if each such adventurer already has one item, return the Item Token to the player of that color.
[Two example diagrams of revealed Item Tokens and adventurer assignments are on the page and are not transcribed.]
Adventurers are assigned to the players according to the usual rules. They take their magic items with them. Note that unusable magic items are returned to their players immediately, so the party carries no items in the party sack.
II In a two-player game, a magic item can be assigned to an adventurer that goes to a non-player. When this Adventurer Tile is discarded to Distant Lands, the Item Token is not discarded; it goes back to the player who assigned it.
Yeah. Ambush him and take your gift back. Spreading evil around here keeps us busy enough. Let those distant lands make their own.
Note that in this variant, no adventurer can have more than one item. They keep the items they were assigned. They do not re-distribute them at the beginning of Combat.
Combat
In Combat, magic items work exactly as in the Straightforward Items Variant. (See above.)
In addition, you must watch to see if your magic items were used. If an item is used in Battle (as explained in the Appendix) mark it with a Gold Token.
When an adventurer with an item is eliminated, or when Combat ends, the Gold Token shows whether the item was used. If so, the player of that color (the player who originally sent the Item Token) takes it and keeps it in his or her Dead Letter Office. If not, the Item Token is discarded to the Distant Lands Board.
You mark items to show that they were used. They are not used up. They can be used again as long as the adventurer who carries them is not eliminated. Only the first use needs to be marked. The number of uses is not counted.
So after Combat, each magic item that was used at least once goes to the Dead Letter Office of the player who originally sent it.
It does not matter whether the adventurer is eliminated or not. Item Tokens in your Dead Letter Office are not available for sending to adventurers in the Second Year. Instead of representing magic items, they now represent the joy of having messed up someone else's dungeon (and possibly a nasty letter from that dungeon lord).
Exception: It can happen that you get an adventurer with an item in your color. This is not good. The item works as usual, but after Combat it goes to the Distant Lands Board whether it was used or not. In this variant, players never acquire magic items that were used against them; they only score magic items of their color that were successfully used against other dungeon lords.
Writing a nasty letter to yourself would be kinda stupid.
Scoring
Magic items are not part of official ministry scoring. If you end up with zero points or less, you are out of luck and you get no license.
However, if you have a positive score, you get 2 extra mischief points for each Item Token in your Dead Letter Office (i.e., for items that were successfully used against other dungeon lords).
Appendix: Successful Use of an Item
In the Tricky Items Variant, you have to determine whether a magic item was used. We strongly recommend that players resolve Battle in order, so that everyone can watch carefully.
Healing Potions
The party's healing potions are considered to have been used if, in any Healing Step, the party heals at least one more damage than it would have healed without potions. In this case, mark all the party's healing potions as used.
[Example diagrams of the slime and goblin attacks are on the page and are not transcribed.]
If you send your slime to attack the party, it will do one damage to each adventurer. In the Healing Step, the party will heal all 3 damage. Both potions are marked as used because without them the party would have healed only 2 damage.
If you send your goblin, it will do 2 damage. These are healed in the Healing Step. Because the priest could have healed them even without the potions, the items are not marked as used.
If you send your goblin and your slime to attack in the same round, then the outcome depends on the order of attack. Which monster should you attack with first if you do not want either Magic Potion to be marked as used? (In both cases, the first thief is eliminated and his item is discarded without use. The only difference is whether the second item is used.)
Lucky Four-Leafed Clover
Four-leafed clovers are successfully used if, in any Trap Step, the party prevents at least one more damage from traps than it would have prevented without them. In that case, all the party's four-leafed clovers are marked as used.
[Example diagrams of the trap cards (Poisoned Dart, Kamikaze Imp, Cursed Ring) are on the page and are not transcribed.]
If you choose the Poisoned Dart, neither four-leafed clover is marked as used. Only 1 damage is prevented, and it would have been prevented even without the items. The extra 2 damage is a special effect that cannot be prevented.
If you choose the Cursed Ring, all 3 damage are prevented. Both items are marked as used (even though one would have been enough).
If you choose the Kamikaze Imp, four of the five points of damage are prevented. The remaining point is dealt to the last priest, which eliminates him. However, before he is eliminated, both four-leafed clovers are marked as used. They go to the Dead Letter Offices of the players who sent them. (If one of them is yours, it is discarded instead.)
Magic Wand
Magic wands are successfully used if the party casts a spell that could not have been cast without them. In that case, all magic wands in the party are marked as used. It does not matter whether the spell had an actual effect. Even casting a Fireball can cause a magic wand to be marked as used.
[Example diagrams of the Suggestion, Pendulum and Anti-magic Dart cards and the party are on the page and are not transcribed.]
The Combat Card for the first round is Suggestion. This is a fast spell, so it is dealt with after traps, but before monsters.
Suppose you choose to attack with your witch. The spell is cast before her attack. The wizard could cast this spell without the help of the warrior's wand, so the item is not marked as used. If you pay the extra cost to keep your witch in the battle, she can eliminate the warrior and his item will be discarded without use.
If you do not eliminate the warrior or the wizard in the first round, then they will be able to cast a spell in the second round, as well. If this occurs, the magic wand will be marked as used because without the item, the party would only be able to cast the first-round spell.
Suppose, instead, you decide to set the Pendulum trap and use no monsters in the first round. The wizard will be eliminated before the Fast Spell Step. Because of the wand, the party will still cast Suggestion. The wand will be marked as used, even though there were no monsters for the spell to affect.
Finally, suppose you use the Anti-Magic Dart and the witch in the first round. You use the dart to deal 1 damage to the wizard and prevent spell-casting. (Note that targeting the warrior would not prevent spell-casting.) You use the witch's two attacks against the wizard to eliminate him. In the next round, the party will not have enough magic points to cast the spell. The wand will remain unused for the rest of Combat and will be discarded. (At least, that is what will happen if the paladin does not show up.)
Amulet of Fortitude
An amulet of fortitude is considered to have been used if it allows the wizard to survive damage that would have eliminated him. In other words, if the wizard has damage equal to his original hit points (without the amulet), the amulet is marked as used.
If damage is enough to eliminate a wizard with an unused amulet, the amulet is not considered to have been used and is discarded. Note, however, that fatigue damage is dealt one point at a time. If one point of fatigue damage brings the total up to the wizard's original hit points, the amulet is marked as used, even if the next point of fatigue damage eliminates him. (The amulet allows him to stumble through the dungeon just a little bit longer.)
Note: If the party has one anti-trap ability, and the Poisoned Meal trap is used against a wizard with an amulet, that amulet is marked, as the wizard survived damage that would eliminate him otherwise. The fact that the damage would be lower without the amulet does not matter.
[Example diagrams of the witch, vampire, priest and wizard cards are on the page and are not transcribed.]
In a later round of Combat, you find yourself in this situation. The Combat Card for this round will deal 2 fatigue damage. (The spell is irrelevant because the party only has one magic point.) The fight takes place in a room.
If you attack with the witch for 4, the wizard will be eliminated despite his amulet of fortitude. The item will not be used, so it will be discarded. This will leave your vampire unable to attack. The priest will heal 1 point of damage, take 2 from fatigue, and survive the round.
Instead, you can use the witch's other attack to eliminate the priest. If you attack the wizard with the vampire for 3, the wizard will survive because of his amulet. The amulet will be marked as used. The wizard will be eliminated by fatigue, and the amulet will go to the Dead Letter Office of the player whose color it is.
If the vampire only attacks for 2, this will not mark the amulet as used. However, when the wizard takes fatigue damage, the first point will cause the wizard to use the amulet. The second point will eliminate him, and the used amulet will be sent to its player's Dead Letter Office.
Can you find a way to eliminate both adventurers this round without causing the amulet of fortitude to be used?