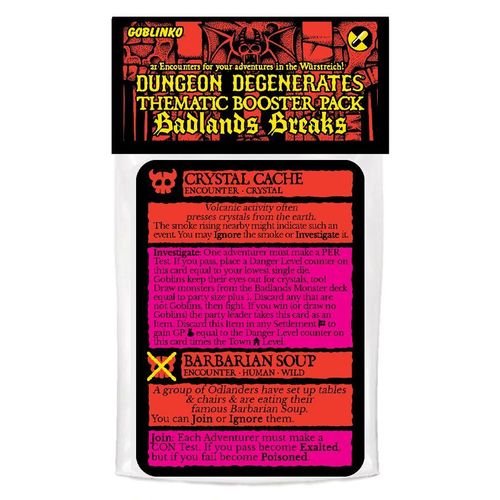
Dungeon Degenerates: Badlands Breaks
Dungeon Degenerates: Badlands Breaks Rulebook
Table of Contents
Table of Contents
- Encounters
- Devil's Bargain
- The Freeshooter
- Earthquake
- Scorched Earth
- Scrag Tamer
- Slavers
- Sludgeslide / Strange Brew
- Spiders
- The Black Rider
- The Desperate Man
- The Wizard
- Threats with Menace
- Circling Krultures / Buzzing Gobflies
- Crystal Cache / Barbarian Soup
- Dark Avenger
- Famine / Feast
- Freak Winds / Fierce Winds
- Goblin Slave Market
- Hobgoblin Wegschleifer / Trophy Room
- Pulsing Cavern / Goblin Spoor
- Raiding Party
- Notes on Transcription
Encounters
Devil's Bargain
Encounter · Daemon.
RESOLVE IMMEDIATELY
A cloaked figure approaches the party with an offer. Enter their Dark Pact to gain unlimited power, no catch...
In reverse MRL order, one adventurer may Agree (roll off ties if more than one adventurer with the same MRL wants to agree). Otherwise, Ignore the figure.
Agree: You have entered a Dark Pact - take this card as an Agenda.
Whenever you make a Skill Check to resolve an Encounter, you must roll 3 dice & use any 2 unless you roll doubles, in which case you must use the 2 matching results. If you roll trebles, take that many Wounds (for example, take 1 Wound if you roll three 1s), unless you roll three 6s, in which case draw a Doom card & apply its effect. If the Hand of Doom is not in play, instead apply any effect that occurs in the Hand of Doom's space to your space.
Ignore: Each adventurer must take a MAG or MRL Test. If you fail become Blinded.
The Freeshooter
Encounter · Daemon.
RESOLVE IMMEDIATELY
As you face off against your foe, a saturnine figure appears - "Fear not! These fiends will feel my fury!".
At the start of each combat round, inflict D3 damage on the monster with the lowest remaining HP (party leader's choice in ties). Any monsters destroyed are not taken as trophies. If you win the fight, he offers a gift to the adventurer with the lowest PER ({PER Test} breaks ties - lowest wins). You may Ignore, Accept or Fight him.
Accept: Take this card as an Ammo/Shot Item. It cannot be traded or shared between adventurers.
MAGIC SHOT: ITEM | ALCHEMICAL | AMMO/SHOT
To use this Item, it must be loaded into another Item that Uses Shot. Range attacks with the attached weapon inflict +2 Piercing damage. On a successful Attack roll with doubles, you must choose one adventurer (including yourself) to take the damage instead. When you roll 12 on your Attack Dice while making a Range attack with the attached weapon, discard this card. Do not take this item if you destroy the Freeshooter.
Stat line (printed at the foot of the card): ATT 6 (Range icon, down-arrow icon labelled PER) · ARM 1 · HP 8 · XP VAL 2, GP 3 (lightning and money-bag values) · Traits: PIERCE 2
Earthquake
Encounter · Environment.
RESOLVE IMMEDIATELY
The ground shudders violently beneath you!
Inside [Inside icon]: You scramble to avoid masonry falling from already crumbling structures. Roll D3 & remove all monsters from the fight with XP VAL equal to the result. Each adventurer must make an AGI Test. If you fail, take damage equal to the lowest die. If you fail on doubles, you are pinned beneath rubble & cannot take part in the fight, but at the end of each combat round you may use the Mist Form Skill or pass a STR Test to pull yourself out of the rubble. If you pass, enter the fight in the next combat round. If there are no adventurers left in the fight, adventurers still pinned by rubble at the start of a combat round are defeated.
Outside [Outside icon]: You & your opponents are knocked off your feet by the undulating earth. Each adventurer must make an AGI Test or become Stunned for the first combat round. Roll D6 for each monster. If you roll above the monster's XP VAL, the monster is Dazed for the first combat round. If the result is double the monster's XP VAL or more, the monster becomes Dazed & Hexed for the first combat round.
Scorched Earth
Encounter · Environment.
RESOLVE IMMEDIATELY
Searing heat & acrid fumes choke the air. Shelter barely helps stave off the oppressive, suffocating weight of contamination.
Roll D6 & add the Danger Level of this space. Deduct 1 for each Hunter in your party & each Wild may make a PER Test to reduce the result by {PER Test}. Apply the following effects cumulatively (so a result of 10 or more triggers every action listed below):
- 2-3: All adventurers become Fatigued.
- 4-5: All adventurers become Weakened.
- 6-7: All adventurers become Blinded.
- 8-9: All adventurers become Poisoned.
- 10+: Treat this space as Perilous [horned skull icon] until the end of the next turn.
Scrag Tamer
Encounter · Human · Hunter · Wild.
You watch fascinated as a young Ödlander commands flying Scrags to her bidding. You may Ignore, Approach or Fight her.
Approach: All adventurers become Blessed. If there is a Human Performer or Human Wild in the party, the adventurer with the highest MAG is given a Tame Scrag ({MAG Test} breaks ties). Take this card as an Ally. You cannot trade or share this Ally.
TAME SCRAG | ALLY
You & your party are immune to Ambush. At the start of the first combat round, if any monsters have a Range [crosshair icon] Attack, roll D6: If the result is less than or equal to the total XP VAL of all monsters with Range [crosshair icon], discard this card.
Stat line (printed at the foot of the card): ATT 4 (down-arrow icon, labelled MRL) · HP 9 · XP VAL 2, GP 1 (lightning and money-bag values) · Traits: ANNOY · RETALIATE · SKIRMISH
Slavers
Encounter · Bandit · Human · Wild.
RESOLVE IMMEDIATELY
"Slavers approaching! Quickly, follow me!" calls the cloaked figure who appears out of nowhere. If there is already an Epic Monster [skull icon] in this space, resolve this card before encountering the Epic Monster [skull icon]. Do not draw monsters this turn unless instructed. You may Fight the Slavers or Follow the Cloaked Figure.
Follow: Draw a card from the Highlands Monster deck (not the Badlands Monster deck). If it is a Bandit, you have been led into a trap! Add this monster to the Fight. All monsters in this space gain Ambush. If not, an old Odlander leads you to the safety of his concealed shelter. The party may automatically Escape without penalty & the party leader gains 1 Luck.
Fight: Draw monsters from the Highlands Monster deck (instead of the Badlands Monster deck). Discard any cards that are not Bandits, then redraw another card for each one discarded. Again discard any that are not Bandits on this second draw, then fight all Bandits drawn. If you draw no Bandits, you realise the Cloaked Figure was just a raving but harmless madman.
Sludgeslide / Strange Brew
Sludgeslide: Encounter · Environment. Strange Brew: Encounter · Environment. Two encounter headers on one card face. The Sludgeslide header carries a horned-skull icon; the Strange Brew header carries the same icon crossed through in yellow.
Sludgeslide
The ground shakes & a tide of toxic sludge pours forth from the cracks! Each adventurer must pass an AGI Test or take damage equal to your lowest die. If you fail on doubles apply the Acidic monster ability if wounded. Each adventurer must then pass a CON Test or become Poisoned.
Strange Brew
You stumble upon a patch of earth that looks disturbed. If there is a Wild, Wizard or Warlock in the party, they recognise this marks the spot where a Waste Witch is fermenting poison & an adventurer may make a MAG Test. If you roll doubles, become Infected. If you pass, take this card as an Item.
WITCH'S BREW | 6 GP | ITEM | ALCHEMICAL
[house icon] [campfire icon, crossed through]: Attach this Item to a Blade, or a weapon that uses Arrows or Bolts. Discard this card next time you rest.
Attacks with the attached weapon that inflict Wounds [drop icon] inflict +2 damage to targets that are not Constructs or Undead. When you roll doubles on your Attack Dice, discard this card.
Spiders
Encounter · Swarm · Vermin.
RESOLVE IMMEDIATELY
You have wandered carelessly into the domain of a swarm of hungry, Goblin Eating Spiders. Their myriad, glistening eyes swivel in your direction as well!
Add this card to the fight. Although the Spiders target ALL [loop icon], they will only target Human adventurers. While the Spiders remain in the fight, any Human or Goblin monsters in the space take D3 damage at the start of each Combat Round. Monsters killed by the Spiders are not taken as Trophies.
Stat line (printed at the foot of the card): ATT 3 (ALL [loop icon]) · HP 9 · XP VAL 2, GP [money-bag icon] (no value printed) · Traits: ANNOY · VENOM. Footer: Attacks Human & Goblin monsters for D3 [drop icon].
The Black Rider
Encounter · Environment · Daemon.
You realize with rising dread that you are being followed at a distance by a sinister, black-cloaked rider.
Take this card as a Curse. While you have this Curse, reduce the effective value of Danger cards drawn by 1. In the Map Action Phase you may Evade or Confront the Rider:
Evade [crouching-figure icon & campfire icon]: One adventurer must make a PER Test. Rogue & Wild may roll 3 dice & choose 2. Compare {PER Test}:
- 0: All adventurers become Fatigued.
- 1-3: The Rider still dogs your steps.
- 4-6: You lose him! The adventurer gains 1 Luck. Shuffle this card back into the deck.
Confront [fist icon & campfire icon]: One adventurer must make a PER Test. Hunter & Wild may roll 3 dice & choose 2. Compare {PER Test}:
- 0: The party becomes Detained.
- 1-3: Try as you might, the Rider evades you.
- 4-6: Fight! If you win, discard this card.
Stat line (printed at the foot of the card): ATT 5 (up-arrow icon, labelled MRL) · ARM 2 · HP 8 · XP VAL 2, GP 2 (lightning and money-bag values) · Traits: EVADE · NECRO
The Desperate Man
Encounter · Human.
RESOLVE IMMEDIATELY
A ragged Würster tears towards you, pursued at some distance by fiends. He implores you to aid him. "The entire Würstreich is at stake!"
If there is already an Epic Monster [skull icon] in this space, resolve this card before encountering the Epic Monster [skull icon]. After drawing monsters, you may Ignore, Defend or Fight him.
Ignore: The monsters ignore you in their pursuit! Shuffle the monsters back into the Badlands Monster deck. Draw a Danger card & increase the Danger Level at the listed location. (If no location is listed, there is no effect).
Defend: Fight the monsters as normal. Attach this card to one XP VAL 1 monster (not ALL [loop icon]). That monster cannot target an adventurer while the card is attached. If you win, draw a Danger card & reduce the Danger Level at the listed location (if no location is listed, the party may choose any space).
Fight: Fight the Desperate Man only (do not add monsters to the fight). If you destroy him, the party gains 1 GP for each Badlands monster that is not Filth. Whether you destroy the Desperate Man or he Skirmishes, action the Ignore section.
Stat line (printed at the foot of the card): ATT 4 (up-arrow icon, labelled MRL) · HP 7 · XP VAL 1, GP [money-bag icon] (no value printed) · Traits: FURY · SKIRMISH. Footer: Skirmish: Shuffle back into Badlands Encounter Deck.
The Wizard
Encounter · Human · Wizard.
RESOLVE IMMEDIATELY
Daemons worry when the Wizard is near... A Wizard walks these parts, casting his magic, weaving his spells.
If there is already an Epic Monster [skull icon] in this space, resolve this card before encountering the Epic Monster [skull icon]. You may Ignore, Approach or Fight the Wizard.
Approach: You try to talk to him, but he remains silent. The adventurer with the highest MAG must make a MAG Test. If you pass the Wizard goes on his way - If there are 12 or more cards left in the Encounter deck, shuffle this card back in. If you fail, the Wizard seems to realise you are in need of his magic & silently escorts you through the treacherous landscape. All monsters in this space are treated as Dazed & all Daemons are treated as Dazed & Hexed.
Fight: Do not draw monsters this turn. The Wizard is a formidable foe! If you win, place a red Doom [icon] counter on the Doom Track (do not move the Hand of Doom or draw a Doom card).
Stat line (printed at the foot of the card): ATT 5 (up-arrow icon, labelled MAG) · ARM 1 · HP 9 · XP VAL 2 (lightning value) · Traits: PETRIFY · NULLIFY · RETALIATE
Threats with Menace
Encounter.
You catch a lone startled runt of a Goblin. Realizing his life is in danger he starts to blabber incontinently - what he has to say pricks up your ears...
In PER order, one adventurer may choose to slaughter the defenseless Goblin to gain 1 XP & 1 GP (do not roll for Loot). If no adventurer kills the Goblin, the party leader [party-leader icon] may instead draw cards from any Encounter, Loot (not Epic Loot) or Monster decks up to the party leader's STR value. You may then choose to discard any of the cards drawn & place the cards you chose not to discard at the top of their deck(s). If there are 16 cards or more left in the Badlands Encounter Deck, reshuffle this card into that deck.
Circling Krultures / Buzzing Gobflies
Circling Krultures: Encounter · Environment · Wild. Buzzing Gobflies: Encounter · Goblin · Swarm. Two encounter headers on one card face.
Circling Krultures
RESOLVE IMMEDIATELY
At some distance from the path you can see circling Krultures. A sign of battle, someone in need of aid or a trap? You may Ignore the Krultures or Investigate.
Investigate: One adventurer must make a PER Test, then compare {PER Test}:
- 0: You are jumped! Monsters in this space gain Ambush.
- 1: A dying Goblin curses you. You become Demoralized.
- 2: A starving Odlander is close to death. If the party discards a Food Item, you gain 1 Luck.
- 3-4: A scene of carnage! Draw & assign monsters this turn, but they are already dead! The party takes them as trophies, gaining GP & rolling for Loot, but do not gain XP.
- 5-6: You approach & see that it is indeed a trap, but are forewarned. The party may Escape this fight without penalty. Monsters in this space lose Ambush.
Buzzing Gobflies
The party is engulfed in a vast swarm of newly hatched Gobflies. Each adventurer must pass a PER Test or discard D3 Food Items.
Crystal Cache / Barbarian Soup
Crystal Cache: Encounter · Crystal. Barbarian Soup: Encounter · Human · Wild. Two encounter headers on one card face. The Crystal Cache header carries a horned-skull icon; the Barbarian Soup header carries the same icon crossed through in yellow.
Crystal Cache
Volcanic activity often presses crystals from the earth. The smoke rising nearby might indicate such an event. You may Ignore the smoke or Investigate it.
Investigate: One adventurer must make a PER Test. If you pass, place a Danger Level counter on this card equal to your lowest single die. Goblins keep their eyes out for crystals, too! Draw monsters from the Badlands Monster deck equal to party size plus 1. Discard any that are not Goblins, then fight. If you win (or draw no Goblins) the party leader takes this card as an Item. Discard this Item in any Settlement [flag icon] to gain GP equal to the Danger Level counter on this card times the Town [house icon] Level.
Barbarian Soup
A group of Odlanders have set up tables & chairs & are eating their famous Barbarian Soup. You can Join or Ignore them.
Join: Each Adventurer must make a CON Test. If you pass become Exalted, but if you fail become Poisoned.
Dark Avenger
Encounter · Daemon.
RESOLVE IMMEDIATELY
A Daemonic Envoy attempts to bend you to its will & send you on a mission of death.
The adventurer with the highest MAG ({MAG Test} breaks ties) must make a MAG Test. If you succeed, add the Daemonic Envoy to the Fight. If you fail, do not draw monsters this turn. Instead, take this card as a Curse:
While you have this Curse, if you roll doubles on any MAG Test, you automatically fail the Test.
You may discard the Curse by destroying one of the Daemonic Envoy's targets:
- Horned Hunter: Wetlands Region.
- Lotus Man: Highlands Region.
- The Wizard: Badlands Region.
Stat line (printed at the foot of the card): ATT 5 (double up-arrow icon, labelled MAG) · HP 8 · XP VAL 2, GP 1 (lightning and money-bag values) · Traits: NULLIFY · WITHER
Famine / Feast
Famine: Encounter · Environment · Wild. Feast: Encounter · Filth · Goblin. Two encounter headers on one card face. The stat line at the foot of the card is printed beneath the Feast panel; see the notes at the end.
Famine
The grueling environment takes its toll. You must have sustenance.
The party may attempt to Forage the surrounding area. One adventurer must make a PER Test (Hunters & Wild roll 3 dice & use any 2). If you fail this Test, any adventurer who does not discard a Food item must make a CON Test. If you fail your CON Test, take Wounds [drop icon] equal to the lowest die.
Feast
You smell an unexpectedly delicious aroma of food, but looking at the scattered offcuts quickly turns your stomach. A Goblin Cook grins & offers you a ladle... Will you Eat the offering, Ignore it or Fight?
Eat: Heal {CON Test} Wounds [drop icon], then adventurers without Gourmet Mastery must fail a MRL Test or become Demoralized. Increase the Danger Level in this space.
Ignore: Increase the Danger Level in this space.
Stat line (printed at the foot of the card, under the Feast panel): ATT 3 (down-arrow icon, labelled CON) · HP 4 · XP VAL 1, GP 2 (lightning and money-bag values) · Traits: RALLY · SKIRMISH
Freak Winds / Fierce Winds
Freak Winds: Encounter · Environment. Fierce Winds: Encounter · Environment. Two encounter headers on one card face. The Freak Winds header carries a horned-skull icon; the Fierce Winds header carries the same icon crossed through in yellow.
Freak Winds
RESOLVE IMMEDIATELY
A strange, iridescent wind distorts your vision. Reality shakes as time itself blurs...
Do not draw monsters this turn. One adventurer must make a MAG Test. If you fail with doubles, place the party in the Maze & resolve Void Shock immediately. If you pass, take this card as a Deed.
In the next Danger Phase, skip the Increase Danger Level step, then discard this card.
Fierce Winds
RESOLVE IMMEDIATELY
A fierce wind cloaks you in choking dust. Do not draw monsters this turn. You may Hunker Down or Push On.
Hunker Down: The party becomes Detained. One adventurer must make a PER Test (roll 3 dice & use any 2 if you are in an Inside [icon] space). If you fail, you must Push On.
Push On: Each adventurer must make a CON Test. If you fail, take damage equal to your lowest single die. If you fail on doubles, you also become Poisoned.
Goblin Slave Market
Encounter · Human · Goblin.
RESOLVE IMMEDIATELY
You pass a Goblin Slave Market, keeping low - then you see a familiar face; an old comrade fallen into the Goblins' grubby grasp! Do not draw monsters this turn unless instructed. You may Ignore your comrade's plight, Barter for their release or Confront the Goblins.
Barter: The adventurer with the lowest MRL must make a MRL Test. If you pass on doubles, you must Fight - draw monsters & add this card to the fight. If you fail, the Goblins will sell at the GP cost of the highest single die rolled - each adventurer gains 1 Luck if you agree to this price. Otherwise you must Confront or Ignore the Market.
Confront: One adventurer must pass a STR Test on doubles or you must Fight - draw monsters & add this card to the fight! If you pass the Test or win the fight, each adventurer gains 1 Luck.
Stat line (printed at the foot of the card): ATT 4 (ALL [loop icon]) · HP 10 · XP VAL 2, GP 5 (lightning and money-bag values) · Traits: PURSUE · SUMMON
Hobgoblin Wegschleifer / Trophy Room
Hobgoblin Wegschleifer: Encounter · Environment · Goblin. Trophy Room: Encounter · Daemon. Two encounter headers on one card face.
Hobgoblin Wegschleifer
Hobgoblin Wegschleifers scour the Badlands, tearing up paths, switching signs & doing their best to mislead unwary travellers...
Each adventurer must make a PER Test. If you fail become Fatigued. If more adventurers fail than pass, the party becomes Detained. For every path in the Badlands Region with an Explored [eye icon] counter, roll D6. On a roll of 1-2, remove the [eye icon] counter.
Trophy Room
RESOLVE IMMEDIATELY
You stumble upon a barely lit chamber. Skulls of all manner of creatures line the walls & it is furnished with bone & gristle.
- All monsters with XP VAL 2 or more in this space gain Fear.
- Daemons gain Annoy & Taunt.
Pulsing Cavern / Goblin Spoor
Pulsing Cavern: Encounter · Environment · Crystal. Goblin Spoor: Encounter · Environment · Goblin. Two encounter headers on one card face. The Pulsing Cavern header carries a horned-skull icon; the Goblin Spoor header carries the same icon crossed through in yellow.
Pulsing Cavern
RESOLVE IMMEDIATELY
As you spy sinister figures approaching, a cave entrance pulsing with light beckons... Choose if you will enter the cavern before drawing monsters. If you enter, all XP VAL 1 monsters are Dazed. Each adventurer must pass a MAG Test or become Stunned until the end of the first combat round (end of fight if you fail on doubles).
Goblin Spoor
RESOLVE IMMEDIATELY
The smell of Goblin is overwhelming! One adventurer may make a PER Test. If you fail, fight as normal. If you pass, you may choose to avoid combat (do not draw monsters this turn) or fight. If you fight & there is at least one Goblin in the fight, you are immune to Ambush, Berzerk, Rally & Skirmish for this fight.
Raiding Party
Encounter · Hunter · Wild.
RESOLVE IMMEDIATELY
An Ödlander Raiding Party blocks the path, having slaughtered a group of Badland horrors.
If there is already an Epic Monster [skull icon] in this space, resolve this card before encountering the Epic Monster [skull icon]. Do not draw monsters this turn unless instructed. Roll D6: Add 1 for each Fighter, Hunter, or Wild in the party. Deduct 1 for each Fishoid, Militant, Puritan, or Reptilian.
- 1 or less: With shouted threats, they turn you back. Each adventurer becomes Fatigued as you take a longer route.
- 2-3: The Raiders eye you suspiciously, but let you pass.
- 4-5: The Raiders move on. The party may loot the bodies. Draw & assign Monster cards. As the monsters are dead, gain no XP but take GP & roll for Loot.
- 6+: The Raiders are keen to trade with you. Draw D6 Items from the Loot deck for purchase. The party may also sell Items to the Raiders at the following rates:
- 2H Items for 5 GP
- 1H or Shield Items for 3 GP
- Food or Herb Items for 1 GP
They will not purchase Items with a Range [crosshair icon] Attack.
Notes on Transcription
- Card count. BGG describes this expansion as 21 new cards. The scans hold 21 card faces (pages 1 to 21 of the community scan): fourteen single-header faces and seven two-header faces ("X / Y"). Each card's own title, type line and text is kept as printed, with both headers on combined faces. Every encounter header on the scans is transcribed.
- Source. The text comes from community card-face scans, not a publisher PDF. A reader should compare exact punctuation against a physical card before relying on it.
- Icons. Stat-line and header icons are rendered as words or as bracketed icon names: XP (lightning), GP (money bag), Luck (clover), Wounds (drop), HP (heart), ATT, ARM, MRL, MAG, PER, AGI, STR, CON, and the arrow icons beside ATT (labelled as printed). Where a card shows an icon with no printed label, it is marked as an icon rather than guessed at: the Inside and Outside icons on Earthquake, the Range crosshair, the loop icon after "ALL", the horned-skull and crossed-out horned-skull icons in the card headers, the Explored eye icon, the Fire/Campfire and house icons on the item boxes, and the party-leader icon on Threats with Menace.
- Stat lines. Stat bars at the foot of each monster card are transcribed. Where the scan shows a money-bag icon with no number, the GP value is marked as not printed, not guessed. The Scrag Tamer and Desperate Man stat bars print no ARM value.
- Stat line placement. On Famine / Feast the stat bar sits beneath the Feast panel and is attributed to Feast, as on the Highlands Happenings two-header faces.
- Partly obscured value. On Raiding Party the "Food or Herb Items" price is partly covered by its money-bag icon on the scan; it is transcribed as 1 GP, which is the reading the scan supports, and should be checked against a physical card.
- Dice faces. The Devil's Bargain trebles examples are shown as pip patterns on the scan; they are rendered as numbers (three 1s, three 6s) for legibility.