Dragoon Expansion (fan expansion for 1944: Race to the Rhine)
Dragoon Expansion (fan expansion for 1944: Race to the Rhine) Rulebook
Table of Contents
Table of Contents
Components
The Patch-Devers module adds the following to 1944: Race to the Rhine:
- Modular Patch-Devers side board (2-sided, shared with TAMC game). If playing with Patch-Devers, place the Patch-Devers board on the right side of the main board. The turn order track is located at the top of the Patch-Devers board if playing with Patch-Devers.
- Patch-Devers side of the main player board. If playing with Patch-Devers, use the Patch-Devers side of the main player board.
- 1 Patch-Devers Current Supply Base marker
- 14 FFI markers
- Commander cards: Patch and Devers
- Corps cards and Corps blocks: 3 green / Patch-Devers
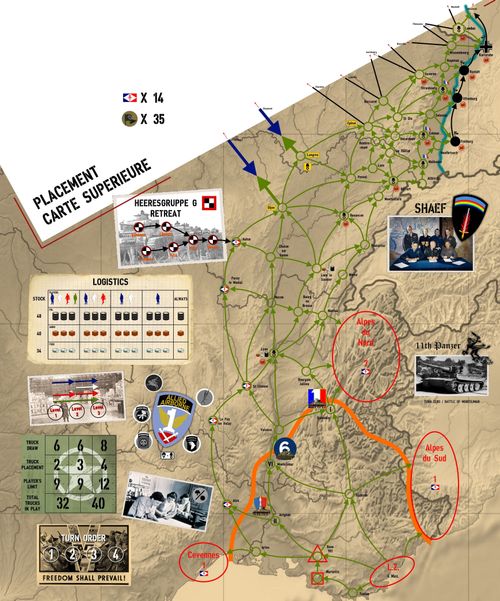
- On the board: FFI starting space, Maquis Zone space and French partisans contact space (Patch-Devers only)
If playing with Patch-Devers, attach the Patch-Devers modular board to the right side of the main board and use the Patch-Devers side of the main player board.
Set up
Set up the game as in the base rules, noting the Patch-Devers entries below.
Player area
- Place your Corps cards in your player area. Patch-Devers: II FR, VI US, I FR
Board
- Place Control markers of each Commander to indicate their current Level on the Logistics Level table. Patch-Devers: 1
Patch-Devers
- Place the General Patch Commander card on top of the General Devers Commander card in your player area. After the first Logistics Step, the Patch card will be removed from play.
- Place the Patch-Devers Current Supply Base marker on the Landing Zone space.
- Place FFI markers in the 3 Maquis Zones, up to the number indicated in the zone (i.e. put 7 markers in Alpes du Nord), and 1 FFI marker in each FFI Starting space.
(Step numbers are as printed in the source rulebook.)
Patch-Devers special rules
The 6th Army Group's invasion of Southern France - named Operation Dragoon - was slightly different in nature to that of Overlord and the eastward advances of Montgomery, Bradley and Patton. Commanders Patch and Devers faced a more dynamic situation in terms of where to establish their Main Supply Base. They also had significant interaction with and support from French resistance fighters.
To represent this in the game, there are a few additional rules that apply to Patch-Devers.
Logistics Step
Following the first Logistics Step:
- Remove the Patch Commander card from the game and replace it with the Devers Commander card. Devers is now the Commander for the remainder of the game. (Design note: After the initial success of Operation Dragoon General Devers took control of US forces from General Patch.)
- The Patch-Devers marker is moved directly to the '3' space on the Logistics Level table.
Main Supply Base
The location of the Patch-Devers Main Supply Base changes after the first and second Logistics Steps. Any Supplies on the old Bases remain there. Place the Current Supply Base marker as follows:
- Until the first Logistics Step: the Landing Zone (the capacity of this Base is limited to 6 Supplies).
- Until the second Logistics Step: Marseille (holds up to 9 Supplies).
- After the second Logistics Step: Supply Base 901 (holds up to 9 Supplies).
French Forces of the Interior (FFI) & Maquis Zones
The FFI markers represent the support provided to the 6th Army Group by the French resistance and partisans. You can move them each round and they can be used to prevent German counter-attacks and provide Ammo to your Corps, in particular benefiting the French Corps.
The FFI markers begin the game in one of 3 Maquis Zones and the dedicated FFI starting spaces. The Maquis Zones are all considered playable spaces, so if a Corps enters one, you must draw a Pursuit card as normal. However, Axis markers are never placed in a Maquis Zone.
FFI movement
This occurs for the Patch-Devers player after you have taken your actions, but before the Axis Reaction. It allows you to move a single FFI marker:
- From a Maquis Zone to an adjacent space, or vice versa, OR
- From one space to an adjacent space.
You may not place an FFI marker in a non-Maquis Zone space that already has 2 FFI markers. There is no limit in the Maquis Zones. There are no further restrictions; you may place FFI markers in spaces containing your Corps or Axis markers.
FFI markers - impact on play
FFI markers have different impacts on play:
- Axis Reaction - Axis markers cannot be placed, nor can a counter-attack take place, in a space containing an FFI marker.
- French Corps Support - If either French Corps (I FR Corps and II FR Corps) enters a space with at least 1 FFI marker, you may discard the marker(s) and replenish the French Corps card with Ammo markers equal to the number of FFI markers discarded (limited by the amount of available supply spaces on the Corps card). This includes a Maquis Zone. The markers may be used immediately to carry out a combat against an Axis Unit if one is present in that space, or transported as normal.
- U.S. Corps Support - If VI Corps enters a space with at least 1 FFI marker, you may discard the marker(s) to gain an immediate +1 Ammo bonus for any combat that occurs in that space. Unlike for the French Corps, the VI Corps may not discard the FFI marker(s) to replenish its card with Ammo markers. Note that this only applies after you have entered the space, thus an FFI marker cannot be used to pay the 1 Ammo cost to enter a Fortified space.
Establishing contact
Historically, it was important for Generals Patch and Devers to quickly establish a sufficient level of contact with the local partisan forces. To represent this, by the time of the first Logistics Step you must have placed a Control marker on either Dijon or Langres. If you fail to do this, as part of the first Logistics Step, remove 1 FFI marker from each space on the board, excluding the Maquis Zones. Any FFI markers remaining on the board can be moved as normal.
(If you did place a Control marker in Dijon or Langres but it was removed by an Axis counter-attack, this still counts as establishing contact, so the FFI markers are not removed).
Patch-Devers changes to the base rules
The passages below are the Patch-Devers-only parts of the base rules, in base-rulebook order. Where a base section is not described here, Patch-Devers plays it as written in the base rulebook.
How to win the game
Example: In the left image, Patch-Devers crossed the Rhine into Freiburg with 1 FR Corps. He defeated the Axis Unit there and placed a Control marker. He is able to trace an unbroken chain of spaces with his green Control markers from Freiburg back to his starting area. He wins the game.
Sequence of play
The sequence of play, in player turn order, is as follows:
- Take actions
- FFI movement (Patch-Devers only)
- Axis reaction
Encirclement
If, by placing a Control marker on a space, you cut off other connected uncontrolled spaces from tracing a continuous chain of uncontrolled spaces to Düsseldorf or Karlsruhe (if playing with Patch-Devers), those spaces are 'encircled'. Multiple spaces may become encircled as the result of a single Corps movement.
Movement halted
Example: Patch-Devers uses an action to move VI Corps. He spends 1 Fuel to begin the movement. He moves into Lure. Since this is already controlled he does not draw a card. He then moves to Remiremont. Since this has an Axis marker he draws the top card from the Axis deck, revealing the 59 Infanterie Div. He spends his 2 Ammo to defeat it. This card also halts his movement. He can choose to spend his remaining Fuel to continue his movement - he has 1 movement allowance left. Or he could save the Fuel and end his movement there.
Core action: Truck Supplies
Example: Patch-Devers needs to get Food and Ammo to VI US Corps, and Fuel to 1 FR Corps. He cannot Truck Supplies directly from Lons Le Saunier to VI Corps in Besancon because there is already a Truck there from a previous round. Instead he can Truck Supplies via Pontarlier. It requires placing 2 Trucks, but the route is clear. He is at Logistics Level 3 so can place up to 4 Trucks with his action. He can also place a Truck between Lons Le Saunier and Bourg en Bresse, transporting the Fuel to the 1 FR Corps.
Logistics Step
Example: It's the first Logistics Step of the game. Bradley begins the game on Logistics Level 2, so advances to Level 3. Patch-Devers moves directly to Level 3 from Level 1. Montgomery and Patton advance a level to Level 2.
Example: It's the Logistics Step and the II FR Corps does not have any Food. The Patch-Devers player flips the II FR Corps marker to its blank side. It cannot unflip to move again until Food is transported to Avignon.
Combat
- For Patch-Devers your Corps can gain additional Ammo from FFI markers present in the space where the combat is occurring (see Section 9 for more information).
Counter-attack
- It is adjacent to an uncontrolled space that can trace a continuous chain of uncontrolled spaces to Düsseldorf or (if playing with Patch-Devers) Karlsruhe (the presence of an Axis marker or flag on one or more of these spaces has no effect on this).
Example: Besancon is unprotected. There are no Allied Corps in its space or an adjacent space, and an adjacent uncontrolled space (Vesoul) can trace a continuous chain of uncontrolled areas to Düsseldorf. This means Besancon can be counter-attacked on the Axis Reaction phase. If this happens the Patch-Devers Control marker on the space is removed, and the Medal for taking the space is returned to the supply.
Place Axis marker
Refer to the player aid for your Commander when it is your turn to place an Axis marker. The aid sets out between 7 and 8 named spaces in your player color where you must place an Axis marker. Do not place a marker where there is an Allied Control marker (or FFI marker for Patch-Devers) or an existing Axis marker. In this case, skip to the next priority space.
Example: It's the end of Bradley's turn and he places the last Axis marker from the supply in Le Thillot, in Patch-Devers's area. He can do this because Le Thillot is adjacent to Gerardmer, which already contains an Axis marker, and can trace a chain of Axis markers to Freiburg, a Victory space with an Axis flag. As he has placed the last Axis marker from the supply, the end of the game is triggered.
Example: Patton has no more available Priority spaces. His Victory space for the purposes of Axis placement is Mainz. Referring to the placement criteria, the first marker he places is in Bad Kreuznach. Worms was the other possibility, but it is further away from the nearest Allied Corps. In the next round he places a marker in Worms. This is because it is the available space closest to Mainz. In the next round he can place a marker between Birkenfield and Kaiserslautern. They are the 2 available spaces both closest to Mainz and the nearest Allied Corps. Neither is Fortified. Consequently, Patch-Devers, to the right of Patton, gets to decide. He places the marker in Kaiserslautern.
Patch-Devers optional rule notes
Operation Wacht am Rhein & Operation Nordwind
Operation Wacht am Rhein (the Battle of the Bulge, as known to the Allies) was the last major German offensive of World War 2. It was supported in North East France - the area of advance of Patch-Devers - by the subsidiary Operation Nordwind (though in the game the geographical split is not relevant).
Activation (the Patch-Devers entry of the list of secondary objectives):
- Each General has 3 to 5 spaces on the board that count as secondary objectives (these relate to historic goals, e.g. the launch sites of the V1 rockets for Montgomery). To claim a secondary objective you must place a Control marker of the relevant color on the space.
- Spaces:
- Patch/Devers: Dijon, Langres, Epinal
Red Ball Express
This rule adds 7 new Pursuit and 2 new Axis Unit cards to the game - all these cards have this icon on them. During set up each player removes 2 Starving Civilian cards (Patch-Devers only removes 1) so that each player has just 1 Starving Civilian card in their Pursuit deck.