Downtown: Air War Over Hanoi – Dragon's Jaw Expansion Module
Downtown: Air War Over Hanoi – Dragon's Jaw Expansion Module Rulebook
Table of Contents
Table of Contents
Expansion Special Rules
Countersheet
The C3i Nr.18 countersheet contains replacement counters for the following flights, which were subject to printer errors in the boxed game: F-8 flight Corktip; A-7 flights Jury, Hornet, Termite; EA-6 flights Battery, Scorpion; F-100 flight Spruce; B-52 flights Purple, Quartz, Scarlet, Cobalt.
In addition, the sheet contains new counters for the F-100D and the Australian Mirage III0(F) and Canberra Mk.20. There are two additional F-105 counters specifically for use in scenario D18 in this module. Two A-4 counters have also been supplied to make up for a perceived shortage of A-4s in some of the scenarios where multiple Navy strikes might occur.
Aircraft Data Charts
The aircraft data charts for the Linebacker III module in C3i Nr.17 were inadvertently omitted. In this issue they have been printed as an INSERT with the ADCs for the F-100D, Canberra Mk.20 and Mirage III0(F) on the reverse.
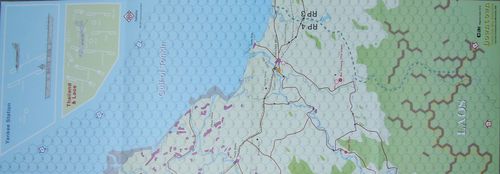
Thanh Hoa Map Extension
The Thanh Hoa map extension abuts the southern edge of the Downtown map. Place the extension on the Downtown map so that the 39XX hex row overlaps.
When the map extension is in play, entry arrows 5, 6, 7 and 8 are relocated to the extension and a new arrow, 9, appears.
The boxes for Yankee Station and Thailand/Laos depict the refueling tracks and navigation beacons used by the USN and USAF, respectively. These boxes can be used to stow spare counters and US flight counters that have exited the map.
Adding the Map Extension to Regular Scenarios
If the map extension is added to a regular scenario, add 2 SAM units (1 located), 1 AAA point and 1 Fire Can unit to the DRV Order of Battle. However, these additional forces must be set up on the map extension.
Dragon's Jaw Bridge
The Dragon's Jaw road and rail bridge in hex 5029 is especially hard to destroy. For attacks on the bridge by all weapons other than LGB and Walleye II, roll one die after resolving damage on the Damage Table [18.21]. If the result is 1-9, degrade the damage result by one level as for Shrikes. If the result is a 10, the originally rolled damage stands.
Royal Australian Air Force
The Royal Australian Air Force's combat contribution to the Vietnam War, aside from transport and helicopter units, was a squadron of Canberra bombers assigned to operations in South Vietnam. Their lack of survivability meant they never attacked north of the DMZ.
It is not certain that the Australian government would have had the political will to contribute to the controversial American bombing of the North. If they had, their aircraft were not equipped for the role, lacking the electronic protection and support systems that the US had developed over years of harsh experience. However, the RAAF had plenty of élan, and if their aircraft were not up to the challenge their pilots were.
The RAAF option in scenario D19 posits something highly unlikely — that a Mirage squadron is redeployed from Malaysia and organized into package strikes with the bombers. It is inconceivable that such a force would have attacked anywhere near RP5 or 6. The more lightly defended lower Route Packs would have been more tempting targets for the Aussies.
D18: Eve of Destruction
Scenario D18
Background
In April 1965, as part of Rolling Thunder 9, the Air Force tried its hand at attacking the Dragon's Jaw bridge at Thanh Hoa. These raids were significant as they were the furthest north the USAF had yet attacked. On 3 April a massive force of thirty-one F-105s, led by Lt Col Robinson Risner and supported by an additional fifteen F-105s and seven F-100s in the flak suppression role, attacked the bridge. One Super Sabre was lost, and while the bridge was hit by several 750 lb bombs and Bullpup missiles, it was unmoved.
The same day the US Navy mounted two major strikes at the Dragon's Jaw from the USS Hancock and the USS Coral Sea, losing one Skyhawk to ground fire. Significantly, during this raid a flight of three MiGs attacked and damaged an F-8. This was the first time a MiG had attacked a US aircraft in the war. Though the Crusader was able to divert to Da Nang, the Vietnamese claimed it as a kill and named 3 April as 'Day of the Air Force' in honor of their first victory.
On 4 April, Risner led another massive strike at the bridge. Amongst the attackers were F-100Ds operating in the CAP role and carrying Sidewinders. Two flights of MiG-17s were vectored at the raiders, engaging both the F-105s and the F-100s in the hazy skies.
In these battles the Super Sabre CAP became the first supersonic fighters to launch air-to-air missiles at Soviet-built MiGs. Though no air-to-air kills were confirmed, the Vietnamese lost three MiGs, possibly to AAA fire. Meanwhile the MiGs scored their very first victories against two F-105s.
The ring of flak at the bridge downed a third F-105. The pilot was Captain Smitty' Harris, who was credited with instituting a tap code' in captivity that allowed the POWs to communicate with each other. He was not released from prison until 12 February 1973.
The American raids of early April were both costly and ineffective. Some 300 hits by 750 lb bombs were believed scored on the target, without destroying it. The Vietnamese air force had carefully planned their intercepts of 3 and 4 April and considered the operation a great success.
Targets
| Target (D18) | Hex | Profile | Organization |
|---|---|---|---|
| Dragon's Jaw Bridge (1-span) | 5029 | A | USAF or USN |
Scenario Conditions (D18)
| Date | 3-4 April 1965 |
| Time of Day | Day, 10:00 hrs |
| Detection Level | US: F; DRV: C |
| GCI Level | 2 |
| Weather | Haze at Deck, Broken cloud at Low/Med |
| Open DRV Airfields | Phuc Yen, 1529 (MiG-17); Kep, 1120 (MiG-17) |
US Order of Battle
- The US player must choose to fly the raid as a USAF or a USN raid.
- Use Table B for a USN raid. Carrier ID: choose from C — Hancock or D — Coral Sea.
- A USAF raid does not use Table A but instead has the following forces:
| Force | Mission | Counters |
|---|---|---|
| Pre-raid Forces | There are no pre-raid forces | |
| Main Raid Force A | Strike Mission | 9x {4} F-105D, Bombing |
| Iron Hand Mission | 3x {4} F-105D, SEAD | |
| 1x {4} F-100D, SEAD | ||
| MiGCAP Mission | 1x {4} F-100D, CAP | |
| Post-raid Forces | Recon Mission | 1x {2} RF-101C, Recon |
US Pilot Quality
- USAF: Regular
- USN: Regular
DRV Order of Battle
Air Units
- Basic MAPS: 10
- Dummy flights: 2
- Available aircraft types: MiG-17F
Reinforcements
| VP | 1 | 2 | 3 | 5 | 8 |
|---|---|---|---|---|---|
| MAPs | +6 | +8 | +10 | – | – |
Ground Units
- SAM Battalions: 0
- Dummy SAMs: 0
- Dummy Radars: 0
- AAA Points: 1
- Fire Can: 2
DRV Pilot Quality
- Rookie
Scenario Special Rules
- The Thanh Hoa map extension is in play.
- US units may only enter the map via entry arrows 5, 6, 7, 8 or 9.
- If the raid is a USAF raid, weather and problems at the refuelling rendezvous point have caused flights to bunch up. As a result, the flight commander has ordered that some flights must orbit near the target while the early flights attack. No more than two bombing-tasked flights may attack the target each game turn. The US player may designate one waypoint as the orbit point provided it is not within four hexes of the target. Within two hexes of this orbit waypoint, Bombing flights may move freely, without restriction. They must return to the flight path when leaving the vicinity of the orbit waypoint.
Victory Conditions
Standard Victory conditions apply [27.8].
D19: All Along The Watchtower
Scenario D19
Background
Rolling Thunder 57 ground on into 1968. The weather was so poor that only occasional breaks permitted any major strikes. Inevitably, when the weather set fair the Dragon's Jaw bridge came in for some attention from both the Air Force and Navy. On 28 January 1968, just two days before the surprise Tet offensive by the Vietnamese, strikes hit the bridge again, with 2,000 lb bombs temporarily putting it out of commission. However, the bridge was back in operation on 8 February, feeding supplies down to the attack in the South.
Targets
The US player secretly rolls a die to determine their target.
| Roll | Target | Hex | Profile | Organization |
|---|---|---|---|---|
| 1-2 | Dragon's Jaw Bridge (1 span) | 5029 | A | USAF |
| 3 | Dragon's Jaw Bridge (1 span) | 5029 | A | USN |
| 4 | Ninh Binh railroad/highway bridge (1 span) | 4025 | B | USN |
| 5 | Thanh Hoa rail repair shop | 5130 | C | USN |
| 6 | Nam Dinh powerplant | 3631 | B | USN |
| 7 | Quang Suoi barracks | 4227 | C | USN |
| 8 | Than Hoa POL Storage | 5229 | D | USN |
| 9 | Thien Ling Dong army base | 5331 | C | USN |
| 10 | Nghia Trang rail yard | 4828 | B | USN |
Scenario Conditions (D19)
| Date | January 1968 |
| Time of Day | Day, 10:30 hrs |
| Detection Level | US: D; DRV: B |
| GCI Level | 3 |
| Weather | Northeast Monsoon, Clear |
| Open DRV Airfields | Phuc Yen, 1529 (MiG-17, MiG-21); Kep, 1120 (MiG-21); Hoa Lac, 2035 (MiG-17, MiG-21); Duong Suong, 2553 (MiG-17) |
US Order of Battle
- Use Table A for an Air Force raid or Table B for a USN raid.
- Carrier ID: choose from Z — Coral Sea.
US Pilot Quality
- USAF: Iron Hand units - Veteran; other units - Trained
- USN: Regular
DRV Order of Battle
Air Units
- Basic MAPS: 13
- Dummy flights: 3
- Available aircraft types: MiG-17F, MiG-21F-13, MiG-21PF
Reinforcements
| VP | 1 | 2 | 3 | 5 | 8 |
|---|---|---|---|---|---|
| MAPs | +3 | +6 | +10 | +16 | +21 |
Ground Units
- SAM Battalions: 4 (set up 1 located)
- Dummy SAMs: 2
- Dummy Radars: 1
- AAA Points: 2
- Fire Can: 3
DRV Pilot Quality
- MiG-17 units: Trained; MiG-21 units: Veteran
Scenario Special Rules
- The Thanh Hoa map extension is in play.
- US units may only enter the map via entry arrows 5, 6, 7, 8 or 9.
Victory Conditions
Standard Victory conditions apply [27.8].
Royal Australian Air Force Option
In Scenario D19 the US player may choose to fly the mission with the Royal Australian Air Force (RAAF) instead of the USAF or USN. The player automatically gets 2 VP for doing so. Make the following changes to the scenario:
- The US Detection level is E, due to unfamiliar air control procedures.
- RAAF units may only enter the map via blue entry arrows 7, 8 or 9.
- RAAF units are all Veteran.
- Add a recovery modifier [20.2] of -3 to Mirage flight recover rolls due to the lack of in-flight refueling.
The RAAF uses Order of Battle Table A, with the following changes. Delete the second Jamming Mission. The first Jamming Mission comprising 2x {1} [Jamming], Jamming is available, as the USAF kindly supplies some electronic warfare support.
- Replace the MiGCAP Mission with the following: 3x {2} Mirage III0(F), CAP
- Replace the Iron Hand Mission with the following: 1x {2} Canberra Mk.20, SEAD
- Replace the Strike Mission with the following: 3x {2} Canberra Mk.20, Bombing
The post-raid Recon Mission is generated normally. (Again, the USAF performs this role.)