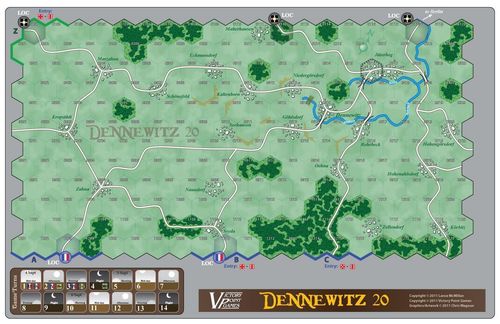
Dennewitz 20
Dennewitz 20 Rulebook
Table of Contents
Table of Contents
[2.0] Game Equipment
The Game Map: The 11" x 17" game map portrays the portions of Prussia and Saxony where the campaign occurred.
The blue units are French. The Anti-French units include Russian (green units), Prussians (gray units), Swedish (yellow units), and Anglo-Prussian (red and gray) forces.
Unit abbreviations include:
- Cz = Czernitchew
- H = Hirschfeld
- Pr = Prussian
- Ru = Russian
- Swe = Swedish
Elite Forces
There are no Elite units (see 9.6 and 10.0) in this game.
The Swedish Corps is considered a Guard unit only when committing it to battle (see 12.2.1). It is not affected by the La Garde Recule rule (see Case 12.2.2).
[3.0] Setting Up the Game
After sides have been determined (i.e., who will play the French and Anti-French side), the standard game set up proceeds as follows:
- The Game Turn marker is placed on the 'September 4, Midday' space.
- Place French and Allied markers on the '6' space of the Morale Track.
- Place the units on the map as listed below:
French
- Turn 1: XII and III Cv
- Turn 2: IV
- Turn 3: VII
See Case 11.6 for details on where and how these units arrive.
Set aside the French XIII, French 'M,' and Danish units; they are not used in this game.
Allied
- Hex 0404: Pr III
- Hex 0904: Pr IV
- Turn 1: Pr H (Area Z)
- Turn 2: Ru Cz (Area Z)
- Turn 3: Sw (Area Z)
- Turn 4: Ru XII (Area Z)
Set aside the Anglo-Prussian 'W' unit, it is not used in this game.
[4.0] Sequence of Play
The French player is the First Player.
[5.0] Random Events
Skip the French Player's Random Events Phase on the first Game Turn.
[9.0] Combat
[9.8.6] Retreat Direction Priority
- French units must retreat towards one of the French LOC hexes along the southern map edge.
- Allied units must retreat towards one of the Allied LOC hexes along the northern map edge.
[11.0] Reinforcements
[11.6] Unit Arrival Locations
Reinforcement units arrive in the following locations (color-coded along the map edge for your convenience):
French units enter along the southern map edge at Entry Areas A, B and C. On its arrival turn, each unit must be committed to one of these three Entry Areas where it will enter, and that arrival area can't be changed.
At Entry Area A, it automatically arrives on schedule. At Entry Area B or C, place that unit off the corresponding map edge and roll a die for its arrival the next turn. At Entry Area B, it arrives on a roll of $, % or ^; at Entry Area C, it arrives on a roll of % or ^. For all other results, that unit does not yet enter play; keep rolling for its arrival each subsequent turn until it finally enters play.
Allied units enter along the western map edge at Entry Area Z. On the turn each unit is scheduled to arrive, the Allied player rolls a die. On a roll of $, % or ^, it arrives as scheduled. On a !, @ or #, that unit does not yet enter play; keep rolling for its arrival each subsequent turn until it finally arrives.
[12.0] Army Morale
[12.7] Onwards to Berlin
At any point during his Movement Phase, the French player may voluntarily eliminate any of his non-Dummy units that are on hex 0118 (in effect, marching them off the map). For each French unit so removed, immediately lower Allied Morale by one (-1); if this drops Allied Morale to zero, the game ends in a French Decisive Victory.
[14.0] Night Turns
French Objective Hexes: none
Allied Objective Hex: Jüterbog (0316)
[16.0] Optional Rules
[16.8] Unreliable Troops
When an unreliable unit (i.e., one with a yellow Combat Strength) participates in a Battle, roll a die to see if it wavers (this is done after Reserves, if any, have been committed), subtracting one (-1) from the result if French morale is currently lower than Allied Morale. If the result is 2 or more, there is no effect. If the result is 1 or less, the unit wavers: its Combat Strength is reduced by one (-1) for that Battle only.
Almost half the soldiers who comprised the French Army of Berlin were from client states (Bavarians, Italians, Saxons, and Wurtemburgers) with waning enthusiasm for Napoleon's cause. Further, many of the French troops were barely-trained recruits.
[17.0] Alternate Scenarios
[17.1] Hagelberg (Optional Rule)
On 27 August, General Hirschberg's Prussians defeated General Girard's French Middle Corps near Hagelberg, enabling Hirschberg to participate at Dennewitz. But that engagement at Hagelberg could have gone differently.
Procedure
During set up, roll a die to determine the outcome of the battle at Hagelberg:
- 1 - Hirschberg Triumphant: Allied morale starts at 7 (instead of 6). The Prussian "H" unit is a Turn 1 reinforcement and the French "M" unit is not used.
- 2 - Hirschberg Victorious: The Prussian "H" unit is a Turn 1 reinforcement and the French "M" unit is not used. (This is the historical outcome.)
- 3 - Hirschberg Successful: The Prussian "H" unit is a Turn 1 reinforcement and the French "M" unit is a Turn 7 reinforcement.
- 4 - Stalemate: Both the Prussian "H" and French "M" units are Turn 5 reinforcements.
- 5 - Girard Successful: The French "M" unit is a Turn 5 reinforcement and the Prussian "H" unit is not used.
- 6 - Girard Victorious: French morale starts at 7 (instead of 6). The French "M" unit is a Turn 2 reinforcement and the Prussian "H" unit is not used.
These reinforcements are subject to Case 11.6 (above) concerning their Entry Area.
[17.2] Napoleon Heads North (Optional Rule)
This variant requires ownership of Dresden 20's French units.
Procedure
During set up, roll one die on each table below to determine the results at Dresden and the Katzbach:
Dresden Outcome:
- 1: Allied Decisive Victory
- 2: Allied Marginal Victory
- 3 or 4: Draw
- 5 or 6: French Decisive Victory
Katzbach Outcome:
- 1: Allied Decisive Victory
- 2 or 3: Allied Marginal Victory
- 4 or 5: Draw
- 6: French Decisive Victory
French Dresden 20 Reinforcements: Add the following French units from Dresden 20 to the Turn track:
- Turn 6: I Cav, GC
- Turn 7: VI
- Turn 8: YG, OG
- Turn 9: Res Art
These French Dresden 20 reinforcements enter play via Entry Area A (only).
Arrival Difficulties Table: Each turn a Dresden 20 reinforcement unit is scheduled to arrive, the French player rolls one die for it and consults the following table (cross-referencing the outcomes of the two battles, above) to determine whether that unit made it or not:
| Katzbach Outcome | Dresden: Allied Decisive | Dresden: Allied Minor | Dresden: Draw | Dresden: French Decisive |
|---|---|---|---|---|
| Allied Decisive | None | None | None | 1 R, 2 R, 3 R, 4 R, 5 W, 6 G |
| Allied Minor | None | None | 1 R, 2 R, 3 R, 4 W, 5 W, 6 G | 1 R, 2 R, 3 R, 4 W, 5 G, 6 G |
| Draw | None | 1 R, 2 R, 3 W, 4 W, 5 W, 6 G | 1 R, 2 R, 3 W, 4 W, 5 G, 6 G | 1 R, 2 R, 3 W, 4 G, 5 G, 6 G |
| French Decisive | None | 1 R, 2 W, 3 W, 4 W, 5 W, 6 G | 1 R, 2 W, 3 W, 4 W, 5 G, 6 G | 1 R, 2 W, 3 G, 4 G, 5 G, 6 G |
If the die roll result is red (R), that unit is permanently removed from play. If the die roll result is green (G), that unit enters play via Entry Area A. If the die roll result is white (W), the unit does not enter play that turn; instead, place it ahead one turn on the Turn Track and roll for it again next turn in the same manner.
After his victory at Dresden, Napoleon intended to reinforce Ney's march on Berlin. However, Blücher's defeat of MacDonald at the Katzbach forced Napoleon to divert eastward instead. Had Napoleon shown up with the promised reinforcements, Dennewitz would have been a very different looking battle, indeed!
[17.3] The Trachenberg Plan
Beginning with Turn 5, and on any turn thereafter, at the start of his Step 4 (Movement), the Allied Player can declare he is initiating an Orderly Withdrawal. Thereafter, and for the rest of the game, the Allied Player may voluntarily eliminate one of his non-Dummy units that is on hex 0118 (in effect, marching it off the map). For each Allied unit so removed, immediately raise Allied Morale by one (+1).
Victory Level Adjustment: If an Orderly Withdrawal is ordered, then the final Victory Level might be adjusted as follows:
At the end of the game, determine the French Augmentation Level by counting the number of their Dresden 20 reinforcement units (only; the French "M" unit does not count; see 17.1) that have actually entered play. Add one (+1) to this total if any of the arriving French units were part of the Imperial Guard (i.e., the GC, OG, YG or Art Res units). The Allied player then rolls a die and, if the result is greater than the Augmentation Level, adjusts the final outcome of the game by one level in the French Player's favor. Any other result has no effect on the final victory level.
Example: At the game's end, the Allied morale level is higher than French morale, and so the outcome is an Allied Marginal Victory. But the Allied player initiated an Orderly Withdrawal during play, so a victory level adjustment might occur. Two French Dresden 20 reinforcements (the VI and YG units) entered play, so the French Augmentation Level value is 3 (one for each of the two arriving units, plus one because the YG unit is part of the French Imperial Guard). The Allied Player rolls a die: on a result of 4-6, the game's outcome is shifted one level in the French Player's favor (to a Draw); on a 1-3 the game's outcome remains an Allied Marginal Victory.
Had the cautious Bernadotte been confronted by a heavily reinforced French army, or by Napoleon himself, he probably would have fallen back on Berlin in accordance with the Trachenberg Plan. But to retreat his army in the face of only token French reinforcements would have undermined his political standing and brought accusations of cowardice.
[18.0] Designer's Notes
Although his forces were still in fairly good order after his defeat at Grossbeeren, Oudinot chose to fall back all the way to Wittenburg. Infuriated, Napoleon sent Ney to relieve him and resume the advance on Berlin.
But Ney's abilities as a commander were little better than Oudinot's. Instead of moving aggressively against the widely dispersed Allied forces, Ney spent a day reviewing his troops before starting his march north.
Ney apparently hoped to fix the Allied left in position at Zahna and swing around them towards Juterbog, but Tauentzein's Prussian IV Corps was able to break contact, fall back, and establish a blocking position near Dennewitz on the evening of September 5. The next morning, Ney concentrated his forces and launched a series of poorly coordinated attacks on the Allied position that lasted throughout the day.
By midday, the French right with Ney personally leading the attack, had forced the Prussians out of Dennewitz and were driving them back on Juterbog. Concurrently, however, the French left flank, by Gohlsdorf, was under severe pressure from Bulow's Prussian III Corps. French reinforcements were able to stabilize that flank until Ney made a fateful mistake...
Rather than acting as an overall Army commander, Ney had become fixated on just the small portion of the battle where he was in personal command. Oblivious to the threat that Bulow posed on his left, Ney pulled Oudinot's XII Corps out of the line to support his own effort against Juterbog. Soon, the French left began to crumble under Bulow's continued hammering and Ney was compelled to order a withdrawal.
Casualties on both sides were roughly even, but the French lost much of their artillery and baggage in the retreat. After two defeats, the French Army of Berlin was irreparably broken as an offensive instrument.
Dennewitz 20 is a straight-up contest between a small but nimble French force against a large, cumbersome Allied opponent. As at Grossbeeren, the Allied army's initial deployment is its greatest weakness – if the French can move quickly they can overwhelm the Prussians and occupy the Juterbog objective before the rest of the Allied army can be brought to bear.
We strongly recommend using the optional Fog of War rule to reflect the full extent of the confusion and uncertainty that was prevalent. The Napoleon Heads North scenario allows you to experiment with what the battle might have looked like had Napoleon been less constrained by events elsewhere, adding to the battle's unpredictability.