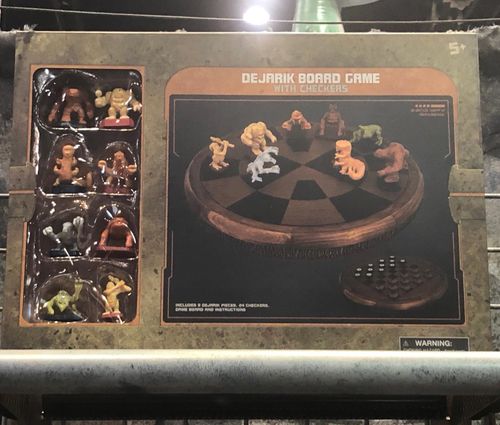
Dejarik
Dejarik Rulebook
Table of Contents
Table of Contents
Players
Dejarik is a game for two players.
The Board
The Dejarik board is made up of a large circle about a half meter in diameter. The board is divided into three concentric circles, called orbits. The central circle is always white. The outer orbits are divided into twelve equal segments, known as rays, which are colored alternately black and white. Players start on opposite sides of the board.
Rules of Dejarik
The goal of Dejarik is to destroy all of the opponent's pieces, before the opponent can destroy yours.
Dejarik is played with a set of eight pieces. The players sit on opposite sides of the board, and each controls four creatures that have Attack, Defense, and Movement ratings. Attack and Defense ratings represent the number of six-sided dice (d6) the piece rolls when attacking or defending. Movement ratings represent the number of spaces a piece may move when moving.
There are eight traditional Dejarik pieces, as follows.
Power Pieces
There are two Power pieces: the Mantellian Savrip and the Monnok. Power pieces have high, balanced ratings.
Mantellian Savrip. The Mantellian Savrip is the only sentient being in the dejarik game, though many people still consider it to be nothing more than a simple creature. These hulking reptilians wear simple clothes and they are often hunted down on their home planet Ord Mantell. It has ratings of Attack 2, Defense 3, Movement 2.
Monnok. The Monnok is another semi-sentient that uses primitive weapons such as spears and staffs. The monnok is respected on its home world of Socorro for its hunting qualities. Smugglers regarded the monnok as an omen for a difficult, but rewarding journey. It has ratings of Attack 3, Defense 2, Movement 2.
Offensive Pieces
There are two Offensive pieces, the Ghhhk and the Houjix, which have high Attack ratings.
Ghhhk. The Ghhhk is a four-legged green animal that hails from the planet Bith (also known as Clak'dor VII). Oil from their skin is used as a healing salve. Male ghhhk wake up at sunrise to start their mating call. It has ratings of Attack 3, Defense 2, Movement 1.
Houjix. The Houjix is a blue animal with four legs and a spiked tail hailing from the Gran world of Kinyen. They look ferocious, but houjix are often kept as pets or guardians and they can be quite gentle. It has ratings of Attack 3, Defense 1, Movement 2.
Defensive Pieces
There are two Defensive pieces, the Kintan Strider and the Ng'ok which have high Defense ratings.
Kintan Strider. The Kintan Strider is a semi-sentient being from Kintan able to use simple weapons, such as clubs and maces. They have long arms and nearly went extinct on Kintan. Luckily, the creatures were exported and bred on other worlds, as well. It has ratings of Attack 1, Defense 3, Movement 2.
Ng'ok. The Ng'ok is a dangerous ill-tempered creature with retractable, razor-sharp claws, used in many systems for protection. Ng'ok warbeasts smell pretty bad. It has ratings of Attack 2, Defense 3, Movement 1.
Mobile Pieces
Finally, there are two Mobile pieces, the K'lor'slug and Grimtaash the Molator, which have high Movement ratings.
K'lor'slug. The K'lor'slug originally hailed from the swamps of Noe'ha'on, but it lives on many other planets after having slipped aboard one of the vessels that visited its planet. The k'lor'slug is a dangerous and poisonous hunter often considered a symbol of gluttony and decay. It has ratings of Attack 2, Defense 1, Movement 3.
Grimtaash the Molator. Grimtaash the Molator is a creature from Alderaanian mythology. According to legend, the spirit of the Molator Grimtaash protected the royal house of Alderaan from corruption and betrayal. It has ratings of Attack 1, Defense 2, Movement 3.
Setup
At the beginning of the game, each player rolls a die to determine who will have initiative and go first in selecting pieces and during the game. The player rolling highest goes first, and selects one piece, with players alternating piece selections. Each player selects one Power, one Offensive, one Defensive, and one Mobile piece for their combatants.
Once pieces are selected, the players alternate placing them as shown, four on each side. The player with initiative places and moves first.
Turns and Actions
During each turn, a player is allowed to take two consecutive actions, which can be used to either move one of their pieces in or to a new space, or to attack an opponent's piece. Thus during a turn a player may move a single piece twice, or move two pieces, or may attack with two pieces, or move and then attack, or attack and then move, etc. A special action is to stand a piece up from Prone (see below). A player must use both of their allotted actions each turn.
Moving
When moving a piece across the game board, the piece must be moved the full amount of spaces indicated by its movement rating. For example, when moving the Molator, the player must move the piece 3 spaces, and may not move it only 2 or 1 in order to place it in a more favorable position. When moving, a piece may move to any space adjacent to its own, either around the orbit or along the ray, but cannot move diagonally, or into a space occupied by another piece. A piece also cannot move into a space, then immediately back into the space it just departed.
(Figure: Legal and illegal moves for a piece with a Move Rating of 3.)
Attacking
If a player has positioned one of his pieces adjacent (on an orbit or ray, not diagonally) to an opposing piece, assuming he has an action remaining in his turn, the player may declare an Attack on that piece.
The attacking player rolls a number of dice equal to the Attack rating of his piece and totals the results. The defending player then rolls a number of dice equal to the Defense rating of his piece and totals the results. Compare the two numbers and refer to the outcomes below to determine results.
Flanking and Reinforced. If a player is attacking with a figure, and a second friendly figure is also adjacent to the enemy target figure, the attacker is Flanking and rolls one additional Attack die. Similarly, if a defending figure has a second friendly figure adjacent to itself, it is Reinforced and may roll one additional Defense die. Remember that adjacent is not measured diagonally.
There are four possible outcomes to an attack based on comparing the Attack and Defense totals:
- Kill. The player's piece may destroy his opponent's. This is known as a "kill". After this, the opponent's piece is removed from the board, but the attacking piece remains in its present space.
- Push. The player's attack may tie or beat the opponent's defense by a small margin (4 or lower). This results in a "push". Strategically, pushing is one of the most important parts of the game. In a push, the attacker "pushes" his opponent's piece to any open adjacent space, either to block other pieces, to set the piece up for an easy kill, or to simply get it out of the way. If there is no space to which the piece can be pushed, it is rendered Prone.
- Counter-Push. The opponent's piece may beat the player's piece by a small margin (4 or lower). This is called a "counter-push". This works the same way as a push, except that the opponent is now pushing the attacking piece into an open adjacent space. Again, if there is no legal space into which to push the piece, it is rendered Prone.
- Counter-Kill. The opponent's piece may destroy the player's piece. This is known as a "counter-kill", and can often change the strategy of the entire match.
Prone Pieces
A Prone piece is laid on its side or back, resulting from a push or counter-push where there is no legal space to be pushed into. It cannot attack while Prone; if attacked while Prone, it rolls one fewer Defense die. A figure can use one action to stand up from Prone in its space.
Attack Outcome Table
| If | Then |
|---|---|
| Attack beats Defense by 5 or more | Kill |
| Attack beats Defense by 4 or less | Push |
| Tie | Push |
| Defense beats Attack by 4 or less | Counter-Push |
| Defense beats Attack by 5 or more | Counter-Kill |
Sudden Death
If each player only has one piece remaining on the board, a final confrontation occurs. The two pieces move to the center of the board for a Sudden Death battle. Each piece uses its highest Attack or Defense rating and rolls dice to determine the outcome. If the first round does not result in a kill or counter-kill, then the same process is repeated, until only one is left standing. This player has won the game.
Variants
Corellian Dejarik. Incorrigible gamblers that they are, the Corellians favor a Dejarik variant with an even greater luck factor. Instead of allowing the players to choose and place their pieces, pieces are randomly assigned to players and positions on the board. In play this is easy to do if using Creature Cards. Shuffle the eight cards, and deal four to each player, placing them clockwise on the board in starting positions. Roll for initiative normally to determine who goes first.
Imperial Dejarik. The Empire puts great emphasis on tactics. In Imperial Dejarik, all pieces have equal statistics of Attack 2, Defense 2, and Movement 2, making achieving advantage via Flanking and Reinforcement all the more critical. A piece in the center circle also gains +1 die attacking or defending, reflecting Imperial doctrine that control of the galactic core is essential.
Creature Statistics
| Piece | Attack (d6) | Defense (d6) | Movement (spaces) | Type |
|---|---|---|---|---|
| Mantellian Savrip | 2 | 3 | 2 | Power |
| Monnok | 3 | 2 | 2 | Power |
| Ghhhk | 3 | 2 | 1 | Offense |
| Houjix | 3 | 1 | 2 | Offense |
| Kintan Strider | 1 | 3 | 2 | Defense |
An Example Game of Dejarik
Chewbacca and R2-D2 are playing Dejarik during the long trip to Alderaan.
The pieces are selected, and the holograms immediately begin taunting and snarling at one another. Chewie ended up with (clockwise in his starting spaces) the Monnok, Grimtaash the Molator, the Kintan Strider, and the Ghhhk, while R2 chose (clockwise) the Houjix, the K'lor'slug, the Mantellian Savrip, and the Ng'ok. The game is started, and R2 has the first move.
As his first move, the astromech droid moves the Ng'ok one space counter-clockwise around the outer orbit, in order to interfere with Chewie's most dangerous piece, the Monnok. As his second move, R2 moves the Houjix toward the central space, a very common opening move.
Then the Wookiee takes his turn, and he decides to move his Strider twice (one space in, one space clockwise, followed by two more spaces clockwise). This places his piece on R2's side of the board, directly adjacent to the Houjix. Remember that the Strider is a Defensive piece. Chewie is using a bold but not uncommon strategy, trying to bait R2 into attacking his strongest defender – a tactic known as the Kintan strider death gambit.
Chewbacca sits back grinning, while C-3PO advises his counterpart to be careful.
R2 responds by moving his Savrip into flanking position, and then using it to attack Chewbacca's Strider. Chewbacca expects a victory, or at least a push. Surprisingly, the Savrip wins, and proceeds to snap the Strider's spine and cackle over its limp corpse. [Chewie rolled a 10, R2 got a 17.]
"RWWAAAAH!!!" is Chewie's response.
"He made a fair move. Screaming about it won't help you," C-3PO says.
After a brief discussion with Han, C-3PO advises a new strategy: "Let the Wookiee win." Chewbacca chuckles and contemplates his next move.