Deep Drive Baseball
Deep Drive Baseball Rulebook
Table of Contents
Table of Contents
- Dice
- Player Cards
- How to Play
- Deep Drives
- Park Effects
- Runner Advancement
- Stealing Bases
- Playing It Safe on the Bases
- Playing the Infield In
- Playing the Outfield In
- Pitcher Endurance
- Pitcher Hitting Cards (PHC)
- Line Outs
- Extra Rules
- Rare/Never Readings
- Batter/Pitcher Advantages
- Pitcher Rest
- Double Plays
- Border Rolls
- Runner Advancement - Hits
- Runner Advancement - Ground Outs
- Runner Advancement - Fly Outs
- Choice Chart
- Cut-Off Chart
- Bunting
- Hit and Run
- Card Layouts
Dice
You will need three (3) 10-sided dice, each of a different color.
You'll read two of the dice together as a "percentile" roll between 00 and 99. The third die is used as a "modifier" roll on some results.
We recommend a red die for your "Tens Die", a white die for your "Ones Die", and a green die for your "Modifier Die".
Outs
Out readings use codes to denote how the ball was hit (L=line out, P=pop out, G=ground out, F=fly out), who fielded it (1=pitcher, 2=catcher, 3=first baseman, 4=second baseman, 5=third baseman, 6=shortstop, 7=left fielder, 8=center fielder, 9=right fielder), and how well it was hit (G#h=hard ground out, G#s=slow ground out, F#d=deep fly out, F#s=shallow fly out).
Pf is a foul pop up down the first base line. If the Ones Die is even, it's a P2; if odd, score as a P3.
Pm is a middle infield pop up. If the Ones Die is even, it's a P4; if odd, score as a P6.
Player Cards
Players are represented by Batter and Pitcher Cards.
Every player who made an appearance in a season has a card. Each team has a PDF file containing those players who were used most frequently. Lesser-used players are collected together in one or more PDF files of "Extras".
How to Play
Resolve a plate appearance by rolling all three dice.
If your percentile dice are between 00 and 49, find the range of numbers that contains your roll on the left side of the Batter Card. If the roll is between 50 and 99, do the same on the Pitcher Card.
- DD: Deep Drive. (See Deep Drives below.)
- SI+, SI: Single. Use the Runner Advancement - Hits chart to check runner advancement.
- BB: Base on balls.
- HBP: Hit by pitch.
- SO: Strikeout.
- DEF: Defensive check. Use the Defense Chart associated with the season being played. (If playing across seasons, use the season of the home team.)
- OUT: Out. The list of ten (10) possible out codes is listed near the bottom of the player's card. Use the modifier die to determine which out code to use for this at-bat.
Deep Drives
If a roll resulted in a Deep Drive, re-roll all three dice. Find the range of numbers that contains your roll on the right side of the Batter Card.
- Park: Park Effect. (See Park Effects below.)
- HR: Home Run.
- TR: Triple.
- DO: Double. If a runner is on 1st, look at the Runner Advancement - Hits chart to see if they score.
- F7d/F8d/F9d: Deep fly out to left (7), center (8), or right (9).
Park Effects
If a roll from the Deep Drive section results in a Park reading, use the modifier die and find the range of numbers that contain your roll on the home stadium's Park Card.
Note that there are separate ranges based on the handedness of the batter.
- HR: Home Run.
- F7d/F8d/F9d: Deep fly out to left (7), center (8), or right (9).
Runner Advancement
On balls in play, use the charts on the following pages.
For singles and doubles, use the Runner Advancement - Hits chart to determine how many bases runners advance. On ground outs, use the Runner Advancement - Ground Outs chart. On fly outs, use the Runner Advancement - Fly Outs chart.
Stealing Bases
At the conclusion of a plate appearance, if a runner is on 1st or 2nd base and the base ahead of them is empty, calculate their JUMP value:
- the Modifier Die
- plus the first number next to the runner's STEAL rating
- plus (or minus) the Pitcher's "H" (i.e. Hold) rating
- plus (or minus) the Catcher's "T" (i.e. Throw) rating
- subtract 2 if the empty base is 3rd base
Find the calculated JUMP total here:
- 9 or less: The runner must hold.
- 10: Offensive Manager chooses whether or not to attempt.
- 11: Runner attempts to steal unless his team trails by 2+ runs.
- 12 or more: Runner attempts to steal.
If the base runner attempts a stolen base, calculate their SAFE chance:
- the runner's STEAL number within parenthesis
- plus (or minus) the Pitcher's "H" (i.e. Hold) rating
- plus (or minus) the Catcher's "T" (i.e. Throw) rating.
Throw two dice and ADD them together.
If the sum is HIGHER than the runner's SAFE number, they are thrown out attempting to steal.
If the sum is LESS THAN OR EQUAL to the runner's SAFE number, they are safe stealing. In addition, if the sum PLUS THE CATCHER'S FIELDING RATING is 4 or less, a catcher overthrow results in an additional base being taken by the runner.
Playing It Safe on the Bases
Unless the bases are loaded, the Offensive Manager may elect to play it safe. With this strategy, runners only ever advance the minimum number of bases on singles (1) and doubles (2). Do not roll for OBEs. Runners do not score from 3rd on DEF checks. Runners do not attempt to score from 3rd on ground balls or fly outs. Runners can not be doubled up on line outs.
Playing the Infield In
This strategy can be used by the Defensive Manager with a runner on 3rd base and less than 2 outs.
Make the following changes to play results:
- Lineouts change to a SI+.
- If the percentile dice are doubles (00, 11, 22, ..., 99), change the result to a SI+.
- Slow and hard ground outs result in the runner on 3rd holding unless the bases are loaded, in which case they are thrown out at the plate on a fielder's choice.
- Normal ground outs result in the runner on 3rd being thrown out at the plate.
If there are runners on the corners with the infield playing in, give the runner on 1st base a +1 advantage to their STEAL number.
Playing the Infield In at the Corners
Treat the same as "Playing the Infield In", but only make changes if the ball is hit to the first or third baseman. (For example, a L3 or L5 would become a single, but an L4 or L6 would remain a lineout.)
Playing the Outfield In
This strategy can be used by the Defensive Manager from the 9th inning on with the potential winning run on 3rd base and less than 2 outs.
Make the following changes to play results:
- Deep fly outs become game-winning singles.
- Normal fly outs become deep fly outs.
- All outfielders get a +1 advantage to their fielding ratings.
Pitcher Endurance
Pitchers begin an appearance with Endurance points that can be lost during the course of a game. Use the number following STARTER if they are appearing as a starting pitcher and following RELIEVER or CLOSER if they are appearing in relief.
The following events can cause a pitcher to lose or gain a point:
- -1 point at the conclusion of an inning of play *
- -1 point for each additional hit (or walk) allowed over 5 in an inning
- -1 point after every 9th batter faced as a starting pitcher *
- -1 point after the 1st run allowed as a starting pitcher
- +1 point for 3 consecutive perfect innings thrown
- +1 point for a reliever who enters mid-inning and records the third out having faced 2 or fewer batters without allowing a baserunner.
* do not apply these rules to starting pitchers in extra innings
If a pitcher's Endurance points reach 0, they are Fatigued. (See Batter/Pitcher Advantages below for the effects of fatigue.)
Two special notes on "RELIEVER: 0" and "CLOSER: 0" pitchers. They can never gain a point. They are not fatigued until either facing 3 batters or an inning ends.
Pitcher Hitting Cards (PHC)
Pitcher Hitting Cards can be used when a pitcher is at bat. Use the PHC that matches the Bat rating on the pitcher's card. Note that some pitchers have individual batter cards available which can be used instead.
Line Outs
On a line out roll coming off of percentile dice rolls of 49 or 99, change the result to an L1.
On any line out to any position with men on base and less than two outs, re-roll the percentile dice. On a roll of 00-09, a runner is doubled up. Use the following order of precedence to determine which runner is out.
- L1: 3rd, 2nd, 1st.
- L3: 1st, 2nd, 3rd.
- L4: 2nd, 1st, 3rd.
- L5: 3rd, 2nd, 1st.
- L6: 2nd, 3rd, 1st.
If a runner is doubled up and there are now just two outs, roll the percentile dice again. A roll of 00-29 results in a triple play!
Extra Rules
The following rules are completely optional but may be introduced for a more advanced experience.
On-Base Events (OBE)
At the start of a plate appearance with any runners on base, see if your percentile dice match any ranges shown on the pitcher's WP, BK, or PO readings as well as the catcher's PB readings.
Tip: note that OBE ranges can only occur if the Tens Die is a 9.
Note that some rangers [sic] have special symbols on them which can limit the chances of an OBE occurring:
- ◓: The event only takes place if the player is on the away team.
- ◠: The event only takes place if the player is on the away team and there are two outs.
- ◒: The event only takes place if the player is on the home team.
- ◡: The event only takes place if the player is on the home team and there are two outs.
There are other ways to play those symbols if you don't mind re-rolls. Rather than using away/home rules for ◓ and ◒, roll a single die. If the roll is even, the event happened. If the roll is odd, it didn't. For ◠ and ◡ symbols, roll a single die. If the roll is 0, the event happens. If the roll is odd, it didn't.
OBEs occur before the play result, which should still stand. For example, let's say a pitcher has an OUT at a roll of 90, but also has a WP listed at 90. If a 90 is rolled with a runner on base, first the Wild Pitch occurs, and immediately after that the OUT occurs.
For maximum realism, do a separate roll of the percentile dice before the plate appearance. If the roll is 00 – 89, you know there's no chance of an OBE, so re-roll and resolve the PA. If the roll is 90 – 99, you know there's at least a chance of an OBE, so check your pitcher and catcher cards. If an OBE does occur, repeat this process to account for the chance of having back-to-back OBEs. Otherwise, re-roll and resolve the PA.
Rare/Never Readings
If the opposing card has a "rare" reading on the same result line, the original result may be taken away. If the modifier die is less than or equal to the number following "rare", keep the result. Otherwise, change the result to an OUT and find the modifier die on the OUTS section of the card that had the "rare" reading.
If the opposing card has a "never" reading on their same result line, immediately change the result to OUT as above.
(Example: a roll of 19 comes up as a BB on the Batter Card. However, the Pitcher Card shows "rare 8" on their BB line. If the modifier die is between 0 and 8 inclusive, keep the base on balls. If it's a 9, look at the OUTS section of the Pitcher Card instead.)
Batter/Pitcher Advantages
Some cards have a circle around the batter- or pitcher-handedness. This denotes a "specialist".
A Batter Advantage exists in any of the following situations:
- A pitcher is Fatigued, or
- A left-handed specialist batter faces a right-handed specialist pitcher, or
- A right-handed specialist batter faces a left-handed specialist pitcher, or
- All of the following are true: a. The team at bat is trailing with the potential tying run on base or at bat b. A RELIEVER pitcher is on the mound, and c. The pitching team has a CLOSER available who has a high enough Endurance that he could potentially pitch the remaining innings of the game.
A Pitcher Advantage exists in any of the following situations:
- A left-handed specialist batter faces a left-handed pitcher
- A left-handed specialist pitcher faces a left-handed batter
- A right-handed specialist batter faces a right-handed pitcher
- A right-handed specialist pitcher faces a right-handed batter
When a Batter Advantage exists, the Offensive Manager may choose to subtract 50 from any roll of 50-99. In addition, all fielders subtract 1 point from their fielding ratings.
When a Pitcher Advantage exists, the Defensive Manager may choose to add 50 to any roll of 00-49. In addition, all fielders add 1 point to their fielding ratings.
Note that it is possible for both a Batter and Pitcher Advantage to exist simultaneously. If this happens, they cancel each other out.
Pitcher Rest
Use the Rest reading of the starting pitcher to determine how many games they should rest following their appearance.
If an asterisk (*) appears following the number and the pitcher's Endurance points fell to 0 or lower, add 1 to the number shown.
Double Plays
On double plays, if the batter has a number listed in the DP section of their card, consider the pivot infielder's fielding rating. If the pivot man's fielding rating is less than the DP number, the batter is safe on a fielder's choice.
On ground balls to the right side of the infield, the shortstop is the pivot man. On ground balls to the left side of the infield, the second baseman covers second. On ground balls to the pitcher, the pivot man is the second baseman when a batter is right-handed and the shortstop when a batter is left-handed.
Border Rolls
With this optional rule, outfielders can affect Deep Drive rolls that are the highest or lowest number available in a range.
Use the modifier die to determine which outfielder is being tested. If the modifier die is between 0 and 2, use the left fielder; if the die is between 3 and 6, use the center fielder; if the die is between 7 and 9, use the right fielder.
On a roll of 00 that results in a HR, the identified outfielder might steal a home run away. If they are rated 4 or higher and the outfielder's wall is 10 feet tall or less, they rob a home run which becomes a deep fly out.
On a roll of 99 that results in a F7d, F8d, or F9d, the identified outfielder might have allowed a home run to sneak over their glove. If they are rated 2 or lower and the outfielder's wall is 10 feet tall or less, they had a chance to steal a home run, but it went off their glove and over the wall for a home run.
If the roll is the largest number on the card's TR range and the identified outfielder is rated 4 or higher, they hold the batter to a double.
If the roll is the smallest number on the card's DO range and the identified outfielder is rated 2 or lower, they misplay the ball and turn it into a triple.
If the roll is the largest number on the card's DO range and the identified outfielder is rated 4 or higher, they make a diving catch that turns it into a shallow fly out.
If the roll is the smallest number on the card's F7d, F8d or F9d range and the identified outfielder is rated 2 or lower, they miss a diving attempt at the catch and it turns into a double.
If the roll is the largest number on the card's F7d, F8d or F9d range and the identified outfielder is rated 4 or higher, they make the catch and also double off the lead runner. (Exception: Runners on 3rd base always hold on a deep fly out and make sure the ball falls safely and cannot be doubled up. In this case, double up a runner from 2nd or 1st base instead.)
Runner Advancement - Hits
Use this chart to determine whether or not a runner advances an extra base on the hit.
Note: With two outs, shift one column to the right. For example, with two outs, consider an average runner to be rated Fast.
| VS | S | — | F | VF | |
|---|---|---|---|---|---|
| SI+ | NO | ? | YES | YES | YES |
| SI | NO | NO | NO | ? | ? |
| DO | NO | NO | ? | ? | ? |
Run rating across the top.
- YES: The runner takes an extra base.
- NO: The runner advances the minimum number of bases.
- ?: The Offensive Manager may attempt to advance. See Choice Chart.
Runner Advancement - Ground Outs
| Man on 1st | Man on 2nd | Man on 3rd | Men on 1&2 | Men on 1&3 | Men on 2&3 | Bases Loaded | |
|---|---|---|---|---|---|---|---|
| G1 | FC-1 | HLD | HLD | FC-3 | HLD-3 | HLD | FC-1 |
| G1h | DP-1 | HLD | HLD | DP-4 | DP-3 | HLD | DP-1 |
| G2 | FC-1 | HLD | HLD |
G1s, G2s, G3s, G4s, G5s, & G6s: always results in an ADV.
- ADV: Batter out. Other runners advance.
- DP-1: Lead runner out on front-end of double play.
- DP-2: Runner on 1st out on front end of double play. Other runners advance.
- DP-3: Defensive Manager chooses between (1) holding runner on 3rd, allowing man on 1st to move to 2nd and retiring batter, or (2) turning a double play while a normal or faster runner scores from 3rd.
- DP-4: Defensive Manager chooses between a 1-5 fielder's choice and a 1-6-3 double play.
- DP-5: If the fielder is rated 5 and the lead runner is normal or slower, they can throw the runner out for a fielder's choice. Otherwise, score as a 3-6-3 double play and lead runner advances.
- DP-6: If the fielder is rated 5 and the lead runner is S or VS, the Defensive Manager can throw them out at 3rd on a fielder's choice. Otherwise, the runner is out at 2nd on the front end of a double play while other runners advance.
- FC-1: Lead runner forced out. Other runners advance and batter safe on fielder's choice.
- FC-2: Runner on 1st forced out at 2nd. Other runners advance. Batter safe on fielder's choice.
- FC-3: If runner on 2nd is slower than runner on 1st or fielder is rated a 5, they're forced out. Otherwise, the runner on 1st is forced out. Other runners advance and the batter is safe on a fielder's choice.
- FC-4: If the runner on 2nd is slower than runner on 1st, they are forced out. Otherwise, the runner on 1st is forced out. All other runners advance and batter safe on fielder's choice.
Runner Advancement - Fly Outs
Use this chart to determine whether or not a runner tags up.
| Code | Running to... | VS | S | — | F | VF |
|---|---|---|---|---|---|---|
| F7 | Home | NO | ? | ? | YES | YES |
| F7 | 3rd | NO | NO | NO | NO | ? |
| F7s | any | NO | NO | NO | NO | NO |
- YES: The runner tags up and advances a base.
- NO: The runner holds.
- ?: The Offensive Manager may attempt to tag up. See Choice Chart.
Choice Chart
On a single, if the Defensive Manager throws home, a runner who started from first may attempt to move up to third on the throw. If they try for third, the Defensive Manager can either continue for the out at the plate (allowing the trail runner to reach 3rd) or cut the ball off (allowing the lead runner to score) and attempt to hold the trailing runner at 2nd. If the Defensive Manager elects to concede the run, use the Cut-Off Chart.
| Roll | Result |
|---|---|
| 00 | Runner caught in rundown and tagged out. Roll again to see if any other runners (including the batter) are able to advance during the rundown. |
Rundown roll (for the 00 result):
| Roll | Result |
|---|---|
| 00-14 | If runner thrown out is not VS, he buys time for other runners to advance a base. |
| 15-29 | If runner thrown out is not S/VS, he buys time for other runners to advance a base. |
| 30-49 | If runner thrown out is F/VF, he buys time for other runners to advance a base. |
| 50-69 | If runner thrown out is VF, he buys time for other runners to advance a base. |
| 70-99 | Runner is thrown out quickly and no trailing runners are able to advance. |
| Roll | Result |
|---|---|
| 01 | Runner is called safe on a close play. Fielder covering the bag argues and is ejected from the game. |
| 02 | Runner is called safe after a collision at the base. Roll one die to check for injuries to the players involved. |
Collision roll (for the 02 result):
| Roll | Result |
|---|---|
| 0-1 | Runner is injured. Check Injury Chart. |
| 2-3 | Fielder covering the base is injured. Check Injury Chart. |
| 4 | Both runner and fielder covering base are injured. Check Injury Chart. |
| 5-9 | Both runner and fielder covering base are shaken up, but neither is injured. |
| Roll | Result |
|---|---|
| 03 | Out unless the fielder covering the bag is rated 1 or lower - they drop the throw and the runner is safe on the error. |
| 04 | Out unless fielder covering the bag is rated 2 or lower - they drop the throw and the runner is safe on the error. |
| 05-97 | Check roll against speed of runner to determine result. |
| 98 | Runner out after collision at base. Roll again on chart at 02 above. |
| 99 | Runner called out on close play, argues and is ejected. |
Speed check for the 05-97 result (columns are the runner's run rating):
| Result | VS | S | — | F | VF |
|---|---|---|---|---|---|
| SAFE | 05-39 | 05-61 | 05-82 | 05-86 | 05-88 |
| HOLD | 40-43 | 62-67 | 83-90 | 87-95 | 89-97 |
| OUT | 44-97 | 68-97 | 91-97 | 96-97 | - |
Cut-Off Chart
If roll calls for an outfielder, use Modifier Die to determine which one to use.
- 0-2: LF
- 3-6: CF
- 7-9: RF
| Roll | Result |
|---|---|
| 00 | The outfielder may make an error on the throw. Roll one die. If the roll is higher than outfielder's fielding rating, the throw is errant and all runners (and the batter) advance a base on the error. |
| 01-04 | The outfielder may make an error on the throw. Roll one die. If the roll is higher than the outfielder's fielding rating, the throw goes over the head of the cut-off man. If this is coming off a single and there was a man on 1st, he makes it to 3rd unless he is S/VS, in which case he holds at 2nd. If 2nd base is open and the batter is not S/VS, he moves up to 2nd. |
| 05-94 | Infielder cuts off the throw. All trailing runners hold. |
| 95-99 | Infielder cuts off throw and catches either trailing runner or batter trying to move up a base. To determine the runner, roll a die to randomly pick one. On ball thrown by the LF, the SS is the cut-off infielder. On a ball thrown by the RF, the 2B is the cut-off infielder. On a ball thrown by the CF, roll a die to randomly pick a middle infielder. |
Bunting
Roll as normal, but find the final play result code here.
If you need to identify a fielder, use the modifier die to determine who takes the ball.
- 0-1: P
- 2-3: C
- 4-6: 1B
- 7-9: 3B
| Roll | Result |
|---|---|
| DD | If reading came from the Batter Card, score as a pop out with lead runner getting doubled off. If reading came from the Pitcher Card, the fielder handles the bunt quickly. If any runners are forced, the lead forced runner is out. Otherwise, runners hold and batter is out. |
| SI+ or SI | If reading came from the Batter Card, possible single. Roll a single die and check the following chart: |
| BB | Ball. Runners hold. |
| HBP | Batter hit by pitcher. |
| SO | Two strikes. |
| OUT | Roll one die and check the following chart: |
Bunt roll for the SI+ or SI result:
| Roll | Result |
|---|---|
| 0 | If the batter is a VS runner, they are out on a sacrifice hit. Otherwise, the batter is safe on an infield single and all runners advance one base. |
| 1-2 | If the batter is a VS or S runner, they are out on a sacrifice hit. Otherwise, the batter is safe on an infield single and all runners advance one base. |
| 3-4 | If the batter is a F or VF runner, they are safe on an infield single and all runners advance one base. Otherwise, they are out on a sacrifice hit. |
| 5-6 | If the batter is a CF runner, they are safe on an infield single and all runners advance one base. Otherwise, they are out on a sacrifice hit. |
| 7-9 | Sacrifice hit. |
If reading is from the Pitcher Card, go to OUT below.
Bunt roll for the OUT result:
| Roll | Result |
|---|---|
| 0 | Pop out. Runners hold. |
| 1 | Lead runner is thrown out by the fielder. |
| 2-4 | Defensive Manager can choose to make an attempt on lead runner or throw batter out. If they make play on lead runner, find runner's speed and fielder's rating on following chart and roll a die. If roll falls within range shown, the runner is out. (Fielding Rating table below.) |
| 5-9 | Sacrifice hit. |
Fielding Rating table for the bunt OUT 2-4 result:
| RUN | 5 | 4 | 3 | 2 | 1 | 0 |
|---|---|---|---|---|---|---|
| VS | 0-8 | 0-7 | 0-6 | 0-5 | 0-4 | 0-3 |
| S | 0-7 | 0-6 | 0-5 | 0-4 | 0-3 | 0-2 |
| — | 0-6 | 0-5 | 0-4 | 0-3 | 0-2 | 0-1 |
| F | 0-5 | 0-4 | 0-3 |
Bunting, continued:
| Roll | Result |
|---|---|
| DEF | If reading came from Batter Card — blooper. Roll one die. If roll is less than or equal to fielder's rating, ball is caught and all runners hold. Otherwise, ball hits ground first and it's a sacrifice hit. If reading came from Pitcher Card — tough play. Roll one die and subtract four. If total is less than or equal to fielder's rating, they field it cleanly for a sacrifice hit. Otherwise, ball is misplayed for a one-base error. |
Hit and Run
Roll as normal, but find the final play result code here.
| Roll | Result |
|---|---|
| DD | Roll again on the batter's Deep Drive section. On a double, all runners score. On deep fly outs, lead runner is doubled up. |
| SI+ or SI | Single. All runners advance two bases. |
| BB | Check the modifier die and check the following chart: |
| HBP | Foul ball. |
| SO | Check the modifier die and check the following chart: |
| OUT | Look up the out code to determine the final result. L: Lead runner is doubled up. G: Always played as if it were a slow ground out. F#d: Runners hold. F#s: Lead runner is doubled up. Otherwise: Played as normal. |
| DEF | Roll again on the Defense Chart. |
Hit and Run, BB roll (modifier die):
| Roll | Result |
|---|---|
| 0 | Ball. Lead runner is caught stealing. |
| 1-5 | Foul ball. |
| 6-9 | Ball. If the lead runner is a VF or F runner, re-roll the Modifier Die and, if it is less than the runner's first STEAL number, they steal the base. Otherwise, the lead runner is thrown out. All trailing runners advance. |
Hit and Run, SO roll (modifier die):
| Roll | Result |
|---|---|
| 0-1 | Strike. Lead runner is caught stealing. |
| 2-6 | Foul ball. |
| 7-9 | Strike. If the lead runner is a VF or F runner, re-roll the Modifier Die and, if it is less than the runner's first STEAL number, they steal the base. Otherwise, the lead runner is thrown out. All trailing runners advance. |
Card Layouts
Batter Cards
Each batter has a Batter Card which is used when they are at bat.
- Batter Handedness: Which side this player bats from. R indicates a right-handed batter (RHB). L indicates a left-handed batter (LHB). S indicates a switch-hitter: when facing a left-handed pitcher, they are assumed to be a RHB; versus a right-handed pitcher, they are a LHB. In some older eras, batter handedness is unknown, so you may see a blank there. In these cases, assume they bat right-handed.
- Injury Rating: This is used when the player is injured to determine the duration of time which they will miss. Players who will miss the most time will have an "F" Injury Rating. Players who miss very little time will have an "A" Injury Rating. Some players will receive an "AA" Injury Rating - they are almost never injured.
- Positions: This line will show each position for which a player is rated. Positions are shown in order of how frequently the player appeared there. Each position receives a fielding rating between 1 (worst) and 5 (best) and is a composite number that is used to reflect both their range and ability to prevent errors. Positions in bold are meant to highlight those at which the player made the majority of his appearances. If a player is used at a position not shown on their card, assume them to have a rating of 0.
Catchers have two extra ratings shown in square brackets following their fielding rating. First is a "T" rating, which is used to adjust the chances of opposing base stealers. A rating above 0 (example: T+1) will yield more attempted steals and a higher success rate on those attempts. A rating below 0 (example: T-1) will yield fewer attempted steals and a lower success rate on those attempts. Catchers also have a "PB" rating. If a dice roll occurs at this number or higher, a Passed Ball occurs. (See On-Base Events for more information.)
- Run: The batter's running rating. Most batters will have a dash, indicating a neutral base runner. Others will have "F" (Fast) or "S" (Slow). Even more rare are "VF" (Very Fast) and "VS" (Very Slow) players.
- Steal: The batter's steal ratings. Many batters will have a dash, indicating they never attempt to steal a base. Most will have two numbers shown - the first used to determine how frequently they attempt a steal, the second to determine their success rate when attempting a steal. Both numbers can be affected by the opposing battery (pitcher and catcher). (See Stealing Bases for more information.)
- DP: This is used by some batters to help them beat out potential double play balls rolled off of the opposing pitcher's card. Most batter cards will have a dash here, but some will have a number. The closer the number is to 5, the less likely they are to bounce into a double play. (See Double Plays for more information.)
- Batting Grid: Together with the opposing pitcher's Pitching Grid, this is where most of the action takes place when resolving a plate appearance. Rolls between 00 and 49 are read from the Batting Grid and are used to reflect the batter's individual abilities.
- Deep Drive Grid: This is used when the batter has rolled a DD off of either their card or the opposing pitcher's card.
- Outs: This is used to determine the type of OUT which the batter has hit into.
- Stats: A quick summary of some of the batter's statistics for the full season.
Pitcher Cards
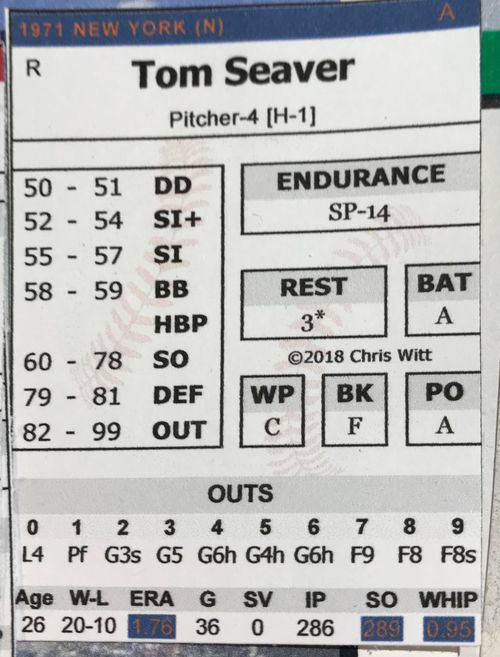
Each pitcher has a Pitcher Card which is used when they are the pitcher.
- Pitcher Handedness: Which side this player throws from. R indicates a right-handed pitcher. L indicates a left-handed pitcher. In some older eras, pitcher handedness is unknown, so you may see a blank there. In these cases, assume they throw right-handed.
- Injury Rating: This is used when the player is injured to determine the duration of time which they will miss. Players who will miss the most time will have an "F" Injury Rating. Players who miss very little time will have an "A" Injury Rating. Some players will receive an "AA" Injury Rating - they are almost never injured.
- Pitcher Usage: This section of the pitcher cards shows how the pitcher was used this season. Pitchers primarily used as starting pitchers will have the word "STARTER" on the left side of the usage box. Pitchers used primarily used as relief pitchers will have the word "RELIEVER" on the left side of the usage box. (Relievers used as closers will have the word "CLOSER" in place of "RELIEVER".) A starter who was frequently used as a reliever as well will have the word "RELIEVER" also appear in the box. If they were used as a reliever, but rarely, the word "reliever" will appear in lower case. Similarly, a reliever who was frequently used as a starter as well will have the word "STARTER" also appear in the box. If they were used as a starter, but rarely, the word "starter" will appear in lower case.
Any pitcher rated to start will also have a REST reading.
- Pitcher Grid: Together with the opposing batter's Batting Grid, this is where most of the action takes place when resolving a plate appearance. Rolls between 50 and 99 are read from the Pitching Grid and are used to reflect the pitcher's individual abilities.
- FLD: The pitcher's fielding rating.
- Hold: The pitcher's ability to hold opposing base stealers. A rating above 0 (example: +1) will yield more attempted steals and a higher success rate on those attempts. A rating below 0 (example: -1) will yield fewer attempted steals and a lower success rate on those attempts.
- Bat: The pitcher's batting ability. If you do not have an individual Batter's Card available for this pitcher when they are at bat, use the Pitcher's Hitting Card with this rating shown in the player's name section.
- PO, WP, BK: If a dice roll occurs in these number ranges, a Pickoff, Wild Pitch, or Balk occurs. (See On-Base Events for more information.)
- Outs: This is used to determine the type of OUT which the batter has hit into.
- Stats: A quick summary of some of the pitcher's statistics for the full season.
Park Cards
Each team has a Park Card which includes a summary of the team's season along with the effects that their park has on HR chances.
- Park Name: The name of the park in which this team played during this season. If the team played in multiple parks that season, the name shown will be the park in which the team played most frequently and park effects will be based on that particular park.
- Park Effects: When a roll result of Park comes up from the Deep Drive section of a batter's card, consult this section of the Park card. Use the modifier die and check the LHB or RHB column based on what side the batter is batting from. (Switch-hitting batter should always use the LHB column versus right-handed pitchers and RHB versus left-handed pitchers.)
- Season Summary: This section shows the team's won-loss record for this season as well as which place they finished within their division. (In non-divisional eras, this will just show the abbreviation of the league they played in.) In addition, if a team won a championship or pennant, that will be indicated here as well.