Das Motorsportspiel
Das Motorsportspiel Rulebook
Table of Contents
Table of Contents
Basic Equipment
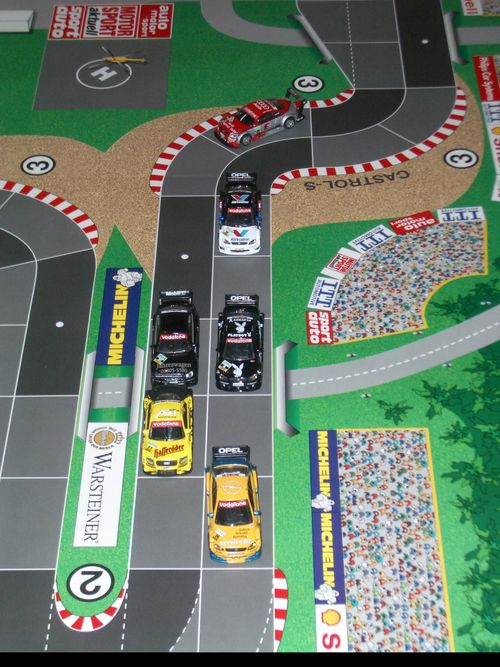
The game contains:
- 1 playfield (racetrack - 150cm x 80cm)
- 6 Race cars (Scale 1:87)
- 3 dice (two white: 1-6 / one red: 2 each 1-3)
- 30 Penalty flags (6 each of yellow, red, black, blue, white)
- 5 racing logs (make a copy of these!)
Our Tip: To better understand the game, set up the track and follow along with the rules!
The Playfield
There are four dice boxes dispersed on the playfield with the numbers: 1-2-3. This is where you will place your dice in the movement order desired after you have rolled (see the game board). The numbers next to the curves determine the maximum gear in which you may drive in the curve (see shifting). The dark gray spaces on the game board are the fast lanes and are twice the size of a normal space (see fast lane).
The Dice
You can roll 1, 2, or 3 dice at once on your turn. After the roll, you decide if you want to use the number that is face up on the die, or the number on the bottom. The numbers on the chosen die face determine your movement. The higher numbers accelerate the car and the lower numbers brake the car (see acceleration). All three dice are normal in such that no die is any more special than any other. They do not have to be placed in any special order. On the red die, the numbers 1-3 each appear twice. This red die is especially useful in the 2-rated curves.
Acceleration
- 3 becomes 4 by turning (For braking the reverse applies)
- 2 becomes 5 by turning
- 1 becomes 6 by turning
The red die is used the same way except the number 1-3 each appears twice.
- 3 becomes 1 or 2 by turning
- 2 becomes 1 or 3 by turning
- 1 becomes 2 or 3 by turning
Our Tip: You should memorize the reverse numbers on each die since they always total 7 and save you the time of looking at the underside. You should always look at the underside of the red die since the number will always be different (one of the other two numbers are possible).
Racing Sequence
There is no hard and fast turn sequence among the players, rather the position of the lead car determines who goes first during a round. The car that is furthest ahead will move first, followed by the next, and so on. If two cars are tied for position in a stretch, the car that arrived first will go first. To signify this event, move the lead car ahead by a nose length.
Changing Lanes
To attain the fast lane or to overtake someone you have to change lanes by moving diagonally. You are only allowed to move diagonally on the rolls of 2, 3, or 5 (see a die). This number on the die determines how may lane changes you may make. Each individual move must progress forward and not just sideways. On rolls of 1, 4, or 6 you may only continue ahead in the same lane.
If two cars are diagonal, with one right behind the other, changing lanes is not allowed. You must always have one open space in between cars.
Shifting Gears
The numbers rolled on the dice is simultaneously the total that your car must move forward. Within the red/white markings of the curves and chicanes, a car is limited to driving in the maximum gear printed next to the given curve. Every higher die roll amount than what is printed must be used prior to the entry to the curve and may not be used within the curve. If this is not possible, you must choose the lower die number (of the two sides) to use. Any number smaller than what is shown for a given curve may also be used. From the last space on the curve you may once again accelerate, even if you are within the red/white markings area, since the first space in which you would use a point on the die is outside the curve.
Game Play
The moving player decides how many dice he will roll. Before rolling, you must state how many of the white dice you will roll. The red die must always be rolled.
Before moving, organize the dice for your desired order of movement and place them into one of the four die boxes on the playfield. FIRST PLACE THE DICE, THEN MOVE THE CAR.
The car is moved forward according to the number shown on the dice in the order they were placed.
Racing cars don't drive backwards or jump over other spaces!
If during your move you discover that you have made an error, you may under no circumstances move your car back. That's the way it is in a real race also. However, just as in a real race, there are some beauty fender benders that occur, especially in curves and chicanes. In these areas, you may need to avail yourself of full braking. If you are blocked from moving because of other cars ahead of you, you miss your turn. If however there is even one space available to move, you must choose to roll and move.
The Fast-lane (and Drafting)
The longer fast-lane (dark gray) spaces with a white dot are moved into and count one space just like the shorter dark gray spaces in the curves without the dot. In spaces with a white dot, a second car may move into the space behind a first. In this situation, move the first car to the front of the space. If the first car in the space moves away, the second car may move forward to the front of the space. If there was a car next to you in this situation, your drafting the lead car now pulls you into a winning position ahead of the former adjacent car.
Driving Errors
Driving errors occur when the rolled dice total is too high to be executed. This can happen in the curves and on straights when over running another car. The amount on the dice that cannot be moved determines whether you incur a light error (1-3 points too much) or a severe error (4 or more points).
For Turns: A driving error always occurs in the first field in which the car attains the unplayable total. If you incur a light error, place a yellow flag next to the car. In the next round, the car with the yellow flag will move last, regardless of position. If you incur a severe error, place a red flag next to the car. This car flies off the track next to the space on the outside of the curve where the error occurred. In this situation, the player loses their next turn completely. In the following round, that car may enter in normal sequence from the space next to where it went off the track. If this space is occupied by another car, it may enter ahead on the next available open space.
For straight-ahead overruns: If a light error is incurred, place a yellow flag next to the car and remain in the space where you were blocked (you again move last in the next round). If a severe error is incurred, place a red flag next to the car. The car is placed off the side of the track next to the car that caused the block (you lose your next turn and enter in sequence from the adjacent space on the following turn). Nothing happens to the car in front that caused the block.
Penalty Flags
Each penalty flag is moved from the track to your pit stop following your next move. Two yellow flags are exchanged for a red flag. If you get another penalty flag, regardless if it is red or yellow, the two flags are exchanged for a black flag. The black flag means you MUST make a pit stop during (at the end of) the current lap. If you have a black flag, and on your way to the pits, you get another flag from errors, you wipe out and are out of the race.
Blue flags are used to mark cars that have been lapped.
White flags are used to track time penalties (see time penalty).
Pit-stops
The pit stop is a way to get rid of any accumulated error and penalty flags. The player does not have to stop in their pit, but rather must drive through the pit lane. The pit lane must be driven through. You cannot simply move your car from where the error occurred to the pit stop.
NOTE: The pit lane must be driven through in the lowest gears. From the beginning of the pit lane to the last space in the lane, you may only use the lowest numbers on the dice. THE FINISH LINE CANNOT BE CROSSED FROM THE PIT LANE.
Training Round
The starting positions are determined from individual training laps. There are two variants to use:
- Whoever accomplishes a lap with the least die rolls gets the first pole position and so on. If two players are tied for rolls, use the person who went the furthest past the finish line.
- A faster method is to measure the total time to accomplish a lap with a stopwatch.
In a training round add 10 seconds or 1 die roll to the total time for every light error (yellow flag) received, and for every severe error (red flag) add 20 seconds or 2 die rolls.
Time Penalties
Time penalties are assessed in the advanced game variation. Before the game begins, players determine the maximum time allowed to accomplish their move from when the dice are rolled (usually between 10 and 60 seconds). One player acts as the timekeeper. If a player exceeds the allotted time, they place a white Time Penalty flag in their pit box. The turn is still finished normally. ATTENTION: Three white penalty flags means a STOP and GO penalty. The player must accomplish a pit stop, enter their pit box, and lose a turn. Any unused points when entering the pit box are ignored.
Full Braking
In a 2-rated turn it is very risky to roll three dice. If you roll a 3 or 4 on the white dice it is impossible to brake down to a 2, even if you rotate the dice. This risk can be greatly reduced by the player deciding to use only one or two white dice BEFORE rolling. The red die can always brake down to a 1 or 2.
Racing Protocol
Place the names of the players and the start positions on the racing protocol sheet. Numerous driving errors can occur among racers in any given die rolling round. Therefore, it's a good idea to keep track of any errors and penalties on the protocol sheet to clear up any questions of who moves next. Individual rounds can be separated with a double slash to mark positions.
For example: #11 yellow, #8 red // #3 yellow, and so on...
Examples
Example 1 (dice 5, 2, 3 rolled): Car "A" has driven cleverly. Had he not changed lanes he would have been going too fast to enter the 2-rated curve. In this situation, one point from the 5 + 2 + 3 = 6 points unusable = severe error.
Example 2 (dice 2, 3, 3 rolled): Car "B" rolls all three dice, which is very risky! He may move the 2, which brings him into the turn. In counting the 3 roll, the error occurs (in the first field attaining the unplayable total). The second unplayable 3 is added to the first for 6 unusable points causing a severe error. This could have been avoided through Full Braking. (Note that the car moves ahead one space then flies off the outside track)
Game Possibilities
New players should start with three lap games and no time penalties. Each player in turn moves one car or team. The team variation has more tactical possibilities, which can also be used even if just one player controls the team. The game system is "open ended" allowing for additional rules variations such as requiring pit stops for tire changes or refueling.
Recommended Starting Position Setup
| 1 | 3 | 5 |
| 2 | 4 | 6 |
DAS MOTORSPORTSPIEL is driven with HERPA MINIATURE MODELS.
Address: professional motor sport games, Obergasse 44, 65207 Wiesbaden. Tel. 06127 – 968112, Fax 968113.
Translator Comments
These rules were translated near verbatim from the German rules included with the game I purchased. There is no date on the German rules book, but there was a sheet from Herpa listing the 98/99 miniature cars available for purchase. The original rules translation by Tim Trant in 1995 was a worthy effort, though riddled with omissions and errors. I have tried to be as accurate as possible in the direct translation. The last paragraph of the German rules concerning "Game Possibilities" says it all. The game is open ended, and as such lends itself to many variations as well as rule interpretations. I have come across variants and questions that I have incorporated below into a FAQ and submitted as an addendum to these rules (see following). The variants and FAQ are unofficial as of this printing.
Game Variants
Alternate Setup (for up to 12 players)
| 1 | 3 | 5 | 7 | 9 | 11 |
| 2 | 4 | 6 | 8 | 10 | 12 |
Final Lap Alternate Rule
As the rules currently stand, you must make a pit stop if you have a black flag. If this occurs during your final lap, you have no chance of finishing the race since the rules state that the finish line does not cross the pit lane. Of course if you have lapped someone, you might still be in the running even with the required pit stop. This naturally forces you to exercise extreme caution during the final lap. Likewise, the rules state that if you incur a third white Time Penalty flag, you must pit stop and miss a turn. Again, you would lose the race if this occurred on your final lap.
For friendly races, use the following: If you incur a black penalty flag or a third white flag on the final lap, you may choose to pit in and continue rolling as normal, or you may try to make the finish line. If you decide not to pit stop, you must drive more cautiously and are limited to rolling only the red die and ONE white die as a maximum. You must announce your decision to pit in or continue as soon as you receive the black or third white flag on the final lap. (Great for kids and beginners)
Fuel and Tire Pit Stops
In a five (or more) lap race, players may agree to require one pit stop (or more) at any time during the race in order to refuel and change tires. If a player passes the pit lane on the semi-final lap without having made the stop, he risks running out of fuel. You may continue the final lap, but if you roll doubles on the white dice, you run out of fuel and coast to a stop. You may play out this final die roll as normal. If this occurs near the finish line, you might even make it across.
The BIG Error
If you totally miscalculate your dice count and end up with more than 6 unusable points (yes, it's possible), you wipe out and are removed from the race. Your car careens off the track and flips over.
Alternate Pit Stop Rule
Normally you only have to drive through the pit lane to get rid of your penalty flags (unless you are forced to pit in from 3 white flags and miss a turn). Using this rule, you always must pit into your pit space. The pit is entered and exited from the adjacent space (no diagonal move entry). Any remaining points on the dice are lost and do not count towards penalties. On your next turn, move out normally using the lowest dice number until clear of the pit lane (unless missing a turn due to time penalties).
NOTE: This rule works well with the Fuel/Tire pit stop variant above. It makes more sense requiring the car to actually enter its pit to get any work done. Also, any pit stop made to remove penalty flags can be used to count for your Fuel/Tire change pit stop if using the F/T variant.
FAQ
Q: How does a "stop & go" differ from any other pit stop? A: On a "stop & go" pit, you must enter your pit and lose a turn (per the rules), where on a regular pit, you just enter the pit lane and just have to drive through it in the lowest gears.
Q: Does the finish line extend across the pit lane? A: No. Per the rules, it does not. This means that if you have a black flag or three white flags (which force a pit stop), and you are on your last lap, you must pit in and cannot cross the finish this lap.
Q: Do you have to make a pit stop if you get a black flag on your last lap? A: Yes. (See alternate rules for a variant to this)
Q: Can you use a die number greater than the number allowed for the turn if in the turn's last space? A: Yes. Only die rolls equal to or less than that shown for the turn may be used to enter, or in the turn. The first space following the turn is considered leaving and not in the red/white turn marking area.
Q: Can you enter the first space of a turn with a die roll number greater than that allowed for the turn? A: No. This one is a bit confusing in the rules. According to my translating skills, you must select the lower number if it's going to put you into the turn, even if it cannot be used to enter the turn. Obviously, there are times that mistakes are made, and the remaining points apply towards any error.
Q: The example on page 7 shows the car moving forward one space on a 2-die turn, even though the die rolled is a three. Is this correct? Why are all six points assessed instead of the remaining 5? A: Yes it's correct. If the error is in the turn, you move ahead one space (call it inertia) even if the die roll was not allowed in that turn. Neither 3 in the example is allowed, so both are added for the error.
Q: If you suffer a red flag error, where is the car placed? A: With any red flag error, the car is placed off the track, in the gravel according to the following:
- If the error occurs in a turn on the inside lane (but not on the last space of the turn), move the car one space ahead and then out to the gravel adjacent to the outside lane. If the space ahead in the turn is blocked, just move the car straight to the gravel adjacent to the outside turn space.
- If the error occurs in a turn on the outside lane, the car careens off the track to the gravel adjacent to that outside space.
- On a straight, just prior to a curve (with no car blocking you, i.e. miscalculated/unusable die roll), move the car to the gravel adjacent to the space you are in (assume heavy braking/loss of control).
- On a straight when forced to stop due to forward car or cars blocking you, move the car onto the gravel adjacent to the blocking car ahead of you (assume veering off to avoid hitting forward car).
Q: What happens if I am blocked in the pit lane? Do I get any error penalties for unused move points? A: The rules do not exclude the pit lane from penalties, so I would think that it would be possible to incur an error due to unusable points if you were blocked. This could cost you the race since you're probably pitting in for a black flag to begin with. Consider only using one or two dice.
Q: Where does my car go if it errs and wipes out into a space where another car just went off the track? A: There is no "space" off the track, in the gravel. Just place your car next to the other. You will both miss a turn, and the first car to go off the track will reenter from that space first.
Q: If I have a black flag in my pit box and incur a white Time Penalty, am I out of the race? A: No. White flags are given for Time Penalties and are not considered driving errors.
Q: How do I enter and exit my pit box? A: You only have to enter your pit box if you have three or more white Time Penalty flags (or if you are playing with the Refuel/Tire Change rule variant). Otherwise, you only have to drive through the pit lane and remove your flags upon passing your pit. If you have to enter your pit, you enter from the adjacent space and exit to the adjacent space (no diagonals here).
Q: Where can I get more cars? A: Order them directly from Herpa at their web site www.herpa.de or check eBay. Lots of hobby shops carry 1:87 scale HO cars that work great. I use Micro Machines (Collectors Edition Corvettes) to run an all Corvette race (they are limited edition 1:87 scale). Metal Minis also makes 1:87 scale models of classics. Hot Wheels and Matchbox cars are too big to use. I've also just discovered some NASCAR key chains that have 1:87 scale models attached. By just clipping them off the chain, they make great scale NASCARs that fit on the DTM track spaces.
Q: It says in the rules that blue flags are for lapped cars. What if I lap more than one car? A: Place a blue flag by each lapped car. It moves with that car. This is where the record keeping sheet is critical to track the movement sequence as well as cars that have been lapped. Translator note: Alternately, keep pennies or chits equal to the number of laps in each pit box. Every time you pass the finish line, remove a chit. This keeps track of the number of laps remaining.
Q: Who died and made you king of the road? A: James Dean. If you don't like it, take it up with him. Thanks and enjoy!