Charlemagne
Charlemagne Rulebook
Table of Contents
Table of Contents
Contents
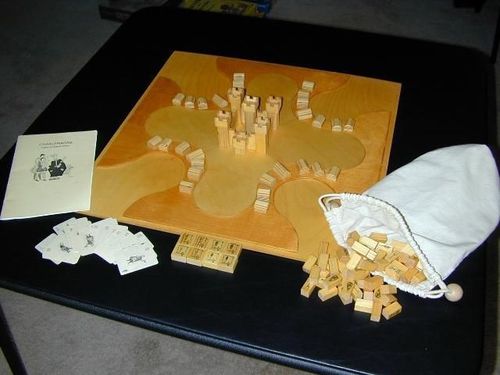
- The game parts of Charlemagne
- Setting up for Charlemagne
- Of Farmsteads and Huts
- Of Barley, Riches, Knights and Serfs
- Of the King's Privileges
- Of problems and Agenda cards
- Order of play
- I Winter: Congregation of Noblemen
- II Spring: Campaigning the Troubles
- III Summer: Ruling the lands
- IV Fall: Harvest, King's Mercy, Church Taxes
- The Winner of Charlemagne
Game parts
Game parts of Charlemagne:
- 25 Agenda cards (4 categories)
- 4 Farmsteads (4)
- 24 Huts (24)
- 64 Resources (4 X 16)
- 8 Privileges (4 X 2)
- 1 Castle (6 pieces)
- 1 Playingboard
- 1 Rulebooklet
- 1 Linnen bag for parts
Setting up Charlemagne
Charlemagne can be played by 2-4 players. Each player chooses a corner of the playingboard for his lands.
The players are all Nobles. The King will be an important factor during the game. He will however not be represented by a player but by certain rules during each phase.
At the start of the game each player receives the following pieces:
- One Farmstead (on the board)
- Six Huts (two on the board next to the Farmstead, four off the board in reserve)
- Eight recouces in his storage (on the board and invisible from other players.)
The other resource pieces are placed facedown on the board or in the bag.
- 24 agenda cards are distributed over all players. (one of the two cards with Unrest/Privilege/Serf is kept aside for the first turn)
- The 6 Castle pieces will be kept off the board.
- The eight Privileges belong to the King and will be kept by the Castle.
Of Farmsteads and Huts
Each Noble lives in his own Farmstead. A Farmstead is a fortified farm together with its buildings. Peasants could take shelter from War and Disaster in this impregnable sanctuary. The lands belonging to the Farmstead provide the Noble with a minimal source of income. The Huts are the dwellings of peasants. The peasants pay a percentage of their annual harvest to their Noble. The size of the harvest depends on the number of peasant Huts that is inhabited.
Of Barley, Riches, Serfs and Knights
Each harvesting time replenishes the Nobles resources. The wise use of his resources allows the Nobleman to achieve his goals. Under different circumstances the value of each of the four resources will differ.
[Gap in source: a sentence is missing here in the HTML copy. The text resumes mid-thought with the following:]
Resources will have to be used to solve Charlemagne's trouble. They will also be used to make your own lands prosper or your rivals lands dwindle.....
Barley
Barley is the most important crop in Charlemagne. Peasants payed for the use of their lands with Barley. In times of Disaster the distribution of Barley was a way for the Nobleman to ease the suffering. Providing his people with enough Barley also ensured a Nobleman of a prosperous and healthy population.
Serfs
Peasants were oftentimes unable to pay enough Barley for the use of their land. Servitude would be the only way for the peasant to pay of his debt. Serfs were like property to the Nobleman. In times of Unrest, releasing Serfs was a way of making the people more happy. Serfs were also obliged to work at the Kings Castle.
Knights
Knights are servants of the Nobleman bound by oath to fight for him. They were trained in the arts of horseback riding and sword fighting. Knights were most frequently called upon to fight an enemy abroad. If need be however Knights will quell a rebellion in Charlemagne itself. Knights are keen to raid other Nobles lands if their insults are in need of punishment.
Riches
Riches are money and any kind of precious metals or stones. Riches are acquired by Taxing merchants and craftsmen or by exacting Toll. Riches are the most efficient way to pay the Kings (or anyone elses) Taxes. Using Riches to bribe a rivals Knights might make it easier to defeat him in battle.
Of the King's Privileges
Eight privilleges are available for the King to grant the Nobles he is indebted to. Privileges allow the Noble to supplement the income of his harvest.
Armoury
In the Kings armouries new soldiers are trained. Having the right to an Armoury ensures a steady flow of Knights.
Toll
The King can grant a Noble the Privilege of asKing any traveler on roads or bridges to pay Toll. The traveler would have to pay in Riches to be allowed to travel on his lands.
Mill
The Privilege to build and run a Mill was very lucrative. Any peasant wanting to Mill his Barley would have to give an amount to the Privileged Noble.
Guilds
Guilds were organizations that specialized in a particular kind of craft. The Noble that was allowed to institute a Guild would be certain of his share of specialized labour sevices. The Noble will have more Serfs at his disposal.
Of problems and Agenda Cards
Twenty-five different problems are threatening Charlemagne. Each of these problems is represented by an agenda card. Eventually all of these problems will have to be solved to keep Charlemange from the claws of chaos.
Order of play
Order of playing Charlemagne:
The game is divided in years. The start of the game is the year 999, the turn of the Millenium. Charlemagne will last for a maximum of 23 years, usually close to 20. The years all follow the same order; the four seasons.
- I Winter: Congregation of the Nobles
- II Spring: Campaigning the Troubles
- III Summer: Ruling the lands
- IV Fall: Harvest, King's Mercy, Church Taxes
I Winter: Congregation of Nobles
The many problems that Charlemagne faces are only treated one by one. The Nobles and the King decide together which problem is most urgent during this year and should therefore be tackled during the spring campaign.
I.1 The agenda cards
During the Winter phase the agenda cards are used. On each card we can see three symbols. The middle picture designates the type of problem the card represents.
War: Charlemagne is continuously threatened by foreign invasions. The Magyar, Vikings, Mongols, etc. If this is not the case the pope will have plans for a holy War to free Jerusalem. The Nobles will have to muster all the Knights they can find to avert these threats.
Taxes: The King or Emperor or the Church will often demand tribute in Riches or other resources to work on their own masterplan.
Disasters: Many of gods plagues will torture mankind. Locusts, Floods, Droughts, Plagues, Fires and other natural Disasters will cause famine and misery among the people. To ease the suffering, Barley and other resources can be used.
Unrest: Not dealing with problems or high Taxes will cause the people to revolt. Inevitably some reason will drive the unruly peasants of Charlemagne to pick up their farm tools and claim what's theirs. Dispensing some of the Serfs from their harsh duties might convince the people of your good intentions.
For being the major contributor to the solution of a problem the King will generously reward you. On each of the Agenda Cards in the top left corner is a symbol of a Privilege or a Castle to signify the reward. When a player solves a Privilege problem he will be allowed to pick a Privilege and will get some fame. For a Castle Privilege the player will be able to gain a lot of fame by contributing to the Kings Castle, but he will gain no Privilege. The resource symbol in the bottom right corner signifies which Privilege has to be sacrified in order for a player to be able to change the agenda.
I.2 The procedure
First year: In the first year the agenda will be the Unrest Privilege Serf card. One of the players makes the first bid. You decide who this is going to be (for example the most corpulent Noble or the oldest wisest Noble). The problem in the first year is clearly the millennium problem. When the year 1000 came Charlemagne was completely in turmoil. The King and the Nobles had to do all they could to solve this problem first. All subsequent examples will use this problem. The agenda cannot be changed in the first year because players need a Privilege to change the agenda.
Later years: In later years the player that won the previous campaign will always play the first agenda card. If that player is out of cards the next player (clockwise) can play his card etc. The agenda card is accepted by default. However; in clockwise order the other players each get one opportunity to pursuade the King to follow their own suggestion for the spring campaign. The original player of the agenda card does not get an other opportunity to change the agenda.
Changing the agenda:
- The player wants to change the agenda must return one of his Privileges to the King.
- This Privilege must correspond to the symbol in the lower right corner of the agenda card.
- The Privileges is returned to the stock at the Kings unbuilt Castle.
- The player takes the previous agenda card into his hand.
- He then plays one of his own cards instead.
- If the player has no more cards except for the one he just took he passes and lets the next player determine the agenda.
This sequence is repeated until the last player has had the opportunity to change the agenda. In this way the agenda can be changed maximally three times in one year and three privileges wil be returned to the King accordingly. The game now continues to the Spring season.
II Spring: Campaign
Now we have established the agenda (unrest in the first year), the Nobles will have to decide how the problem will be solved and who will get the Kings reward.
II.1
The player that played the agenda card in the Winter season begins the bidding. From his storage he makes a first bid of one or more resources (he may also pass). The resources do not have the same value. Under different circumstances the resources also have different values.
During campaigns the pointvalue of each resource is:
[Gap in source: the resource point-value table that follows this sentence is not present in the HTML copy. The values are not reproduced here.]
There is a reason for the fact that a resource is worth something different under different circumstances. For example it is completely obvious that Knights are very useful in case of War. However Knights are not so useful during Disasters. They are not trained to clean up the mess and they just get in the way. Releasing Serfs will certainly ease the tension during Unrest. Giving Riches to the people is more likely to make matters worse than anything else. Every value has a similar explanation.
The bidding is cumulative. Each additional bid is added to the previous bids in this season by the same Noble. After the initial bid the players may in clockwise order make their counter bids. Each cumulative bid must be higher than any of the other players cumulative bid. If a player wants to stop the bidding he may pass. He may then take back the last addition and return it to his storage, all previous bids are lost. The bidding continues until all players but one have passed. At this point the bidding stops and the remaining player wins the campaign. He does lose all resources in his cumulative bid.
Example: In the first round the first player has bid 6 points, one Serf and one Barley. After him two players have passed and one player has bid 8 points, two Serfs. in the second round the first player raises the stakes to 10 points with one extra Serf. The other player bids 15 point by adding a Knight and a Serf. The first player now decides he can not win. He passes and withdraws his last bid, the one Knight. The first player loses one Barley and one Knight and gets nothing. The other player wins and gets the rewards of the Privilege.
There is no maximum limit to any one bid during the spring campain.
Example: A player bids everything he has in the first round of the first campaign. By the time it is his turn again he is outbid by an other player. The player may now pass and take back his last bid which is everything he has. If however all players had passed he would have won the Spring Campaign but at the cost of his whole resource storage.
The highest bidder wins the campaign. The agenda card is set aside and will not be used again during this game. The winner ofcourse gets his due reward. Additionally this player starts each sequence of this year. Upto and until the next agenda phase.
II.2 To the Victor
Ofcourse the King is very grateful to his Nobles for solving yet another problem in the Kingdom. According to the magnitude of the problem there will be a reward for the winner.
Privileges: If the Privilege symbol is depicted in the top left corner of the agenda card that was just solved, the winner of the spring campain may choose a Privilege to his liking from the Kings stock. If his choice is no longer available he may take it from an other player of his own choice. One player may own more than one Privilege of a kind. Besides the Privilege, the winner also may record one Victory point for his total.
Castle building: If the agenda card depicts a Castle symbol the winner will not be allowed to take a Privilege. Like in the previous case. The problem was so mayor that Charlemagne will instead celebrate by building an addition to the Kings Castle. Naturally the winner of the campaign will be allowed to supervise the Castle building. The number of Victory points a player gets for this round depends on which Castle piece can be built.
| Castle piece | Victory points |
|---|---|
| 1st | 1 Point |
| 2nd | 1 Point |
| 3rd | 1 Point |
| 4th | 2 Points |
| 5th | 2 Points |
| 6th | 3 Points |
This number is than multiplied by the number of Serfs that player has set aside for building (See 3 Ruling the lands) plus one. At this time the builders are placed back in the stock. The builders Huts are also removed (many people died during Castle building).
Example: Suppose a player has the Privilege of building the fourth Castle piece. This player has two Serfs set aside as builders for the job. This player now receives a Privilege of his choice and 2 x (2+1) = 6 points. (the first three pieces would have given him 3 points, the sixth piece would have given him 9 points.
As there is a maximum of three builders per player (see III ruling the lands) the maximum number of points scored in one round is 12 for the last Castle piece.
Notice: There are 8 Castle agend cards in the deck. Although it is good to keep your cards until the last moment it is also a pity if you are stuck with them at the end of the game.....
III Summer: Ruling the lands
The Nobles are obliged to take care of their lands and of their people. Doing this involves keeping the peasants stomachs full and their hands busy. The winner of the spring campaign starts this round. The other players follow clockwise. In this phase resources are used. There is no limits to the number of actions each player can take. All the resources used succesful or unsuccesful are discarded after use.
III.1 Population growth
The Noble may give one or more Barley to his people. Each Barley will keep enough people from starving or attract enough new people to populate a Hut. The more Huts the more harvest (4.1 Harvest). Each player has a maximum of 6 Huts he can build. This is all your lands are able to sustain.
III.2 Builders
The Noble may assign one or more of his Serfs to building duty. The builder will live in one of the players Huts until he is used for building a Castle or until that Hut is plundered by an other player. The player takes one Serf out of his storage and places it with one of his existing Huts. This Hut will no longer be counted for harvests. At most half of the Huts may be assigned to builders. The builders do not grow any crops but they need to be fed. (This means there is a limit of three builders per player).
III.3 Foraging
The Noble may send out one or more Knights to forage the lands of another Noble. To do this the Noble places one of his Knights on the board next to the Noble that is being foraged. This Noble than has a choice to defend his lands from the raiding Knights or to let them do their worst. If a player does not defend himself, one of his Huts (of his choice) will be removed from his village. A Noble may defend himself by placing one of his own Knights on the table. In this case both Knights are returned to the stockpile. The attacker may now choose to attack again. If the defending player no longer puts up a fight one Hut may be plundered. The spoils from this plundered Hut consist of two resources randomly drawn from the stockpile. A Nobles Farmstead may never be plundered (The King will be most displeased at this; divide and conquer!) .
Notice:
- Foraged resources are always taken from the stockpile never from a Nobles own storage.
- A Noble without Huts can not be pillaged.
- After a Noble has pillaged an other Noble once, he may continue to destroy Huts. He may however not take any more resources for them They will be supposed to have been evacuated after the initial attack. The next Noble can still attack the previous victim and get his spoils. (A player can at most collect spoils from three players in each ruling phase)
Example: A Noble has four Knights at his disposal. He decides to try his luck with the next player in line. He places one Knight on the table close to his left hand neighbour. The neigbour defends himself by also placing a Knight on the table. Both Knights are discarded. Our player is not easily discouraged and attacks the same Noble again. This time he does not defend himself. With minor teeth grinding the defender discards one of his Huts. Next having secured some loot our Nobleman turns his attention to another player. He plays his third Knight and the other player immediately loses one Hut for not defending himself. Now our Noble has two plunders to his name. He decides to attack his left hand neighbour again. This neigbour again loses one Hut. Our Noble is happy with his work. He takes four resources from the stockpile and passes for this turn. (He does not take six because of the fact that he plundered two Huts from the same player.). The spoils consist of a Knight, two Barley and one Serf, not bad!)
II.4 Bribery
[The source prints this section as "II.4" although it appears in the Summer phase; the numbering is kept as printed.]
A Noble may use his Riches to convince other Nobles Knights to leave the battlefield. The Noble does this by placing a Riches on the board next to the Noble of his choice. This Noble must than hand in one of his Knights and both return to the stockpile. If the Noble has no Knights he must show all his resources to the player trying to bribe him to prove that. The Riches has in that case served to get this information and will be discarded also.
Example: The next player in line from our previous example is the vengeful neighbour. The player has kept a Knight in reserve to strike back. He guesses that the four spoils that the player received contains at least one Knight. He spends one "Riches" to bribe any Knights present. The victim hands in his "Knight". The player tries again. Since the victim has no more "Knights" he shows the Noble all his resources. The Noble now has his revenge. He attacks his tormentor with his last Knight and plunders one of his Huts. The player ends his turn and gets his two resources (a 'Knight' and a 'Barley"). All the next players now know that the first player is without Knights! This leaves him wide open to attack.
IV Fall
Harvest
The harvest time brings relief for the depleted storages of the Nobles. The population will be Taxed and Privileges also bring in their rewards during harvest time.
IV.1 Taxation of the lands
The Nobles get one resource for their Farmstead. For each two Huts they get an additional harvest. Huts with builders do not count for the harvest. The resources from Huts and the Farmstead are drawn randomly from the stockpile.
Tip: Advanced players may opt to take the resource of their choice from their Farmstead. They do this in the normal order. (Winner of the campaign begins) They call out what they will take for their Farmstead one by one. They may also choose to draw random so the others do not know what they got.
IV.2 Income from Privileges
The income from Privileges corresponds to the Privilege. Mills give Barley, Tolls give Riches, Armouries give Knights and Guilds give Serfs. These resources are sought out of the stockpile. If a resource is not available in the stockpile one may be randomly drawn instead.
Example: A player has his Farmstead, 3 Huts, an Armoury and Toll Privilege. He was two random resources for his Farmstead and Huts (3 Huts give 1 harvest.). On top of that he gets one Knight and one Riches.
Notice: The theoretical maximal harvest is 1+3+8=11 resources. This happens when one player has all the Privileges.
The King's Mercy
The King has no interest in seeing one of his Nobles in Ruins. After the Harvest King Lothar may order one of his Nobles to aid a weaker brother. Before the King would take such matters he usually needed some pleading from the impoverished Noble.
Procedure: Each player gets his turn in clockwise order starting with the winner of the last campaign. When a Noble has four or less resources, and he has only enjoyed income from his Farmstead he may ask the King for help. The King will always grant the request. The Poor player may now pick another Noble and randomly draw up to half of the resources from his storage. The King will grant the generous Noble with a Privilege of his choice (nobody gets any Victory points for this one).
Church Taxes
When the Storages are full Nobles have some time to think about life or, more likely, the afterlife. Nobles with plenty resources and no intention of donating to the Church would certainly not be judged kindly by the almighty. Fortunately the Church is always ready to take a contribution. With this contribution they might feed the needy or build new Churches.
Procedure: All resources over ten must be discarded. The discarded resources may be of the Nobles own choice (the Lord is not to picky). Nothing is returned for this generosity.
Notice: This phase comes after the Kings Mercy. It is therefore possible to gain more than 5 resources in that phase. Consequently it is possible that a previously poor Noble will now hand some resources over to the Church...
The Winner of Charlemagne
As soon as the last Castle piece has been built during the spring campaign, the game ends. All Victory points scored are now added up. The Noble that has earned most fame for his deeds is the apple of the Kings eye and the successor to the throne. The winner of Charlemagne!