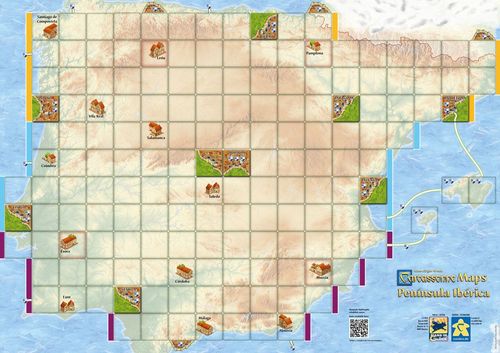
Carcassonne Maps: Península Ibérica
Carcassonne Maps: Península Ibérica Rulebook
Table of Contents
Table of Contents
Components
- 1 Carcassonne Map. In addition, you need:
- Tiles: We recommend playing with the base game tiles and the first and second expansion. Of course, you can combine everything you want to try. For each map there is a recommendation of a number of tiles you could use. It is better to play without the additional rules and meeples of the expansions and to use only the tiles.
- Meeples: If possible, every player should use 9 instead of 7 meeples (+1 meeple on the scoring board).*
* If you need additional meeples, you'll find everything you need in our webshop cundco.de
Overview
There are several start-squares on each map. On each square there is a small town and they are with a red edging. You should start with at least 2 start-squares. Take the starting tile (with the darker backside) and one or 2 random tiles and place all of them on 2 to 3 start-squares. You start your game by placing your first tile next to these tiles.
If you play after the base game rules and without the Maps-Chips expansion rules, you simply ignore the additional prints on the maps (e.g. the wine bottles on the France Map, the colored lines on the Ibérica Map, Islands on the Benelux Map, etc.). The general rules stay the same, and some new rules are added.
(Note: to make it easier to read we will be using the words large city and town even if those words do not always represent reality.)
General Rules
1. Placing a Land tile
You're only allowed to place a tile on a preprinted square. As usual, you have to place a tile next to an already placed one.
Large Cities
On squares with printed large city tiles (Berlin, London, Paris, Amsterdam or Barcelona) you cannot place tiles. As soon as you place a tile next to a city tile it is connected. From now on, everybody can place a tile next to the city tile.
Towns
Squares with towns (with a small house, for example Bremen, Bordeaux, Oxford, Strasbourg, Utrecht, Salamanca,...) count as normal squares. You are allowed to place tiles according to the general rules. On some Maps the rules for these tiles differ. You find some variants on page 3. (Printed as "page 3"; the variants are in the Variants section below.)
Border squares with adjacent city or road
Wherever there are cities or roads printed on the "border" of the map you have to place a compatible tile.
Border squares without connection
The "border" of the map is neutral which means that you are allowed to place your tile the way you want if there are no preprinted cities or roads. In this case, it doesn't matter how you place your tiles (with regard to the border).
Ferry routes
If you have connected a ferry route with a road, everybody is allowed to continue this connection on the other end of the road.
2. Placing a Meeple
After having placed a tile you are allowed to place a meeple according to the general rules.
3. Scoring a feature
A coat of arms gives you 2 additional points in each scoring no matter if it is part of a road or a city.
1. Large Cities
If you complete a large city you score according to the general rules. Preprinted large city tiles are scored in the same way as a normal city tile. Coats of arms give bonus points.
2a. Border squares with adjacent city or road
Roads which end on the border are automatically completed there. Preprinted roads or cities are scored as normal tiles. Coats of arms give bonus points.
2b. Border squares without a connection
A city, road or field placed on the border (next to clouds or the sea) is seen as completed. You score them according to the normal rules.
3. Ferry Routes
A ferry route gives you 1 point for the road plus the coats of arms on this connection. They are scored when the road is completed.
4. Monastery on the border
To complete and score a monastery on the border it isn't necessary to place 8 adjacent. Only the surrounding squares (also the diagonal ones) have to be filled with tiles. However, only "real" tiles as well as preprinted large cities are scored.
Final scoring
As usual, city tiles and coats of arms of cities or roads which haven't been completed score only 1 point each. Coats of arms of uncompleted roads which end in neighboring countries also score 1 point.
Variants
Towns
You can try to use the following additional rules for the town squares:
a) Placing a tile on top of a town grants you one instant extra tile which has to be placed immediately. This can only be done once within one draw.
b) Placing a tile on top of a town costs two points.
c) When scoring a road, you get 2 bonus points for each town which is still visible and touches your road (horizontally or vertically).
Península Ibérica Map: Treats
With this mini-expansion you can collect Chips and place them as treats. If you find a treat, you'll get points.
Components
- 30 Map-Chips (10 each in purple, light blue and orange). The Map-Chips are available in our webshop (see: mini-expansions).
- We recommend to play with 110-120 tiles (e.g. base game + 1st + 2nd expansion).
Setup
Use 3 of the 4 available starting-squares (León, Pamplona, Évora and Murcia).
Shuffle all 30 Chips face down. Place them evenly distributed on the squares of the map and stick to the following rules:
- place them face down
- only 1 chip per square
- no chips on the large city squares or town squares
- no chips next to each other vertically or horizontally (only diagonally)
- no chips vertically or horizontally adjacent to a used starting square or an open side of a large city
- no chips on the island squares of the Balearic Islands.
Gameplay
1. Placing a Land tile
Island-squares with coats of arms
You can only place tiles on Island-squares if they have been connected with a ferry route from the mainland (see general rules). If you place a tile on a square with a coat of arms, you'll get two points per coat of arms immediately.
Collecting Chips
If you place a tile on a square with a chip you take the chip, you turn it face down and get 1 or 2 points immediately. Then you place the chip again face up on the map respecting the following rules "to place a treat":
Placing a treat
The color of a Chip determines the area, i.e. the tracks in which you have to place your treat face up:
- orange Chip = top tracks (1 to 4)
- blue Chip = centre tracks (5 to 8)
- purple Chip = bottom tracks (9 to 12)
On one of the possible tracks you look for a free square without a tile (preprinted or placed) and place the Chip face up on it.
Collecting treats
If you place a tile on a square with a treat (face up Chip), you take the Chip and you get twice the number of points shown on the Chip (2 or 4 points). Then you take the Chip out of the game.
2. Placing a Meeple
After having placed a tile you are allowed to place a meeple according to the general rules.
3. Scoring a feature
The scoring is done as usual.
End of game
Remaining face up or face down Chips don't give you any points.