Battle of Churubusco
Battle of Churubusco Rulebook
Table of Contents
Table of Contents
Preliminary Information
Churubusco uses a scale different from the big battles, c. 50 yards per hex, similar to that in Chapultepec. While the Turn/AM sequence remains the same, each Turn now represents c. 30 minutes, not an hour. Some of the basic rules mechanics have been streamlined (cf. the artillery fire rules, below).
Balance
This is a difficult game for the Americans to win … if the Mexican player can maintain his position. He outnumbers the attackers, but much of that is ephemeral, as his cavalry is not in an aggressive mood and many of his units, especially the National Guard units, are in combat for the first time. But he has position, and he has field of fire. And his purpose is to delay, not hold forever. So, if he’s still in place by the end of the 10th turn (which would be about the time that the Mexicans, historically, folded tent and stole away), he’s done his job … and he wins.
Changes to Basic GBACW Rules
(3.0) Sequence of Play
II. B is used only by the US, and is applicable if the brigadier is within Command Range of his Division commander.
D is not used.
(4.0) Command
The US Division Commanders’ Activation Rating is not used, and there are no Artillery Leaders.
(5.0) Activation
(5.1) The US automatically has the Initiative each game-turn.
(5.21) Only the US uses Efficiency markers, as per the battle rules, below.
(5.3) The Americans use Division Activation Markers. The Mexicans use Army markers for all infantry and artillery units. The Cavalry AM is used for the mounted units.
(5.34) Only the US may use Brigade Coordination.
(5.36) There is no Mexican Division leader. Mexican brigadiers are in Command if they are within Santa Anna’s range. Otherwise, they are treated as Out of Command for this battle and, thus, do not get to use II/B (Division Orders).
(5.4) Not used.
(6.0) The Orders System
(6.1) There are no March orders in this battle; just Advance and Attack.
(6.3) The Reserve Rule is not used.
(7.0) Facing
(7.21) Change: Units under Advance Orders may change facing one vertex (per hex they are in) at no cost in MP.
(8.0) Stacking and Extension
(8.12) The Stacking limits are 5 SP of infantry (or one counter, whichever is bigger) and up to six guns. Only 2 guns may be placed (plus the infantry) in a Defensive Wall hex (e.g., 4103),
(8.4) Line Extension is not used; we’ve kept the units to small enough size, vis a vis the scale, to make this unnecessary. See, though, Special Fire Rules, below.
(10.0) Fire Combat
See the Special Rules for Fire, below.
(10.52) Mexican units in Defensive Wall hexes may use prepared Fire at any range, if they don’t move.
(10.61) Mexican artillery may not move. US batteries may not move and fire in the same activation.
(10.63) Mexican guns in different hexes may not combine fire. Guns that are stacked together may do so, regardless of type.
(11.0) Shock Assault
(11.37) Units defending against shock while in a Defensive Wall hex subtract one (-1) when undertaking a Pre-Shock Cohesion check.
(13.0) Morale and Rally
(13.3) Ignore this rule; it is not used.
(15.0) Engineering
This section is ignored; no one may build breastworks.
(17.0) Fatigue
Fatigue is not used; the battle is too short.
Special Rules for the Battle
Terrain
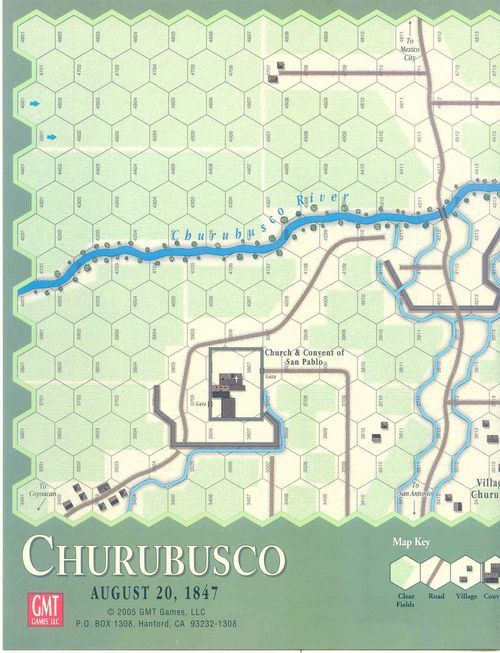
Fields. The entire area around the village of Churubusco (and the Portales “farm” just to the north) was cornfield, with the corn head high, and the ground criss-crossed with irrigation ditches and wagon ruts. The corn slowed movement, and the ditches rendered artillery movement extremely difficult, other than by roads.
Causeways and Roads. The farm roads provide the only speedy access on the battlefield. The Causeway leading into the tete de pont appears “raised” because it is bordered by the same type of ditch (perhaps not quite as wide) that surround the strong points.
Ditches. These were mostly for irrigation, although the defensive works used the idea, in moat fashion, to make moving against them just that more difficult. The ones surrounding the fortifications were 4 feet deep and 28 feet wide.
The Defensive Walls. The walls guarding both the tete de pont and the convent were recently constructed, and done so quite well, although, as you can see, the western flank was not finished. About 9 feet high, the walls had places atop for the guns and defenders, and thus they are placed inside the hex (not on the hexside). A unit in a defensive Wall is assumed to be atop that wall. It may exist in that hex and not be on the wall by placing a “Not on Wall” marker atop of it. Note costs to get atop wall from inside, and to get off the wall (also inside).
Play Note #1: Remember that units defending inside/atop such fortifications (a) get a -1 DRM to any pre-Shock Cohesion checks, and (b) may ignore Retreat results.
The Convent and Church. The church buildings had their own walls, not built for defensive purposes but quite high. They were not crossable militarily, with access to the convent grounds solely by doors and gates. The Mexicans had constructed some scaffolding along the walls to allow a few men to take position there, and some defenders were atop the convent roof. Given that the area outside of the convent was about 100 yards away, and that the walls did much to block LOS, it is not quite sure what good these units could do.
With this in mind, the game allows entry by any one unit to the Convent through either of the two gates, and such entry places that unit atop the convent roof.
Efficiency/Activation Markers
The Mexicans get to put two (2) Activation markers into play each turn. He may use either two Army AM, or one Army and one Cavalry AM. They do not use/need efficiency markers.
- The Army Marker activates all infantry and artillery on the map.
- The Cavalry AM activates all cavalry. However, cavalry may only be activated once per turn.
The Americans get 6 Efficiency markers, which are drawn for the 3 US Divisions (four 2’s, two 3’s). Each Turn the US player draws one for each Division, as per the usual rules. However, they may not be modified by any ratings.
Small-Arms Fire
(8.31) The Maximum Fire Strength per hex is five (5).
(8.45) If both units – ‘a’ and ‘b’ (e.g., the 4 US regiment) – of the same regiment are in adjacent hexes, for purposes of combining fire SP’s, they are treated as if they were “extended”.
Play Note: This does not apply to 10.42/Return Fire.
Infantry uses the Churubusco Small-Arms Range Chart to determine the DRM for fire.
Special Artillery Rules
On-Map Artillery
Given the scale of the map, any gun of the era could reach any hex on the map with relative efficiency, given good Line of Sight. Therefore, to simplify matters, the artillery in this battle do not use the normal artillery firing rules. Instead, they use the Churubusco Artillery Firing Table.
When firing guns, the player rolls the die and consults that table. He adjusts that dieroll as follows:
- +1 for each SP over ‘1’ in that unit. Thus, a 2SP section would get a +1 DRM
- -1, for all Mexican guns.
- +1 for firing at any target within three hexes.
- -1 if off-map; see below
Historical Note: The Mexican artillery held their fire until the Americans were in musket range, mostly for effect, partially because the corn hid the approaching units.
Restrictions. Aside from the normal LOS rules, Mexican artillery atop the defensive Walls may not fire into any hex adjacent to that wall hex. This includes Reaction/Return Fire. (A question of the inability of the guns to depress at that angle).
US Off-Map Artillery
The US batteries do not have to move onto the game map. The fields presented major movement problems, and the roads and causeways, narrow as they were, had to remain open for the foot units.
The three US batteries may be placed one hex off-map, at either 3202 or 3211. They count range by tracing from there, the first hex they count being either 3202 or 3211. Mexican guns may fire at these batteries by reversing the range count.
US off-map artillery may not fire at any hex that is adjacent to a friendly unit.
The Mexican Army
Initial Mexican Deployment
All units are under Advance Orders.
| Hexes | Units |
|---|---|
| Any Defensive Wall hex, or Rincon; any other hex adjacent to the Convent. | All units of the Bravos and Independencia National Guard; the San Patricio Battalion; all 7 4lb, 6lb, and 8lb artillery units. |
| Within 2 hexes of 4212 | Perez; any 4 units from Perez’s brigade, 3 12-pounder Guns (1 per hex) |
| On the road between the Tete de pont and the Convent (3907-4209) | Any 3 units from Perez’s brigade |
| Any hex noth of and adjacent to the Churubusco R. from 4312, east. | Any 4 units from Perez’ brigade |
| Within two hexes of 4511 | Santa Anna [a]; the Hussars of Special Powers [b], Tulancingo Curraissiers, Light Mounted Regiment of Vera Cruz |
Torrejon’s Cavalry
The Mexican Player has a large brigade of cavalry sitting just off the eastern edge of the map, north of the river.
The Mexican Player may bring these units on in any Turn after an American unit has appeared north of the Churubusco. They enter with any Cavalry Activation (see above) through 4618.
a = It appears that Santa Anna was in overall command of the Mexicans during most, if not all, of the battle. However, his role appears to have been limited to moving units around to shore up defenses. As the Mexican position here is entirely defensive, there is no need to have Santa Anna be part of the “game” mechanics.
b = The Hussars are Santa Anna’s personal guard. They will never move more than one hex away from him, and they move only when Santa Anna moves. The other two regiments may be activated as part of a cavalry activation.
The US Assault Force
No US units start on the map; all units enter as Reinforcements. They enter under whatever Orders the US Player wishes.
There are three divisions:
- Worth’s 1st Division: the brigades of Garland and Clarke
- Twiggs’s 2nd Division: the brigades of Smith [a] and Riley
- Pillow’s 3rd Division.: the brigades of Pierce and Shields [b]
a = Smith’s brigade (1/2 Div), included the regiment of Mounted Rifles. While these men fought dismounted at Cerro Gordo, it appears that they were mounted here and served solely as escort for the infantry. We have not included them in the counter-mix.
b = Shield’s brigade was actually part of Twigg’s Division. However, it was reassigned to Pillow for the attack because, among other reasons, Pierce (soon to be 14th President of the US) fell off his horse early in the day, fainted from the pain, and could not take command., So his regiments were combined with those of Shields to form one brigade.
US units enter through any one of three entry hex/areas. The US Player must assign, before starting, one division to each of the three entry hexes.:
- 3402 (This is the road from Cocoyanas, where Scott has his HQ)
- 3411 (the road from San Antonio, and Contreras)
- 4501-4601. These hexes may not be used until Turn 4.
Historical Entry: For those wishing to follow exactly who entered where, the attack started with an assault on the Convent, led by Smith’s brigade. Worth’s Division was assigned the road from Cocoyanas (3402). Twigg advanced from San Antonio (3411) with Clarke’s brigade in the lead. Garland’s brigade (for the most part) entered somewhat later and swung to the right (east) to cross the river. Shield’s extended brigade (from Pillow) entered a couple of hours after the initial assaults had taken place, as a flanking maneuver, through 4501-4601.
Historical Note: A company of dragoons was present, but did not take place in the battle.
Initiative
The US Player always has the Initiative.
Victory
The game has 10 Turns.
The U.S. Player wins if, at the end of any game-turn (not Activation Phase), he occupies both 4311 and 4212.
The Mexican Player wins if the US player doesn’t.
Charts and Tables
The Terrain Effects Chart: Churubusco
| Terrain | Inf (Move) | Cav (Move) | Arty (Move) | Leader (Move) | Effect on Fire | Effect on Shock | Block LOS? |
|---|---|---|---|---|---|---|---|
| Fields | 2 | 2 | 4 | 2 | -1 [f] | x | NO |
| Road [a] | 1 | 1 | 1 | 1 | x | x | NO |
| Village | 2 | 3 | 3 | 2 | -1 | -1 |
x = No Effect. NO = Not Allowed. OTIH = Other Terrain in Hex. D = Automatically Disordered at end of movement.
* = Effects are all adjustments to the Dieroll. They apply if the defender is in the named hex, or being shocked/fired at across that hexside.
Movement Notes
a = The roads, of course, negate any other terrain in the hex for movement costs. b = This refers to entering the convent through the gate and going onto the roof, which is allowed for one unit only. The cost also applies to leaving the roof and going through the gate. c = There is no cost for changing facing when using – and following – a road. e = See restrictions on the number of guns that may in any one of these hexes.
Combat Notes
a = Road hexes are considered to be “clear”. d = Units that incur a Retreat result as a 2nd Disorder from either Shock or Fire may, if it wishes, ignore the Retreat and stay in place with no additional effect. f = This applies to all fire except that from an adjacent hex. It has more to do with visibility than anything else. g = To everything except the Convent roof.
Churubusco Artillery Firing Table
| Adjusted Dieroll | Result |
|---|---|
| 0-3 | No Effect |
| 4 | d-2 |
| 5 | d-1 |
| 6 | d |
| 7 | d+1 |
| 8 | d+2 |
| 9+ | D |
Dieroll Adjustments
- +1 for each SP over ‘1’ in that unit. Thus, a 2SP section would get a +1 DRM
- +1 for firing at any target within three hexes.
- -1 all Mexican guns.
- -1 Terrain?
- -1 Artillery moved
There are no DRM for Off-Map US Artillery, other than terrain.
Churubusco Small-Arms
Range in Hexes
| Weapon Type | Max/Prep | 1 | 2 | 3 | 4 | 5 | 6-7 |
|---|---|---|---|---|---|---|---|
| M (Musket) | [5/2] | +3 | +2 | 0 | -1 | -3 | x |
| BkR (Baker Rifle) | [7/2 ‘x’] | +2 | +1 | 0 | -1 | -2 | -3 |
| C (Carbine) | [5/na] | +1 | 0 | -1 | -2 | -4 | x |
x = See new 10.52. The effectiveness of the Baker Rifles was often reduced by fouling.
Counters
Values are reproduced as printed. Each infantry, cavalry and artillery counter lists its front (normal) values and, in italics on the reverse, its Disordered values, as the base rules describe for combat units (see the Gringo! rules, section 2.21). Leader values are reproduced as printed without interpretation.
Mexican Leaders
Leaders (Repl in italics)
| Leader | Type | Front (top / bottom) |
|---|---|---|
| S. Anna | Army | **** / 0 4 |
| Rincon | Convent | * N / 3 +1 |
| Perez | Tete | * N / 3 -1 |
| Torrejon | Cavalry | * C / 3 0 |
| Repl (Rincon) | Convent | * C / 3 0 |
| Repl (Perez) | Tete | * C / 2 -1 |
| Repl (Torrejon) | Cavalry | * C / 2 -1 |
Mexican Activation Markers
- MEXICO ARMY AM (two)
- MEXICO CAVALRY AM (one)
Mexican Regular Infantry
Disordered status in italics.
| Unit | Commander | Weapon | Front (CS-Coh-MA) | Disordered |
|---|---|---|---|---|
| 1 Ligero a | Perez | X BkR | 4-6-6 | 4-5-5 |
| 1 Ligero b | Perez | X BkR | 4-6-6 | 4-5-5 |
| 3 Ligero a | Perez | X BkR | 5-6-6 | 5-5-5 |
| 3 Ligero b | Perez | X BkR | 5-5-6 | 5-4-5 |
| 3 Ligero c | Perez | X BkR | 4-5-6 | 4-4-5 |
Mexican Irregular Infantry
| Unit | Commander | Weapon | Front (CS-Coh-MA) | Disordered |
|---|---|---|---|---|
| BravosNG | Rincon | X M | 6-4-5 | 6-2-4 |
| BravosNG | Rincon | X M | 5-3-5 | 5-2-4 |
| BravosNG | Rincon | X M | 5-3-5 | 5-2-4 |
| IndpNG | Rincon | X M | 6-4-5 | 6-2-4 |
| IndpNG | Rincon | X M | 5-3-5 | 5-2-4 |
Mexican Cavalry
| Unit | Commander | Type | Front (CS-Coh-MA) | Disordered |
|---|---|---|---|---|
| 2 Line | Torrejon | C | 4L-4-9 | 4L-2-7 |
| 3 Line | Torrejon | C | 3L-4-9 | 3L-2-7 |
| 7 Line | Torrejon | C | 4L-4-9 | 4L-2-7 |
| 8 Line | Torrejon | C | 4L-4-9 | 4L-2-7 |
| GuanAct | Torrejon | E | 3L-2-9 | 3L-0-7 |
Mexican Artillery
Artillery values are bracketed Fire Strength, Cohesion, and Movement Allowance (x = may not move).
| Unit | Commander | Front (Fire-Coh-MA) |
|---|---|---|
| Convent • 4 | Convent | [2]-7-x |
| Convent • 6 | Convent | [1]-7-x |
| Convent • 8 | Convent | [2]-7-x |
| Convent • 8 | Convent | [2]-7-6 |
| Tete • 12 | Tete | [1]-7-x |
| Tete • 12 | Tete | [1]-7-x |
| Tete • 12 | Tete | [1]-7-x |
US Army and Division Leaders and Activation Markers
| Leader | Type | Front (top / bottom) |
|---|---|---|
| SCOTT | Army | **** / +2 6 |
| WORTH | 1st Div | ** 1 / 5 |
| TWIGGS | 2nd Div | ** 0 / 3 |
| PILLOW | 3rd Div | ** 0 / 2 |
| WORTH | Army (Repl) | Repl / +1 4 |
| GARLAND | 1st Div (Repl) | Repl 1 / 3 |
| RILEY | 2nd Div (Repl) | Repl 0 / 2 |
| CDWLDR | 3rd Div (Repl) | Repl 0 / 2 |
US Efficiency and AM
- 4 ‘2’ Efficiency
- 2 ‘3’ Efficiency
- 3 AMs each for Worth, Twiggs and Pillow
US Brigadiers
| Brigadier | Division | Front (top / bottom) |
|---|---|---|
| Garland | 1/1Div | * A / 3 +1 |
| Clarke | 2/1Div | * N / 4 0 |
| Smith | 1/2/Div | * A / 5 +1 |
| Riley | 2/2/Div | * N / 3 +1 |
| Shields | 1/3Div | * N / 4 0 |
| BELTON | 1/I | Repl N / 3 0 |
| ABCRMB | 2/I | Repl N / 3 0 |
| LORING | 1/2Dv | Repl N / 2 0 |
| REPL |
US Regular Infantry
Disordered values in italics.
| Unit | Commander | Weapon | Front (CS-Coh-MA) | Disordered |
|---|---|---|---|---|
| 4 US a | Garland | X M | 4-7-6 | 4-6-5 |
| 4 US b | Garland | X M | 4-7-6 | 4-6-5 |
| 2 Art a | Garland | X M | 3-6-6 | 3-5-5 |
| 2 Art b | Garland | X M | 3-6-6 | 3-5-5 |
| 3 Art a | Garland | X M | 3-6-6 | 3-5-5 |
US Volunteer Infantry
| Unit | Commander | Weapon | Front (CS-Coh-MA) | Disordered |
|---|---|---|---|---|
| 1 SC | Shields | X M | 4-7-5 | 4-6-4 |
| 2 NY | Shields | X M | 4-6-5 | 4-5-4 |
US Artillery
| Unit | Commander | Front (Fire-Coh-MA) |
|---|---|---|
| A, 2US a | Garland | [2]-8-8 |
| A, 2US b | Garland | [2]-8-8 |
| K, 1US a | Smith | [2]-8-8 |
| K, 1US b | Smith | [2]-8-8 |
| 3rd Art | Shields | [2]-8-7 |
| 3 Vol Art | Shields | [2]-7-7 |
Markers
The printed list of markers needed for the battle (under the heading "Need:"):
- Strength markers 1-6
- Combat Ineffective Brigade
- Shock (Check Cohesion)
- Attack/Advance
- Cavalry Charge
- Prepared Fire
- Must/May Advance
- Collapes/Blown
- “Not on Wall” (about 5)