ASG Golf
ASG Golf Rulebook
Table of Contents
Table of Contents
Introduction
NOTE: Official tournament golf rules apply in all situations not covered in these rules.
To play the ASG Golf Game, you must have a course, cards representing the golfers in the match or tournament, a set of "Result Charts". You also need a way to mark the golfers' progress around the course. We suggest that you insert a golf hole inside a clear plastic sheet protector, and use an erasable marker to keep track of the golfers.
To begin . . .
- Select a course and the golfers playing in the match. Four is the maximum for a single round.
- Assign each golfer a number. Start at the first hole to begin play; choose the club (see Use of Clubs) for the first golfer and roll three dice of different colors.
- Designate one die as the tens digit and another as the units digit. Combine their results to form a two-digit number from 11 to 66 and use that to get a number from the golfer's card. The third die is used to determine direction.
Surveying the Course
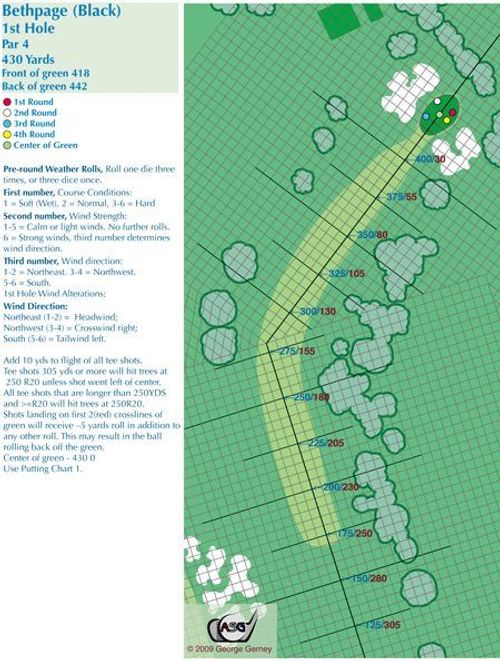
Each hole is overlaid with a grid dividing the terrain into 5-yard increments. The grid over each green features four colored points: red, white, blue, yellow. These are used to show pin locations for different days of a tournament, or you may choose any pin location you wish for a casual round. If playing a full tournament, the courses are designed to use pin positions in the stated color order for each successive round. There is also a light green colored point(s) that designates the "Center of the Green."
At the end of these rules there is an Options section that contains instructions for use of optional course-related modifications that can add even more flavor to your play. These options include an advanced tree chart, different levels of rough to account for major tournament play, wind conditions, and overall course condition.
While each of these modifications is easy to implement, ASG recommends that the first couple of rounds be played with no modifications.
Flight and Roll of the Ball
Starting from the tee, the distance of the shot is measured along the bold centerline that runs the full length of the hole. Each square represents a distance of five yards. The yardage for each shot is provided in three numbers under the columns "Flight", "Direction from 3rd Die Result", and "Roll". For example let's say we are using Stuart Appleby, and he is using the 1 Wood off the 1st tee. We roll a 4-2-3 with our 3 dice. We read the first 2 numbers as a "42". Since Stuart is using the 1 Wood, we look up "42" on his card under the "W" column. The result number is "4." We look up "4" on the "1 Wood" chart and get this result: The ball flies 265 yards, coming down 5 yards left as determined by our 3rd die result of "3." It rolls an additional 35 yards.
Directional signals in ASG Golf are:
- L = Left
- R = Right
- L/R = If a shot is aimed left or right, this directional amount must be in the same direction. If the shot was not aimed, the golfer may choose to go either left or right.
- I = Inside - The ball goes closer to the centerline than the pin.
- O = Outside - The ball goes farther from the centerline than the pin.
- PH = Pin High
Aiming and Hitting your Shot
To aim a shot, state the intention and use the distance aimed L or R as the new origin (center) line for marking the shot. Any L or R distance is calculated from this new origin line. For example, if the player aims left 20 and the result of his shot is R10, the ball would end up at L10, and L10 would be the origin line for the next shot.
Refer to the "Aiming Chart" to see (depending upon your club choice, and the distance aimed) if there is any loss of distance on the shot. If so, deduct that distance from the "flight" of the shot. Regardless of any aiming, all shots roll parallel to the centerline.
Selecting the Proper Club
Choosing the right club is an important part of ASG Golf. On some shots, going for the longest distance is simply inadvisable, even off the tee. Maximum distance may carry you beyond a dogleg or into the rough, sand trap, water hazard, or trees. So base your club selection on the distance you want the ball to travel. Each golfer card shows a key number for wood and long-iron (2, 3 & 4) shots (Wood) and for medium and short iron shots (Iron). For example, if the golfer's Wood key number is 4, then consult result line 4 for the club and situation to determine the golfer's average distance with that club.
Use of Clubs
Woods - The driver is only used for tee shots. Use the 3 Wood wherever balls are playable except from a sand trap.
Irons - Remember to use the W column for shot(s) with the 2, 3, or 4 iron. Use the I column for all other irons, including the wedge(s).
For all shots that are from closer than the Golfer's average I result on the Sand Wedge Chart (based on the terrain used for the shot), use the Shorter Wedge Shots Charts. Measure this distance from yardline to yardline. Choose whether to aim at the pin or at the center of the green and use the appropriate Shorter Wedge Shots Chart. Only 2 dice are required to be rolled when using the Shorter Wedge Shot Charts.
(NOTE: on holes that have two points designated "center of the green"; you may choose which one you want to aim for.)
Remember to look up your result under the column matching the golfer's iron (I) rating. Golfers vary in their accuracy on short approach shots. To account for this some numbers in the I column are followed by letter modifiers - p, t, r, m, s and d. These will affect results negatively or positively depending upon the terrain, simulating the individual golfer's effectiveness with short approach shots. Check the Shorter Wedge Shots Charts for details regarding how and when to use the letter modifiers.
Putter - The P column is used only for putts. Only 2 dice are required to be rolled when putting. The putter is the only club you can use on the green. Once on the green, determine the conversion of yards to feet by using the "Putt Length Determination Chart". Once the putt length is determined in feet, refer to the proper "Putting Chart" (stated on left-hand side of every hole chart). The charts range from 1 (easiest) to 5 (most difficult). The charts are broken down by the length of the putt and reflect the increasing difficulty, the longer the putt. On any putt 21 feet or longer, the golfer has the choice of "Going" for it or "Lagging" the putt. "Go" has a greater chance of success, but also a greater chance of leaving a longer putt following a miss.
In addition, every golfer has a short putt (SP) rating that will reflect his ability to get the ball in the cup from within three feet. On certain results you will need to roll additional dice and add or subtract the rating to determine whether the putt is successful. The specifics are described on the "Putting Charts."
You can also use the putter from just off the edge of the green so long as it lies on the fairway within the first grid off the green. If you choose the putter for this approach, check the appropriate putting chart and roll the dice. Once you have located the result, drop down four lines to get the final location. (NOTE: if the initial result number is a 1 or a 2, do not drop down.)
Course Characteristics & Hazards
The course name, hole number, and yardage are listed in the upper left hand corner of each hole. The yardage reflects the distance from the tee to the cross line closest to the center of the green. References to the green on the boards refer to this point. Each hole also includes the distances to the front and back of the green.
Greens - Represented by the darkest color of the course. Once on the green change the unit of measure from yards to feet by using the "Putt Length Determination Chart". Greens differ in difficulty. Be sure to use the "Putting Chart" appropriate to the hole you are playing.
Fairways - The lightest shade of green represents the fairways. Use the fairway column when using any club from this part of the course.
Rough - The medium green shade represents the rough. When hitting a shot from this area, use the Rough Column for your club choice.
If a ball lands in the rough on the fly, reduce its roll by 50%. If the ball rolls into the rough, reduce the remainder of its roll by 50%. If the figure to be divided is 5 yards or fewer, make NO reduction.
Sand Traps - White, yellow or orange areas on the fairway or bordering the fairway represent sand traps. Use the Sand Trap column for any shot from a sand trap; only irons may be used from the sand trap. NOTE: Any ball landing in a sand trap on the fly stops immediately. Any roll result is cancelled. If a ball rolls into a trap, and has rolled more than half its roll, it stops; otherwise it continues for half its remaining roll even if this results in the ball leaving the trap. However, no ball can roll through a yellow or orange trap.
If a shot has been played from a yellow or orange sand trap, and a similarly colored result appears to the right of the flight box; use the flight distance listed in the colored box. If this flight distance is 65 yards or less reduce any directional distance by 1/2. Make no change to the roll.
Water Hazards - Any blue color on the course represents a body of water. If a ball should drop or roll into a water hazard, you can drop a new ball in play on any playable black or gray line before the hazard at the cost of one penalty stroke. On a lateral hazard, you play from the spot where the ball crossed the hazard line. You can also choose to play from the opposite side of the hazard, but no closer to the hole. Or choose to play the shot again from the point of the original shot at the cost of one penalty stroke.
Out of Bounds - The shot MUST be replayed from the original spot with a one-stroke penalty.
Hills - While not evident on the aerial views, hills can affect play on a number of holes for the ASG courses. The effects of any hills can be found in the hole instructions on the side of each hole diagram. For example on the first hole at Pinehurst #2, you will add 5 yards to the flight of your tee shot.
Trees - Outlined in dark green and slightly lighter green than the rough, trees stop the flight of any ball that carries into a tree square on the fly. The ball stops immediately with no bounce or roll. Any ball that rolls under a tree or into a mass of trees has its remaining roll reduced by one-half. Remaining rolls of less than 5 yards are not halved.
For the ensuing shot, a ball is in the trees if it is on a tree-covered square and more than one full square of trees lies between it and the green. Use the Rough column for any shot from a tree area unless the terrain at the grid point indicates clearly something other than rough. In this case, use the appropriate column for the shot.
A ball is behind trees if a straight line from the ball to the following locations intersects a tree square: the front of the green, center of the green, or back of the green. Proceed as if hitting from the rough; however, the maximum club is a 7 iron. If there is an opening to any of these locations the golfer is considered to have a clear shot with no restrictions.
NOTE: The Shooting from the Trees Option provides the potential for using a wider range of clubs.
Other - Some courses may include other types of terrain. These terrain types and their effects will be detailed on the individual course.
OPTIONS
Rough
You may elect to play the rough according to PGA, US Open, or standard conditions. There may be course-specific rough types also; these will be defined on the course. At the start a tournament, choose the conditions under which the match is being played. Before taking a shot from the rough, roll one die to determine whether the golfer has a poor lie:
- US Open - 4-6 = poor lie
- PGA - 5-6 = poor lie
- Standard course - 6 = poor lie
When the golfer has a poor lie, check the poor lie column in the rough portion of the appropriate club chart to determine how the lie has affected the flight distance. If the resulting flight distance is 65 yards or less reduce any directional distance by 1/2. Make no change to the roll.
Trees
For more detailed play, use the optional Trees Charts to determine the position, lie and club options for the next shot.
Weather Conditions/Wind
At the beginning of each round, check for Weather Conditions. The results differ among the ASG courses. Check the left hand side of the first hole diagram to determine the effects. As with the roll for the cup location, these conditions will govern play throughout this round. (For a tournament with more than four golfers, this roll for the weather conditions affects all rounds played that day.)
NOTE: Wind effects for the course and time of year may also affect the flight of the ball, sometimes to the golfer's benefit and sometimes to his utter dismay.
Wind - Calm/Light and Strong. The 1st hole of each course will explain how to determine the strength of wind (Calm/Light or Strong) for the day. The 1st hole of the course will also give details on how to determine the wind direction for the day if the wind is Strong. Each hole will have a listing for which wind chart to use for the hole based on the wind direction for the day. Consult the wind charts for specifics of how to play in strong winds. There may also be courses that will have course-specific wind effects that will not require the use of the Wind Chart.
Course Conditions
Golf courses can be soft, hard, or normal, depending on the weather leading up to the day of the match. To determine course conditions by following the instructions on the first hole diagram of every ASG course.
If the course is "soft," reduce Fairway and Rough roll by half. There are no changes to play on the greens.
If the course is "normal," there are no changes to any results except on the greens. When calculating all first putt distances a 3rd die roll of "6" adds the sum of the first two dice to the distance given on the chart. If the shot finished on the pin and the 3rd die roll is a "6" simply double the calculated putt length.
Example: The shot finishes 5 yd x 5 yd from the pin and the putt distance roll is 5-4-6 the 1st putt distance will be 32 feet since the 3rd die was a "6" and the 9 ft must then be added to the distance of 23 ft obtained from the chart.
If the course is hard, add 10 yards to fairway roll and 5 yards to green roll. In addition, when calculating all first putt distances read a 3rd die result of "5" or "6" as adding the total of the first two dice to the distance given on the chart.