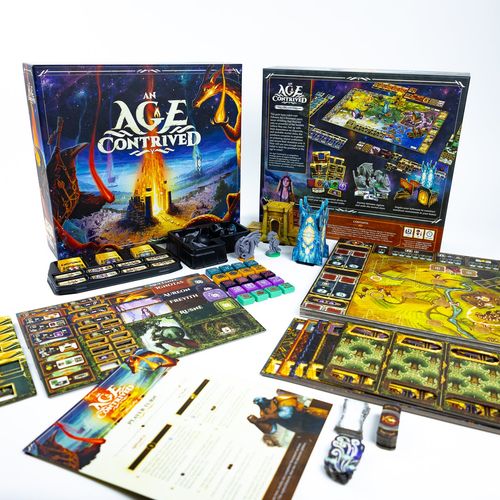
An Age Contrived
An Age Contrived Rulebook
Table of Contents
Table of Contents
Goal
In An Age Contrived, each player takes on the role of a god in the Eldranic pantheon, deriving their power from the belief of mortals. Players support mortal development through monuments, pillars of civilization, and other lasting achievements.
The goal is to have the most victory points (VP), representing mortal belief in your god. All VP are scored at the end of the game, based on how you have placed your energy tokens on the board. Players take their turns in clockwise order with no rounds or phases.
The game ends when the last monument is fully constructed, at which point subsequent players take one final turn (if necessary) until all players have had an equal number of turns.
Components
Global Components
- 1 game board
- 6 Monuments, each divided into 4 or 5 sections
- 6 Monument frames
- Monument stickers — Before your first game, affix an identifying sticker onto the metal frame of each Monument. Before doing so, construct each Monument with its 4-5 magnetic sections, to confirm which metal frame corresponds to which Monument. See pages 20-21 for depictions of the metal frames and fully constructed Monuments. There is an extra copy of each sticker, in case you make an error.
- 6 Monument Benefit Tokens
- 5 Monument Randomizer Tokens, plus 1 Beacon token for solo play
- 6 Monument Patron Tokens
- 6 Achievement Tokens
- 25 Conduit Tokens
- 15 upgraded Transmuter Tiles
- 5 neutral Bridge Tokens
- 5 Divine Winds Tokens, for the Divine Winds module
- 1 start player marker
- 5 quick-start cards
- 5 player aids
- 16 upgraded Action Tokens
The player count is depicted by a number of lines in the top-right corner of the front side of each component. For example, the Monument Benefit Tokens are included in games with a player count of 2 or more.
Character Components
- 105 Energy Tokens, 21 per character (referred to as energy) — 3 Wild, 6 Magnet, 6 Compass, 6 Rose
- 5 Transmutation Devices (these are metal in the Collector's Edition)
- 5 Character Boards
- 5 Character Miniatures, 1 per character (referred to as your character)
- 5 Channel Markers, 1 per character
- 15 Bridge Tokens, 3 per character
- 25 Action Tokens, 5 per character
- 35 Transmuter Tiles, 7 per character
Setup
Board Setup
-
Shuffle the 5 Monument Randomizer Tokens, and reveal a number equal to the player count. You will use these Monuments in addition to the Beacon Monument in your game. You will always play with a number of Monuments equal to the number of players +1.
- Locate the metal frame for each Monument in use this game (see pages 20-21), insert it into its assigned position below the game board, and place the board in the middle of the table. For ease of setup, start by inserting the frames of the Beacon and the Fortress (if it is in use this game), which are positioned on one of the board's central panels. Then, insert the frames of the remaining Monument(s) by folding up the board's outer panels.
- Locate the stacked sections for each Monument in use this game, and place them in their assigned space on the board. Check that each stack of sections is numbered in order from 1-4 (or 1-5 for the Fortress), with 1 at the top.
- Locate the Monument Patron Token for each Monument in use this game and place it into its Monument's bound energy area.
- Return all remaining Monument sections, Monument Patron Tokens, and all Monument Randomizer Tokens to the box.
-
For a player count of fewer than 5, remove all Monument Benefit Tokens that show a player count greater than your number of players, and return them to the box. You will be left with a number of Monument Benefit Tokens equal to the number of players +1. Randomly deal 1 Monument Benefit Token face-up into the assigned space next to each stack of Monument sections in use this game.
-
Randomly deal 1 of the 6 Achievement Tokens face-up into each of the 2 blank Achievement Token spaces on the board. Return the remaining 4 Achievement Tokens to the box.
-
For a player count of fewer than 4, remove all upgraded Transmuter Tiles that show a player count greater than your number of players, and return them to the box. Shuffle the remaining upgraded Transmuter Tiles by tier I, II, and III, depicted on the back side of each tile. Then, place tier II on top of tier III and tier I on top of tier II to form a single face-down deck. Place the deck in its assigned space on the board. Reveal 4 upgraded Transmuter Tiles face-up to fill the Tile Pool in order, ending with the leftmost space.
Player Setup
-
Randomly deal 1 quick-start card to each player to assign characters. Take your character's matching Transmutation Device, Character Board, character components, and a player aid. Each player may choose which side of their Transmutation Device, Character Board, and Transmuter Tiles to use, which has no effect on gameplay.
Designer's Note: If all players agree, you may choose your characters instead of assigning them randomly. We recommend choosing at the very start of setup, before Achievement Tokens are revealed. We also recommend that you do not play the same character more than twice in a row when choosing.
- If you are playing with metal Transmutation Devices, then assemble the matching tray for each character, and place the Transmutation Device above it, into the aligning grooves. Each tray is comprised of 4 long, thin cardboard pieces.
-
Place your Character Miniature on the starting space of the closest region to your seat at the table that has a Monument in use this game.
-
Place 2 Energy Tokens of each type (8 total) into the energy reserve on the game board. It does not matter which of the 5 energy reserve sections you use.
-
Place your remaining 13 Energy Tokens into the Exhausted Pool of your Character Board.
-
Place your 3 Bridge Tokens on their matching numbered spaces I, II, and III, on your Character Board. It does not matter which side of each Bridge Token is face-up.
-
Place your Channel Marker on its matching space on your Character Board with one side face-up, according to your player count.
- 2 players: charged side face-up
- 3-5 players: exhausted side face-up
-
Place your 5 Action Tokens into their matching numbered spaces 1-5 of your Transmutation Device.
Your transmutation device is the instrument by which you bridge the gap between aethereal and physical. Use it efficiently to deploy your energy and exert your will in the mortal realm. Your transmuter tiles are the cogs in the machine of your transmutation device, each one a vehicle for energy.
Your Transmutation Device (referred to as your Device) determines how you can take actions throughout the game. It works like a conveyor belt that moves from left to right.
The 5 spaces for Transmuter tiles form your channel, and Transmuter tiles in your channel are said to be active. You will always have 2 Transmuter tiles outside of your channel, which are said to be inactive.
-
Place your 5 Transmuter Tiles numbered 1-5 into their matching numbered spaces 1-5 of your Transmutation Device. They form your channel of active tiles. Transmuter Tiles must always be right side up, with their gold strip at the top.
-
Place your 2 Transmuter Tiles numbered 0 to the left of your Transmutation Device. They begin the game inactive.
-
Place Energy Tokens from your Exhausted Pool, matching the types and positions depicted on your quick-start card. Place 1 Energy Token into the Tile Pool. According to your player count, place Energy Tokens into the Transmuter Tiles in your Transmutation Device.
- 2 players: Place 8 Energy Tokens into the tiles in positions 1, 2, 3, and 4.
- 3-5 players: Place 6 Energy Tokens into the tiles in positions 1, 2, and 3.
-
According to your player count, randomly deal the neutral Bridge Tokens depicted below face-up onto the broken path spaces connecting each player's starting region to the central region. Then, randomly deal any remaining neutral Bridge Tokens face-up onto the remaining broken path spaces connected to the central region (see page 7).
- 2 players, 3 players, 4 players, and 5 players each use an increasing number of neutral Bridge Tokens, as depicted in the setup diagram.
-
Determine the start player randomly, and give them the start player marker.
How to Teach
The first time we teach An Age Contrived to anyone, we encourage them to consider it a learning game. As a game with interconnected systems that encourage players to plan ahead, it can be difficult for players to internalize every rule before they start playing. If you are the type of group that wants to start playing as soon as possible and are happy to learn the game's systems as you go, then this section is intended for you. It presents the minimum amount of information that you need to know in order to start playing. We recommend teaching your group in the order presented here, then having the first player take their turn.
Conversely, if you are the type of group that wants to know every rule before you start playing, we still recommend teaching the rules in the order presented here, but it is your choice how to teach the remaining rules. You may alternatively choose to skip this section entirely.
For your first game, we recommend playing with the Divine Winds module, which makes the game a little more forgiving. During setup, give each player one Divine Winds Token. It will be explained later.
Monument Overview
Begin by reading the GOAL section on page 3. One of your main efforts in this game will be constructing Monuments. Each Monument begins the game flat, with only its topmost section accessible. Each of these sections has 3 spaces that can be filled with the Energy Tokens of any combination of players. Once the last space is filled, that section of the Monument will be constructed. Only the player who fills the last space will bind an energy to the Monument for VP, but all players who contribute will gain a benefit. It's good to contribute to a Monument section and even better to finish one.
At the end of the game, you will score VP according to the number of energy you have bound to each Monument. For example, in a game that has 3 Monuments in play, you could score up to 36 VP from Monuments.
For each Monument:
| Number of energy | VP |
|---|---|
| 1 | 3 |
| 2 | 7 |
| 3+ | 12 |
Turn Overview
Everything you do in the game is driven by your Transmutation Device, which works like a conveyor belt that moves from left to right. There are two types of turns, and you can choose either one or the other. The first type of turn is to ADVANCE, where you move your channel of tiles forward and load some of them with energy. The second type of turn is to take ACTIONS. You can take as many actions as you wish, but you can only use the energy in the bottom row of your Device to do so. All of the available actions are depicted on the Action Tokens in the bottom row of your Device, and to take any particular action, you must exhaust an energy from immediately above it.
ADVANCE Overview
Move your conveyor belt of tiles one or two positions to the right, then fill only the tile(s) that entered your Device with energy from your Exhausted Pool. Read pages 13-14 (including the example), but ignore step 3. It is only relevant later in the game.
ACTIONS Overview
Exhaust energy from the bottom row of your Device to take actions, one at a time, until you decide to stop or run out of bottom-row energy. Read pages 14-15, but ignore the example for now. Then, read the list of actions on pages 16-17 in the order listed below, referring to the Action Tokens in each player's Device as you go.
-
Action Token 3: Deploy (from position 2 or 3)
-
Action Token 1: Deploy (from position 4 or 5)
-
Action Token 1: Recharge
-
Action Token 4: Move your character
Designer's Note: In the early game, the only reason to move your character on the map is to land on Bridge Tokens, which provide engine-building benefits.
-
Action Token 2: Claim
-
Action Token 2: Reposition
You can skip the remaining actions on Action Token 4, which relate to longer-term scoring. You are now ready to start playing. Remember to refer to your player aid and to consider the suggestions on your quick-start card.
Learn As You Go
The first time that...
- a Monument section is completed, read pages 18-19.
- you place a Bridge Token, read its section on page 20.
- your character lands on a Bridge Token, read its section on page 24.
- you gain an upgraded Action Token, read its section on page 20.
- you gain a Conduit Token, read its sections on pages 21 and 27.
After each player has taken 5-6 turns, read these additional rules:
- Achievements on pages 22-23 as a way to score VP.
- Monument & Pillar Tracks on pages 25-26 as a way to score VP.
- Divine Winds Tokens on page 35 as a way to load more energy into your tiles.
- Any unlocked character abilities on pages 28-31 and on your player aid.
Energy Tokens
Energy represents your god's ability to exert influence in the world. Its natural state is at rest in the aethereal realm, represented by the exhausted pool of your character board. Energy must be transmuted through your transmutation device to be applied towards your various purposes. Binding your energy solidifies your legacy but reduces your ability to exert further influence.
Energy Tokens (referred to as energy) are the game's main resource. You will use them to, among other things, take actions, complete Monuments, and earn VP. You begin the game with 13 energy available and 8 in reserve on the board, which you may gain throughout the game. Your success will largely be determined by how well you can manage your energy.
There are 4 different types of energy, each with a different ability (see page 19). The types are largely relevant when placing energy into Monument sections.
At certain times throughout the game, you will be allowed to gain energy from the reserve (see page 20), making it available for you to use.
At certain times throughout the game, you will be required to exhaust energy by placing it into the Exhausted Pool of your Character Board. This happens most often when taking actions.
Binding Energy
At certain times throughout the game, you will be allowed (or required) to bind your energy into spaces on the board, where they will earn you VP. The methods for binding energy are described in detail in other sections of this rulebook.
You must bind an energy to a Monument when you complete a section of that Monument (see page 18), and you may do so when you reach the end of the Monument Track (see page 25). Each Monument may hold an unlimited number of bound energy.
You may bind an energy to a Pillar of Civilization when you reach the end of the Pillar Track (see page 26). Spaces in each Pillar of Civilization are limited.
You may bind an energy to an Achievement when you have met its requirements (see page 22). Spaces in each Achievement are limited.
Running Out of Energy
There may be times during the game when you would get to take energy from your Exhausted Pool but have none available. At such times, you may take energy from anywhere else that you have it, unless it is bound to an Achievement, still in the reserve, or part of a completed Monument section. Below are all the locations from which you may take energy after running out:
- Any slot in your Device
- Your Monument Track
- Your Pillar Track
- The Tile Pool
- Any incomplete Monument sections
- Any Monument's bound energy area
- Any Pillar of Civilization
Gameplay
On your turn, you must either ADVANCE your channel or take one or more ACTIONS. At the end of your turn, resolve any completed Monument sections (see page 18).
After you have completed your turn and resolved any resulting effects, play proceeds clockwise. It is your responsibility to notify the next player when it is their turn.
Advance Turn
When you use your turn to advance your channel, you prepare your Transmutation Device with energy to take more and better actions on a future turn.
Perform these steps in order:
-
Select one of your two inactive Transmuter Tiles, and slide it into position 1 of your Device, pushing the five active Transmuter Tiles in your channel each one position to the right. If any energy are present in the Transmuter Tile that exits your Device from position 5, they are immediately exhausted.
-
If your Channel Marker is charged (with its charged side facing up), you may exhaust it to repeat step 1, using your other inactive Transmuter Tile. Exhaust your Channel Marker by flipping it over.
- You may not select the Transmuter Tile that just exited your Device from position 5.
-
Gain any benefits from Conduit Tokens (see page 27).
-
Load the Transmuter Tile(s) that entered your Device this turn with energy from your Exhausted Pool.
- You may choose freely which energy are placed into which tile slots.
- You do not need to fill all available tile slots.
- If you do not have sufficient exhausted energy to fill all available tile slots, you may fill any remaining tile slots by taking your energy as described on page 12: Running Out of Energy.
-
Place the Transmuter Tile(s) that exited your Device from position 5 to the left of your Device, outside of your channel and inactive.
- As you decide how to load energy in step 4, the next player may start to take their turn. This helps to keep the game moving at a steady pace. However, you must not use the next player's turn to inform your own decisions.
Example: You perform an ADVANCE turn at the start of the game. Your Channel Marker is exhausted, so you cannot perform step 2. You have no Conduit Tokens, so step 3 does not yet apply either.
Actions Turn
When you use your turn to take actions, you use the energy loaded in your Transmutation Device to pursue your goals.
Perform these steps in order:
-
From the bottom row of one of your five active Transmuter Tiles, select and exhaust one energy.
-
Activate the Action Token immediately below the selected energy to take its depicted action(s). The list of available actions is on pages 16-17.
- If the actions are separated by a vertical bar "│", you must choose one action from those depicted.
- If the actions are separated by a plus symbol "+", you may take all of the depicted actions, in the order of your choice.
-
Repeat steps 1 and 2 as many times as you wish. Fully resolve each action and any resulting effects before you return to step 1.
You may take many actions on your turn, limited only by the number of bottom-row energy in your active Transmuter Tiles.
You may remove two energy from the same Transmuter Tile to activate the same Action Token twice in one turn – once for each energy that is removed.
A bottom-row energy in position 5 is considered wild – it may be used to activate any Action Token in your Device.
You must take at least one action on an ACTIONS turn.
Example: You perform an ACTIONS turn. First, you exhaust one energy from the bottom row of your Transmuter Tile in position 1 and choose to take the Deploy action from the Action Token in position 1. You select the one Transmuter Tile in position 4 and place the one energy from its top row into a Monument section.
Next, you exhaust one energy from position 4 and choose to take the Move action from the Action Token in position 4 to move one space up the Pillar Track.
Next, you exhaust one energy from position 3 to take the Deploy action (the only option) from the upgraded Action Token in position 3. You select the two Transmuter Tiles in positions 2 and 3 and place all three energy from their top rows, which you divide between Monument sections and the Tile Pool.
Finally, you exhaust your second and last energy from position 1 and choose this time to take the Recharge action from the Action Token in position 1 to flip your Channel Marker over from its exhausted side to its charged side.
You could take an action with your energy in position 2, but you choose not to.
Actions List
DEPLOY
This action transmutes your energy, allowing you to apply it towards the purposes of your choosing on the board.
According to the depicted action, select 1x or 2x Transmuter Tiles in your Device from the available positions highlighted in red. Place all energy from the top row of the selected Transmuter Tile(s) into the Tile Pool (see page 17), available spaces in Monument sections (see page 18), or Achievements for which you qualify (see page 22).
-
If you Deploy multiple energy, you may divide them freely between any of the eligible spaces listed above.
-
You may not place energy into a Monument's bound energy area or into a Pillar of Civilization with this action.
- If you are playing with metal Transmutation Devices, then you may perform the Deploy action by pulling the slider in the selected position, then releasing it to eject the energy out the front of your Device. There is a learning curve to do this smoothly, both on the pull and the release. You should get the hang of it by the end of your first game.
RECHARGE
You can ADVANCE faster on a future turn after restoring your connection between aethereal and physical.
Flip your Channel Marker over from its exhausted side to its charged side. If your Channel Marker is already charged, it remains charged.
MOVE
You can move on the map or on one of the two tracks on your Character Board, thereby gaining benefits or VP.
Move either your character (see page 24), on the Monument Track (see page 25), or on the Pillar Track (see page 26) by up to 1x, 2x, or 3x spaces, according to the depicted action.
REPOSITION
This action lets you reposition your previously deployed energy to take advantage of openings at the opportune time.
According to the depicted action, place up to 2x or 4x of your energy from the Tile Pool and any spaces in incomplete Monument sections into the Tile Pool (see page 17), available spaces in Monument sections (see page 18), and Achievements for which you qualify (see page 22).
- You may not Reposition energy from a Monument section that has been completed. It will be constructed automatically at the end of the current player's turn.
- You may not place energy from or into a Monument's bound energy area or a Pillar of Civilization with this action.
CLAIM
You can claim new Transmuter Tiles from the Tile Pool to improve the efficiency of your Device, develop your ability to move, and fulfill Achievement requirements.
Perform these steps in order:
-
From the Tile Pool, select up to 2 face-up Transmuter Tiles that you wish to claim. Then, select the energy that you will use to claim them, which must already be in the Tile Pool. The number of energy (N) must equal the cost depicted above the selected Transmuter Tile(s). Exhaust the selected energy.
- If you have upgraded this action, then the cost is 1 energy per Transmuter Tile instead of N.
-
Place the claimed Transmuter Tile(s) into your Device, each replacing any 1 of your 7 existing tiles. Return each replaced tile to the box and exhaust any energy in it. You do not load the claimed tile(s) with energy.
-
Slide each remaining Transmuter Tile in the Tile Pool to the right if there is space available, then reveal tiles from the deck face-up to fill any empty spaces, starting with the rightmost space.
-
Proceeding clockwise, each opponent who has at least 1 energy present in the Tile Pool may place 1 energy from their Exhausted Pool into the Tile Pool.
- If a player does not have an exhausted energy, they may instead place an energy from a location as described on page 12: Running Out of Energy.
Example: You take the Claim action as the Ignotas (orange) player. You select the highlighted Transmuter Tile and exhaust 2 energy to claim it. After performing steps 2 and 3, the Freyith and Aureon players each place 1 energy from their Exhausted Pool into the Tile Pool.
Tile Pool
This pool traverses the physical and aethereal realms of Eldranir, among many others. You can draw from it to strengthen your connection to the mortal realm in the form of more potent transmuter tiles, while leveraging your energy as your rivals do the same.
When you place an energy into the Tile Pool, place it into the area below the symbol. Each player may have any number of energy of any type(s) in the Tile Pool.
At the end of the game, you will score 1 VP for each of your energy remaining in the Tile Pool.
Monuments
As the mortal clans of Eldranir coalesce, the gods conspire to influence mortals to construct enduring monuments to the pantheon. You can employ your energy to inspire your followers and provide otherworldly materials, resulting in wondrous constructs that will draw worshippers for a thousand generations and tower over mortal structures. You will benefit from any contribution to a monument, but only by completing a section will you bind your energy to it and solidify your legacy.
Each Monument is divided into 4 or 5 sections that are constructed one at a time until the Monument is fully constructed. The sections are numbered in the order in which they are completed, with section 1 at the top of each Monument's stack.
When you place an energy into a Monument section, you must place it into any empty space of the matching type.
Monument Section Completion
When you place an energy into the last empty space of a Monument section, that section is completed and will be constructed automatically at the end of the current player's turn. Turn one of your energy in the Monument section on its edge to indicate that you are the completing player. Each opponent with at least one energy present in the Monument section is a contributing player. At the end of the current player's turn, perform these steps in order:
-
Starting with the first contributing player in clockwise order from the completing player, each contributing player and lastly the completing player performs these 2 steps in any order:
-
Gain either the energy depicted on the Monument section (see page 20) or the benefit depicted on the adjacent Monument Benefit Token (see pages 20-21).
- Each player gains their selected benefit only once, regardless of how many energy they have in a Monument section when it is completed.
- The first section of each Monument grants two energy instead of one. If you choose to gain the energy, gain both energy depicted.
-
Exhaust or optionally activate (see page 19) each of your energy in the Monument section, except for one that the completing player must select to bind to the Monument. The completing player may select any one of their energy in the Monument section to bind — it does not need to be the energy that completed the section.
-
-
Completing player: Construct the Monument section by placing it into its frame on the board, matching the section number listed beside the frame. Bind your selected energy by placing it into the Monument's bound energy area.
-
If there are one or more additional Monument sections completed, note which player will be next in turn order once all section completions are resolved, then return to step 1 (Note: the completing player and contributing player(s) may be different for each Monument section completed). Otherwise notify the next player that it is their turn.
If multiple Monument sections are completed on a player's turn, that player decides in which order they are resolved. It can happen that one Monument section completion triggers another Monument section completion, in which case the player whose turn it is still decides the order in which to resolve all remaining Monument section completions.
Example: On your turn as the Multanec (teal) player, you place two energy into the exposed section of the Forge Monument, filling its last empty space. You turn one of your energy on its edge to indicate that you are the completing player for when the section will be constructed at the end of your turn.
When the section is constructed at the end of your turn, first the Freyith (purple) player chooses to gain a Magnet energy and a Rose energy from the reserve (depicted on the Monument section) and then they activate their Rose energy. Next, you choose to gain a Conduit Token (depicted on the Monument Benefit Token). You activate your Compass energy and select your Rose energy to bind to the Monument as you construct the Monument section.
Monument Patron Tokens
When you bind your 2nd energy to any single Monument in use this game, take the Monument Patron Token in that Monument's bound energy area and place it in front of you (if available and if you don't already have a Monument Patron Token). Each player may have only one Monument Patron Token.
At the end of a turn on which you ADVANCE, if you possess a Monument Patron Token, you may construct the topmost available section of any Monument. Starting with the first opponent in clockwise order from you, each player with at least one energy present in the Monument section performs these 2 steps in any order:
- Gain either the energy depicted on the Monument section or the benefit depicted on the adjacent Monument Benefit Token.
- Exhaust or optionally activate each of your energy in the Monument section.
Then, place the Monument section into its frame on the board, matching the section number listed beside the frame.
Energy Types
There are 4 different types of energy, each with a different ability.
- Compass: When this energy is activated, place it into the Tile Pool (see page 17), an available space in a Monument section (see page 18), or an Achievement for which you qualify (see page 22).
- Magnet: When this energy is activated, load it into any empty slot in one of your five active Transmuter Tiles.
- Rose: When this energy is activated, exhaust it and move either your character (see page 24), on the Monument Track (see page 25), or on the Pillar Track (see page 26) by up to 2 spaces.
- Wild: Each character has a unique icon for their Wild energy. When this energy is placed into a Monument section, it may be placed into any empty space, regardless of type. This energy has no inherent activation ability. When you place your tier-I Bridge Token (see page 20), a unique ability will be unlocked for this energy.
Monuments of Eldranir
THE ANFIRIEN BEACON — Visible from the four corners of Eldranir, its light serves as a reminder of the unity of mortals and gods.
THE NAMARILLION FORGE — A monument to creation, the fountain at its heart defies traditional logic as it supplies endless fuel for mortal construction.
THE FORTRESS OF KOLYM THRIN — A monument to protection at the edge of Eldranir's habitable land, it keeps the barren wastes at bay.
THE ERIDONIC GATE — With a seething portal of aethereal energy, it is an active reminder of the presence of the gods.
THE LIBRARY OF VALDUIN — Resplendent beyond mortal ability, it represents present and future advancements since mortals' age of darkness.
THE SHIP OF TOLINTHRA — Featuring two golden eyes and phoenixes in flight, it represents the gods' leadership of mortals into a new age of wonder.
Benefits
The benefits below appear on the various Monument sections, Monument Benefit Tokens, and Bridge Tokens.
GAIN AN ENERGY
Take and exhaust an energy of the type depicted (= any type) from the energy reserve on the game board.
When you gain the second energy of a single type, immediately Recharge your Channel Marker (see page 16).
- The first section of each Monument grants two energy instead of one. If you choose to gain the energy, gain both energy depicted.
PLACE A BRIDGE TOKEN
Take the lowest-tier Bridge Token (I, II, or III) from your Character Board and place it, with either side facing up, onto any broken path space on the game board that is empty, filled with a neutral Bridge Token, or filled with one of your existing Bridge Tokens.
- The side that you choose to place face-up depicts a benefit that any player will gain when their character lands on this Bridge Token (see page 24).
- You immediately gain the ability on your Character Board that was under the Bridge Token (see pages 28-31).
- If you select a space with a neutral Bridge Token, return the neutral Bridge Token to the box.
- If you select a space with one of your existing Bridge Tokens, return the existing Bridge Token to its matching numbered space on your Character Board. You immediately lose the corresponding ability that it covers.
- You may select a space on the board even if it has one or more characters on its Bridge Token. Any such characters do not gain the benefit depicted on the newly placed Bridge Token.
- If there are no empty broken path spaces left, you may return a newly gained Bridge Token to the box instead of placing it on the board.
GAIN AN UPGRADED ACTION TOKEN
Take an upgraded Action Token from the supply and place it into the matching numbered space 1-4 at the bottom of your Device, replacing the existing Action Token in that position. Return the replaced Action Token to the box.
-
If you have already gained an upgraded Action Token for a given position, you may not do so again for that same position.
- It can happen that you gain an upgraded Action Token and use it for an action on the same turn.
GAIN A CONDUIT TOKEN
Take a Conduit Token from the supply and place it into any empty Conduit Token space at the top of your Device.
- If you are the first player to gain a Conduit Token of a certain type, take the Conduit Token with 2 icons on it at the top of that stack.
- If you have no empty Conduit Token spaces, you may not gain a Conduit Token.
- If you gain this benefit on an ADVANCE turn, the new Conduit Token will not generate movement (see page 27).
- Once you place a Conduit Token into your Device, it may not be moved from that space.
GAIN A TRANSMUTER TILE
From the Tile Pool, claim the Transmuter Tile in the rightmost position, as if you were taking a Claim action (see page 17). Do not exhaust any energy from the Tile Pool. Perform steps 2-4 of the Claim action as normal.
- If you gain this benefit on an ADVANCE turn, the new Transmuter Tile will not generate movement from Conduit Tokens (see page 27), will negate any such movement yet to be generated by the tile it replaces, and will not be loaded with energy.
REPLENISH A TRANSMUTER TILE
At the end of the current turn, after all Monument section completions are resolved, load any one of your five active Transmuter Tiles with energy from your Exhausted Pool.
-
You may choose freely which energy are placed into which tile slots.
-
You do not need to fill all available tile slots.
-
If you do not have sufficient exhausted energy to fill all available tile slots, you may fill any remaining tile slots by taking your energy as described on page 12: Running Out of Energy.
- If multiple players gain this benefit on the same turn, then resolve them in clockwise order, ending with the player whose turn it is.
MOVE YOUR CHARACTER
Move your character forward on the map up to 2x or 4x spaces (see page 24), according to the depicted benefit.
MOVE UP A TRACK
Move up to 2x or 3x spaces on either the Monument Track or the Pillar Track (see pages 25-26), according to the depicted benefit.
CHOOSE ANY MONUMENT BENEFIT TOKEN
Gain the benefit depicted on any Monument Benefit Token on the board.
Achievements
Generate belief among mortals by accomplishing lasting achievements that leverage all of your contributions to their civilization.
Each of the five Achievements has a requirement depicted at the top and two scoring spaces depicted below.
If you qualify for an Achievement by meeting its requirements, then you may place an energy into an empty space in that Achievement when you Deploy (see page 16), Reposition (see page 16), or activate a Compass energy (see page 19). The energy is bound to the Achievement and remains there for the rest of the game.
-
Each player may bind only one energy to each Achievement.
-
Each player may bind only one energy of each type to the five Achievements. Since there are only four types of energy, each player can bind an energy to only four of the five Achievements.
-
The 5-VP scoring space on the right side of each Achievement is only available with a player count of 3 or more.
- Once you qualify for an Achievement, you do not automatically bind an energy to it. You must do so actively, often by taking a Deploy or Reposition action.
You only need to qualify for an Achievement at the time you place an energy into it. Your energy remains bound to that Achievement even if you subsequently cease to qualify for it.
Requirements
Printed on the board (used in every game):
- Have at least 2 Monument icons on your 7 Transmuter Tiles.
- Have at least 2 Pillar icons on your 7 Transmuter Tiles.
- Have at least 4 Boot icons on your 7 Transmuter Tiles.
For all 3 of the requirements listed above, icons on Conduit Tokens do not count.
Achievement Tokens (randomized each game):
- Have at least 1 bound energy of 3 different types (anywhere on the board).
- Have at least 1 bound energy in 3 different Monuments.
- Have at least 3 bound energy in 1 region.
- Have at least 1 energy of each type from the energy reserve.
- Have at least 3 Conduit Tokens.
- Have at least 3 upgraded Action Tokens.
Scoring Parameters
- For each Achievement space of this type, score 2 VP for each of your bound energy (anywhere on the board) of the type matching your bound energy in this space. Count the bound energy in this space. See page 23 for an example.
- For each Achievement space of this type, score 5 VP for your bound energy in this space.
Example: As the Freyith (purple) player, you score 8 VP for this Achievement: 2 VP for each of the 4 Magnet energy that you have bound on the board.
Character Movement & Bridge Tokens
Your god forms an avatar to exist among mortals – a physical manifestation of their aethereal self. Unlock your unique abilities by linking the divided regions of Eldranir, then journey between regions to unite their clans.
Character Movement
Move your character forward on the map up to the number of spaces specified (usually by Action Tokens, Monument Benefit Tokens, or Conduit Tokens).
Your character may only move in the direction they are facing at the beginning of their movement and may choose in which direction to move when they encounter a forking path.
- If your character begins its movement on one of the five non-Bridge spaces in the central region, they may choose in which direction to move, so long as it isn't the direction they last came from.
Your character must end their movement facing in the direction they have just moved.
Your character may not move onto a broken path space that has not been connected with a Bridge Token. Each Bridge Token counts as a space.
If your character would move forward but can't (either because they encounter a broken path space or are on a starting space), they instead turn around and move back in the direction they came from. This is the only way to reverse your character's facing. Turning around is free – it does not count as one of the spaces in your movement.
Your character may share a space with one or more other player's characters.
When your character would move onto a space occupied by another player's character, your character may skip over that space instead, extending their movement by 1 space.
Example: You move Rusnė (green) 3 spaces. First, you move her 1 space forward, choosing which direction to take in the forking path. Then, choosing to skip over Freyith (purple), you turn Rusnė around when she encounters a broken path space and move her 1 space. Finally, you move her 1 additional space, choosing to skip over Multanec (teal) and land on a Bridge Token.
Bridge Tokens
When your character moves onto (or skips over) a Bridge Token space, you may immediately gain the benefit depicted on the Bridge Token (see pages 20-21), regardless of whose it is. You may resume your character's movement after you have gained this benefit and resolved any resulting effects. Tier-III Bridge Tokens depict no such benefits themselves but allow you to gain the benefit depicted face-up on any other Bridge Token on the game board.
Monument & Pillar Tracks
Wield your power to bolster your position among worshippers at monuments and to introduce the pillars of civilization to the mortal clans. Both will solidify your legacy among mortals.
Move energy on either the Monument Track or the Pillar Track up to the number of spaces specified (usually by Action Tokens, Bridge Tokens, or Conduit Tokens). Perform these 2 steps in any order and as many times as you wish:
-
If the corresponding track on your Character Board is empty, then you may spend 1 movement to place an energy upright from your Exhausted Pool into the lowest slot of that track.
- If you do not have an exhausted energy, you may instead place an energy from a location as described on page 12: Running Out of Energy.
-
If the corresponding track on your Character Board already contains an energy, then you may spend 1 movement to move that energy 1 slot up the track.
You may not have more than one energy at a time on the same track.
Binding Energy
At any time when you are moving your character or moving up a track, you may bind an energy from the highest slot of either track as described below. This may interrupt your movement and does not spend any movement.
Designer's Note: You are not required to bind an energy when it reaches the highest slot of a track, and there may be good reason for you to keep it there and bind it later. However, you will need to bind it before you can start a new energy on that track.
When you bind an energy from the Monument Track, place it into a Monument's bound energy area in any region in which your character or at least one of your Bridge Tokens is present.
Example: You move 2 spaces up the Monument Track. You already have an energy in the track's third slot, so you first spend 1 movement to move that energy 1 slot up the track, into the highest slot. You choose to immediately bind the energy into the Forge Monument, as you have a Bridge Token present in its region. Then, you spend 1 movement to place a new energy into the Monument Track from your Exhausted Pool.
When you bind an energy from the Pillar Track, place it into an empty space in a Pillar of Civilization in any region in which your character or at least one of your Bridge Tokens is present.
- Each player may bind only one energy to each Pillar of Civilization.
- The energy space on the right side of each Pillar of Civilization is only available with a player count of 4 or more.
Your Bridge Token is considered present in the 2 regions that it connects. When your character is on a Bridge Token space, it is also considered present in both regions.
Example: You move 2 spaces up the Pillar Track. You already have an energy in the track's second slot, so you spend 2 movement to move that energy 2 slots up the track, into the highest slot. You choose not to bind the energy yet. On a subsequent turn, you choose to bind the energy into the mathematics Pillar of Civilization, while your character is moving into its region.
Pillars of Civilization
- ECONOMICS
- ENGINEERING
- INSTITUTIONS
- LITERATURE
- MATHEMATICS
- PHILOSOPHY
Conduit Tokens
Upgrade your Transmutation Device to harness its potential, channeling power into the mortal realm.
During step 3 of a turn on which you ADVANCE, count any matching icons that align vertically on Conduit Tokens and Transmuter Tiles in your Device.
- For any Boot icons that align, move your character forward on the map by up to the number of icons counted (see page 24).
- For any Monument or Pillar icons that align, move up the corresponding track by up to the number of icons counted (see pages 25-26).
If your Conduit Tokens generate more than one type of movement on an ADVANCE turn, then generate each type of movement in the order of your choice.
Conduit Tokens do not generate the movement described above on an ACTIONS turn.
Once you place a Conduit Token into your Device, it may not be moved from that space.
Example: You perform an ADVANCE turn. You slide 1 Transmuter Tile into your Device, then exhaust your Channel Marker to slide a second Transmuter Tile into your Device.
You count 3 Boot icons and 4 Pillar icons that align vertically on your Conduit Tokens and Transmuter Tiles. You choose to first move 4 spaces up the Pillar Track, then move your character 3 spaces forward on the map.
You do not generate any movement up the Monument Track, because the Transmuter Tile with a Monument icon passed by the matching Conduit Token, but did not align vertically at step 3 of the ADVANCE turn.
Character Abilities
Each character has 3 unique abilities depicted on the left side of their Character Board, which begin the game covered by Bridge Tokens and inactive. As soon as a Bridge Token is removed from your Character Board (see page 20), you gain the ability that was under the Bridge Token. Character abilities are always unlocked from bottom (tier-I) to top (tier-III).
Each character also has 2 unique scoring criteria on their tier-III Bridge Token (1 on each side). Each game, only the scoring criteria that you choose to place face-up on the game board will apply. The scoring criteria on your tier-III Bridge Token apply only to you.
Designer's Note: You do not need to learn the character abilities in order to start playing, as they begin the game inactive and are only unlocked gradually. If you want a simpler experience, you may choose to play without character abilities and tier-III Bridge Token scoring entirely, in which case you can ignore the rules on pages 28-31. The game functions without these abilities, though they are intended for the full gameplay experience.
When there is a discrepancy between the global rules and a character ability, the character ability takes precedence.
The tier-III ability of every character is triggered when they enter a region in which they did not start the current turn, and resolved at the end of that turn. Your character is considered to enter a region when they move into a non-Bridge space in that region. Resolve any triggered tier-III abilities after all Monument section completions and Transmuter Tile replenishments have been resolved, and in clockwise order, ending with the player whose turn it is.
- Even if your character enters multiple regions in the same turn, your tier-III ability only triggers once on that turn. However, it is possible to enter a region on another player's turn and on your own turn, both of which will trigger the ability.
- While moving your character, it can happen that you move onto (or skip over) a Bridge Token that allows you to place your tier-III Bridge Token, thereby unlocking your tier-III ability. If your character continues moving at least 1 additional space and thereby enters a region, their tier-III ability will be triggered on that same turn that it was unlocked.
Aureon, The Traveler
Inquisitive and intent, they roam the realms collecting folklore from mortals and gods alike, enshrining each one in a collection of woven knots.
Abilities
i. When 1 of your Wild energy is activated, exhaust it and move your character by up to 2 spaces.
ii. When you move your character, you may move 1 additional space. Limit of once per turn.
- If you gain this ability while moving your character, then you may use it immediately.
iii. At the end of a turn on which your character has entered a region, you may replenish a Transmuter Tile (see page 21).
Tier-III Bridge Scoring
- Score 4 VP for each of your bound energy in a Pillar of Civilization in the 2 adjacent regions (max 8 VP).
- If you have at least 2 bound energy in each adjacent region, then score 10 VP.
Ignotas, The Keeper
Charged with governing the edicts and energy of the pantheon, he stoically maintains stability while otherwise leaving his fellow gods to their business.
Abilities
i. When you load 1 of your Wild energy into position 2 in your Device, you may recharge your Channel Marker.
ii. During step 4 of a turn on which you ADVANCE, you may load energy into the Transmuter Tile that started your turn in position 1.
iii. At the end of a turn on which your character has entered a region, you may rearrange all energy that are in your Device.
Tier-III Bridge Scoring
- Score 2 VP for each of your bound energy of a different type in the 2 adjacent regions (max 8 VP).
- If you have bound energy of at least 3 different types in a single Monument of either adjacent region, then score 10 VP.
Multanec, The Crafter
Obsessively inventive, he builds and perfects the instruments of technological advancement, making new achievements possible for gods and mortals alike.
Abilities
i. Each time you deploy 1 of your Wild energy into a Monument section, you may place 1 energy from your Exhausted Pool into the same Monument section.
- If you do not have an exhausted energy, you may instead place an energy from a location as described on page 12: Running Out of Energy.
ii. Each time you bind an energy, you may either move your character by 1 space or recharge your Channel Marker.
iii. At the end of a turn on which your character has entered a region, you may place 1 energy from your Exhausted Pool into the Tile Pool or an Achievement for which you qualify.
- If you do not have an exhausted energy, you may instead place an energy from a location as described on page 12: Running Out of Energy.
Tier-III Bridge Scoring
- Score 3 VP for every 2 of your bound energy in Monuments in the 2 adjacent regions.
- If you have at least 2 bound Wild energy in the 2 adjacent regions, then score 10 VP.
Rusnė, The Bulwark
Vigilant and decisive, she investigates reports of concern to the pantheon, then decides how best to confront or contain them.
Abilities
i. Each time you use a Wild energy to take an action, it is considered a wild action (as if it were in position 5).
ii. Each time you gain an energy, set it aside. At the end of each turn, at the same time as Transmuter Tile replenishments, you may load one of the gained energy into any empty slot in one of your five active Transmuter Tiles. Exhaust any remaining energy.
iii. At the end of a turn on which your character has entered a region, you may rearrange the Conduit Tokens in your Device.
Tier-III Bridge Scoring
- Score 3 VP for each of your bound Wild energy in the 2 adjacent regions (max 9 VP).
- If you have at least 4 bound energy in a single region of either adjacent region, then score 10 VP.
Freyith, The Orchestrator
She maintains the importance of the pantheon in the mortal realm, weaving new developments to inevitably reinforce mortals' sense of dependence.
Abilities
i. When 1 of your Wild energy is activated, activate it as the type of energy of its current space (Compass, Magnet, or Rose). If activated as a Compass, it is still considered wild when placed into a Monument section.
ii. At each instance that you may move your character, you may instead teleport your character to any non-Bridge map space and choose your facing.
- Each energy that you use to take an action to move your character counts as 1 instance.
- Each Rose energy that you use to move your character counts as 1 instance.
- All movement that is generated by the Monument Benefit Token and the Bridge Token counts as 1 instance.
- All movement that is generated by Conduit Tokens on an ADVANCE turn counts as 1 instance.
iii. At the end of a turn on which your character has entered a region, you may move 1 of your bound energy from any region to your current region. It remains bound.
You may move energy from a Monument's bound energy area to a Pillar of Civilization and vice versa.
Tier-III Bridge Scoring
- Score 2 VP for each of your bound energy of a single type in the 2 adjacent regions (max 12 VP).
- If you have at least 5 bound energy in the 2 adjacent regions, then score 11 VP.
Game End & Final Scoring
The game ends when the last Monument is fully constructed, by having its final section constructed at the end of a player's turn. Finish the current player's turn, including all resulting effects from the section completion. If necessary, subsequent players take one final turn until all players have had an equal number of turns. Once the last player's turn is finished, perform final scoring. A summary of final scoring can be found along the left and top edges of the game board.
1) Fully Gained Energy
For types of energy that you have fully gained (i.e. both energy are gone from the energy reserve), score VP as follows:
| Number of types | VP |
|---|---|
| 1 | 3 |
| 2 | 6 |
| 3 | 10 |
| 4 | 15 |
2) Monuments
For each Monument in use this game, score VP according to the number of energy that you have bound to it:
| Number of energy | VP |
|---|---|
| 1 | 3 |
| 2 | 7 |
| 3+ | 12 |
3) Pillars of Civilization
For energy that you have bound to Pillars of Civilization, score VP as follows:
| Number of energy | VP |
|---|---|
| 1 | 4 |
| 2 | 9 |
| 3 | 15 |
| 4 | 22 |
| 5 | 30 |
| 6 | 39 |
4) Tier-III Bridge Tokens
If you have your tier-III Bridge Token on the game board, you score VP according to its face-up criteria. See pages 28-31 for the description of each character's scoring criteria. The scoring criteria on your tier-III Bridge Token apply only to you.
Your Bridge Token is considered adjacent to the 2 regions that it connects.
5) Achievements
- For each Achievement space of this type, score 2 VP for each of your bound energy (anywhere on the board) of the type matching your bound energy in this space. Count the bound energy in this space. See page 23 for an example.
- For each Achievement space of this type, score 5 VP for your bound energy in this space.
6) Tile Pool
For each energy that you have present in the Tile Pool, score 1 VP.
Winning the Game
The player with the most VP wins the game. If there is a tie, the player with the highest number of bound energy wins (in Monuments, Pillars of Civilization, and Achievements). If there is still a tie, the player with the most energy in the Tile Pool wins. If there is still a tie, the tied players share the victory and jointly lead the pantheon into the new age.
When disassembling the Monuments to repack the game, create ordered stacks from 1-4 or 1-5 to make setup faster for your next game.
Spirit of the Game
An Age Contrived is a game about competing to become the most powerful god, but also about collaborating to ensure the stability of the pantheon as a whole for the age to come. Interactions between players are intended to be positive rather than cutthroat. The designers offer the following table-etiquette guidance, based on how they like to play:
- Encourage Good Flow. On a turn when you ADVANCE, the next player can generally start their turn while you decide which energy to load into your Transmuter Tiles, to keep the game moving at a steady pace. However, you are encouraged to study the board and other players' Devices, but not the next player's Device if they are starting an ACTIONS turn, and the next player is encouraged not to place any energy they Deploy or Reposition until the previous player has finished. There is a balance to be struck between flow and competition, and it is up to the players involved whether the next player can go without influencing the current player's decisions or if it's best to wait.
- Redoing Actions. Since you can take as many actions as you can afford on an ACTIONS turn (and must fully resolve any effects before moving to the next action), you may realize partway through your turn that you want to redo your actions. The designers generally allow this, but only to the extent that you can accurately remember which energy were in which Transmuter Tile slots at the beginning of your turn — once you have started mixing energy into your Exhausted Pool or deploying multiple energy, it becomes difficult to unwind and is generally not allowed. This is tended to be permitted more for new players than experienced ones. It is recommended not to pick up energy from your Device and hold it together in your hand while deciding on actions, since it's easy to forget where each energy came from and where it's going; instead, Deploy energy to the area in front of your Device and take it from there as you decide where to place it on the board, allowing multiple Deploy actions in a row without having to fully allocate one before starting the next.
Divine Winds Module
If you want to make your games of An Age Contrived a little more forgiving, then you may choose to play with this module. During setup, give each player one Divine Winds Token. It has the following rules:
- During step 4 of a turn on which you ADVANCE, you may spend your Divine Winds Token (return it to the box) to replenish 2 Transmuter Tiles (see page 21).
- When you could bind an energy from the highest slot of the Monument or Pillar Track (see pages 25-26), you may instead return the energy to your Exhausted Pool to regain your Divine Winds Token. You may not have more than one Divine Winds Token at a time.
- At the end of the game, if you have an unspent Divine Winds Token, it is worth 5 VP.
Expert Setup Variant
Instead of placing energy as depicted on your quick-start card, you may freely program your starting energy. You may use your player aid as a screen if you wish.
After determining the start player, secretly select a number of Energy Tokens from your Exhausted Pool, according to your player count.
- 2 players: Select any 8 Energy Tokens and place them in any configuration into the Transmuter Tiles in positions 1, 2, 3, and 4 of your Transmutation Device.
- 3-5 players: Select any 6 Energy Tokens and place them in any configuration into the Transmuter Tiles in positions 1, 2, and 3 of your Transmutation Device.
Select any 1 additional Energy Token and set it aside. All players then reveal simultaneously and place the 1 Energy Token that was set aside into the Tile Pool.
Instead of placing the 5 neutral Bridge Tokens randomly, players may draft how they are placed. Perform the draft after determining the start player and revealing starting energy, as described above.
Starting with the last player and proceeding in counter-clockwise order, place a neutral Bridge Token face-up onto any empty broken path space on the game board, stopping only when all possible neutral Bridge Tokens have been placed. However, once a player's starting region has a neutral Bridge Token connected to it, you may not place another token connected to that region. It can therefore happen that not all 5 tokens can be placed. Return any remaining tokens to the box.
Monument Sections
Section 5 accepts any type of energy but does not grant a new energy.
The six Monuments — The Anfirien Beacon, The Library of Valduin, The Eridonic Gate, The Namarillion Forge, The Fortress of Kolym Thrin, and The Ship of Tolinthra — each have their sections depicted on this page for reference during assembly.