Ada Lovelace: Consulting Mathematician
Ada Lovelace: Consulting Mathematician Rulebook
Table of Contents
Table of Contents
Set Up
Print copies of the Museum Sheet and the Dice Sheet. You will use the Dice Sheet to allocate your dice to actions. You will write on the Museum Sheet. Colour is unnecessary in this game, so feel free to print both sheets in black-and-white.
Grab a pencil.
Place 6, 6-sided dice in the Reserve section in the Dice Manager, at the top of the Dice Sheet.
Gameplay
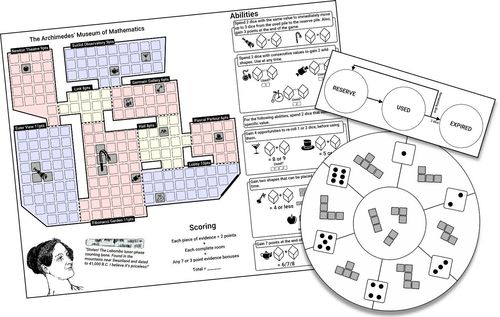
Your objective is to draw polyominoes on the map of the museum so that you both surround pieces of evidence and fill rooms. You will use dice to gather these polyominoes and to unlock special abilities.
Turns
On each turn, take two dice from the Reserve section and roll them. Use each of them to either take a polyomino or to unlock an ability, as detailed below. After you have used each die, place it into the Used section on the dice manager.
When you have used both of your dice, continue by taking two more dice from the reserve and rolling them in the same manner.
If only one die remains in the Reserve section, roll it and use it as normal.
When there are no more dice left in the Reserve section, return all six to the Reserve section and check off the top box on the time-tracker, on the museum sheet.
When the final box in the time tracker is checked, the game is over. Calculate your score and see if you caught the thief by consulting the scoring chart below.
- Each piece of evidence is worth 2 points
- Each room is worth an amount of points if every empty square in it has been filled (investigated) with polyominoes. The point value for each room is next to the room name.
- Some pieces of evidence give bonus points if their ability has been unlocked.
Action: Take a Polyomino
On the Dice Wheel, you will see that each die value is associated with two shapes. You can use a die to take one of its two associated shapes and draw that shape onto the Museum Sheet map.
When drawing a shape, you can flip (mirror) and rotate the chosen shape as you please, but it must be drawn in its entirety. It cannot overlap with other filled-in squares and cannot leave the boundary of the museum. It can be placed between rooms (through a dashed line doorway).
Evidence squares (pre-shaded squares with icons) are considered filled and cannot be drawn in. If you completely surround a piece of evidence, you have collected it and can then circle it on the Abilities column. You will now earn points for that evidence and you can unlock its ability.
In one example, the crowbar and binoculars have been collected because they have been surrounded completely (including diagonal squares).
Action: Unlock an Ability
Write the value of the die in one of the die-icons, next to a piece of evidence you have already collected. If you fill in both dice-icons appropriately, you gain the ability indicated.
In one example, the player has collected the violin and penny farthing bike on the museum sheet, so they have circled them in the Abilities column. The player has also unlocked the violin evidence ability and used it once. They have begun to unlock the penny farthing bike ability, but have not finished it yet. Maybe they'll finish it in a future turn.
Other Things
Wild Shapes
Three of the pieces of evidence (penny farthing bike, stopwatch, and ham) give you access to wild shapes. If you use these abilities, you can take any shape from the Dice Wheel, including the three special shapes in the middle. Use the check-boxes to keep track of how many wilds you have used.
Consecutive Values
This term means dice that have only one number difference between them. Eg, 4 and 5. The numbers 6 and 1 are not consecutive.
Scoring
Check your final score against this chart.
- 0-29 points. Flustered, you drop an ancient abacus on the ground, smashing it. Everybody boos.
- 30-39 points. A few random knick-knacks do not make a convincing case!
- 40-49 points. You have a case, but it is unconvincing. Your reputation is in tatters.
- 50-59 points. You've gathered some decent evidence, so you blame Sir Charles Wheatstone. "Preposterous!" he yells. Others come to his defence, "He was performing on his concertina at the time." Whoops!
- 60-74 points. You try to blame Charles Babbage and some people say, "By golly, I think she's right!" But you're not right. Charles is not amused.
- 75+ points. You pin the blame on Lord Byron, even though he has been dead for 18 years. But your evidence is so thorough, everyone is convinced you are telling the truth. And that means nobody realises it was really you who stole the Lebombo Bone! Ada Lovelace: Master Criminal!
Component Notes: Dice Manager and Dice Wheel
The Dice Manager on the Dice Sheet has a Reserve section and a Used section, with an arrow returning all dice from Used back to Reserve once the Reserve is emptied — this reset is what triggers checking off a box on the time-tracker.
The Dice Wheel shows eight spokes, one for each die value 1 through 6 plus two spokes without a die value. Each of the six numbered spokes displays two polyomino shapes that a die of that value can be used to take. The centre of the wheel shows three additional special shapes, which are only available through Wild Shape abilities, not by rolling a numbered die.
Component Notes: The Archimedes' Museum of Mathematics
The Museum Sheet is a grid map divided into named rooms, each labelled with its point value:
- Newton Theatre — 9 points
- Euclid Observatory — 9 points
- Link — 8 points
- Germain Gallery — 6 points
- Euler View — 11 points
- Hall — 8 points
- Pascal Parlour — 6 points
- Lobby — 10 points
- Fibonacci Garden — 11 points
Rooms are separated by solid lines, with dashed-line doorways connecting adjacent rooms (polyominoes may be drawn through a doorway, spanning two rooms). Pieces of evidence are printed as pre-shaded squares bearing an icon (including a crowbar, binoculars, violin, penny farthing bike, stopwatch, top hat, cocktail glass, teapot, and ham) scattered among the rooms; these squares are already filled and cannot be drawn on.
The time-tracker beside the map lists five checkboxes, one for each time the dice all cycle from Reserve to Used and back: 9:40 pm, 9:45 pm, 9:50 pm, 9:55 pm, 10:00 pm. Checking the fifth box ends the game.
Final score is the sum of: each piece of evidence collected (2 points each), each complete room (its listed point value), and any 7- or 3-point evidence bonuses earned through unlocked abilities.
Component Notes: Abilities Reference
The Abilities column on the Dice Sheet lists the special abilities unlocked by evidence, each requiring two dice matching a stated condition to be written into that evidence's paired die-icons:
- Spend 2 dice with the same value (crowbar) to immediately move up to 3 dice from the Used pile to the Reserve pile. Also, gain 3 points at the end of the game.
- Spend 2 dice with the same value (binoculars) to immediately move up to 3 dice from the Used pile to the Reserve pile. Also, gain 3 points at the end of the game.
- Spend 2 dice with consecutive values (violin) to gain 2 wild shapes. Use at any time.
- Spend 2 dice with consecutive values (ham) to gain 2 wild shapes. Use at any time.
- Spend 2 dice with consecutive values (penny farthing bike) to gain 2 wild shapes. Use at any time.
- Spend 2 dice that sum 8 or 9 (cocktail glass) to gain 4 opportunities to re-roll 1 or 2 dice, before using them.
- Spend 2 dice that sum 5 or 6 (top hat) to gain 4 opportunities to re-roll 1 or 2 dice, before using them.
- Spend 2 dice that sum 4 or less (key) to gain two shapes that can be placed, once each, at any time.
- Spend 2 dice that sum 10 or more (apple) to gain two shapes that can be placed, once each, at any time.
- Spend 2 dice that sum 6, 7, or 8 (teapot) to gain 7 points at the end of the game.
- Spend 2 dice that sum 6, 7, or 8 (a piece of evidence pictured with a pair of eyeglasses) to gain 7 points at the end of the game.